- What's In This Guide
- Activating the Certificate Authority Proxy Function Server
- Configuring the Cisco CTL Client
- Configuring Inter-device Security for the Cisco TelePresence Infrastructure Devices
- Configuring and Verifying Cisco TelePresence Security
- Configuring Cisco TelePresence Browser Security
- Troubleshooting Security Configuration on the Cisco TelePresence System
- Cisco TelePresence Firewall and Access List Considerations
- Encrypted Key Transport (EKT) and CTMS Secure Communications
Securing Cisco TelePresence Products
Bias-Free Language
The documentation set for this product strives to use bias-free language. For the purposes of this documentation set, bias-free is defined as language that does not imply discrimination based on age, disability, gender, racial identity, ethnic identity, sexual orientation, socioeconomic status, and intersectionality. Exceptions may be present in the documentation due to language that is hardcoded in the user interfaces of the product software, language used based on RFP documentation, or language that is used by a referenced third-party product. Learn more about how Cisco is using Inclusive Language.
- Updated:
- November 2, 2011
Chapter: Configuring Cisco TelePresence Browser Security
Configuring Cisco TelePresence Browser Security
Contents
This section describes how to set up an encrypted link between a secure web server on a Cisco TelePresence infrastructure device (a CTMS, CTRS, or CTS-Manager), and the browser through which you access the device Administrative UI. This chapter includes the following sections:
Overview
You can set up an encrypted link between the web server of a Cisco TelePresence infrastructure device (a CTMS, CTRS, or CTS-Manager), and the browser through which you access the Administrative UI. If multiple infrastructure devices exist in your Cisco TelePresence topology, you can optionally set up browser security for each one.
Setting up browser security is comprised of these steps, which can be performed over one or more days:
1.![]() Request a Secure Sockets Layer (SSL) certificate from a certificate authority (CA), which is comprised of these substeps:
Request a Secure Sockets Layer (SSL) certificate from a certificate authority (CA), which is comprised of these substeps:
a.![]() Generate a Certificate Signing Request (CSR).
Generate a Certificate Signing Request (CSR).
b.![]() Apply for the SSL certificate from a CA.
Apply for the SSL certificate from a CA.
c.![]() Wait for the SSL certificate from the CA, which can take a few seconds to a few days.
Wait for the SSL certificate from the CA, which can take a few seconds to a few days.
Setting Up Browser Security
Before You Begin
- After installing the certificate, the device automatically restarts, which abruptly ends all active meetings or recordings. Therefore, we recommend installing the certificate(s) during a time when there are few or no active meetings.
- You can set up either inter-device security or browser security on an infrastructure device. If inter-device security is already set up, you must disable it before you can set up browser security. For information on disabling inter-device security, see the “Removing Security from an Infrastructure Device” section.
Requesting an SSL Certificate From a Certificate Authority
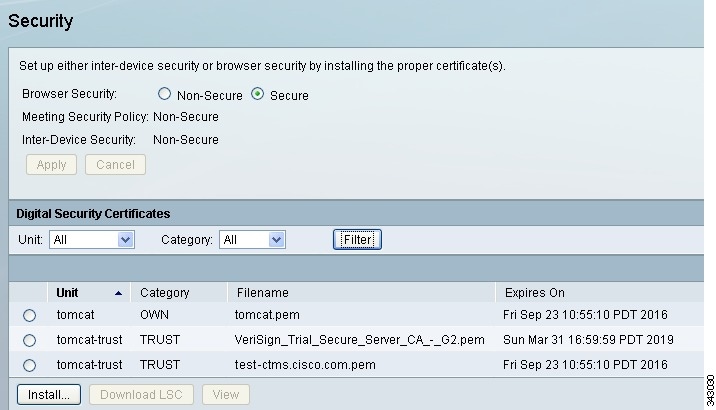
Step 1![]() From the left navigation in the device Administrative UI, click Configure > Security .
From the left navigation in the device Administrative UI, click Configure > Security .
The Security page displays as shown in Figure 5-1.
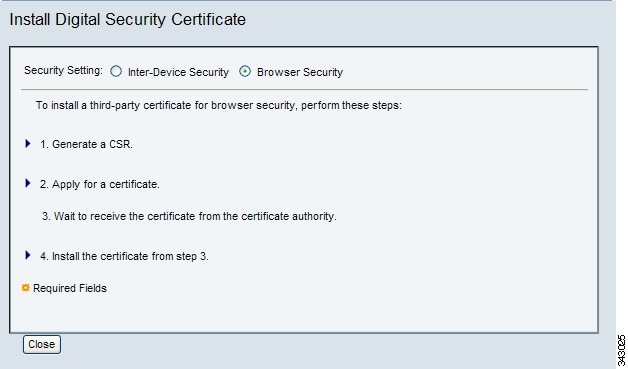
The Install Digital Security Certificate dialog box displays.
Step 3![]() For the Security Setting field, click the Browser Security radio button.
For the Security Setting field, click the Browser Security radio button.
The Install Digital Security Certificate dialog box updates with browser security fields as shown in Figure 5-2.
Figure 5-2 Install Digital Security Certificate Dialog Box—Browser Security Fields
Step 4![]() Click the arrow icon for step 1 to display the fields you must provide for a CSR.
Click the arrow icon for step 1 to display the fields you must provide for a CSR.
The Install Digital Security Certificate dialog box updates with the CSR fields as shown in Figure 5-3.
Figure 5-3 Install Digital Security Certificate Dialog Box—CSR Fields
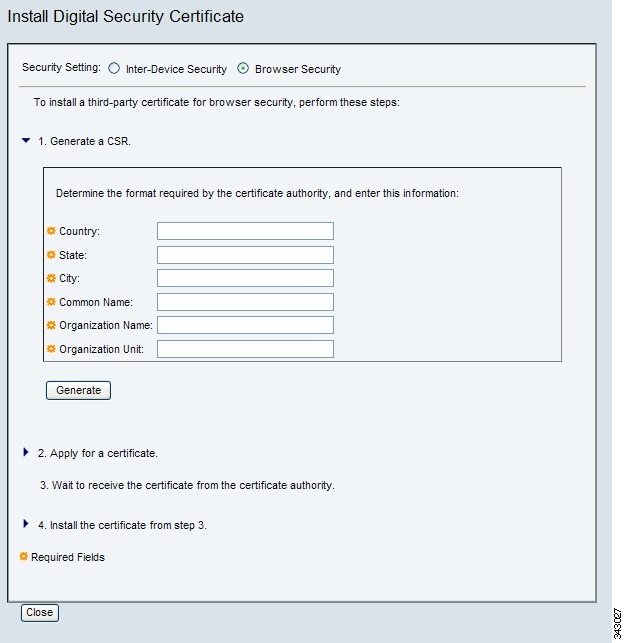
Step 5![]() Enter information for each field in the following format.
Enter information for each field in the following format.

Note![]() These CSR field formats are generally accepted by most CAs. If the format for a particular field is incorrect, the CA typically provides an error message that includes the correct format.
These CSR field formats are generally accepted by most CAs. If the format for a particular field is incorrect, the CA typically provides an error message that includes the correct format.
- Country—Enter a two-letter uppercase abbreviation. For example, US.
- State—Enter an unabbreviated state name in upper- or lower-case. For example, California.
- City—Enter an unabbreviated city name in upper- or lower-case with spaces, if needed. For example, San Jose.
- Common Name—Enter the web server hostname and domain name in alphanumeric upper- or lower-case characters. For example, SanJose-ctms1.mycompany.com.

Tip To avoid receiving a website security certificate warning, we recommend that you access the device Administrative UI using the same common name specified in the CSR. For example, if you specified “SanJose-ctms1.mycompany.com” as the common name when generating the CSR, enter “https://SanJose-ctms1.mycompany.com” in the URL field of a browser to access the device Administrative UI for SanJose-ctms1.
The system generates the CSR in a few seconds and displays the CSR content in a scrollable window as shown in Figure 5-4.
Figure 5-4 Install Digital Security Certificate—CSR
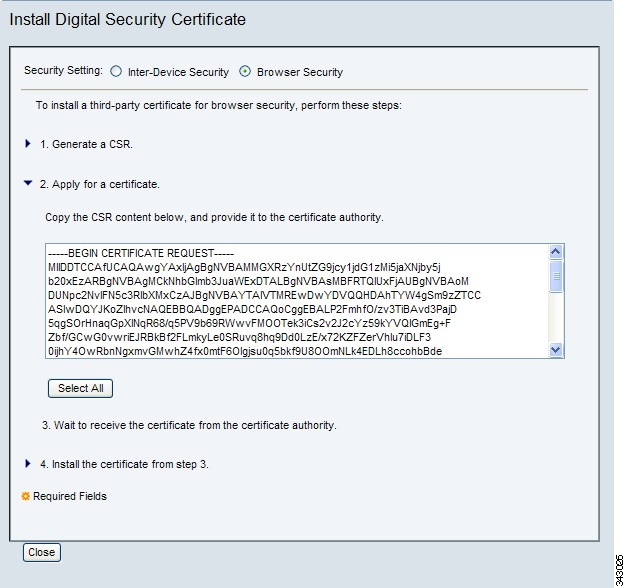
Step 7![]() Click Select All , copy the entire CSR, and submit it to the CA.
Click Select All , copy the entire CSR, and submit it to the CA.
Note![]() After submitting the CSR to the CA, do not regenerate the CSR until after the SSL certificate is installed in the device. Doing so can cause a mismatch between the CSR and the SSL certificate, which will prevent the SSL certificate from being installed in the device.
After submitting the CSR to the CA, do not regenerate the CSR until after the SSL certificate is installed in the device. Doing so can cause a mismatch between the CSR and the SSL certificate, which will prevent the SSL certificate from being installed in the device.
The only circumstance under which you might need to regenerate the CSR is if the SSL certificate needs to be rekeyed (replaced).
Step 8![]() Wait for receipt of the SSL certificate from the CA.
Wait for receipt of the SSL certificate from the CA.
The CA could provide the SSL certificate in a few seconds to a few days. In the meantime, you can close the Install Digital Security Certificate dialog box, and return to it after you receive the certificate.
Step 9![]() After you receive the certificate, go to the “Installing the SSL Certificate” section.
After you receive the certificate, go to the “Installing the SSL Certificate” section.
Installing the SSL Certificate
The CA might provide one or more certificate files. For example, it could provide one or more intermediate files as well as an SSL certificate file:
If you receive multiple files, you must install the fist intermediate file first, then the second intermediate files, and the SSL certificate last.
Note![]() Installing the SSL certificate file causes the device to automatically restart, which abruptly ends all active meetings or recordings. Therefore, we recommend performing this task during a time when there are few or no active meetings.
Installing the SSL certificate file causes the device to automatically restart, which abruptly ends all active meetings or recordings. Therefore, we recommend performing this task during a time when there are few or no active meetings.
To install the certificate file(s):
Step 1![]() Return to the Install Digital Security Certificate dialog box.
Return to the Install Digital Security Certificate dialog box.
Step 2![]() For the Security Setting field, click the Browser Security radio button.
For the Security Setting field, click the Browser Security radio button.
The Install Digital Security Certificate dialog box updates with browser security fields.
Step 3![]() Click the arrow icon for step 4 to expand the dialog box with certificate installation fields as shown in Figure 5-5.
Click the arrow icon for step 4 to expand the dialog box with certificate installation fields as shown in Figure 5-5.
Figure 5-5 Install Digital Security Certificate—Install Certificate
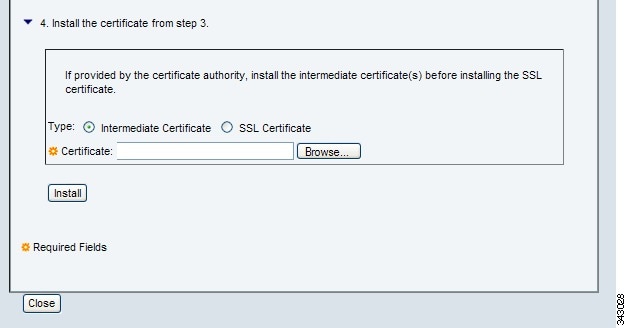
Step 4![]() If you received one or more intermediate files, perform these substeps to install them. Otherwise, go on to Step 5.
If you received one or more intermediate files, perform these substeps to install them. Otherwise, go on to Step 5.
Tip![]() If you received multiple intermediate files, the order in which you install the files is not important. However, knowing which file is last in the intermediate file chain becomes significant during Step 5.
If you received multiple intermediate files, the order in which you install the files is not important. However, knowing which file is last in the intermediate file chain becomes significant during Step 5.
a.![]() Click the Intermediate Certificate radio button, then locate the intermediate file on your hard disk and click Open .
Click the Intermediate Certificate radio button, then locate the intermediate file on your hard disk and click Open .
After the file is installed, the Security page reappears. In this page, check the Digital Security Certificates table to ensure that the certificate appears.
c.![]() If there are additional intermediate files to install, return to the browser security fields in the Install Digital Security Certificate dialog box, and repeat steps a and b until each file is installed.
If there are additional intermediate files to install, return to the browser security fields in the Install Digital Security Certificate dialog box, and repeat steps a and b until each file is installed.
Step 5![]() To install the SSL certificate, perform these substeps:
To install the SSL certificate, perform these substeps:
a.![]() In the Install Digital Security Certificate dialog box, click the SSL Certificate radio button.
In the Install Digital Security Certificate dialog box, click the SSL Certificate radio button.
b.![]() From the Intermediate Certificate drop-down list that appears, choose the last intermediate file in the chain.
From the Intermediate Certificate drop-down list that appears, choose the last intermediate file in the chain.
If you are not certain which intermediate file is the last in the chain, choose the last file that appears in the drop-down list.
c.![]() Locate the SSL certificate on your hard disk, and click Open .
Locate the SSL certificate on your hard disk, and click Open .
Tip If an error message is displayed, you may have selected an intermediate file that was not the last in the chain. Go back to substep b, choosing a different intermediate file from the drop-down list, then repeat substeps c and d.
Tip If the SSL certificate cannot be installed because it does not match the CSR, the CSR was probably modified then regenerated after requesting the SSL certificate that you tried to install. To resolve this issue, you must submit the current CSR to the CA and get a new SSL certificate for the same domain.
The device automatically restarts. During the restart, a page appears wherein you can monitor the installation progress, which should take a few minutes. After the installation is complete, a Continue button in the monitoring page activates. If desired, click Continue to log back into the device Administrative UI.
Tip![]() If the installation is complete but the Continue button does not activate after several minutes, you can open a new browser, re-access the device Administrative UI, and log in if desired.
If the installation is complete but the Continue button does not activate after several minutes, you can open a new browser, re-access the device Administrative UI, and log in if desired.
Step 6![]() To verify that browser security is properly set up, do the following:
To verify that browser security is properly set up, do the following:
a.![]() Log out of any open sessions with the device Administrative UI, and close the browsers.
Log out of any open sessions with the device Administrative UI, and close the browsers.
b.![]() Open a new browser. and in the URL field, enter “https:// common-name ”, where common-name is the common name you specified when generating the CSR .
Open a new browser. and in the URL field, enter “https:// common-name ”, where common-name is the common name you specified when generating the CSR .
For example, if you specified “SanJose-ctms1.mycompany.com” as the common name, enter the entire name, including the domain portion of the name.
c.![]() Check your browser to ensure that it is secure.
Check your browser to ensure that it is secure.
Ensuring Access to the Administrative GUI if Your SSL Certificate Is Expiring Or Being Rekeyed
An SSL certificate is revoked (cancelled) under the following circumstances:
- The certificate expires.
- The certificate is rekeyed (replaced). During this process, the CA may revoke the existing certificate and replace it with a new one.
Note![]() If your SSL certificate is revoked while browser security is enabled on your device, you will be denied access when logging into the device Administrative UI. To prevent this situation, we strongly recommend disabling browser security if your SSL certificate is close to expiration or must be rekeyed. For information on disabling browser security, see the “Disabling and Reenabling Browser Security” section. (This section also includes information about reenabling the browser, which you can ignore.)
If your SSL certificate is revoked while browser security is enabled on your device, you will be denied access when logging into the device Administrative UI. To prevent this situation, we strongly recommend disabling browser security if your SSL certificate is close to expiration or must be rekeyed. For information on disabling browser security, see the “Disabling and Reenabling Browser Security” section. (This section also includes information about reenabling the browser, which you can ignore.)
However, if you are denied access to the device Administrative UI because of a revoked SSL certificate, see the “Understanding What to Do If the SSL Certificate Is Revoked” section for information about regaining access.
Understanding What to Do If the SSL Certificate Is Revoked
If a revoked SSL certificate prevents you from accessing the device Administrative UI, you can restore access using the set web-security command in the device command-line interface (CLI). For information about this command, see the Cisco TelePresence Multipoint Switch Command Reference at this location:
http://www.cisco.com/en/US/docs/telepresence/multipoint_switch/1_8/administration/guide/CTMS_Release1_8.html
After regaining access to the device Administrative UI, you must perform the following high-level tasks:
- Disable browser security on the device
- Get a new SSL certificate from your CA
- Install the new certificate
- Reenable browser security
The device automatically restarts after you disable browser security. Therefore, we recommend performing this procedure when there are few or no active meetings.
Step 1![]() From the left navigation in the device Administrative UI, click Configure > Security .
From the left navigation in the device Administrative UI, click Configure > Security .
Step 2![]() At the top of the Security page, change the setting of the Browser Security field from Secure to Non-Secure.
At the top of the Security page, change the setting of the Browser Security field from Secure to Non-Secure.
The device automatically restarts. During the restart, a page appears wherein you can monitor the progress, which should take a few minutes. After the restart is complete, a Continue button in the monitoring page activates. If desired, click Continue to log back into the device Administrative UI.
Step 4![]() Work with your CA to get a new SSL certificate.
Work with your CA to get a new SSL certificate.
Step 5![]() After you receive the new SSL certificate, install certificate using information in the “Installing the SSL Certificate” section.
After you receive the new SSL certificate, install certificate using information in the “Installing the SSL Certificate” section.
Disabling and Reenabling Browser Security
At any time, you can disable browser security.
The device automatically restarts after you disable and reenable browser security. Therefore, we recommend performing these procedures when there are few or no active meetings.
Step 1![]() From the left navigation in the device Administrative UI, click Configure > Security .
From the left navigation in the device Administrative UI, click Configure > Security .
Step 2![]() At the top of the Security page, change the setting of the Browser Security field from Secure to Non-Secure.
At the top of the Security page, change the setting of the Browser Security field from Secure to Non-Secure.
The device automatically restarts. During the restart, a page appears wherein you can monitor the progress, which should take a few minutes. After the restart is complete, a Continue button in the monitoring page activates. If desired, click Continue to log back into the device Administrative UI.
Step 1![]() Determine the expiration date of the intermediate and SSL certificates retained by the system by checking your records or contacting the CA.
Determine the expiration date of the intermediate and SSL certificates retained by the system by checking your records or contacting the CA.
If the files are still valid, go on to Step 2.
If the files have expired, you must repeat all tasks described in the “Setting Up Browser Security” section.
Step 2![]() From the left navigation in the device Administrative UI, click Configure > Security .
From the left navigation in the device Administrative UI, click Configure > Security .
Step 3![]() At the top of the Security page, change the setting of the Browser Security field from Non-Secure to Secure.
At the top of the Security page, change the setting of the Browser Security field from Non-Secure to Secure.
The device automatically restarts. During the restart, a page appears wherein you can monitor the progress, which should take a few minutes. After the restart is complete, a Continue button in the monitoring page activates. If desired, click Continue to log back into the device Administrative UI.
The SSL file reappears in the Digital Security Certificates table in the Security page.
 Feedback