- Preface
- Information About the Cisco WebEx Enabled TelePresence Feature
- First-Time Configuration Checklist
- Configuring Cisco MCU and TelePresence Server
- Configuring Call Control
- Configuring Certificates on Cisco VCS Expressway
- Configuring Cisco TelePresence Management Suite
- Configuring Cisco TelePresence Management Suite Extension for Microsoft Exchange
- Configuring Cisco TelePresence Management Suite Provisioning Extension
- Configuring Audio
- Integrating Cisco TelePresence with Your Cisco WebEx Site Administration Account
- Scheduling Cisco WebEx Enabled TelePresence Meetings
- Troubleshooting
Cisco WebEx Enabled TelePresence Configuration Guide (TMS 14.3.1 - WebEx Meeting Center WBS29)
Bias-Free Language
The documentation set for this product strives to use bias-free language. For the purposes of this documentation set, bias-free is defined as language that does not imply discrimination based on age, disability, gender, racial identity, ethnic identity, sexual orientation, socioeconomic status, and intersectionality. Exceptions may be present in the documentation due to language that is hardcoded in the user interfaces of the product software, language used based on RFP documentation, or language that is used by a referenced third-party product. Learn more about how Cisco is using Inclusive Language.
- Updated:
- July 2, 2014
Chapter: Scheduling Cisco WebEx Enabled TelePresence Meetings
Scheduling Cisco WebEx Enabled TelePresence Meetings
Contents
This chapter provides a background on how to schedule Cisco WebEx Enabled TelePresence meetings, with tips and known issues. It contains the following sections:
Introduction
This chapter provides an overview of how to schedule WebEx Enabled TelePresence meetings using TMS and useful information, tips and known issues about WebEx Enabled TelePresence meetings.
In addition to scheduling using TMS, there are up to 3 additional ways to schedule a WebEx Enabled TelePresence meeting:
With the WebEx and TelePresence Integration to Outlook, users can schedule WebEx Enabled TelePresence meetings directly from Microsoft Outlook for Windows. Advanced options like adding external video and audio dial-in participants are also available.
For scheduling information, refer to the WebEx and TelePresence Integration to Outlook Quick Reference Guide
For additional information, including how to schedule a meeting on behalf of another person or to assign a delegate to schedule meetings for you, refer to the WebEx and TelePresence Integration to Outlook help available in Outlook or the user guide, available on your WebEx site.
With Cisco Smart Scheduler, Macintosh, mobile and other non-Windows users can schedule WebEx Enabled TelePresence meetings using a simple web-based interface which is touch-screen friendly.
For scheduling information, refer to the Cisco Smart Scheduler and WebEx Scheduling Mailbox Quick Reference Guide
For additional information, including supported browsers and mobile platforms, refer to the Cisco TelePresence Management Suite Provisioning Extension (TMSPE) release notes.
With the Cisco WebEx Scheduling Mailbox, users without the WebEx and TelePresence Integration to Outlook can create a TelePresence Enabled WebEx meeting in Outlook by inviting TelePresence rooms and then adding WebEx to the meeting by including a special invitee; the WebEx Scheduling Mailbox.
The mailbox may be called simply “webex” or something different. It as configured by the administrator and provided to users.
For additional information, refer to the Cisco TelePresence Management Suite Extension for Microsoft Outlook (TMSXE) Installation Guide and release notes.
For scheduling information, refer to the Cisco Smart Scheduler and WebEx Scheduling Mailbox Quick Reference Guide
Scheduling WebEx Enabled TelePresence Meetings in Cisco TMS
When scheduling conferences with Cisco TMS, it is not necessary for the user to worry about network protocols, MCUs, or gateways. Cisco TMS handles infrastructure choices and compatibility checking of all these things automatically. Advanced users may still tune and tweak the selected methods for the conference as needed.
To schedule a Cisco WebEx Enabled TelePresence Meeting:
Step 2![]() Go to Booking > New Conference.
Go to Booking > New Conference.
Figure 11-1 Cisco TMS New Conference page
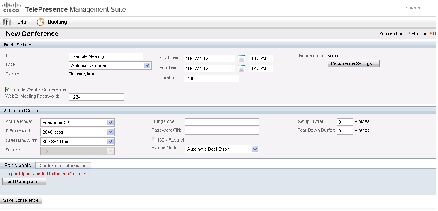
Step 3![]() For Title, enter a conference title. It will be displayed in all Cisco TMS interfaces, and in email notifications about the meeting.
For Title, enter a conference title. It will be displayed in all Cisco TMS interfaces, and in email notifications about the meeting.
Step 4![]() For Type, select either Automatic Connect or One Button to Push.
For Type, select either Automatic Connect or One Button to Push.
- Automatic Connect: Cisco TMS automatically connects all participants at the meeting start time.
- One Button to Push: Meeting dial-in information is automatically displayed on endpoints that support One Button to Push. Participants on those endpoints join the meeting by pressing a button. For endpoints that do not support One Button to Push, the meeting organizer adds a video dial-in number.

Note![]() For information about additional types, refer to the TMS help.
For information about additional types, refer to the TMS help.
Step 5![]() Set the Start Time and the End Time or Duration for the meeting.
Set the Start Time and the End Time or Duration for the meeting.
Step 6![]() Make sure Include WebEx Conference is checked.
Make sure Include WebEx Conference is checked.
Step 7![]() Optionally, enter a WebEx Meeting Password.
Optionally, enter a WebEx Meeting Password.
Note![]() If you do not enter a password, WebEx will automatically generate one. It will be displayed on the Confirmation page, after you successfully schedule the meeting.
If you do not enter a password, WebEx will automatically generate one. It will be displayed on the Confirmation page, after you successfully schedule the meeting.
Step 8![]() Optionally, click Recurrence Settings to create a series of meetings that are tied together, such as a weekly or daily meeting.
Optionally, click Recurrence Settings to create a series of meetings that are tied together, such as a weekly or daily meeting.
Note![]() Advanced settings are optional. Most settings will take their default values from the Conference Default values configured under Administrative Tools. Refer to the help for an overview of all available settings. For details on the Advanced Settings, click the Help button in Cisco TMS.
Advanced settings are optional. Most settings will take their default values from the Conference Default values configured under Administrative Tools. Refer to the help for an overview of all available settings. For details on the Advanced Settings, click the Help button in Cisco TMS.
Note![]() If Secure is set to Yes, Cisco TMS will only allow systems that support encryption to participate in the conference.
If Secure is set to Yes, Cisco TMS will only allow systems that support encryption to participate in the conference.
Step 9![]() Optionally, add notes about the meeting in Conference Information, which will appear in the meeting invitation.
Optionally, add notes about the meeting in Conference Information, which will appear in the meeting invitation.
Step 10![]() In the Participant tab, click Add Participant and a new window will appear.
In the Participant tab, click Add Participant and a new window will appear.
- Available participants and a planner view with their availability is displayed based on existing scheduled and ad hoc meetings. The colored vertical lines represent your current requested time for the scheduled meeting.
- Click the tabs to have participants listed by type. If you have used scheduling before, the default tab is Last Used with quick access to the systems you have used recently.
- Hover over any system, or the blocks in the planner view, for additional detail about the system or scheduled meeting.
Step 11![]() Add participants to the meeting by selecting their checkbox and clicking the > button to add them to the list of selected participants on the right side of the window. Adding network infrastructure components like MCUs and Gateways is optional as Cisco TMS will handle this for you automatically.
Add participants to the meeting by selecting their checkbox and clicking the > button to add them to the list of selected participants on the right side of the window. Adding network infrastructure components like MCUs and Gateways is optional as Cisco TMS will handle this for you automatically.
Step 12![]() Use the External tab to add systems not managed by Cisco TMS, for example endpoints in other organizations, or telephone participants.
Use the External tab to add systems not managed by Cisco TMS, for example endpoints in other organizations, or telephone participants.
- For dial-out participants, enter their contact information, and Cisco TMS will automatically connect them to the conference at the scheduled time.
- For dial-in participants (including endpoints that do not support One-Button-to-Push), Cisco TMS will reserve the capacity needed to host the site in the conference and will provide you with precise dial-in information to forward to the participant.
Step 13![]() When all participants have been added, click OK.
When all participants have been added, click OK.
You are returned to the conference page, with the participant section of the page now showing your selected participants, and some additional tabs. These additional tabs allow advanced scheduling tasks such as altering how calls are connected, or setting specific MCU conference settings for the meeting.
Step 14![]() Use the Video Conference Master drop-down list to determine which system should be considered the meeting organizer. Not all telepresence systems support the necessary features for this functionality, and only systems that are eligible will be displayed in this list. This is the system that will be prompted:
Use the Video Conference Master drop-down list to determine which system should be considered the meeting organizer. Not all telepresence systems support the necessary features for this functionality, and only systems that are eligible will be displayed in this list. This is the system that will be prompted:
Step 15![]() Click Save Conference. When the conference is saved, Cisco TMS will do all the routing calculations to determine the best way to connect your selected participants.
Click Save Conference. When the conference is saved, Cisco TMS will do all the routing calculations to determine the best way to connect your selected participants.
–![]() You are presented with a confirmation page indicating that your conference has been saved and showing the details of your meeting, including the participant list and listing how each of those participants are scheduled to connect to the conference and the exact dial string any participants must dial.
You are presented with a confirmation page indicating that your conference has been saved and showing the details of your meeting, including the participant list and listing how each of those participants are scheduled to connect to the conference and the exact dial string any participants must dial.
–![]() You will also receive an email confirmation from Cisco TMS with all meeting information, including WebEx and video dial-in information, and an ICS attachment for saving the event in your Outlook (or a compatible) calendar. Open the ICS attachment and save it to your calendar.
You will also receive an email confirmation from Cisco TMS with all meeting information, including WebEx and video dial-in information, and an ICS attachment for saving the event in your Outlook (or a compatible) calendar. Open the ICS attachment and save it to your calendar.
–![]() If your WebEx site is set up to send email confirmations, you will receive two additional emails from WebEx: 1. An email with the subject line “Meeting Scheduled” which contains the host key and the WebEx information for the meeting 2. An email with the subject line “(Forward to attendees) Meeting Invitation” which contains only the WebEx information for attendees.
If your WebEx site is set up to send email confirmations, you will receive two additional emails from WebEx: 1. An email with the subject line “Meeting Scheduled” which contains the host key and the WebEx information for the meeting 2. An email with the subject line “(Forward to attendees) Meeting Invitation” which contains only the WebEx information for attendees.
–![]() You are returned to the New Conference page. A message banner states why it was not possible to save the meeting. This may be due to lack of availability, lack of network resources, or no known route to connect the participants together.
You are returned to the New Conference page. A message banner states why it was not possible to save the meeting. This may be due to lack of availability, lack of network resources, or no known route to connect the participants together.
–![]() Edit the conference settings to try to resolve the issue and try saving the conference again.
Edit the conference settings to try to resolve the issue and try saving the conference again.
Step 16![]() After successfully scheduling your meeting, invite people to the meeting using your calendar application.
After successfully scheduling your meeting, invite people to the meeting using your calendar application.
For information about the Cisco WebEx Enabled TelePresence meeting experience, see Cisco WebEx Enabled TelePresence Experience.
Information, Tips and Known Issues About WebEx Enabled TelePresence Meetings
The following section contains useful information, including tips and known issues relating to Cisco WebEx Enabled TelePresence meetings. The information is divided into sections corresponding to each product that is part of the Cisco WebEx Enabled TelePresence Solution.
Cisco TMS
- Cisco TMS can be configured so that meetings must be approved by the Cisco TMS administrator before getting booked. This feature can be used to regulate port usage at companies that want to limit / regulate usage.
- Cisco TMS limits the number of ports to the number selected under the external tab of the Cisco TMS meeting when it is scheduled.
- Starting a meeting early is supported for both TelePresence and WebEx using the Default Setup Buffer setting when scheduling the meeting.
Note![]() Setup (and teardown) buffers are not supported when using Smart Scheduler, the WebEx and TelePresence Integration to Outlook, or any other client that uses the TMS booking API.
Setup (and teardown) buffers are not supported when using Smart Scheduler, the WebEx and TelePresence Integration to Outlook, or any other client that uses the TMS booking API.
- Extending a meeting is supported for both TelePresence and WebEx using the Extend Mode setting when scheduling a meeting. Meeting extension is not guaranteed. If resources (ports) are fully booked at the scheduled end time of the meeting, the meeting will end.
- A meeting organizer scheduling a meeting using the WebEx and TelePresence Integration to Outlook, should never modify that meeting later in TMS.
If the original meeting is modified later in TMS, the meeting information in TMS will fall out of sync with the meeting organizer’s Outlook calendar. The reason for this is that TMSXE does not have write access to the meeting organizer's calendar and, as a result, can’t make any changes to it.
MCU and TelePresence Server
- At the start of the meeting, the MCU/TelePresence Server calls into WebEx, even if there are no TelePresence or WebEx participants.
- The MCU/TelePresence Server’s role is different from a regular WebEx participant. When joining the meeting, if there is no meeting host currently in the meeting, the MCU becomes the default host and starts the meeting.
–![]() If there is already a WebEx host, MCU/TelePresence Server will not become the host.
If there is already a WebEx host, MCU/TelePresence Server will not become the host.
–![]() If WebEx host leaves the meeting, the MCU/TelePresence Server becomes the host and the meeting continues.
If WebEx host leaves the meeting, the MCU/TelePresence Server becomes the host and the meeting continues.
- If MCU/TelePresence Server leaves the meeting before the WebEx host leaves, the meeting continues.
- If MCU/TelePresence Server leaves the meeting after the WebEx host leaves, the meeting ends.
- If WebEx host leaves the meeting after the MCU/TelePresence Server leaves, the meeting ends.
- If WebEx host stays in the meeting after the MCU/TelePresence Server leaves, the WebEx meeting continues.
- TelePresence Server by default, sends video in the ActivePresence screen layout, which displays the active speaker in a full screen pane with additional participants appearing in up to six equally sized overlaid panes at the bottom of the screen (up to four panes for 2 and 4 screen endpoints). In full-screen mode in WebEx, WebEx participants appear in equally sized panes below the TelePresence video at the bottom of the window. MCU by default, sends video in a full-screen layout.
Endpoints
- Participants joining the meeting from any TelePresence endpoint may not see the presentation from WebEx if they are using their endpoint as a computer monitor.
- Content presented from an EX60 can take a long time to appear. If the endpoint is registered to Unified CM, this can be resolved by enabling User-Agent passthrough in Unified CM.
TMSXE
When booking a meeting using Web Scheduling Mailbox, if TMSXE detects an error condition (ex: not able to connect with WebEx server), the error email is sent in plain text format to the meeting organizer.
WebEx
- A black silhouette is shown for a WebEx user when they do not have their camera on or when they do not have enough bandwidth to send video using their WebEx client.
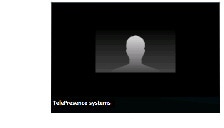
- In the WebEx Meeting Center, all TelePresence endpoints are displayed as one WebEx participant called “TelePresence systems” both in the Participant list and when a TelePresence user is the active speaker.
–![]() In the Meeting Center full screen view, the “TelePresence systems” participant appears as a black silhouette, as shown in Figure 2Figure 2.
In the Meeting Center full screen view, the “TelePresence systems” participant appears as a black silhouette, as shown in Figure 2Figure 2.
Figure 2 “TelePresence systems” in Full Screen View
- The WebEx host can mute all or individual participants after they join the meeting. It is not possible to mute TelePresence participants through the WebEx client. TelePresence participants must mute themselves.
- To mute WebEx participants, you have to be the WebEx host.
–![]() To reclaim the host role, you have to get the WebEx host key.
To reclaim the host role, you have to get the WebEx host key.
- Audio quality can be bad for WebEx participants using Computer Audio when attending using the WebEx Meeting Center client on Windows or Mac. Cisco recommends users to call in with a phone using the audio conference number for the meeting.
- The meeting is started by the first participant who joins the meeting (host or other WebEx participant). The rest of the participants “join” the meeting.
- A non-host user can start the meeting only if the “Join Before Host” feature is enabled on the site, and its start time could be 5/10/15 minutes (set a time of scheduling) before the scheduled time. Otherwise, a non-Host has to wait for the meeting to be started by the host before they can join.
- If a WebEx audio only participant is talking, the last video participant to talk is displayed until the next video participant speaks.
- The user's Outlook time zone and WebEx account time zone must be the same for the meeting to be scheduled at the correct time in both Outlook and WebEx.
- When the WebEx portion of the meeting ends, the audio will end too.
- The link bandwidth between MCU and WebEx is set by the WebEx client with the lowest bandwidth. The bandwidth of the link can go up as soon as the WebEx client with the poorest bandwidth leaves the meeting. For example, if a WebEx client that joins the meeting is only capable of 360p, the maximum bandwidth for all participants will be 360p. When that participant leaves the meeting, if all other participants are capable of a higher bandwidth, like 720p, the bandwidth will go up for all participants.
 Feedback