Cisco Catalyst 4900M Switch Installation Guide
Bias-Free Language
The documentation set for this product strives to use bias-free language. For the purposes of this documentation set, bias-free is defined as language that does not imply discrimination based on age, disability, gender, racial identity, ethnic identity, sexual orientation, socioeconomic status, and intersectionality. Exceptions may be present in the documentation due to language that is hardcoded in the user interfaces of the product software, language used based on RFP documentation, or language that is used by a referenced third-party product. Learn more about how Cisco is using Inclusive Language.
- Updated:
- January 4, 2012
Chapter: Troubleshooting the Installation
Troubleshooting the Installation
This chapter describes how to troubleshoot the Catalyst 4900M switch hardware installation and contains these sections:
- Getting Started
- Problem Solving to the System Component Level
- Identifying Startup Problems
- Troubleshooting the Power Supply
- Contacting Customer Service
If your system has problems starting up, use the information in this chapter to help isolate the cause. Problems with the initial startup are often caused by poor or improper connections. Although temperature conditions above the maximum acceptable level rarely occur at initial startup, environmental monitoring functions are included because they also monitor DC-line voltages.

Note![]() For configuration questions or problems, refer to the software configuration guide or the command reference publication to configure or enable the interfaces.
For configuration questions or problems, refer to the software configuration guide or the command reference publication to configure or enable the interfaces.
Getting Started
When the initial system boot is complete, verify the following:
- Power supplies are supplying power to the system.
- The system fan assembly is operating.
- System software boots successfully.
If all of these conditions are met and the hardware installation is complete, refer to the software configuration guide and the command reference publications to troubleshoot the software. However, if any of these conditions are not met, use the procedures in this chapter to isolate and, if possible, resolve the problem.
Problem Solving to the System Component Level
The key to success when troubleshooting the system is to isolate the problem to a specific system component. The first step is to compare what the system is doing to what it should be doing. Because a startup problem can usually be attributed to a single component, it is more efficient to isolate the problem to a subsystem rather than troubleshoot each separate component in the system.
The switch consists of the following subsystems:
- Power supply—Includes the power supply and power supply cooling. (See the “Troubleshooting the Power Supply” section.)
- Fan assembly system—The chassis fan assembly should operate whenever system power is on. Usually, it continues to operate even when the environmental monitor shuts down the system because of an overtemperature or overvoltage condition. (It will shut down for a power supply shutdown.) You should be able to hear the fan assembly to determine whether or not it is operating. If the FAN LED is orange and you determine that the fan assembly is not operating, you should immediately contact a customer service representative. There are no installation adjustments that you can make if the fan assembly does not function properly at the initial startup.
Identifying Startup Problems
When you connect the power cords to the Catalyst 4900M switch, follow these steps:
Step 1![]() Flip the power switches to the on position (AC powered systems only).
Flip the power switches to the on position (AC powered systems only).
Step 2![]() Verify that power is available to the power supplied from the site AC or DC source. Flip breakers and fuses if necessary.
Verify that power is available to the power supplied from the site AC or DC source. Flip breakers and fuses if necessary.
Step 3![]() Listen for the system fan assembly. If you do not immediately hear the system fan assembly begin to operate, see “Troubleshooting the Power Supply” section.
Listen for the system fan assembly. If you do not immediately hear the system fan assembly begin to operate, see “Troubleshooting the Power Supply” section.
Step 4![]() If you determine that the power supplies are functioning normally and that the fan assembly is faulty, contact a customer service representative. If the system fan assembly does not function properly at initial startup, there are no installation adjustments that you can make.
If you determine that the power supplies are functioning normally and that the fan assembly is faulty, contact a customer service representative. If the system fan assembly does not function properly at initial startup, there are no installation adjustments that you can make.
LED Readings
LEDs indicate all system states in the startup sequence. By checking the LEDs, you can determine when and where the system failed in the startup sequence. To check the LEDs, follow these steps:
Step 1![]() Compare the LED states to those listed in Table 1-1 .
Compare the LED states to those listed in Table 1-1 .
Step 2![]() Verify that the LEDs on the front panel are lit:
Verify that the LEDs on the front panel are lit:
- The STATUS LED flashes yellow during diagnostic boot tests. It is green when the switch is operational (online). If the system software is unable to start up, this LED stays orange.
- The port LEDs (1-48) are green when the module is operational (online). If no signal is detected, the LINK LED is off. The port LED remains yellow if the port is disabled. The port LED flashes yellow if the port tested faulty at startup.
Step 3![]() If a STATUS LED is red, contact a customer service representative for instructions.
If a STATUS LED is red, contact a customer service representative for instructions.
Step 4![]() If the boot information and system banner are not displayed, verify that the terminal is set correctly and that it is connected properly to the console port.
If the boot information and system banner are not displayed, verify that the terminal is set correctly and that it is connected properly to the console port.
Troubleshooting the Power Supply
To help isolate a power subsystem problem, perform the following steps:
Step 1![]() Verify that the power supply is plugged in and that the on/off switch is set to ON (if the power supply is an AC supply).
Verify that the power supply is plugged in and that the on/off switch is set to ON (if the power supply is an AC supply).
Step 2![]() Look at the power supply LED (PS1 or PS2). If the LED is off or if the LED is red, unplug the power cord, and then plug the power cord in. Be sure the on/off switch is OFF before removing the power cord from the power supply.
Look at the power supply LED (PS1 or PS2). If the LED is off or if the LED is red, unplug the power cord, and then plug the power cord in. Be sure the on/off switch is OFF before removing the power cord from the power supply.
Step 3![]() If the LED remains off, there might be a problem with the AC or DC source or the power cable.
If the LED remains off, there might be a problem with the AC or DC source or the power cable.
Step 4![]() Connect the power cord to another power source if one is available.
Connect the power cord to another power source if one is available.
Step 5![]() If the LED then lights, the problem is the first power source.
If the LED then lights, the problem is the first power source.
Step 6![]() If the LED fails to light after you connect the power supply to a new power source, replace the power cord.
If the LED fails to light after you connect the power supply to a new power source, replace the power cord.
Step 7![]() If the LED still fails to light when the switch is connected to a different power source with a new power cord, the power supply is probably faulty.
If the LED still fails to light when the switch is connected to a different power source with a new power cord, the power supply is probably faulty.
If you are unable to resolve the problem, contact a customer service representative for instructions.
Contacting Customer Service
If you are unable to solve a startup problem after using the troubleshooting suggestions in this chapter, contact a customer service representative for assistance and further instructions. Before you call, have the following information ready to help your service provider assist you as quickly as possible:
- Date you received the switch
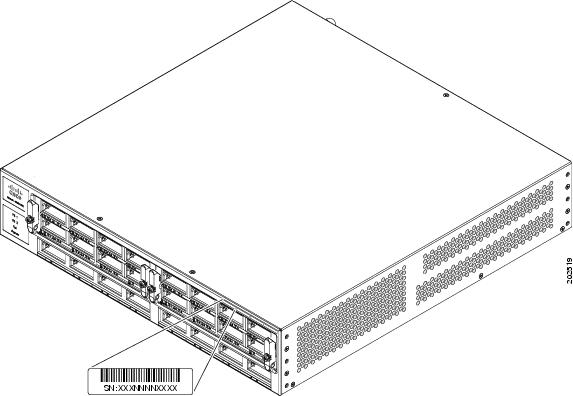
- Chassis serial number (located on a label on the right of the rear of the chassis, see Figure 1-1)
- Type of software and release number
- Maintenance agreement or warranty information
- Brief description of the problem
- Brief explanation of the steps you have already taken to isolate and resolve the problem
Figure 1-1 Serial Number Location
 Feedback