- Index
- New and Changed Information
- Preface
- Overview
- Installing and Launching the DCNM Server
- Installing and Launching the DCNM Client
- Using the DCNM Client
- Administering DCNM Server Users
- Administering Device Discovery
- Administering Devices and Credentials
- Administering DCNM Licensed Devices
- Working with Topology
- Managing Events
- Working with Inventory
- Configuring SPAN
- Managing Device Software Images
- Working with Configuration Change Management
- Administering Auto-Synchronization with Devices
- Administering Statistical Data Collection
- Administering DCNM Server Log Settings
- Maintaining the DCNM Database
- Troubleshooting DCNM
Cisco DCNM Fundamentals Configuration Guide, Release 4.1
Bias-Free Language
The documentation set for this product strives to use bias-free language. For the purposes of this documentation set, bias-free is defined as language that does not imply discrimination based on age, disability, gender, racial identity, ethnic identity, sexual orientation, socioeconomic status, and intersectionality. Exceptions may be present in the documentation due to language that is hardcoded in the user interfaces of the product software, language used based on RFP documentation, or language that is used by a referenced third-party product. Learn more about how Cisco is using Inclusive Language.
- Updated:
- November 19, 2008
Chapter: Managing Device Software Images
- Information About Device OS Management
- Licensing Requirements for Device OS Management
- Prerequisites for Device OS Management
- Guidelines and Limitations for Device OS Management
- Using the Device OS Management Screen
- Configuring Software Installation Jobs
- Viewing Software Installation Job Details
- Creating or Editing a Software Installation Job
- Using the Software Installation Wizard
- Rescheduling a Software Installation Job
- Deleting a Software Installation Job
- Adding or Changing Comments for a Software Installation Job
- Changing Installation Options for a Software Installation Job
- Configuring File Servers
- Field Descriptions for Device OS Management
- Additional References
- Feature History for Device OS Management
Managing Device Operating Systems
This chapter describes how to use the Device OS Management feature in Cisco Data Center Network Manager (DCNM).
This chapter includes the following topics:
•![]() Information About Device OS Management
Information About Device OS Management
•![]() Licensing Requirements for Device OS Management
Licensing Requirements for Device OS Management
•![]() Prerequisites for Device OS Management
Prerequisites for Device OS Management
•![]() Guidelines and Limitations for Device OS Management
Guidelines and Limitations for Device OS Management
•![]() Using the Device OS Management Screen
Using the Device OS Management Screen
•![]() Configuring Software Installation Jobs
Configuring Software Installation Jobs
•![]() Field Descriptions for Device OS Management
Field Descriptions for Device OS Management
•![]() Feature History for Device OS Management
Feature History for Device OS Management
Information About Device OS Management
The Device OS Management feature allows you to control the software images installed on devices that are managed by DCNM.
This section includes the following topics:
Device OS Management Screen
The Device OS Management screen allows you to view information about the software images used by a managed device. You can also start the Software Installation Wizard from the Device OS Management Summary pane.
Software Installation Jobs
The Software Installation Jobs feature allows you to create and monitor software installation jobs. DCNM provides the Software Installation Wizard, which you use to specify all the necessary information for configuring a software installation job.
You can create software installation jobs that affect one or more managed devices. You can use software images that are already in the local file system of the devices or DCNM can instruct each managed device included in a job to transfer software images to the local file system on the managed device. Your options are as follows:
•![]() Device file system—You can use software images that are in the local file system of the devices. You must ensure that the images exist on the devices prior to configuring the installation job.
Device file system—You can use software images that are in the local file system of the devices. You must ensure that the images exist on the devices prior to configuring the installation job.
You can specify a software image for a device type category rather than for a single device; however, the image that you specify must exist on each device in the category, in the same location and with the same filename. For example, if you specify bootflash:/images/n7000-s1-dk9.4.1.2.upg.bin, the n7000-s1-dk9.4.1.2.upg.bin image file must exist in bootflash:/images on each device in the device category.
•![]() File server—You can use a file server that you have configured in DCNM. If you use a file server, DCNM uses the information that you provide when you configure the file server and when you configure the software installation job to assemble a URL that the managed devices in the job can use to retrieve the software images.
File server—You can use a file server that you have configured in DCNM. If you use a file server, DCNM uses the information that you provide when you configure the file server and when you configure the software installation job to assemble a URL that the managed devices in the job can use to retrieve the software images.
Before configuring a software installation job, you should ensure that the software images are on the file server. You must also configure the file server in DCNM. For more information, see the "File Servers" section.
•![]() URL—You can use a URL to specify the image files. The verification that DCNM performs for a URL varies depending upon the transfer protocol that you use, as follows:
URL—You can use a URL to specify the image files. The verification that DCNM performs for a URL varies depending upon the transfer protocol that you use, as follows:
–![]() FTP—DCNM verifies the URL format, that the FTP server in the URL is reachable, and that the specified image file exists on the FTP server. The FTP URL format is as follows:
FTP—DCNM verifies the URL format, that the FTP server in the URL is reachable, and that the specified image file exists on the FTP server. The FTP URL format is as follows:
ftp://username@servername/path/filename
–![]() SFTP—DCNM verifies the URL format, that the SFTP server in the URL is reachable, and that the image file specified exists on the SFTP server. The SFTP URL format is as follows:
SFTP—DCNM verifies the URL format, that the SFTP server in the URL is reachable, and that the image file specified exists on the SFTP server. The SFTP URL format is as follows:
sftp://username@servername/path/filename
–![]() TFTP—You must ensure that the path and image filename are correct. DCNM verifies the URL format and that the TFTP server in the URL is reachable. The TFTP URL format is as follows:
TFTP—You must ensure that the path and image filename are correct. DCNM verifies the URL format and that the TFTP server in the URL is reachable. The TFTP URL format is as follows:
tftp://servername/path/filename
–![]() SCP—You must ensure that the SCP server is reachable and that the path and image filename are correct. DCNM verifies the URL format. The SCP URL format is as follows:
SCP—You must ensure that the SCP server is reachable and that the path and image filename are correct. DCNM verifies the URL format. The SCP URL format is as follows:
scp://username@servername/path/filename
The Software Installation Wizard includes an optional step for verifying the version compatibility of software images with the managed devices. During this step, if a software image was specified by a URL or file server, DCNM instructs managed devices to copy the software image from the URL or file server to the bootflash file system on the device. If you skip the version compatibility step, DCNM does not instruct devices to copy software images from URLs or file servers until the installation job begins.
File Servers
The File Servers feature allows you to configure files servers, which you can use for the following purposes:
•![]() Software installation jobs—DCNM can get software image files from a file server and transfer them to devices included in a software installation job.
Software installation jobs—DCNM can get software image files from a file server and transfer them to devices included in a software installation job.
•![]() Configuration rollbacks—DCNM can back up device configurations to a file server when you roll back a device configuration.
Configuration rollbacks—DCNM can back up device configurations to a file server when you roll back a device configuration.
DCNM supports file servers that use the following protocols:
•![]() FTP
FTP
•![]() SFTP
SFTP
•![]() TFTP
TFTP
If you use a file server in a software installation job, the managed devices included in the job must be able to connect to the file server directly.
Virtualization Support
Device software images apply to physical devices rather than virtual device contexts (VDCs). When you change the software image on a managed device, all VDCs on the device use the new software image.
Licensing Requirements for Device OS Management
The following table shows the licensing requirements for this feature:
|
|
|
|---|---|
DCNM |
Device OS Management requires a LAN Enterprise license. For information about obtaining and installing a DCNM LAN Enterprise license, see the "Installing Licenses" section on page 2-7. |
Prerequisites for Device OS Management
The Device OS Management feature has the following prerequisites:
•![]() The Device OS Management feature supports only devices that are managed by DCNM, which means that DCNM must have successfully discovered the device.
The Device OS Management feature supports only devices that are managed by DCNM, which means that DCNM must have successfully discovered the device.
•![]() The Device OS Management feature supports only devices that you have added to the list of DCNM-licensed devices.
The Device OS Management feature supports only devices that you have added to the list of DCNM-licensed devices.
•![]() Devices included in a software installation job must be reachable by DCNM when a software installation job occurs. Software installation jobs fail for unreachable devices.
Devices included in a software installation job must be reachable by DCNM when a software installation job occurs. Software installation jobs fail for unreachable devices.
Guidelines and Limitations for Device OS Management
The Device OS Management feature has the following configuration guidelines and limitations:
•![]() URLs and file servers used in a software installation job must be reachable by the managed devices included in the job.
URLs and file servers used in a software installation job must be reachable by the managed devices included in the job.
•![]() If you use a DNS name in a URL or when you configure a file server, ensure that managed devices using the URL or file server can resolve the DNS name.
If you use a DNS name in a URL or when you configure a file server, ensure that managed devices using the URL or file server can resolve the DNS name.
•![]() Software installation jobs do not reload connectivity management processors (CMPs). You must manually reload CMPs as needed when a software installation job completes. The status for a completed software installation job includes messages about CMPs that must be reloaded manually. For more information, see the Cisco NX-OS Software Upgrade and Downgrade Guide, Release 4.1.
Software installation jobs do not reload connectivity management processors (CMPs). You must manually reload CMPs as needed when a software installation job completes. The status for a completed software installation job includes messages about CMPs that must be reloaded manually. For more information, see the Cisco NX-OS Software Upgrade and Downgrade Guide, Release 4.1.
•![]() For Cisco Nexus 7000 series devices that have a single supervisor module, a software installation job does not reload the device. After the installation job completes, to run the newly installed software image on a single-supervisor Nexus 7000 series device, you must manually reload the device. For more information, see the Cisco NX-OS Software Upgrade and Downgrade Guide, Release 4.1.
For Cisco Nexus 7000 series devices that have a single supervisor module, a software installation job does not reload the device. After the installation job completes, to run the newly installed software image on a single-supervisor Nexus 7000 series device, you must manually reload the device. For more information, see the Cisco NX-OS Software Upgrade and Downgrade Guide, Release 4.1.
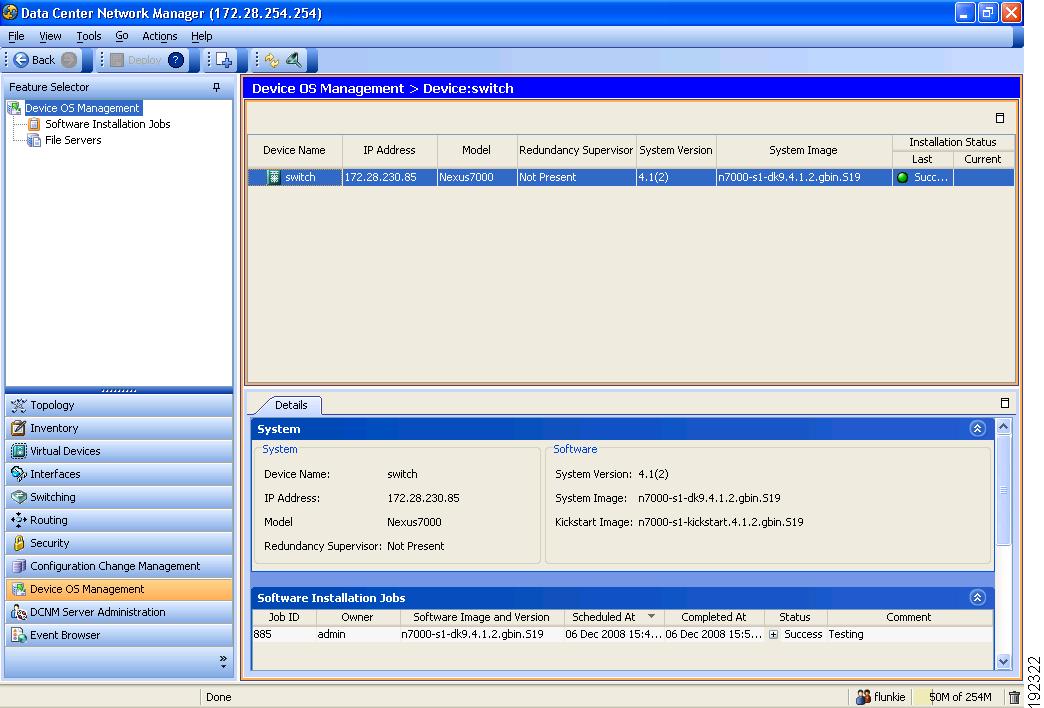
Using the Device OS Management Screen
Figure 13-1 shows the Device OS Management content pane.
Figure 13-1 Device OS Management Content Pane
This section includes the following topics:
•![]() Installing Software on a Device
Installing Software on a Device
Viewing Device Image Details
You can view details about the software image on a managed device.
DETAILED STEPS
To view details about a software image on a managed device, follow these steps:
Step 1 ![]() From the Feature Selector pane, choose Device OS Management.
From the Feature Selector pane, choose Device OS Management.
A table of managed devices appears in the Summary pane. Each row displays software image information about a device. Devices are listed alphabetically.
Step 2 ![]() Click the device for which you want to see software image details.
Click the device for which you want to see software image details.
The Details pane displays two sections of information. In addition to displaying the information also shown in the Summary pane, if an installation job is scheduled, the System section displays a message about any scheduled installation job, including a link to the installation job.
The Software Installation Jobs section displays information about future, ongoing, and past installation jobs.

Tip ![]() To expand or collapse the System or the Software Installation Jobs sections, double-click the section title.
To expand or collapse the System or the Software Installation Jobs sections, double-click the section title.
Step 3 ![]() (Optional) To open a scheduled software installation job, in the System section, click the link to the installation job.
(Optional) To open a scheduled software installation job, in the System section, click the link to the installation job.
The Feature Selector pane changes to the Software Installation Jobs feature. For more information, see the "Viewing Software Installation Job Details" section.
Installing Software on a Device
You can install software on a device listed on the Device OS Management Summary pane. Installing software from the Device OS Management Summary pane starts the Software Installation Wizard, which allows you to create or modify a software installation job.
BEFORE YOU BEGIN
Ensure that the software images that you want to install are available by one of the options that the Software Installation Wizard supports. For more information, see the "Software Installation Jobs" section.
DETAILED STEPS
Step 1 ![]() From the Feature Selector pane, choose Device OS Management >Device OS Management.
From the Feature Selector pane, choose Device OS Management >Device OS Management.
A table of managed devices appears in the Summary pane.
Step 2 ![]() Click a device that you want to include in a new software installation job.
Click a device that you want to include in a new software installation job.
Step 3 ![]() From the menu bar, choose Actions > Install Software.
From the menu bar, choose Actions > Install Software.
The Software Installation Wizard dialog box displays the Select Switches step. The device that you selected is listed under Selected Switches.
Step 4 ![]() To use the wizard, see the "Using the Software Installation Wizard" section.
To use the wizard, see the "Using the Software Installation Wizard" section.
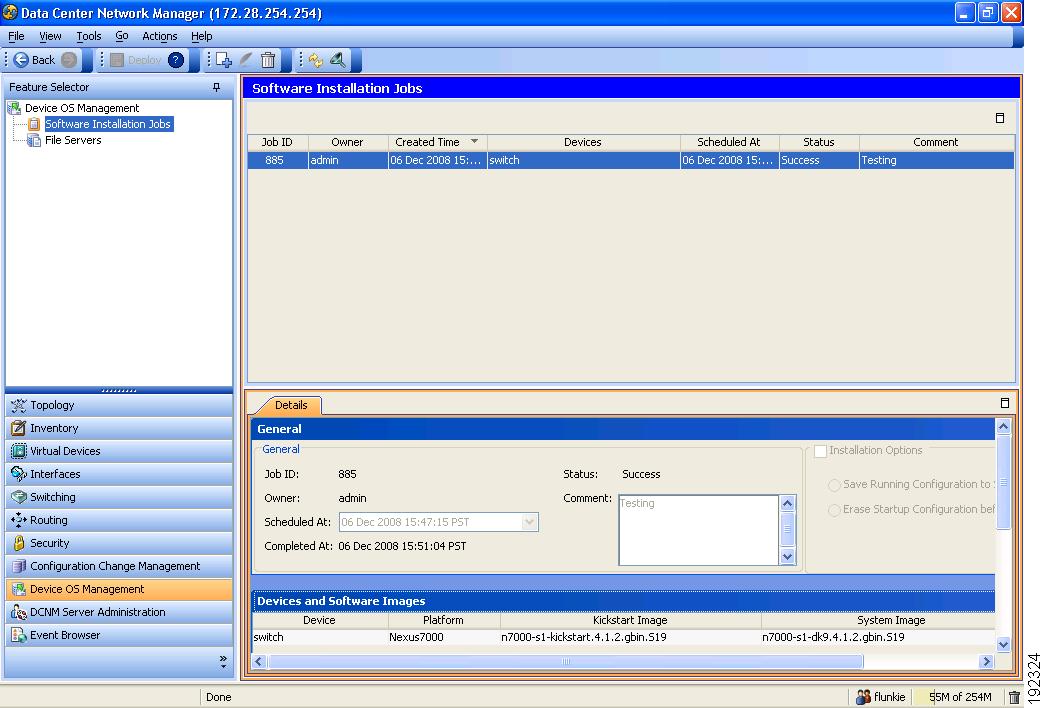
Configuring Software Installation Jobs
Figure 13-2 shows the Software Installation Jobs content pane.
Figure 13-2 Software Installation Jobs Content Pane
This section includes the following topics:
•![]() Viewing Software Installation Job Details
Viewing Software Installation Job Details
•![]() Creating or Editing a Software Installation Job
Creating or Editing a Software Installation Job
•![]() Using the Software Installation Wizard
Using the Software Installation Wizard
•![]() Rescheduling a Software Installation Job
Rescheduling a Software Installation Job
•![]() Deleting a Software Installation Job
Deleting a Software Installation Job
•![]() Adding or Changing Comments for a Software Installation Job
Adding or Changing Comments for a Software Installation Job
Viewing Software Installation Job Details
You can view the details of a software installation job, including its status.
BEFORE YOU BEGIN
You must have configured a software installation job before you can view its details.
DETAILED STEPS
To view software installation job details, follow these steps:
Step 1 ![]() From the Feature Selector pane, choose Device OS Management > Software Installation Jobs.
From the Feature Selector pane, choose Device OS Management > Software Installation Jobs.
The Summary pane displays a table of software installation jobs.
Step 2 ![]() Click the software installation job for which you want to view details.
Click the software installation job for which you want to view details.
The Details pane displays two sections of information. The General section displays the job ID, the job owner, scheduling information, comments, and installation options.
The Device and Software Images section displays a table of devices included in the job, the software images to be installed on each device, and the status of the installation for the device.
Tip ![]() To expand or collapse the General or the Device and Software Images sections, double-click the section title.
To expand or collapse the General or the Device and Software Images sections, double-click the section title.
Creating or Editing a Software Installation Job
From the Software Installation Jobs content pane, you can create a software installation job or edit an existing job. Creating or editing a job from the Software Installation Jobs content pane starts the Software Installation Wizard, which allows you to create or modify a job.
BEFORE YOU BEGIN
Ensure that the software images that you want to install are available by one of the options that the Software Installation Wizard supports. For more information, see the "Software Installation Jobs" section.
DETAILED STEPS
To create or edit a software installation job, follow these steps:
Step 1 ![]() From the Feature Selector pane, choose Device OS Management > Software Installation Jobs.
From the Feature Selector pane, choose Device OS Management > Software Installation Jobs.
The Summary pane displays a table of software installation jobs.
Step 2 ![]() Do one of the following:
Do one of the following:
•![]() If you want to create a job, from the menu bar, choose Actions > New.
If you want to create a job, from the menu bar, choose Actions > New.
•![]() If you want to edit a job, in the Summary pane, click the job, and then, from the menu bar, choose Actions > Edit.
If you want to edit a job, in the Summary pane, click the job, and then, from the menu bar, choose Actions > Edit.
The Software Installation Wizard dialog box displays the Select Switches step.
Step 3 ![]() To use the wizard, see the "Using the Software Installation Wizard" section.
To use the wizard, see the "Using the Software Installation Wizard" section.
Using the Software Installation Wizard
You can use the Software Installation Wizard to configure a new software installation job or make changes to an existing software installation job.
BEFORE YOU BEGIN
Start the Software Installation Wizard, from one of the following places:
•![]() Device OS Management—See the "Installing Software on a Device" section.
Device OS Management—See the "Installing Software on a Device" section.
•![]() Software Installation Jobs—See the "Creating or Editing a Software Installation Job" section.
Software Installation Jobs—See the "Creating or Editing a Software Installation Job" section.
DETAILED STEPS
To use the Software Installation Wizard, follow these steps:
Step 1 ![]() In the Software Installation Wizard dialog box, follow these steps for each device that you want to include in the installation job:
In the Software Installation Wizard dialog box, follow these steps for each device that you want to include in the installation job:
a. ![]() Under Available Switches, click the device.
Under Available Switches, click the device.
b. ![]() Click Add.
Click Add.
Tip ![]() To remove a device from the job, under Selected Switches, click the device and then click Remove.
To remove a device from the job, under Selected Switches, click the device and then click Remove.
Step 2 ![]() Click Next.
Click Next.
The Software Installation Wizard dialog box displays the Specify Software Images step. Devices are categorized by the physical device type. You can specify software images for each device individually or for an entire category of devices of the same physical type.
Step 3 ![]() For each device or physical device category, specify a kickstart image and a system image. To do so, follow these steps once for the Kickstart Image text box and again for the System Image text box:
For each device or physical device category, specify a kickstart image and a system image. To do so, follow these steps once for the Kickstart Image text box and again for the System Image text box:
a. ![]() In the applicable image text box, click to activate the text box and then click the more button.
In the applicable image text box, click to activate the text box and then click the more button.
The Software Image Browser dialog box appears.
b. ![]() Specify the location of the file for the software image to be installed. To do so, choose one of the following options:
Specify the location of the file for the software image to be installed. To do so, choose one of the following options:
•![]() File Server—If you choose this option, you must pick a file server from the Repository list, navigate the folders on the file server, and select the software image file.
File Server—If you choose this option, you must pick a file server from the Repository list, navigate the folders on the file server, and select the software image file.
•![]() Switch File System—If you choose this option, you must navigate the file system on a device and select the software image file.
Switch File System—If you choose this option, you must navigate the file system on a device and select the software image file.
If you are specifying a software image for a device type category, the image specified must exist on each device in the category, in the same location and with the same filename.
•![]() URL—If you choose this option, enter the URL in the URL text box. If the transfer protocol that you use includes a username in the URL, in the Password text box type the password for the username in the URL.
URL—If you choose this option, enter the URL in the URL text box. If the transfer protocol that you use includes a username in the URL, in the Password text box type the password for the username in the URL.
c. ![]() Click OK.
Click OK.
If you specified a URL, DCNM verifies the URL.
The Software Image Browser dialog box closes. The applicable image text box displays the software image that you chose.
Step 4 ![]() (Optional) If you do not want the software installation wizard to verify that the selected kickstart and system software images are compatible with a device, check the Skip Version Compatibility check box in the row of the device.
(Optional) If you do not want the software installation wizard to verify that the selected kickstart and system software images are compatible with a device, check the Skip Version Compatibility check box in the row of the device.
Tip ![]() The Next button remains unavailable until you have specified a kickstart image and a system image for each device included in the software installation job.
The Next button remains unavailable until you have specified a kickstart image and a system image for each device included in the software installation job.
Step 5 ![]() Click Next.
Click Next.
If you specified a URL or a software image repository for the location of software images, DCNM instructs the devices in the job to retrieve the images from the specified locations.
If any device does not have enough space in its local file system to receive the software image files, a dialog box provides you the option to free up space on the device.
Step 6 ![]() If you receive a warning about insufficient space on the device, do one of the following:
If you receive a warning about insufficient space on the device, do one of the following:
•![]() If you want to delete files from devices, click Yes. Use the Delete Files dialog box to explore the local file system of devices and delete unwanted files. When you are done, click OK and then click Next.
If you want to delete files from devices, click Yes. Use the Delete Files dialog box to explore the local file system of devices and delete unwanted files. When you are done, click OK and then click Next.
•![]() If you want to remove the device from the job, click No, click Back, and return to Step 3.
If you want to remove the device from the job, click No, click Back, and return to Step 3.
•![]() If you want to exit the software installation wizard, click No and then click Cancel.
If you want to exit the software installation wizard, click No and then click Cancel.
Unless you chose to skip the version compatibility check for every device in the installation job, the Software Installation Wizard dialog box displays the Pre-installation Checks step. The Version Compatibility Check column indicates whether a device passed or failed the check.
Step 7 ![]() If the Software Install Wizard dialog box displays the Pre-installation Checks step, follow these steps:
If the Software Install Wizard dialog box displays the Pre-installation Checks step, follow these steps:
a. ![]() If any device failed the version compatibility check, do one of the following:
If any device failed the version compatibility check, do one of the following:
–![]() If you want to change the software image files specified for a device, click Back and return to Step 3.
If you want to change the software image files specified for a device, click Back and return to Step 3.
–![]() If you want the job to proceed by not installing software on devices that failed the version compatibility check, check the Skip devices with version compatibility failure check box.
If you want the job to proceed by not installing software on devices that failed the version compatibility check, check the Skip devices with version compatibility failure check box.
b. ![]() Click Next.
Click Next.
The Software Installation Wizard dialog box displays the Installation Options and Schedule step.
Step 8 ![]() (Optional) If you want the job to save the current configuration or delete the current configuration on each device, follow these steps:
(Optional) If you want the job to save the current configuration or delete the current configuration on each device, follow these steps:
a. ![]() Check the Installation Options check box.
Check the Installation Options check box.
b. ![]() If you want the job to copy the running configuration to the startup configuration on each device, click the Save Running Configuration to Startup before Installation radio button. After the installation job, devices in the job will have the same configuration that they did prior to the job, unless the installation is an upgrade or downgrade that modifies the running configuration.
If you want the job to copy the running configuration to the startup configuration on each device, click the Save Running Configuration to Startup before Installation radio button. After the installation job, devices in the job will have the same configuration that they did prior to the job, unless the installation is an upgrade or downgrade that modifies the running configuration.
c. ![]() If you want the job to delete the startup configuration on each device, click the Erase Startup Configuration before Installation radio button. After the installation job completes, devices in the job will have only the default running configuration.
If you want the job to delete the startup configuration on each device, click the Erase Startup Configuration before Installation radio button. After the installation job completes, devices in the job will have only the default running configuration.
Step 9 ![]() Under Schedule, do one of the following:
Under Schedule, do one of the following:
•![]() If you want the software installation job to start immediately after you complete the wizard, click the Install Now radio button.
If you want the software installation job to start immediately after you complete the wizard, click the Install Now radio button.
•![]() If you want to specify a date and time for the start of the software installation job, click the Schedule Installation radio button and then use the Date and Time field to specify when the job should begin.
If you want to specify a date and time for the start of the software installation job, click the Schedule Installation radio button and then use the Date and Time field to specify when the job should begin.
Step 10 ![]() (Optional) In the Comments text box, enter a comment about the installation job.
(Optional) In the Comments text box, enter a comment about the installation job.
Step 11 ![]() (Optional) If you want the software installation job to save the log data for failed installations, check the Archive logs from switches on DCNM server upon installation failure check box.
(Optional) If you want the software installation job to save the log data for failed installations, check the Archive logs from switches on DCNM server upon installation failure check box.
Step 12 ![]() Click Finish.
Click Finish.
If you specified a date and time for the job under Schedule, the wizard closes and the job appears in the Summary pane.
If you clicked the Install Now radio button under Schedule, the Software Installation Status dialog box displays information about each device in the job and the job status.
Step 13 ![]() If the Software Installation Status dialog box appears, do one of the following:
If the Software Installation Status dialog box appears, do one of the following:
•![]() If you want to close the dialog box and allow the job to run, click Run in Background.
If you want to close the dialog box and allow the job to run, click Run in Background.
•![]() If you want to abort software installation on one or more devices, for each device, click the device and click Abort Selected.
If you want to abort software installation on one or more devices, for each device, click the device and click Abort Selected.
•![]() If you want to abort software installation for all devices, click Abort All.
If you want to abort software installation for all devices, click Abort All.
Tip ![]() If you abort software installation on all devices, click Close to close the dialog box.
If you abort software installation on all devices, click Close to close the dialog box.
Rescheduling a Software Installation Job
You can change the scheduled date and time of a software installation job.
BEFORE YOU BEGIN
The software installation job that you want to reschedule must have a status of Scheduled. You cannot reschedule aborted or completed jobs.
DETAILED STEPS
To reschedule a software installation job, follow these steps:
Step 1 ![]() From the Feature Selector pane, choose Device OS Management > Software Installation Jobs.
From the Feature Selector pane, choose Device OS Management > Software Installation Jobs.
The Summary pane displays a table of software installation jobs.
Step 2 ![]() In the Summary pane, click the job that you want to reschedule.
In the Summary pane, click the job that you want to reschedule.
The Details pane displays information about the job.
Step 3 ![]() (Optional) From the Details tab, expand the General section, if necessary.
(Optional) From the Details tab, expand the General section, if necessary.
Step 4 ![]() Use the Scheduled At field to specify when the job should begin.
Use the Scheduled At field to specify when the job should begin.
Step 5 ![]() From the menu bar, choose File > Deploy to save the change to the job schedule.
From the menu bar, choose File > Deploy to save the change to the job schedule.
Deleting a Software Installation Job
You can delete a software installation job, regardless of its state. In the Summary pane for Software Installation Jobs, completed and aborted jobs remain until you delete them.
DETAILED STEPS
To delete a software installation job, follow these steps:
Step 1 ![]() From the Feature Selector pane, choose Device OS Management > Software Installation Jobs.
From the Feature Selector pane, choose Device OS Management > Software Installation Jobs.
The Summary pane displays a table of software installation jobs.
Step 2 ![]() In the Summary pane, click the job that you want to delete.
In the Summary pane, click the job that you want to delete.
The Details pane displays information about the job.
Step 3 ![]() From the menu bar, choose Actions > Delete.
From the menu bar, choose Actions > Delete.
A Warning dialog box displays a confirmation message.
Step 4 ![]() Click Yes.
Click Yes.
The job is removed from the summary pane. You do not need to save your changes.
Adding or Changing Comments for a Software Installation Job
You can add or change the comments associated with a software installation job.
DETAILED STEPS
To add or change comments for a software installation job, follow these steps:
Step 1 ![]() From the Feature Selector pane, choose Device OS Management > Software Installation Jobs.
From the Feature Selector pane, choose Device OS Management > Software Installation Jobs.
The Summary pane displays a table of software installation jobs.
Step 2 ![]() In the Summary pane, click the job for which you want to add or change comments.
In the Summary pane, click the job for which you want to add or change comments.
The Details pane displays information about the job.
Step 3 ![]() (Optional) From the Details tab, expand the General section, if necessary.
(Optional) From the Details tab, expand the General section, if necessary.
Step 4 ![]() In the Comments field, enter your comments.
In the Comments field, enter your comments.
Step 5 ![]() From the menu bar, choose File > Deploy to save the change to the job schedule.
From the menu bar, choose File > Deploy to save the change to the job schedule.
Changing Installation Options for a Software Installation Job
You can change the installation options associated with a software installation job. Installation options allow you to specify whether DCNM should save the running configuration of devices, delete the startup configuration, or take no action on the configuration of devices prior to installing the software.
DETAILED STEPS
To change installation options for a software installation job, follow these steps:
Step 1 ![]() From the Feature Selector pane, choose Device OS Management > Software Installation Jobs.
From the Feature Selector pane, choose Device OS Management > Software Installation Jobs.
The Summary pane displays a table of software installation jobs.
Step 2 ![]() In the Summary pane, click the job for which you want to add or change comments.
In the Summary pane, click the job for which you want to add or change comments.
The Details pane displays information about the job.
Step 3 ![]() (Optional) From the Details tab, expand the General section, if necessary.
(Optional) From the Details tab, expand the General section, if necessary.
Step 4 ![]() If you want devices in the software installation job to have only the default device configuration after the installation job completes, follow these steps:
If you want devices in the software installation job to have only the default device configuration after the installation job completes, follow these steps:
a. ![]() Check the Installation Options check box.
Check the Installation Options check box.
b. ![]() If you want the job to delete the startup configuration on each device, click the Erase Startup Configuration before Installation radio button.
If you want the job to delete the startup configuration on each device, click the Erase Startup Configuration before Installation radio button.
Step 5 ![]() If you want devices in the software installation job to have the same running configuration after the installation job completes, follow these steps:
If you want devices in the software installation job to have the same running configuration after the installation job completes, follow these steps:
a. ![]() Check the Installation Options check box.
Check the Installation Options check box.
b. ![]() If you want the job to copy the running configuration to the startup configuration on each device, click the Save Running Configuration to Startup before Installation radio button.
If you want the job to copy the running configuration to the startup configuration on each device, click the Save Running Configuration to Startup before Installation radio button.
Step 6 ![]() If you want the devices in the software installation job to use their current startup configuration as their running configuration after the software installation job completes, uncheck the Installation Options check box.
If you want the devices in the software installation job to use their current startup configuration as their running configuration after the software installation job completes, uncheck the Installation Options check box.
Step 7 ![]() From the menu bar, choose File > Deploy to save the change to the job schedule.
From the menu bar, choose File > Deploy to save the change to the job schedule.
Configuring File Servers
Figure 13-3 shows the File Servers content pane.
Figure 13-3 File Servers Content Pane

This section includes the following topics:
Adding a File Server
You can add a file server to DCNM.
BEFORE YOU BEGIN
Gather the following information about the file server:
•![]() Server IP address or hostname
Server IP address or hostname

Note ![]() If you use the hostname, it must be registered with the DNS server that the DCNM server is configured to use.
If you use the hostname, it must be registered with the DNS server that the DCNM server is configured to use.
•![]() Transfer protocol that the server provides. DCNM supports the following transfer protocols:
Transfer protocol that the server provides. DCNM supports the following transfer protocols:
–![]() FTP
FTP
–![]() SFTP
SFTP
–![]() TFTP
TFTP
•![]() Username and password that DCNM should use to access the server.
Username and password that DCNM should use to access the server.
•![]() The base directory on the server. All files and directories that DCNM needs to access must be available under this directory.
The base directory on the server. All files and directories that DCNM needs to access must be available under this directory.
DETAILED STEPS
To add a file server, follow these steps:
Step 1 ![]() From the Feature Selector pane, choose Device OS Management > File Servers.
From the Feature Selector pane, choose Device OS Management > File Servers.
The Contents pane displays a table of file servers.
Step 2 ![]() From the menu bar, choose Actions > New.
From the menu bar, choose Actions > New.
A new row appears in the Contents pane, with the cursor in the Server Name/IP Address field.
Step 3 ![]() In the Server Name/IP Address field, enter the IP address or hostname of the file server.
In the Server Name/IP Address field, enter the IP address or hostname of the file server.
Step 4 ![]() Double-click the Protocol field and choose the protocol from the list that appears. Supported protocols are as follows:
Double-click the Protocol field and choose the protocol from the list that appears. Supported protocols are as follows:
•![]() FTP
FTP
•![]() SFTP
SFTP
•![]() TFTP
TFTP
Step 5 ![]() If the file server requires authentication, double-click the User Credentials field and enter the username and password for the server. If you want DCNM to remember the password, check the Save Password check box.
If the file server requires authentication, double-click the User Credentials field and enter the username and password for the server. If you want DCNM to remember the password, check the Save Password check box.
Step 6 ![]() Double-click the Base Directory field.
Double-click the Base Directory field.
The Software Image Browser dialog box appears.
Step 7 ![]() Explore the server file system and choose the directory that DCNM should use as the base directory. All files and directories that DCNM needs to access must be located under this directory. By default, the root directory of the server is the base directory.
Explore the server file system and choose the directory that DCNM should use as the base directory. All files and directories that DCNM needs to access must be located under this directory. By default, the root directory of the server is the base directory.
Step 8 ![]() (Optional) Double-click the Comment field and enter your comments.
(Optional) Double-click the Comment field and enter your comments.
Step 9 ![]() From the menu bar, choose File > Deploy to save the change to the job schedule.
From the menu bar, choose File > Deploy to save the change to the job schedule.
Changing a File Server
You can change the user credentials, base directory, and comments of a file server.
Note ![]() You cannot change the values in the Server Name/IP Address or Protocol fields. If you need to change these values, delete the file server and create a file server with the new values.
You cannot change the values in the Server Name/IP Address or Protocol fields. If you need to change these values, delete the file server and create a file server with the new values.
BEFORE YOU BEGIN
If you are changing the user credentials or base directory, determine what the new user credentials or base directory should be.
DETAILED STEPS
To change a file server, follow these steps:
Step 1 ![]() From the Feature Selector pane, choose Device OS Management > File Servers.
From the Feature Selector pane, choose Device OS Management > File Servers.
The Contents pane displays a table of file servers.
Step 2 ![]() In the table, locate the row for the file server that you want to change.
In the table, locate the row for the file server that you want to change.
Step 3 ![]() Perform the following items to change the file server entry as needed:
Perform the following items to change the file server entry as needed:
•![]() If you want to change the user credentials, double-click the User Credentials field for the file server and enter or clear the username and password for the server. If you want DCNM to remember the password, check the Save Password check box.
If you want to change the user credentials, double-click the User Credentials field for the file server and enter or clear the username and password for the server. If you want DCNM to remember the password, check the Save Password check box.
•![]() If you want to change the base directory, double-click the Base Directory field and use the Software Image Browser dialog box to choose the directory that DCNM should use as the base directory.
If you want to change the base directory, double-click the Base Directory field and use the Software Image Browser dialog box to choose the directory that DCNM should use as the base directory.
•![]() If you want to change the comments, double-click the Comments field and enter your comments.
If you want to change the comments, double-click the Comments field and enter your comments.
Step 4 ![]() From the menu bar, choose File > Deploy to save the file server changes.
From the menu bar, choose File > Deploy to save the file server changes.
Deleting a File Server
You can delete a file server.
BEFORE YOU BEGIN
Ensure that the file server is specified in the Archival Settings feature as the file server for configuration rollback. For more information, see the "Configuring the Rollback File Server Setting" section on page 14-19.
DETAILED STEPS
To delete a file server, follow these steps:
Step 1 ![]() From the Feature Selector pane, choose Device OS Management > File Servers.
From the Feature Selector pane, choose Device OS Management > File Servers.
The Contents pane displays a table of file servers.
Step 2 ![]() In the table, click the row for the file server that you want to delete.
In the table, click the row for the file server that you want to delete.
Step 3 ![]() From the menu bar, choose Actions > Delete.
From the menu bar, choose Actions > Delete.
Note ![]() If the file server is specified in the Archival Settings feature as the file server for a configuration rollback, a dialog box informs you that the file server cannot be deleted. For more information, see the "Configuring the Rollback File Server Setting" section on page 14-19.
If the file server is specified in the Archival Settings feature as the file server for a configuration rollback, a dialog box informs you that the file server cannot be deleted. For more information, see the "Configuring the Rollback File Server Setting" section on page 14-19.
The file server is removed from the summary pane. You do not need to save your changes.
Field Descriptions for Device OS Management
This section includes field descriptions for the three features available in the Feature Selector drawer for Device OS Management:
•![]() Field Descriptions for Device OS Management
Field Descriptions for Device OS Management
•![]() Field Descriptions for Software Installation Jobs
Field Descriptions for Software Installation Jobs
•![]() Field Descriptions for the File Servers Contents Pane
Field Descriptions for the File Servers Contents Pane
Field Descriptions for Device OS Management
This section includes the following field descriptions for the Device OS Management feature:
•![]() Device: Details: System Section
Device: Details: System Section
•![]() Device: Details: Software Installation Jobs Section
Device: Details: Software Installation Jobs Section
Device: Details: System Section
Device: Details: Software Installation Jobs Section
Field Descriptions for Software Installation Jobs
This section includes the following field descriptions for the Software Installation Jobs feature:
•![]() Installation Job: Details: General Section
Installation Job: Details: General Section
•![]() Installation Job: Details: Devices and Software Images Section
Installation Job: Details: Devices and Software Images Section
Installation Job: Details: General Section
Installation Job: Details: Devices and Software Images Section
Field Descriptions for the File Servers Contents Pane
Additional References
For additional information related to the Device OS Management feature, see the following sections:
Related Documents
Standards
|
|
|
|---|---|
No new or modified standards are supported by this feature, and support for existing standards has not been modified by this feature. |
— |
Feature History for Device OS Management
Table 13-6 lists the release history for this feature.
 Feedback