Cisco Nexus 9000 Series NX-OS Programmability Guide, Release 6.x
Bias-Free Language
The documentation set for this product strives to use bias-free language. For the purposes of this documentation set, bias-free is defined as language that does not imply discrimination based on age, disability, gender, racial identity, ethnic identity, sexual orientation, socioeconomic status, and intersectionality. Exceptions may be present in the documentation due to language that is hardcoded in the user interfaces of the product software, language used based on RFP documentation, or language that is used by a referenced third-party product. Learn more about how Cisco is using Inclusive Language.
- Updated:
- June 24, 2014
Chapter: NX-API
NX-API
About NX-API
On Cisco Nexus devices, command-line interfaces (CLIs) are run only on the device. NX-API improves the accessibility of these CLIs by making them available outside of the switch by using HTTP/HTTPS. You can use this extension to the existing Cisco Nexus CLI system on the Cisco Nexus 9000 Series devices. NX-API supports show commands, configurations, and Linux Bash.
NX-API supports JSON-RPC.
Transport
NX-API uses HTTP/HTTPS as its transport. CLIs are encoded into the HTTP/HTTPS POST body.
The NX-API backend uses the Nginx HTTP server. The Nginx process, and all of its children processes, are under Linux cgroup protection where the CPU and memory usage is capped. If the Nginx resource usage exceeds the cgroup limitations, the Nginx process is restarted and restored.
Message Format
NX-API is an enhancement to the Cisco Nexus 9000 Series CLI system, which supports XML output. NX-API also supports JSON output format for specific commands.
 Note |
|
Security
NX-API supports HTTPS. All communication to the device is encrypted when you use HTTPS.
NX-API is integrated into the authentication system on the device. Users must have appropriate accounts to access the device through NX-API. NX-API uses HTTP basic authentication. All requests must contain the username and password in the HTTP header.
Note | You should consider using HTTPS to secure your user's login credentials. |
You can enable NX-API by using the feature manager CLI command. NX-API is disabled by default.
NX-API provides a session-based cookie, nxapi_auth when users first successfully authenticate. With the session cookie, the username and password are included in all subsequent NX-API requests that are sent to the device. The username and password are used with the session cookie to bypass performing the full authentication process again. If the session cookie is not included with subsequent requests, another session cookie is required and is provided by the authentication process. Avoiding unnecessary use of the authentication process helps to reduce the workload on the device.
Note | A nxapi_auth cookie expires in 600 seconds (10 minutes). This value is a fixed and cannot be adjusted. |
Note | NX-API performs authentication through a programmable authentication module (PAM) on the switch. Use cookies to reduce the number of PAM authentications, which reduces the load on the PAM. |
Using NX-API
The commands, command type, and output type for the Cisco Nexus 9000 Series devices are entered using NX-API by encoding the CLIs into the body of a HTTP/HTTPs POST. The response to the request is returned in XML or JSON output format.
Note | For more details about NX-API response codes, see Table of NX-API Response Codes. |
You must enable NX-API with the feature manager CLI command on the device. By default, NX-API is disabled.
The following example shows how to configure and launch the NX-API Sandbox:
-
Enable the
management interface.
switch# conf t
switch(config)# interface mgmt 0
switch(config)# ip address 198.51.100.1/24
switch(config)# vrf context managment
switch(config)# ip route 203.0.113.1/0 1.2.3.1
-
Enable the NX-API
nxapi feature.
switch# conf t
switch(config)# feature nxapi
The following example shows a request and its response in XML format:
Request:
<?xml version="1.0" encoding="ISO-8859-1"?>
<ins_api>
  <version>0.1</version>
  <type>cli_show</type>
  <chunk>0</chunk>
  <sid>session1</sid>
  <input>show switchname</input>
  <output_format>xml</output_format>
</ins_api>
Response:
<?xml version="1.0"?>
<ins_api>
  <type>cli_show</type>
  <version>0.1</version>
  <sid>eoc</sid>
  <outputs>
    <output>
      <body>
        <hostname>switch</hostname>
      </body>
      <input>show switchname</input>
      <msg>Success</msg>
      <code>200</code>
    </output>
  </outputs>
</ins_api>
The following example shows a request and its response in JSON format:
Request:
{
    "ins_api": {
        "version": "0.1",
        "type": "cli_show",
        "chunk": "0",
        "sid": "session1",
        "input": "show switchname",
        "output_format": "json"
    }
}
Response:
{
    "ins_api": {
        "type": "cli_show",
        "version": "0.1",
        "sid": "eoc",
        "outputs": {
            "output": {
                "body": {
                    "hostname": "switch"
                },
                "input": "show switchname",
                "msg": "Success",
                "code": "200"
            }
        }
    }
}
- Sample NX-API Scripts
- NX-API Sandbox
- NX-API Management Commands
- NX-API Request Elements
- NX-API Response Elements
Sample NX-API Scripts
The sample scripts demonstrate how a script is used with NX-API. The scripts are available at https://github.com/datacenter/nexus9000/tree/master/nx-os/nxapi/check_cable.
NX-API Sandbox
The NX-API Sandbox is the web-based user interface that you use to enter the commands, command type, and output type for the Cisco Nexus 9000 Series device using HTTP/HTTPS. After posting the request, the output response is displayed.
Note | When using the NX-API Sandbox, Cisco recommends that you use the Firefox browser, release 24.0 or later. |
You must enable NX-API with the feature manager CLI command on the switch and use a browser to use the NX-API Sandbox. By default, NX-API is disabled.
The following example shows how to configure and launch the NX-API Sandbox:
-
Enable the
management interface.
switch# conf t
switch(config)# interface mgmt 0
switch(config)# ip address 198.51.100.1/24
switch(config)# vrf context managment
switch(config)# ip route 203.0.113.1/0 1.2.3.1
-
Enable the NX-API
nxapi feature.
switch# conf t
switch(config)# feature nxapi
- Open a browser and enter http://mgmt-ip to launch the NX-API Sandbox. The following figure is an example of a request and output response.
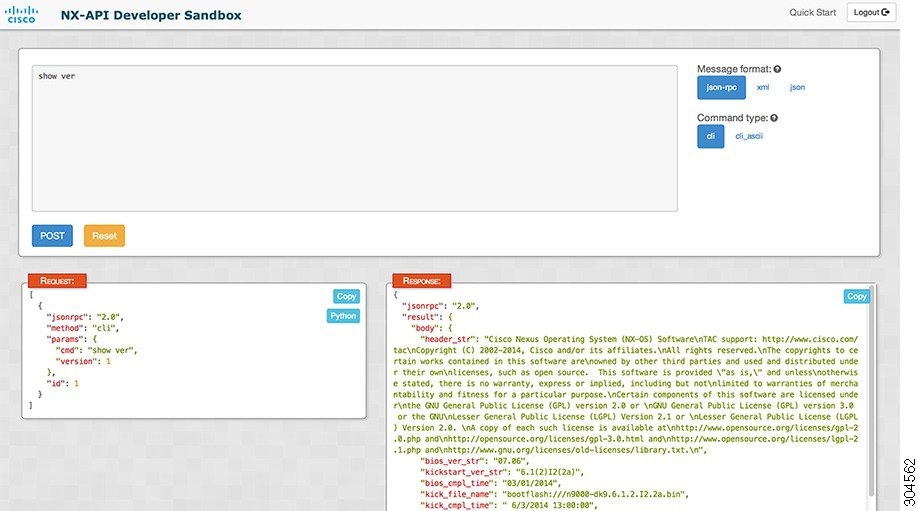
In the NX-API Sandbox, you specify the commands, command type, and output type in the top pane. Click the POST Request button above the left pane to post the request. Brief descriptions of the request elements are displayed below the left pane.
After the request is posted, the output response is displayed in the right pane.
The following sections describe the commands to manage NX-API and descriptions of the elements of the request and the output response.
NX-API Management Commands
You can enable and manage NX-API with the CLI commands listed in the following table.
| NX-API Management Command | Description |
|---|---|
|
feature nxapi |
Enables NX-API. |
|
no feature nxapi |
Disables NX-API. |
|
nxapi {http|https} port port |
Specifies a port. |
|
no nxapi {http|https} |
Disables HTTP/HTTPS. |
|
show nxapi |
Displays port information. |
|
nxapi certificate {httpscrt |httpskey} |
Specifies the upload of the following: |
|
nxapi certificate enable |
Enables a certificate. |
NX-API Request Elements
NX-API request elements are sent to the device in XML format or JSON format. The HTTP header of the request must identify the content type of the request.
You use the NX-API elements that are listed in the following table to specify a CLI command:
NX-API Response Elements
The NX-API elements that respond to a CLI command are listed in the following table:
|
NX-API Response Element |
Description |
|---|---|
|
version |
NX-API version. |
|
type |
Type of command to be executed. |
|
sid |
Session ID of the response. This element is valid only when the response message is chunked. |
|
outputs |
Tag that encloses all command outputs. When multiple commands are in cli_show or cli_show_ascii, each command output is enclosed by a single output tag. When the message type is cli_conf or bash, there is a single output tag for all the commands because cli_conf and bash commands require context. |
|
output |
Tag that encloses the output of a single command output. For cli_conf and bash message types, this element contains the outputs of all the commands. |
|
input |
Tag that encloses a single command that was specified in the request. This element helps associate a request input element with the appropriate response output element. |
|
body |
Body of the command response. |
|
code |
Error code returned from the command execution. NX-API uses standard HTTP error codes as described by the Hypertext Transfer Protocol (HTTP) Status Code Registry (http://www.iana.org/assignments/http-status-codes/http-status-codes.xhtml). |
|
msg |
Error message associated with the returned error code. |
 Feedback