Cisco Nexus 1010 Software Configuration Guide, Release 4.2(1)SP1(4)
Bias-Free Language
The documentation set for this product strives to use bias-free language. For the purposes of this documentation set, bias-free is defined as language that does not imply discrimination based on age, disability, gender, racial identity, ethnic identity, sexual orientation, socioeconomic status, and intersectionality. Exceptions may be present in the documentation due to language that is hardcoded in the user interfaces of the product software, language used based on RFP documentation, or language that is used by a referenced third-party product. Learn more about how Cisco is using Inclusive Language.
- Updated:
- February 20, 2012
Chapter: Migrating a VSM
Migrating a VSM
This chapter describes how to move or migrate a VSM to the Cisco Nexus 1010 product family, and includes the following sections:
•![]() Information About Migrating a VSM
Information About Migrating a VSM
•![]() Migrating a VSM to the Cisco Nexus 1010
Migrating a VSM to the Cisco Nexus 1010
•![]() Feature History for Migration
Feature History for Migration
Information About Migrating a VSM
After you have installed the Cisco Nexus 1010 or Cisco Nexus 1010-X, you can move, or migrate, your VSMs from virtual machines to the Cisco Nexus 1010 or Cisco Nexus 1010-X.
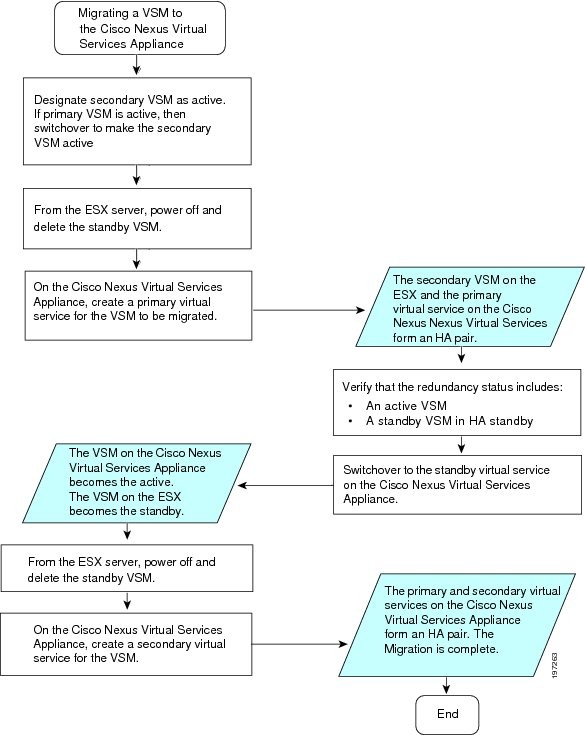
Figure 5-1 shows the process for migrating a VSM to the Cisco Nexus 1010.

Note ![]() Figure 5-1 assumes that the standby state VSM on the ESX is also assigned the secondary HA role. If your standby state VSM is assigned the primary role, then reverse the roles in the flow chart.
Figure 5-1 assumes that the standby state VSM on the ESX is also assigned the secondary HA role. If your standby state VSM is assigned the primary role, then reverse the roles in the flow chart.
Figure 5-1 Migrating a VSM to the Cisco Nexus 1010
Guidelines and Limitations
Follow these guidelines and limitations when moving or migrating a VSM from a virtual machine to the Cisco Nexus 1010:
•![]() You must use the same management VLAN for both the VSM that you are migrating and the Cisco Nexus 1010.
You must use the same management VLAN for both the VSM that you are migrating and the Cisco Nexus 1010.
•![]() You must use the same RAM size and disk size for the virtual service as those used for the VSM virtual machine.
You must use the same RAM size and disk size for the virtual service as those used for the VSM virtual machine.
Migrating a VSM to the Cisco Nexus 1010
Use this procedure to move, or migrate, a VSM to the Cisco Nexus 1010 without service interruption.
BEFORE YOU BEGIN
Before beginning this procedure, you must know or do the following:
•![]() You have installed a primary and secondary Cisco Nexus 1010 in HA mode.
You have installed a primary and secondary Cisco Nexus 1010 in HA mode.
•![]() You are logged in to the CLI of the Cisco Nexus 1010 in EXEC mode.
You are logged in to the CLI of the Cisco Nexus 1010 in EXEC mode.
•![]() You know the name of the VSM that you want to move or migrate from the ESX.
You know the name of the VSM that you want to move or migrate from the ESX.
•![]() The Cisco Nexus 1000V software must already be installed and upgraded to Release 4.2(1)SV1(5.1) on the ESX server.
The Cisco Nexus 1000V software must already be installed and upgraded to Release 4.2(1)SV1(5.1) on the ESX server.
–![]() For information about installing the software, see the Cisco Nexus 1000V Software Installation Guide, Release 4.2(1)SV1(4a).
For information about installing the software, see the Cisco Nexus 1000V Software Installation Guide, Release 4.2(1)SV1(4a).
–![]() For information about upgrading see the Cisco Nexus 1000V Software Upgrade Guide, Release 4.2(1)SV1(5.1)
For information about upgrading see the Cisco Nexus 1000V Software Upgrade Guide, Release 4.2(1)SV1(5.1)
•![]() When creating the secondary virtual service, use the same information that you used for the primary VSM for the following:
When creating the secondary virtual service, use the same information that you used for the primary VSM for the following:
–![]() ISO filename
ISO filename
–![]() Management IP address
Management IP address
–![]() Domain ID
Domain ID
–![]() Hostname
Hostname
–![]() Default gateway
Default gateway
–![]() Control and packet VLAN IDs
Control and packet VLAN IDs
Note ![]() If you use a value that results in a mismatch with the ESX, then the synchronization between the ESX and the Cisco Nexus 1010 overwrites your configuration on the Cisco Nexus 1010.
If you use a value that results in a mismatch with the ESX, then the synchronization between the ESX and the Cisco Nexus 1010 overwrites your configuration on the Cisco Nexus 1010.
•![]() When creating the secondary virtual service, use the same information used for the VSM VM for the following:
When creating the secondary virtual service, use the same information used for the VSM VM for the following:
–![]() RAM size
RAM size
–![]() Disk size
Disk size
•![]() Designate the secondary VSM as active. If primary VSM is active, then change it to make the secondary VSM active
Designate the secondary VSM as active. If primary VSM is active, then change it to make the secondary VSM active
DETAILED STEPS
Step 1 ![]() From the ESX vSphere client, right-click the standby VSM and choose power off from the popup menu.
From the ESX vSphere client, right-click the standby VSM and choose power off from the popup menu.
The standby VSM is powered off.
Step 2 ![]() From the ESX vSphere client, right-click the standby VSM and choose delete from disk from the popup menu.
From the ESX vSphere client, right-click the standby VSM and choose delete from disk from the popup menu.
The standby VSM is removed from the ESX server. Only the primary VSM is active on the ESX server with modules attached.
Step 3 ![]() From the CLI of the active Cisco Nexus 1010, use the following commands to create a primary virtual service for the VSM that you want to migrate. Use the same information that you used to create the secondary VSM.
From the CLI of the active Cisco Nexus 1010, use the following commands to create a primary virtual service for the VSM that you want to migrate. Use the same information that you used to create the secondary VSM.
config t
virtual service blade name
ram
virtual-service-blade-type new new iso filename
enable primary
Example:
switch# config t
switch(config)# virtual-service-blade VB-1
switch(config-vsb-config)# virtual-service-blade-type new new dcos_vsm.iso
switch(config-vsb-config)# ramsize 2048
switch(config-vsb-config)# disksize 4
switch(config-vsb-config)# interface control vlan 1322
switch(config-vsb-config)# interface packet vlan 1323
switch(config-vsb-config)# enable primary
Enter domain id[1-4095]: 1322
Management IP version [V4/V6]: [V4]
Enter Management IP address: 10.78.109.67
Enter Management subnet mask: 255.255.255.224
IPv4 address of the default gateway: 10.78.109.65
Enter HostName: switch
Enter the password for 'admin': xz35vb1zx
switch(config-vsb-config)#
Step 4 ![]() Verify that the configuration is complete.
Verify that the configuration is complete.
show virtual-service-blade summary
Example:
switch(config-vsb-config)# show virtual-service-blade summary
-------------------------------------------------------------------------------
Name Role State Nexus1010-Module
-------------------------------------------------------------------------------
VB-1 PRIMARY VSB DEPLOY IN PROGRESS Nexus1010-PRIMARY
VB-1 SECONDARY VSB NOT PRESENT Nexus1010-SECONDARY
Example:
switch(config-vsb-config)# show virtual-service-blade summary
-------------------------------------------------------------------------------
Name Role State Nexus1010-Module
-------------------------------------------------------------------------------
VB-1 PRIMARY VSB POWERED ON Nexus1010-PRIMARY
VB-1 SECONDARY VSB NOT PRESENT Nexus1010-SECONDARY
Once you have created the virtual service on the primary Cisco Nexus 1010, an HA pair forms between the secondary VSM on the ESX and the primary virtual service on the Cisco Nexus 1010.
Step 5 ![]() From the CLI of the secondary VSM on the ESX, use the following command to verify the redundancy status of the VSMs.
From the CLI of the secondary VSM on the ESX, use the following command to verify the redundancy status of the VSMs.
show system redundancy status
If the output indicates the following, then you can proceed with a system switchover.
•![]() The presence of an active VSM
The presence of an active VSM
•![]() The presence of a standby VSM in the HA standby redundancy state
The presence of a standby VSM in the HA standby redundancy state
Example:
switch# show system redundancy status
Redundancy role
---------------
administrative: primary
operational: primary
Redundancy mode
---------------
administrative: HA
operational: HA
This supervisor (sup-1)
-----------------------
Redundancy state: Standby
Supervisor state: HA standby
Internal state: HA standby
Other supervisor (sup-2)
------------------------
Redundancy state: Active
Supervisor state: Active
Internal state: Active with HA standby
Step 6 ![]() From the CLI of the secondary VSM on the ESX server, use the following command to initiate a manual switchover to the standby virtual service on the Cisco Nexus 1010.
From the CLI of the secondary VSM on the ESX server, use the following command to initiate a manual switchover to the standby virtual service on the Cisco Nexus 1010.
system switchover
Example:
switch# system switchover
----------------------------
2009 Mar 31 04:21:56 n1000v %$ VDC-1 %$ %SYSMGR-2-HASWITCHOVER_PRE_START:
This supervisor is becoming active (pre-start phase).
2009 Mar 31 04:21:56 n1000v %$ VDC-1 %$ %SYSMGR-2-HASWITCHOVER_START:
This supervisor is becoming active.
2009 Mar 31 04:21:57 n1000v %$ VDC-1 %$ %SYSMGR-2-SWITCHOVER_OVER: Switchover completed.
2009 Mar 31 04:22:03 n1000v %$ VDC-1 %$ %PLATFORM-2-MOD_REMOVE: Module 1 removed (Serial
number )
switch#
Before continuing with the next step, wait until the switchover completes and the standby supervisor becomes active.
The following occurs when the switchover is complete:
•![]() The VSM on the ESX reboots.
The VSM on the ESX reboots.
•![]() The virtual service configuration on the Cisco Nexus 1010 is overwritten to match what is on the VSM on the ESX.
The virtual service configuration on the Cisco Nexus 1010 is overwritten to match what is on the VSM on the ESX.
The primary virtual service on the Cisco Nexus 1010 is now the active VSM.
Step 7 ![]() From the ESX vCenter client, right-click the standby VSM and choose power off from the popup menu.
From the ESX vCenter client, right-click the standby VSM and choose power off from the popup menu.
The standby VSM is powered off.
Step 8 ![]() From the ESX vCenter client, right-click the standby VSM and choose delete from disk from the popup menu.
From the ESX vCenter client, right-click the standby VSM and choose delete from disk from the popup menu.
The standby VSM is removed from the ESX server.
Step 9 ![]() From the CLI of the active Cisco Nexus 1010, use the following commands to create a new secondary virtual service. Use the same information that you used to create the primary virtual service.
From the CLI of the active Cisco Nexus 1010, use the following commands to create a new secondary virtual service. Use the same information that you used to create the primary virtual service.
config t
virtual service blade name
enable primary
After you enter these commands, the Cisco Nexus 1010 prompts you for additional information.
Once you have created the secondary virtual service on the active Cisco Nexus 1010, an HA pair is formed between the primary virtual service and the secondary virtual service on the Cisco Nexus 1010.
Example:
switch# config t
switch(config)# virtual-service-blade VB-1
switch(config-vsb-config)# enable secondary
Enter vsb image: [dcos_vsm.iso]
Enter domain id[1-4095]: 1322
Management IP version [V4/V6]: [V4]
Enter Management IP address: 10.78.109.67
Enter Management subnet mask length: 27
IPv4 address of the default gateway: 10.78.109.65
Enter HostName: switch
Enter the password for 'admin': xz35vb1zx
Step 10 ![]() Verify that the configuration is complete.
Verify that the configuration is complete.
show virtual-service-blade summary
Example:
switch(config-vsb-config)# show virtual-service-blade summary
-------------------------------------------------------------------------------
Name Role State Nexus1010-Module
-------------------------------------------------------------------------------
VB-1 PRIMARY VSB POWERED ON Nexus1010-PRIMARY
VB-1 SECONDARY VSB DEPLOY IN PROGRESS Nexus1010-SECONDARY
Example:
switch(config-vsb-config)# show virtual-service-blade summary
-------------------------------------------------------------------------------
Name Role State Nexus1010-Module
-------------------------------------------------------------------------------
VB-1 PRIMARY VSB POWERED ON Nexus1010-PRIMARY
VB-1 SECONDARY VSB POWERED ON Nexus1010-SECONDARY
Step 11 ![]() You have completed this procedure.
You have completed this procedure.
The VSM is migrated from the ESX host to the Cisco Nexus 1010.
Verifying the Migration
To verify the migration, use the following commands:
|
|
|
|---|---|
show virtual-service-blade summary |
Displays the redundancy state (active or standby) and the redundancy role (primary or secondary) for each virtual service. |
show system redundancy status |
Displays the redundancy state (active or standby) and the redundancy role (primary or secondary) for the Cisco Nexus 1010s. See Example 5-2. |
Example 5-1 Virtual Service Blade Configuration
These examples show how to display and verify virtual service blades during and after migration:
switch(config-vsb-config)# show virtual-service-blade summary
-------------------------------------------------------------------------------
Name Role State Nexus1010-Module
-------------------------------------------------------------------------------
VB-1 PRIMARY VSB NOT PRESENT Nexus1010-PRIMARY
VB-1 SECONDARY VSB DEPLOY IN PROGRESS Nexus1010-SECONDARY
switch(config-vsb-config)# show virtual-service-blade summary
-------------------------------------------------------------------------------
Name Role State Nexus1010-Module
-------------------------------------------------------------------------------
VB-1 PRIMARY VSB NOT PRESENT Nexus1010-PRIMARY
VB-1 SECONDARY VSB POWERED ON Nexus1010-SECONDARY
Example 5-2 System Configuration
This example shows how to display and verify the system configuration during migration:
switch# show system redundancy status
Redundancy role
---------------
administrative: primary
operational: primary
Redundancy mode
---------------
administrative: HA
operational: HA
This supervisor (sup-1)
-----------------------
Redundancy state: Standby
Supervisor state: HA standby
Internal state: HA standby
Other supervisor (sup-2)
------------------------
Redundancy state: Active
Supervisor state: Active
Internal state: Active with HA standby
Additional References
For additional information related to implementing system-level HA features, see the following sections:
•![]() MIBs
MIBs
•![]() RFCs
RFCs
Related Documents
Standards
|
|
|
|---|---|
No new or modified standards are supported by this feature, and support for existing standards has not been modified by this feature. |
— |
MIBs
|
|
|
|---|---|
No MIBs are supported by this feature |
RFCs
|
|
|
|---|---|
No RFCs are supported by this feature |
— |
Feature History for Migration
This section provides the migration feature release history.
|
|
|
|
|---|---|---|
VSM migration |
4.0(4)SP1(1) |
This feature was introduced. |
 Feedback