Cisco Nexus 1000V VEM Software Installation and Upgrade Guide, Release 4.0(4)SV1(2)
Available Languages
Table Of Contents
Cisco Nexus 1000V VEM Software Installation and Upgrade Guide, Release 4.0(4)SV1(2)
Information About the Virtual Ethernet Module
Introduction to Cisco Nexus 1000V and the Virtual Ethernet Module
Information About VEM Software for VMware Patch Releases
Flow Chart:
Installing the VEM Software on an ESX HostUsing the vCLI to Install the VEM Software
Manually Installing the VEM Software
Obtaining Documentation and Submitting a Service Request
Cisco Nexus 1000V VEM Software Installation and Upgrade Guide, Release 4.0(4)SV1(2)
Revised: March 7, 2011OL-20459-02Use this document and your VMware documentation to install software on the Cisco Nexus 1000V Virtual Ethernet Module (VEM) on a VMware ESX or ESXi 4.0 server. The following methods can be used to install VEM software:
•
VMware Update Manager (VUM)
•
•

Note
Note
This document includes the following topics:
•
•
•
•
•
Audience
This document is for use by experienced server administrators who configure and maintain server software. Table 1 describes the roles of server administrator and network administrator.
This document includes instructions for installing new VEM software as a fresh install or after upgrading the VSM software to a new version.
To install the Virtual Supervisor Module (VSM), see the Cisco Nexus 1000V Software Installation Guide, Release 4.0(4)SV1(2).
For detailed information about upgrading the software on the VSM and VEM, see the Cisco Nexus 1000V Software Upgrade Guide, Release 4.0(4)SV1(2).
Information About the Virtual Ethernet Module
This section provides information about the Virtual Ethernet Module and includes the following topics:
•
•
Introduction to Cisco Nexus 1000V and the Virtual Ethernet Module
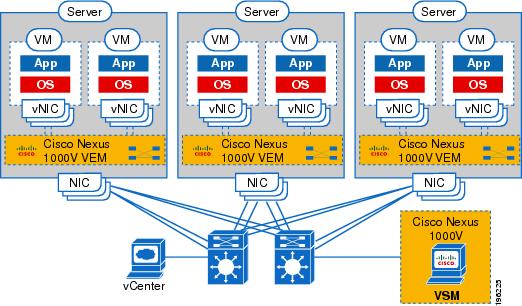
Cisco and VMware jointly designed APIs that produced the Cisco Nexus 1000V. The Cisco Nexus 1000V is a distributed virtual switch solution that is fully integrated within the VMware virtual infrastructure, including VMware vCenter for the virtualization administrator. This solution off loads the configuration of the virtual switch and port groups to the network administrator to enforce a consistent data center network policy.
The Cisco Nexus 1000V has the following components that can virtually emulate a 66-slot modular Ethernet switch with redundant supervisor functions:
•
–
–
–
•
–
–
–
–
–
Active-standby VSMs increase high availability.
In the Cisco Nexus 1000V, traffic is switched between virtual machines locally at each VEM instance. Each VEM also interconnects the local virtual machine with the rest of the network through the upstream access-layer network switch (blade, top-of-rack, end-of-row, and so forth). The VSM runs the control plane protocols and configures the state of each VEM accordingly, but it never forwards packets.
In Cisco Nexus 1000V, modules are numbered as follows:
•
•
•
NIC ports are 3/1 and 3/2.The ports to which the virtual NIC interfaces connect are virtual ports on the Cisco Nexus 1000V where they are assigned a global number.
Figure 1 shows an example of the Cisco Nexus 1000V distributed architecture.
Figure 1 Cisco Nexus 1000V Distributed Switching Architecture
Obtaining VEM Software
VEM software can be obtained from the sources shown in Table 2.
Table 2 Obtaining VEM Software
VUM
If you are using VUM, then VUM obtains the VEM software from the VSM through the web server hosted on the VSM. After obtaining it, VUM installs the VEM software either during the VSM Add Host operation on the Cisco Nexus 1000V DVS, or after the VEM software is updated on the VSM.1
VSM
After the VSM has been installed as a VM, copy the file containing the VEM software from the VSM homepage using the following url:
http://VSM_IP_Address/
VMware
Download the VEM software from the VMware website.
Click Download Vmware vSphere 4 Enterprise Plus > Download
Download the VMware patches if you are utilizing VMware releases with patches.
Cisco
Download the VEM software from the Cisco website.
1 vCenter Update Manager 4.0 does not list Cisco Nexus 1000V patches or updates, but you can add a Cisco Nexus 1000V patch source using the VMware knowledge base procedure at the following url:
http://kb.vmware.com/selfservice/microsites/search.do?language=en_US&cmd=displayKC&externalId=1013134
vCenter Update Manager 4.0 Update 1 does not have this limitation.
VEM Installation Methods
VEM software can be installed using your VMware documentation. Table 3 lists the methods for installing software on a VEM.
Table 3 Cisco Nexus 1000V VEM Software Installation Methods
VMware Virtual CLI (vCLI)
X
X
Remote Login Manual Installation
X
X1
X
X
1 SSH must be enabled on the host.
2 For installations, no action is required by the server administrator; VUM automatically installs the VEM software.
3 VUM will not install the VEM software on a host where the vCenter resides. The vCenter must be migrated to another host before installing VEM software.
Information About VEM Software for VMware Patch Releases
Cisco Nexus 1000V VEM software is updated to support VMware patch releases and is available on both the VMware and Cisco software download web sites.
The Cisco Nexus 1000V software posted on these web sites can be used for both installation and upgrade of the VEM for both the VMware Classic and VMware Embedded platforms with the following exception:
•
For information about installing software on an ESX or ESXi, see your VMware documentation.
For information about VEM software packages and compatibility, see the document, Cisco Nexus 1000V Compatibility Information, Release 4.0(4)SV1(2).
Prerequisites
Note
Note
Before installing the Cisco Nexus 1000V VEM software, you must know or do the following:
•
•
–
–
•
•
•
•
•
VUM automatically installs the VEM software.•
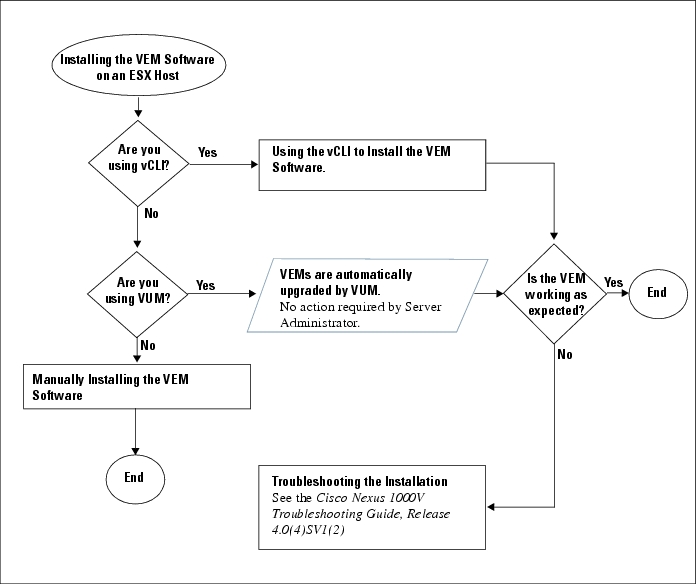
Flow Chart:
Installing the VEM Software on an ESX HostThe following flow chart is designed to be used as reference with "Using the vCLI to Install the VEM Software" section and "Manually Installing the VEM Software" section to guide you through the software installation process.
Figure 2 Installing the VEM Software on an ESX Host
Using the vCLI to Install the VEM Software
You can install the Cisco Nexus 1000V VEM software with vCLI on an ESXi host.
BEFORE YOU BEGIN
Before beginning this procedure, you must know or do the following:
Note
•
•
•
•
•
PROCEDURE
Step 1
[root@serialport -]# cd tmp[root@serialport tmp]#Step 2
[root@serialport tmp]# vihostupdate -i -b ./cisco-vem-v100-4.0.4.1.1.nn-0.4.nn.zip
--server fcs-visor1
Enter username: rootEnter password:Host updated successfully.[root@serialport tmp]#Step 3
[root@serialport tmp]# vihostupdate -q --server fcs-visor1Enter username: rootEnter password:-----Bulletin ID----- -----Installed----- ----------Summary----------VEM400-20904000-BG 2009-J4-TO6:02:56 A Cisco switch module for VMware ESX Server 4.0.0 systems[root@serialport tmp]#Step 4
•
•
You have completed this procedure.
Manually Installing the VEM Software
You can manually install the Cisco Nexus 1000V VEM software on an ESX host.
BEFORE YOU BEGIN
Before beginning this procedure, you must know or do the following:
Note
•
•
•
•
PROCEDURE
Step 1
[root@cos1-]# esxupdate -b ./cross_cisco-vem-v100-4.0.4.1.1.nn-0.4.nn-release.vib update
cross_cisco-vem-v100-4.0.4.1.1.nn-0.4.nn..   ################################### [100%]
Unpacking cross_cisco-vem-v100-esx_4.. ################################### [100%]Installing cisco-vem-v100-esx ################################### [100%]Running [/usr/sbin/vmkmod-install.sh]...ok.[root@cos1-]#This command loads the software manually onto the host, loads the kernel modules, and starts the VEM Agent on the running system.
Step 2
[root@cos1-]# vem statusVEM modules are loadedSwitch Name Num Ports Used Ports Configured Ports MTU UplinksvSwitch0 32 3 32 1500 vmnic0VEM Agent is running[root@cos1-]#Step 3
•
•
You have completed this procedure.
Step 4
Uninstalling the VEM Software
You can uninstall the Cisco Nexus 1000V software from a VEM.
BEFORE YOU BEGIN
Before beginning this procedure, you must know or do the following:
•
–
–
–
•
PROCEDURE
Step 1
This command removes the software from the host, removes the kernel modules, and stops the VEM Agent on the running system.
Example:[root@fcs-cos2 ~]# vem-remove -dWatchdog-vemdpa: Terminating watchdog with PID 6651Removing CIsco VEM VIB from COS systemRemoving VIB cross_cisco-vem-v100-esx_4.0.4.1.1.27-0.4.2Removing cisco-vem-v100-esx ############################### [100%]Running [/usr/sbin/vmkmod-install.sh]...Ok.root@fcs-cos2 ~]#Example:~ # vem-remove -dwatchdog-vemdpa: Terminating watchdog with PID 8815Removing Cisco VEM VIB from visor systemRemoving VIB cross_cisco-vem-v100-esx_4.0.4.1.1.27-0.4.2Removing packages :cisco-vem-v100-esx ########################### [100%]Running [/usr/sbin/vmkmod-install.sh]...ok.Cleaning up running visor system~ #Step 2
Example:[root@fcs-cos2 -]# esxupdate --vib-view query------------------VIB ID------------------ Package State -----------Timestamp------------cross_cisco-vem-v100-esx_4.0.4.1.1.27-0.4.2 retired 2009-07-02T15:26:45.994264-05:00root@fcs-cos2 -]#Example:~ # esxupdate --vib-view query------------------VIB ID------------------ Package State -----------Timestamp------------cross_cisco-vem-v100-esx_4.0.4.1.1.27-0.4.2 retired 2009-07-02T05:20:47.860404+00:00~ #Step 3
•
•
You have completed this procedure.
Related Documentation
Cisco Nexus 1000V includes the following documents available on Cisco.com:
General Information
Cisco Nexus 1000V Release Notes, Release 4.0(4)SV1(2)
Cisco Nexus 1000V Compatibility Information, Release 4.0(4)SV1(2)
Install and Upgrade
Cisco Nexus 1000V Software Installation Guide, Release 4.0(4)SV1(2)
Cisco Nexus 1000V VEM Software Installation and Upgrade Guide, Release 4.0(4)SV1(2)
Cisco Nexus 1000V Software Upgrade Guide, Release 4.0(4)SV1(2)
Configuration Guides
Cisco Nexus 1000V License Configuration Guide, Release 4.0(4)SV1(2)
Cisco Nexus 1000V Getting Started Guide, Release 4.0(4)SV1(2)
Cisco Nexus 1000V Interface Configuration Guide, Release 4.0(4)SV1(2)
Cisco Nexus 1000V Layer 2 Switching Configuration Guide, Release 4.0(4)SV1(2)
Cisco Nexus 1000V Port Profile Configuration Guide, Release 4.0(4)SV1(2)
Cisco Nexus 1000V Quality of Service Configuration Guide, Release 4.0(4)SV1(2)
Cisco Nexus 1000V Security Configuration Guide, Release 4.0(4)SV1(2)
Cisco Nexus 1000V System Management Configuration Guide, Release 4.0(4)SV1(2)
Cisco Nexus 1000V High Availability and Redundancy Configuration Guide, Release 4.0(4)SV1(2)
Cisco Nexus 1000V XML API User Guide, Release 4.0(4)SV1(2)
Programming Guide
Cisco Nexus 1000V XML API User Guide, Release 4.0(4)SV1(2)
Reference Guides
Cisco Nexus 1000V Command Reference, Release 4.0(4)SV1(2)
Cisco Nexus 1000V MIB Quick Reference
Troubleshooting and Alerts
Cisco Nexus 1000V Troubleshooting Guide, Release 4.0(4)SV1(2)
Cisco Nexus 1000V Password Recovery Guide
Cisco NX-OS System Messages Reference
Obtaining Documentation and Submitting a Service Request
For information about obtaining documentation, submitting a service request, and gathering additional information, see the monthly What's New in Cisco Product Documentation, which also lists all new and revised Cisco technical documentation.
Subscribe to the What's New in Cisco Product Documentation as a Really Simple Syndication (RSS) feed and set content to be delivered directly to your desktop using a reader application. The RSS feeds are a free service and Cisco currently supports RSS Version 2.0.
 Feedback
Contact Cisco
- Open a Support Case

- (Requires a Cisco Service Contract)