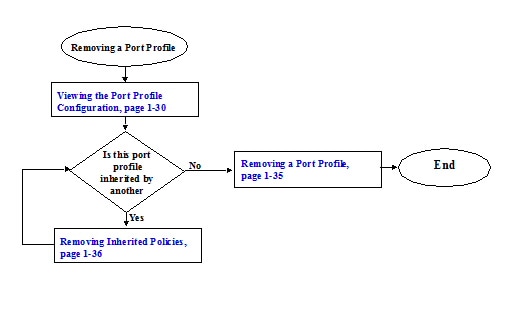
Removing a Port Profile
The following flow chart shows the procedures required to remove a port profile.
Before You Begin
- You are logged in to the CLI in configuration mode.
- You have configured the Nexus 1000V connection using the procedure in the document, Cisco Nexus 1000V Getting Started Guide, Release 4.0(4)SV1(1).
- The Nexus 1000V is connected to vCenter Server/ESX.
- You know whether another port profile inherits the characteristics of this port profile.
Note To find a port profile that most closely matches your current needs, use the procedure, Viewing the Port Profile Configuration.
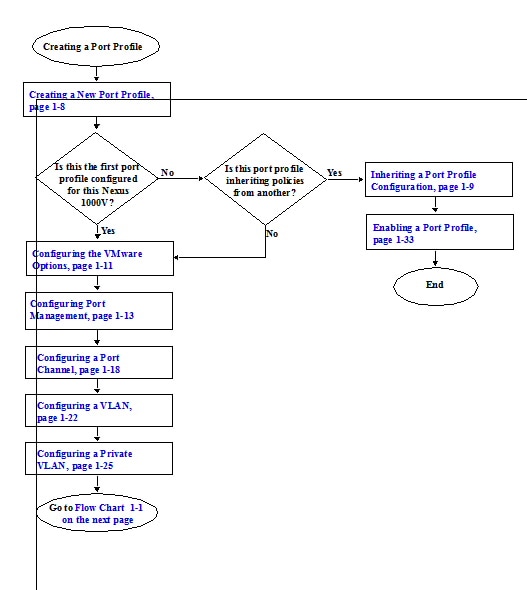
Creating a New Port Profile
Use this procedure to create a new port profile.
BEFORE YOU BEGIN
- You are logged in to the CLI in EXEC mode.
- You know the name that you want to give to this port profile. A name can be up to 80 characters but each port profile must have a unique name.
- You know whether the ports are going to be uplink ports.
Note If the port profile is configured as an uplink (capability uplink command), then it cannot be used to configure VMware virtual ports.
- You know whether the ports need to be initialized with system settings.
SUMMARY STEPS
1. config t
2. port-profile profilename
3. (Optional) description profiledescription
4. (Optional) capability {uplink | l3control}
5. show port-profile [brief | expand-interface | usage] [name <profile-name>]
6. copy running-config startup-config
DETAILED STEPS
|
|
|
Step 1 |
config t Example: n1000v# config t n1000v(config)# |
Places you in the CLI Global Configuration mode. |
Step 2 |
port-profile profilename Example: n1000v(config)# port-profile AccessProf n1000v(config-port-prof)# |
Places you into CLI Global Configuration mode for the specified port profile. The port profile name can be up to 80 characters and must be unique for each port profile on the Nexus 1000V. |
Step 3 |
description profiledescription Example: n1000v(config-port-prof)# description allaccess4 n1000v(config-port-prof)# |
Optional) Adds a description to the new port profile. This description is automatically pushed to the vCenter Server. profile description: up to 80 ASCII characters Note If the description includes spaces, it must be surrounded by quotations (“all access 4”). |
Step 4 |
capability {uplink | l3control} Example: n1000v(config-port-prof)# capability uplink n1000v(config-port-prof)# |
(Optional) Allows the port to be used as an uplink port. In vCenter Server, the port groups with uplink port profiles can be selected and assigned to physical ports (a vmnic or a pnic). Note If a port profile is configured as an uplink, then it cannot be used to configure VMware virtual ports. |
Step 5 |
show port-profile name profile-name Example: n1000v(config-port-prof)# show port-profile name AccessProf |
(Optional) Displays information about the port profile(s). |
Step 6 |
copy running-config startup-config Example: n1000v(config-port-prof)# copy running-config startup-config |
(Optional) Saves the running configuration persistently through reboots and restarts by copying it to the startup configuration. |
n1000v(config)# port-profile AccessProf
n1000v(config-port-prof)# description allaccess4
n1000v(config-port-prof)# capability uplink
n1000v(config-port-prof)# show port-profile name AccessProf
evaluated config attributes:
n1000v(config-port-prof)# copy running-config startup-config
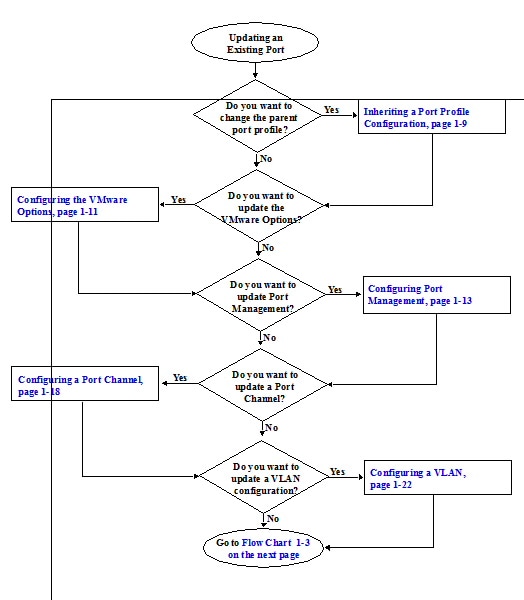
Inheriting a Port Profile Configuration
Use this procedure toinherit policies from an existing port profile configuration. This procedure takes the configuration of the inherited port profile and uses it as the default configuration for another profile.
Note To identify a port profile to inherit, examine the current profiles in your Nexus 1000V using the procedure, Viewing the Port Profile Configuration. and find one with characteristics that most closely match your current needs.
Before You Begin
- You are logged in to the CLI in EXEC mode.
- You are familiar with Table 1-2 showing which characteristics can be inherited and which cannot.
- You know the name of the existing port profile whose policies will be inherited.
SUMMARY STEPS
1. config t
2. port-profile profilename
3. inherit port-profile profilename
4. (Optional) capability {uplink | l3control}
5. show port-profile [brief | expand-interface | usage] [name <profile-name>]
6. copy running-config startup-config
Detailed Steps
|
|
|
Step 1 |
config t Example: n1000v# config t n1000v(config)# |
Places you in CLI Global Configuration mode. |
Step 2 |
port-profile profilename Example: n1000v(config)# port-profile AccessProf n1000v(config-port-prof)# |
Places you into CLI Global Configuration mode for the specified port profile. The port profile name can be up to 80 characters and must be unique for each port profile on the Nexus 1000V. |
Step 1 |
inherit port-profile portprofilename Example: n1000v(config-port-prof)#inherit port-profile mgmtNetwork n1000v(config-port-prof)# |
Adds the inherited configuration to the new port profile as a default configuration. Any inherited setting can be changed using the CLI. profile name: A name for the port profile whose policies are inherited. The name can be up to 80 characters and must be unique for each port profile on the Nexus 1000V. |
Step 2 |
show port-profile
n1000v(config-port-prof)# show port-profile
|
(Optional) Displays information about the profile that inherits and the profile that is inherited. |
Step 3 |
copy running-config startup-config Example: n1000v(config-port-prof)# copy running-config startup-config |
(Optional) Saves the running configuration persistently through reboots and restarts by copying it to the startup configuration. |
Step 4 |
You have completed this procedure. If using a flow chart, return to the one that pointed you here:
|
n1000v(config)# port-profile AccessProf
n1000v(config-port-prof)# inherit port-profile mgmtNetwork
n1000v(config-port-prof)# show port-profile
switchport trunk allowed vlan 100-110
evaluated config attributes:
switchport trunk allowed vlan 100-110
inherit: port-profile mgmtNetwork
channel-group auto mode on
evaluated config attributes:
switchport trunk allowed vlan 100-110
channel-group auto mode on
assigned interfaces
Configuring the VMware Options
Use this procedure to designate that this is a VMware port profile.
BEFORE YOU BEGIN
- You are logged in to the CLI in EXEC mode.
- You know if you want the VMware port group to have the same name as the port profile; or if you are specifying an alternate name for the VMware port group.
- The vmware max-ports command is only available for non-uplink profiles.
- You know if you want to restrict the maximum number of ports that can be assigned to the port profile. If so, you know what the maximum number is.
SUMMARY STEPS
1. config t
2. port-profile profilename
3. vmware port-group [ pg_name ]
4. vmware max-ports number
5. show port-profile [brief | expand-interface | usage] [name < profile-name >]
6. copy running-config startup-config
DETAILED STEPS
|
|
|
Step 1 |
config t Example: n1000v# config t n1000v(config)# |
Places you in the CLI Global Configuration mode. |
Step 2 |
port-profile profilename Example: n1000v(config)# port-profile AccessProf n1000v(config-port-prof)# |
Places you into CLI Global Configuration mode for the specified port profile. The port profile name can be up to 80 characters and must be unique for each port profile on the Nexus 1000V. |
Step 3 |
vmware port-group [ pg_name ] Example: n1000v(config-port-prof)# vmware port-group n1000v(config-port-prof)# |
Designates the port-profile as a VMware port-group. The port profile is mapped to a VMware port group of the same name. When a vCenter Server connection is established, the port group created in Nexus 1000V is then distributed to the virtual switch on the vCenter Server. pg-name: Port group name. If you do not specify a pg-name, then the port group name will be the same as the port profile name. If you want to map the port profile to a different port group name, use the pg-name option followed by the alternate name. |
Step 4 |
vmware max-ports num Example: n1000v(config-port-prof)# vmware max-ports 5 n1000v(config-port-prof)# |
Designates the maximum number of ports that can be assigned to the non-uplink port profile. When the specified maximum number of ports is reached, no more ports can be assigned. The default is 32 ports. |
Step 5 |
show port-profile name profile-name Example: n1000v(config-port-prof)# show port-profile name AccessProf |
(Optional) Displays information about port profile(s). |
Step 6 |
copy running-config startup-config Example: n1000v(config-port-prof)# copy running-config startup-config |
(Optional) Saves the running configuration persistently through reboots and restarts by copying it to the startup configuration. |
n1000v(config)# port-profile AccessProf
n1000v(config-port-prof)# vmware port-group
n1000v(config-port-prof)# vmware max-ports 5
n1000v(config-port-prof)# show port-profile name AccessProf
evaluated config attributes:
n1000v(config-port-prof)#
Configuring Port Management
Use this procedure to configure port management, including access or trunk mode, and the administrative state for each port in the profile.
BEFORE YOU BEGIN
- You are logged in to the CLI in EXEC mode.
- You know whether you are configuring the port profile as an access port or trunk port.
– An access port transmits packets on only one, untagged VLAN. You specify which VLAN traffic that the interface carries, which becomes the access VLAN. If you do not specify a VLAN for an access port, that interface carries traffic only on the default VLAN. The default VLAN is VLAN1.
– A trunk port transmits untagged packets for the native VLAN; and encapsulated, tagged packets for all other VLANs.
- You know if you want to restrict the maximum number of ports that can be assigned to the port profile. If so, you know what the maximum number is.
SUMMARY STEPS
1. config t
2. port-profile profilename
3. switchport mode { access | trunk }
4. no shutdown
5. show port-profile [brief | expand-interface | usage] [name <profile-name>]
6. copy running-config startup-config
DETAILED STEPS
|
|
|
Step 1 |
config t Example: n1000v# config t n1000v(config)# |
Places you in the CLI Global Configuration mode. |
Step 2 |
port-profile profilename
n1000v(config)# port-profile AccessProf n1000v(config-port-prof)# |
Places you into CLI Global Configuration mode for the specified port profile. The port profile name can be up to 80 characters and must be unique for each port profile on the Nexus 1000V. |
Step 3 |
switchport mode { access | trunk } Example: n1000v(config-port-prof)# switchport mode access n1000v(config-port-prof)# |
In configuration mode for the new port profile, use the switchport mode command to designate the interfaces as either switch access ports (the default) or trunks. |
Step 4 |
no shutdown Example: n1000v(config-port-prof)# no shutdown n1000v(config-port-prof)# |
Administratively enables all ports in the profile. |
Step 5 |
show port-profile name profile-name Example: n1000v(config-port-prof)# show port-profile name AccessProf |
(Optional) Displays information about port profile(s). |
Step 6 |
copy running-config startup-config Example: n1000v(config-port-prof)# copy running-config startup-config |
(Optional) Saves the running configuration persistently through reboots and restarts by copying it to the startup configuration. |
n1000v(config)# port-profile AccessProf
n1000v(config-port-prof)# switchport mode access
n1000v(config-port-prof)# no shutdown
n1000v(config-port-prof)# show port-profile name AccessProf
evaluated config attributes:
n1000v(config-port-prof)#
Clearing a Port Management Policy from a Port Profile
Use this procedure to remove either the shutdown or switchport mode configuration from a port profile and change it to its default state. Removing the shutdown configuration changes the state of the port profile ports to shutdown. Removing the switchport mode converts the port profile ports to switch access ports.
BEFORE YOU BEGIN
- You are logged in to the CLI in EXEC mode.
- After removing the configuration for an attribute, then the attribute does not appear in show command output.
SUMMARY STEPS
1. config t
2. port-profile profilename
3. default {shutdown | switchport mode}
4. show port-profile [brief | expand-interface | usage] [name <profile-name>]
5. copy running-config startup-config
DETAILED STEPS
|
|
|
Step 1 |
config t Example: n1000v# config t n1000v(config)# |
Places you in the CLI Global Configuration mode. |
Step 2 |
port-profile profilename Example: n1000v(config)# port-profile AccessProf n1000v(config-port-prof)# |
Places you into CLI Global Configuration mode for the specified port profile. The port profile name can be up to 80 characters and must be unique for each port profile on the Nexus 1000V. |
Step 3 |
default {shutdown | switchport mode} Example: n1000v(config-port-prof)# default switchport mode n1000v(config-port-prof)# |
Removes either the shutdown attribute or the switchport mode attribute configuration from the port profile.
- shutdown: Reverts port profile ports to shutdown state
- switchport mode: Reverts port profile ports to switch access ports.
|
Step 4 |
show port-profile name profile-name Example: n1000v(config-port-prof)# show port-profile name AccessProf |
(Optional) Displays information about port profile(s). After removing an attribute’s configuration, the show command output does not display the attribute. |
n1000v(config)# port-profile AccessProf
n1000v(config-port-prof)# default shutdown
n1000v(config-port-prof)# show port-profile name AccessProf
evaluated config attributes:
n1000v(config-port-prof)#
Configuring a System Port Profile
Use this procedure to configure a system port profile for critical ports.
SUMMARY STEPS
1. config t
2. port-profile profilename
3. description profiledescription
4. system vlan vlan-id-list
5. show port-profile [brief | expand-interface | usage] [name <profile-name>]
6. copy running-config startup-config
DETAILED STEPS
|
|
|
Step 1 |
config t Example: n1000v# config t n1000v(config)# |
Places you in the CLI Global Configuration mode. |
Step 2 |
port-profile profilename Example: n1000v(config)# port-profile AccessProf n1000v(config-port-prof)# |
Places you into CLI Global Configuration mode for the specified port profile. The port profile name can be up to 80 characters and must be unique for each port profile on the Nexus 1000V. |
Step 3 |
description profiledescription Example: n1000v(config-port-prof)# description “System profile for critical ports” n1000v(config-port-prof)# |
Adds a description to the port profile. This description is automatically pushed to the vCenter Server. profile description: up to 80 ASCII characters Note If the description includes spaces, it must be surrounded by quotations. |
Step 4 |
system vlan vlan-id-list Example: n1000v(config-port-prof)# system vlan 114,115 n1000v(config-port-prof)# |
Adds the system vlan to this port profile. A system vlan is used to configure and bring up physical or veth ports before the VSM has established communication with the VEM. |
Step 5 |
show port-profile name profile-name Example: n1000v(config-port-prof)# show port-profile name AccessProf |
(Optional) Displays information about port profile(s). After removing an attribute’s configuration, the show command output does not display the attribute. |
n1000v# show port-profile
port-profile UplinkProfile1
description: System profile for critical ports
switchport trunk allowed vlan 110-119
evaluated config attributes:
switchport trunk allowed vlan 110-119
port-profile UplinkProfile2
switchport trunk allowed vlan 117
channel-group auto mode on
evaluated config attributes:
switchport trunk allowed vlan 117
channel-group auto mode on
n1000v# show running-config
port-profile UplinkProfile1
switchport trunk allowed vlan 110-119
port-profile UplinkProfile2
switchport trunk allowed vlan 117
channel-group auto mode on
Configuring a Port Channel
This section includes the following procedures:
Configuring a Port Channel Connecting to a Single Upstream Switch
Use this procedure to configure a port channel in a port profile when all ports in the goup are connected to the same upstream switch.
To configure a port channel in a port profile when the ports are connected to two different upstream switches, see the Configuring a Port Channel Connecting to Two Upstream Switches.
BEFORE YOU BEGIN
- You are logged in to the CLI in EXEC mode.
- The channel group number assignment is made automatically when the port profile is assigned to the first interface.
- The channel group mode is set to on.
SUMMARY STEPS
1. config t
2. port-profile profilename
3. channel-group auto mode { on | active | passive } [ sub-group cdp ]
4. show port-profile [brief | expand-interface | usage] [name <profile-name>]
5. copy running-config startup-config
DETAILED STEPS
|
|
|
Step 1 |
config t Example: n1000v# config t n1000v(config)# |
Places you in the CLI Global Configuration mode. |
Step 2 |
port-profile profilename Example: n1000v(config)# port-profile AccessProf n1000v(config-port-prof) |
Places you into Port Profile Configuration mode for the specified port profile. The port profile name can be up to 80 characters and must be unique for each port profile on the Nexus 1000V. |
Step 3 |
channel-group {auto} [mode {on | active | passive}] {sub-group cdp} Example: n1000v(config-port-prof)# channel-group auto mode on n1000v(config-port-prof)# |
Defines a channel group and saves it in the running configuration.
- auto: A unique port channel is created and automatically assigned when the port profile is assigned to the first interface. Each additional interface belonging to the same module is added to the same port-channel. In VMware environments, a different port channel is created for each module.
- mode : on, active, or passive
(active and passive use LACP)
- sub-group cdp : Identifies this channel group as asymmetric. CDP information is used to automatically create up to two subgroups for managing the traffic flow.
|
Step 4 |
show port-profile name profile-name Example: n1000v(config-port-prof)# show port-profile name AccessProf |
(Optional) Displays information about port profile(s). |
Step 5 |
copy running-config startup-config Example: n1000v(config-port-prof)# copy running-config startup-config |
(Optional) Saves the running configuration persistently through reboots and restarts by copying it to the startup configuration. |
n1000v(config)# port-profile AccessProf
n1000v(config-port-prof)# channel-group auto mode on
n1000v(config-port-prof)# show port-profile name AccessProf
channel-group auto mode on
evaluated config attributes:
channel-group auto mode on
n1000v(config-port-prof)#
Configuring a Port Channel Connecting to Two Upstream Switches
Use this procedure to configure the uplink port profile, to be used by the physical NICs in the VEM, in vPC-HM when the ports in the port channel connect to two different upstream switches.
To configure a port channel in a port profile when the ports are connected to a single upstream switch, see the Configuring a Port Channel.
BEFORE YOU BEGIN
- You are logged in to the CLI in EXEC mode.
- When you create a port channel, an associated channel group is automatically created.
- The channel group mode must be set to on.
- You know whether CDP is configured in the upstream switches. If so, then CDP creates a subgroup for each upstream switch to manage its traffic separately.
- If you are using CDP with the default CDP timer (60 seconds), links that advertise that they are in service and then out of service in quick succession can take up to 60 seconds to be returned to service.
- If CDP is not configured in the upstream switch, then you must manually configure subgroups to manage the traffic flow on the separate switches.
- If vPC-HM is not configured when port channels connect to two different upstream switches, then the VMs behind the Cisco Nexus 1000V receive duplicate packets from the network for broadcast/unknown floods/multicast.
- vPC-HM can also be configured on the interface. For more information, see the Cisco Nexus 1000V Interface Configuration Guide, Release 4.0(4)SV1(1).
SUMMARY STEPS
1. config t
2. port-profile profilename
3. channel-group auto mode { on | active | passive } [ sub-group cdp ]
4 Do one of the following
– If CDP is not configured for the upstream switch(es), then continue with the next step.
– If CDP is configured for the upstream switch(es), then go to Step 9..
5 exit
6 interface ethernet range
7 sub-group-id number
8 Repeat steps html#48159"> 6 and 7 for each port member connected to an upstream switch that is not configured for CDP.
9. show port-profile [brief | expand-interface | usage] [name <profile-name>]
10. copy running-config startup-config
DETAILED STEPS
|
|
|
Step 1 |
config t Example: n1000v# config t n1000v(config)# |
Places you in the CLI Global Configuration mode. |
Step 2 |
port-profile profilename Example: n1000v(config)# port-profile uplinkProf n1000v(config-port-prof)# |
Places you into Configuration mode for the specified port profile. The port profile name can be up to 80 characters and must be unique for each port profile on the Nexus 1000V. |
Step 3 |
channel-group { auto } [ mode { on | active | passive }] { sub-group cdp } Example: n1000v(config-port-prof)# channel-group auto mode on sub-group cdp n1000v(config-port-prof)# |
Defines a channel group for the specified port profile and saves it in the running configuration.
- auto: A unique port channel is created and automatically assigned when the port profile is assigned to the first interface. Each additional interface belonging to the same module is added to the same port-channel. In VMware environments, a different port channel is created for each module.
- mode: on
(Active and passive modes use LACP and are not supported for vPC-HM.)
- sub-group cdp : Identifies this channel group as asymmetric. CDP information is used to automatically create up to two subgroups for managing the traffic flow. If CDP is not configured in the upstream switch, then you must also configure subgroups manually.
|
Step 4 |
Do one of the following: – If CDP is not configured for both upstream switch(es), then continue with the next step. – If CDP is configured for both upstream switch(es), then go to Step 9. |
Step 5 |
exit Example: n1000v(config-if)# exit n1000v(config)# |
Exits the Interface Configuration mode for the port channel and returns you to Global Configuration mode. |
Step 6 |
interface ethernet range Example: n1000v(config)# interface ethernet3/2-3 n1000v(config-if)# |
Places you into Interface Configuration mode for the specified interface range. |
Step 7 |
sub-group id number Example: n1000v(config-if)# sub-group-id 0 n1000v(config-if)# |
Configures the specified port channel members as vPC-HM so that the specified subgoup can manage traffic for one of the two upstream switches. Allowable subgroup numbers = 0 or 1 |
Step 8 |
Repeat Step 6 and Step 7 for each port member connected to an upstream switch that is not configured for CDP. |
Step 9 |
show port-profile name profile-name Example: n1000v(config-port-prof)# show port-profile name AccessProf |
(Optional) Displays information about port profile(s). |
Step 10 |
copy running-config startup-config Example: n1000v(config-port-prof)# copy running-config startup-config |
(Optional) Saves the running configuration persistently through reboots and restarts by copying it to the startup configuration. |
n1000v(config)# port-profile uplinkProf
n1000v(config-port-prof)# channel-group auto mode on sub-group cdp
doc-n1000v(config-port-prof)# show port-profile name uplinkProf
channel-group auto mode on sub-group cdp
evaluated config attributes:
channel-group auto mode on sub-group cdp
n1000v(config-port-prof)# copy running-config startup-config
The following is an example of a port profile configuration where the ports connect to two different upstream switches. This port profile can be used with all ports configured in the channel.
n1000v(config)# port-profile up-system
n1000v(config-port-prof)# capability uplink
n1000v(config-port-prof)# vmware port-group
n1000v(config-port-prof)# switchport mode trunk
n1000v(config-port-prof)# switchport trunk allowed vlan 232,270-279
n1000v(config-port-prof)# channel-group auto mode on sub-group cdp
n1000v(config-port-prof)# no shutdown
n1000v(config-port-prof)# system vlan 232,270-271
n1000v(config-port-prof)# state enabled
Configuring a VLAN
Use this procedure to configure a VLAN for the port profile.
BEFORE YOU BEGIN
- You are logged in to the CLI in EXEC mode.
- You know whether the port profile is needed for trunks or access ports.
- You know the needed VLAN configuration for this port profile.
- The VLAN must already be created on the switch before you can configure it.
- You know the VLAN ID for the VLAN you are configuring.
- VLAN1 is the default VLAN. You cannot create, modify, or delete this VLAN.
- You know the supported VLAN ranges. Nexus 1000V supports up to 4094 VLANs in accordance with the IEEE 802.1Q standard. These VLANs are organized into ranges with different uses.
Table 1-1 describes the available VLAN ranges.
Table 1-1 VLAN Ranges
|
|
|
|
1 |
Normal |
Cisco default. You can use this VLAN, but you cannot modify or delete it. |
2–1005 |
Normal |
You can create, use, modify, and delete these VLANs. |
1006-4094 |
Extended |
You can create, name, and use these VLANs. You cannot change the following parameters:
- State is always active.
- VLAN is always enabled.
You cannot shut down these VLANs. |
3968-4047 and 4094 |
Internally allocated |
These 80 VLANs, plus VLAN 4094, are allocated for internal device use. You cannot create, delete, or modify any VLANs within the block reserved for internal use. |
SUMMARY STEPS
1. config t
2. port-profile profilename
3. Do one of the following:
- (Optional) switchport access vlan vlan-id-access
- (Optional) switchport trunk allowed vlan {allowed-vlans | add add-vlans | except except-vlans | remove remove-vlans | all | none}
4. switchport trunk native vlan vlan-id
5. show port-profile [brief | expand-interface | usage] [name <profile-name>]
6. copy running-config startup-config
DETAILED STEPS
|
|
|
Step 1 |
Do one of the following:
- If you are assigning this switchport to VLAN 1, the default, go to Step 10. No action is needed since this is the default configuration.
- Otherwise, continue with the next step.
|
Step 2 |
config t Example: n1000v# config t n1000v(config)# |
Places you in the CLI Global Configuration mode. |
Step 3 |
port-profile profilename Example: n1000v(config)# port-profile AccessProf n1000v(config-port-prof)# |
Places you into CLI Global Configuration mode for the specified port profile. The port profile name can be up to 80 characters and must be unique for each port profile on the Nexus 1000V. |
Step 4 |
Do one of the following:
- To assign a specific VLAN ID number to the access port, continue with the next step.
- Otherwise, go to Step 7.
|
Step 5 |
switchport access vlan vlan-id-access Example: n1000v(config-port-prof)# switchport access vlan 4 n1000v(config-port-prof)# |
Assigns a VLAN ID to the access port for this port profile. |
Step 6 |
Go to Step 10. |
Step 7 |
Do one of the following:
- To specify allowed VLAN IDs on the trunk port, continue with the next step.
- To set the trunking native characteristics when the interface is in trunking mode, go to Step 9.
- Otherwise. go to Step 10
|
Step 8 |
switchport trunk allowed vlan { allowed-vlans | add add-vlans | except except-vlans | remove remove-vlans | all | none} Example: n1000v(config-port-prof)# switchport trunk allowed vlan all n1000v(config-port-prof)# |
To specify allowed VLANs on the trunk port, in configuration mode for the new port profile, use the switchport trunk allowed vlan command followed by an option:
- allowed VLAN IDs
- add VLAN IDs
- except VLAN IDs
- remove VLAN IDs
- all
- none
|
Step 9 |
switchport trunk native vlan vlan-id Example: n1000v(config-port-prof)# switchport trunk native vlan 3 n1000v(config-port-prof)# |
Sets the trunking native characteristics when interface is in trunking mode. |
Step 10 |
show port-profile name profile-name Example: n1000v(config-port-prof)# show port-profile AccessProf |
(Optional) Displays information about port profile(s). |
Step 11 |
copy running-config startup-config Example: n1000v(config-port-prof)# copy running-config startup-config |
(Optional) Saves the running configuration persistently through reboots and restarts by copying it to the startup configuration. |
n1000v(config)# port-profile AccessProf
n1000v(config-port-prof)# switchport trunk allowed vlan all
n1000v(config-port-prof)# switchport trunk native vlan 3
n1000v(config-port-prof)# show port-profile name AccessProf
switchport trunk allowed vlan all
channel-group auto mode on
evaluated config attributes:
switchport trunk allowed vlan all
channel-group auto mode on
n1000v(config-port-prof)#
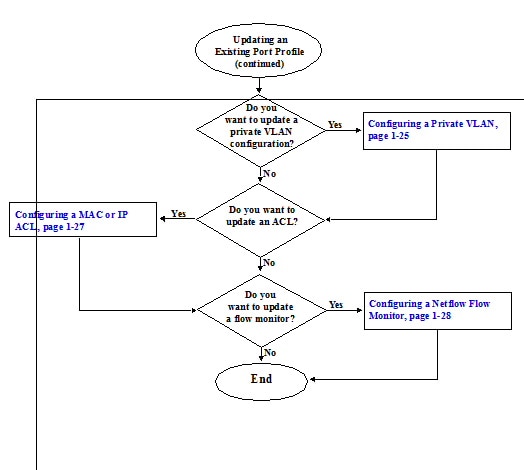
Configuring a Private VLAN
Use this procedure to configure the port profile to be used as a private VLAN.
For detailed information about private VLAN, see the document, Cisco Nexus 1000V Layer 2 Switching Configuration Guide, Release 4.0(4)SV1(1).
BEFORE YOU BEGIN
- You are logged in to the CLI in EXEC mode.
- You know the VLAN IDs for both the primary VLAN and the secondary VLAN in the private VLAN pair.
- You know whether this private VLAN inherits its configuration.
SUMMARY STEPS
1. config t
2. port-profile profilename
3. switchport mode private-vlan { host | promiscuous }
4. switchport private-vlan host-association primary-vlan secondary-vlans
5. switchport private-vlan mapping primary_vlan [add | remove] secondary_vlans
6. show port-profile [brief | expand-interface | usage] [name <profile-name>]
7. copy running-config startup-config
DETAILED STEPS
|
|
|
Step 1 |
config t Example: n1000v# config t n1000v(config)# |
Places you in the CLI Global Configuration mode. |
Step 2 |
port-profile profilename Example: n1000v(config)# port-profile AccessProf n1000v(config-port-prof)# |
Places you into CLI Global Configuration mode for the specified port profile. The port profile name can be up to 80 characters and must be unique for each port profile on the Nexus 1000V. |
Step 3 |
switchport mode private-vlan { host | promiscuous } Example: n1000v(config-port-prof)# switchport mode private-vlan promiscuous n1000v(config-port-prof)# |
To designate the port profile for use as a private VLAN, in configuration mode for the new port profile, use the switchport mode private-vlan command followed by the private VLAN policy (host or promiscuous).
- promiscuous: Promiscuous ports belong to the primary VLAN and communicate with the Layer 3 gateway. Promiscuous ports can communicate with any interface in the PVLAN domain, including those associated with secondary VLANs.
- host: Host ports belong to the secondary VLANs in the PVLAN pairs as one of the following:
– community PVLAN host port – isolated PVLAN host port |
Step 4 |
switchport private-vlan host-association primary-vlan secondary-vlans Example: n1000v(config-port-prof)# switchport private-vlan host-association 3 300 301 302 n1000v(config-port-prof)# |
Assigns the primary and secondary PVLAN IDs to the port profileand saves this association in the running configuration.
- primary: Each PVLAN has only one primary VLAN ID.
- secondary: Each PVLAN can have multiple secondary VLAN IDs.
|
Step 5 |
switchport private-vlan mapping primary_vlan
[add | remove] secondary_vlans Example: n1000v(config-port-prof)# switchport private-vlan mapping primary_vlan add 3 300 301 302 n1000v(config-port-prof)# |
Maps the PVLAN for the port profile and saves it in the running configuration. |
Step 6 |
show port-profile name profile-name Example: n1000v(config-port-prof)# show port-profile name AccessProf |
(Optional) Displays information about port profile(s). |
Step 7 |
copy running-config startup-config Example: n1000v(config-port-prof)# copy running-config startup-config |
(Optional) Saves the running configuration persistently through reboots and restarts by copying it to the startup configuration. |
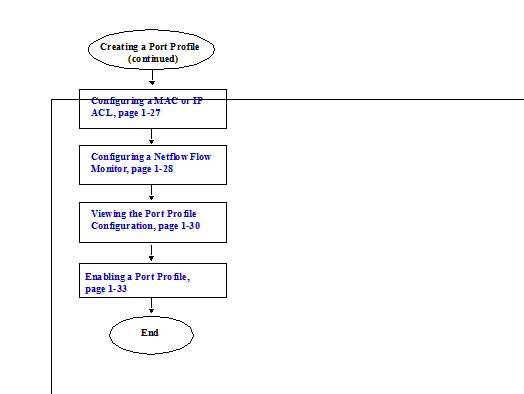
Configuring a MAC or IP ACL
Use this procedure to configure a MAC or an IP ACL for a port profile.
BEFORE YOU BEGIN
- You are logged in to the CLI in EXEC mode.
- You know the name of the IP or MAC access control list that you want to configure for this port profile.
- You know the direction of packet flow for the access list.
- For more information about ACLs, see the Cisco Nexus 1000V Security Configuration Guide, Release 4.0(4)SV1(1)
SUMMARY STEPS
1. config t
2. port-profile profilename
3. mac port access-group { acl_name | acl_dir }
ip port access-group { acl_name | acl_dir }
4. show port-profile [brief | expand-interface | usage] [name <profile-name>]
5. copy running-config startup-config
DETAILED STEPS
|
|
|
Step 1 |
config t Example: n1000v# config t n1000v(config)# |
Places you in the CLI Global Configuration mode. |
Step 2 |
port-profile profilename Example: n1000v(config)# port-profile AccessProf n1000v(config-port-prof)# |
Places you into CLI Global Configuration mode for the specified port profile. The port profile name can be up to 80 characters and must be unique for each port profile on the Nexus 1000V. |
Step 3 |
Do one of the following:
- If adding a MAC ACL, continue with the next step.
- If adding an IP ACL go to Step 5.
|
Step 4 |
mac port access-group { acl_name | acl_dir } Example: n1000v(config-port-prof)# mac port access-group allaccess4 out n1000v(config-port-prof)# Continue with Step 6. |
Adds a MAC ACL to the port profile and saves it in the running configuration.
- acl_name: The name of the ACL that you are adding to this port profile.
- acl_dir: The direction of packet flow, either inbound or outbound.
|
Step 5 |
ip port access-group { acl_name | acl_dir } Example: n1000v(config-port-prof)# ip flow access-group allaccess4 in n1000v(config-port-prof)# |
Adds the specified IP ACL to the port profile and saves it in the running configuration.
- acl_name: The name of the ACL that you are adding to this port profile.
- acl_dir: The direction of packet flow, either inbound or outbound.
|
Step 6 |
show port-profile name profile-name Example: n1000v(config-port-prof)# show port-profile name AccessProf |
(Optional) Displays the port profile configuration. |
Step 7 |
copy running-config startup-config Example: n1000v(config-port-prof)# copy running-config startup-config |
(Optional) Saves the running configuration persistently through reboots and restarts by copying it to the startup configuration. |
n1000v(config)# port-profile AccessProf
n1000v(config-port-prof)# mac port access-group allaccess4
n1000v(config-port-prof)# show port-profile name AccessProf
description: allaccess4 out
mac port access-group allaccess4 out
ip flow monitor allaccess4 in
evaluated config attributes:
mac port access-group allaccess4 out
ip flow monitor allaccess4 out
n1000v(config-port-prof)#
Configuring a Netflow Flow Monitor
Use this procedure to configure a Netflow flow monitor for the port profile.
BEFORE YOU BEGIN
- You are logged in to the CLI in EXEC mode.
- For more information about netflow, see the Cisco Nexus 1000V System Management Configuration Guide, Release 4.0(4)SV1(1)
SUMMARY STEPS
1. config t
2. port-profile profilename
3. ip flow monitor name {input | output}
4. show port-profile [brief | expand-interface | usage] [name <profile-name>]
5. copy running-config startup-config
DETAILED STEPS
|
|
|
Step 1 |
config t Example: n1000v# config t n1000v(config)# |
Places you in the CLI Global Configuration mode. |
Step 2 |
port-profile profilename Example: n1000v(config)# port-profile AccessProf n1000v(config-port-prof)# |
Places you into CLI Global Configuration mode for the specified port profile. The port profile name can be up to 80 characters and must be unique for each port profile on the Nexus 1000V. |
Step 3 |
ip flow monitor name { input | output } Example: n1000v(config-port-prof)# ip flow monitor allaccess4 output n1000v(config-port-prof)# |
Applies a flow monitor to the port profile.
- name: adds the name of the flow monitor
- input: applies the flow monitor to incoming traffic.
- output: applies the flow monitor to outgoing traffic.
|
Step 4 |
show port-profilename profile-name Example: n1000v(config-port-prof)# show port-profile name AccessProf |
(Optional) Displays information about port profile(s). |
Step 5 |
copy running-config startup-config Example: n1000v(config-port-prof)# copy running-config startup-config |
(Optional) Saves the running configuration persistently through reboots and restarts by copying it to the startup configuration. |
n1000v(config)# port-profile AccessProf
n1000v(config-port-prof)# ip flow monitor allacces4 output
n1000v(config-port-prof)# show port-profile name AccessProf
ip flow monitor allaccess4 output
evaluated config attributes:
ip flow monitor allaccess4 output
n1000v(config-port-prof)#
Viewing the Port Profile Configuration
Use this procedure to view port profile configurations.
DETAILED STEPS
|
|
|
Step 1 |
show port-profile [brief | expand-interface | usage]
[name < profile-name >]
|
Display port profile configuration(s). |
Example 1-1 Command output for the command, show port-profile
n1000v# show port-profile
port-profile UplinkProfile1
description: Profile for critical system ports
port-group: UplinkProfile1
switchport trunk allowed vlan 1,110-119
evaluated config attributes:
switchport trunk allowed vlan 1,110-119
port-profile UplinkProfile2
port-group: UplinkProfile2
switchport trunk allowed vlan 117
evaluated config attributes:
switchport trunk allowed vlan 117
port-profile Ubuntu-Profile
port-group: Ubuntu-Profile
switchport access vlan 118
evaluated config attributes:
switchport access vlan 118
Example 1-2 Command output for the command, show port-profile name
n1000v# show port-profile name Ubuntu-Profile
port-profile Ubuntu-Profile
port-group: Ubuntu-Profile
switchport access vlan 118
evaluated config attributes:
switchport access vlan 118
Example 1-3 Command output for the command, show port-profile brief
n1000v# show port-profile brief
--------------------------------------------------------------------------------
Port Profile Remote Conf Eval Child Child
Profile State Mgmt Items Items Intfs Profs
--------------------------------------------------------------------------------
UplinkProfile1 enabled vmware 3 3 1 0
UplinkProfile2 enabled vmware 3 3 2 0
Ubuntu-Profile enabled vmware 3 3 1 0
n1000v# sh port-profile usage
--------------------------------------------------------------------------------
Port Profile Port Adapter Owner
--------------------------------------------------------------------------------
UplinkProfile1 Eth2/2 vmnic1 mcs-srvr26
UplinkProfile2 Eth2/3 vmnic2 mcs-srvr26
Ubuntu-Profile Veth439 ubuntu-2
Example 1-4 Command output for the command, show port-profile expand-interface name
n1000v# show port-profile expand-interface name UplinkProfile1
port-profile UplinkProfile1
switchport trunk allowed vlan 110-119
Example 1-5 Command output for the command, show port-profile expand-interface
n1000v# show port-profile expand-interface
port-profile UplinkProfile1
switchport trunk allowed vlan 110-119
port-profile UplinkProfile2
switchport trunk allowed vlan 117
switchport trunk allowed vlan 117
port-profile Ubuntu-Profile
switchport access vlan 118
Example 1-6 Command output for the port-profile portion of the command, show running-config
n1000v# show running-config
port-profile UplinkProfile1
description "Profile for critical system ports"
switchport trunk allowed vlan 110-119
port-profile UplinkProfile2
switchport trunk allowed vlan 117
port-profile Ubuntu-Profile
switchport access vlan 118
Enabling a Port Profile
Use this procedure to enable a port profile.
BEFORE YOU BEGIN
- You are logged in to the CLI in EXEC mode.
SUMMARY STEPS
1. config t
2. port-profile profilename
3. state enabled
4. show port-profile [brief | expand-interface | usage] [name <profile-name>]
5. copy running-config startup-config
DETAILED STEPS
| |
|
|
Step 1 |
config t Example: n1000v# config t n1000v(config)# |
Places you in the CLI Global Configuration mode. |
Step 2 |
port-profile profilename Example: n1000v(config)# port-profile AccessProf n1000v(config-port-prof)# |
Places you into CLI Global Configuration mode for the specified port profile. The port profile name can be up to 80 characters and must be unique for each port profile on the Nexus 1000V. |
Step 3 |
state enabled Example: n1000v(config-port-prof)# state enabled n1000v(config-port-prof)# |
Enables the port profile. The port profile’s configuration is applied to the assigned ports. If the port profile specifies a VMware port group, the port group will be created in the vswitch on the vCenter Server. |
Step 4 |
show port-profile name profile-name Example: n1000v(config-port-prof)# show port-profile name AccessProf |
(Optional) Displays information about port profile(s). |
Step 5 |
copy running-config startup-config Example: n1000v(config-port-prof)# copy running-config startup-config |
(Optional) Saves the running configuration persistently through reboots and restarts by copying it to the startup configuration. |
n1000v(config)# port-profile AccessProf
n1000v(config-port-prof)# state enabled
n1000v(config-port-prof)# show port-profile name AccessProf
switchport trunk allowed vlan all
channel-group auto mode on
evaluated config attributes:
switchport trunk allowed vlan all
channel-group auto mode on
n1000v(config-port-prof)#


 Feedback