- Title
- New and Changed Information
- Preface
- Overview
- Configuring FIPS
- Configuring Users and Common Roles
- Configuring Security Features on an External AAA Server
- Configuring IPv4 and IPv6 Access Control Lists
- Configuring Certificate Authorities and Digital Certificates
- Configuring IPSec Network Security
- Configuring FC-SP and DHCHAP
- Configuring Port Security
- Configuring Fibre Channel Common Transport Management Security
- Configuring Fabric Binding
- Configuring Cisco TrustSec Fibre Channel Link Encryption
Cisco MDS 9000 Family NX-OS Security Configuration Guide
Bias-Free Language
The documentation set for this product strives to use bias-free language. For the purposes of this documentation set, bias-free is defined as language that does not imply discrimination based on age, disability, gender, racial identity, ethnic identity, sexual orientation, socioeconomic status, and intersectionality. Exceptions may be present in the documentation due to language that is hardcoded in the user interfaces of the product software, language used based on RFP documentation, or language that is used by a referenced third-party product. Learn more about how Cisco is using Inclusive Language.
- Updated:
- October 10, 2013
Chapter: Configuring Port Security
Configuring Port Security
All switches in the Cisco MDS 9000 Family provide port security features that reject intrusion attempts and report these intrusions to the administrator.

Note![]() Port security is supported for Fibre Channel ports and Fibre Channel over Ethernet (FCoE) ports as fc-port-security.
Port security is supported for Fibre Channel ports and Fibre Channel over Ethernet (FCoE) ports as fc-port-security.
This chapter includes the following sections:
- About Port Security
- Port Security Configuration
- Enabling Port Security
- Activating Port Security
- About Enabling Auto-learning
- Port Security Manual Configuration
- Port Security Configuration Distribution
- Database Merge Guidelines
- Port Security Activation
- Auto-learning
- Port Security Manual Configuration
- Port Security Configuration Distribution
- Database Merge Guidelines
- Database Interaction
- Displaying Port Security Configuration
- Database Merge Guidelines
About Port Security
All switches in the Cisco MDS 9000 Family provide port security features that reject intrusion attempts and report these intrusions to the administrator.
Typically, any Fibre Channel device in a SAN can attach to any SAN switch port and access SAN services based on zone membership. Port security features prevent unauthorized access to a switch port in the Cisco MDS 9000 Family in the following ways:
- Login requests from unauthorized Fibre Channel devices (Nx ports) and switches (xE ports) are rejected.
- All intrusion attempts are reported to the SAN administrator through system messages.
- Configuration distribution uses the CFS infrastructure, and is limited to those switches that are CFS capable. Distribution is disabled by default.
- Configuring the port security policy requires the ENTERPRISE_PKG license (see the Cisco MDS 9000 Family NX-OS Licensing Guide).
This section includes the following topics:
Port Security Enforcement
To enforce port security, configure the devices and switch port interfaces through which each device or switch is connected, and activate the configuration.
- Use the port world wide name (pWWN) or the node world wide name (nWWN) to specify the Nx port connection for each device.
- Use the switch world wide name (sWWN) to specify the xE port connection for each switch.
Each Nx and xE port can be configured to restrict a single port or a range of ports.
Enforcement of port security policies are done on every activation and when the port tries to come up.
The port security feature uses two databases to accept and implement configuration changes.
- Configuration database—All configuration changes are stored in the configuration database.
- Active database—The database currently enforced by the fabric. The port security feature requires all devices connecting to a switch to be part of the port security active database. The software uses this active database to enforce authorization.
About Auto-Learning
You can instruct the switch to automatically learn (auto-learn) the port security configurations over a specified period. This feature allows any switch in the Cisco MDS 9000 Family to automatically learn about devices and switches that connect to it. Use this feature when you activate the port security feature for the first time as it saves tedious manual configuration for each port. You must configure auto-learning on a per-VSAN basis. If enabled, devices and switches that are allowed to connect to the switch are automatically learned, even if you have not configured any port access.
When auto-learning is enabled, learning happens for the devices or interfaces that were already logged into the switch and the new devices or interfaces that need to be logged in. Learned entries on a port are cleaned up after you shut down that port if auto-learning is still enabled.
Learning does not override the existing configured port security policies. So, for example, if an interface is configured to allow a specific pWWN, then auto-learning will not add a new entry to allow any other pWWN on that interface. All other pWWNs will be blocked even in auto-learning mode.
No entries are learned for a port in the shutdown state.
When you activate the port security feature, auto-learning is also automatically enabled.
Note![]() If you activate port security feature, auto-learning gets enabled by default. You cannot re-activate port security until auto-learning is disabled or deactivate and activate again.
If you activate port security feature, auto-learning gets enabled by default. You cannot re-activate port security until auto-learning is disabled or deactivate and activate again.
Port Security Activation
By default, the port security feature is not activated in any switch in the Cisco MDS 9000 Family.
By activating the port security feature, the following apply:
–![]() From this point, auto-learning happens for the devices or interfaces that were already logged into the switch and also for the new devices will login in future.
From this point, auto-learning happens for the devices or interfaces that were already logged into the switch and also for the new devices will login in future.
–![]() You cannot activate the database until you disable auto-learning.
You cannot activate the database until you disable auto-learning.
- All the devices that are already logged in are learned and are added to the active database.
- All entries in the configured database are copied to the active database.
After the database is activated, subsequent device login is subject to the activated port bound WWN pairs, excluding the auto-learned entries. You must disable auto-learning before the auto-learned entries become activated.
When you activate the port security feature, auto-learning is also automatically enabled. You can choose to activate the port security feature and disable auto-learning.

Tip![]() If a port is shut down because of a denied login attempt, and you subsequently configure the database to allow that login, the port does not come up automatically. You must explicitly issue a no shutdown CLI command to bring that port back online.
If a port is shut down because of a denied login attempt, and you subsequently configure the database to allow that login, the port does not come up automatically. You must explicitly issue a no shutdown CLI command to bring that port back online.
Port Security Configuration
The steps to configure port security depend on which features you are using. Auto-learning works differently if you are using CFS distribution.
This section includes the following topics:
- Configuring Port Security with Auto-Learning and CFS Distribution
- Configuring Port Security with Auto-Learning without CFS
- Configuring Port Security with Manual Database Configuration
Configuring Port Security with Auto-Learning and CFS Distribution
To configure port security, using auto-learning and CFS distribution, follow these steps:
Step 1![]() Enable port security. See the “Enabling Port Security” section.
Enable port security. See the “Enabling Port Security” section.
Step 2![]() Enable CFS distribution. See the “Enabling Distribution” section.
Enable CFS distribution. See the “Enabling Distribution” section.
Step 3![]() Activate port security on each VSAN. This turns on auto-learning by default. See the “Activating Port Security” section.
Activate port security on each VSAN. This turns on auto-learning by default. See the “Activating Port Security” section.
Step 4![]() Issue a CFS commit to copy this configuration to all switches in the fabric. See the “Committing the Changes” section. At this point, all switches are activated, and auto-learning.
Issue a CFS commit to copy this configuration to all switches in the fabric. See the “Committing the Changes” section. At this point, all switches are activated, and auto-learning.
Step 5![]() Wait until all switches and all hosts are automatically learned.
Wait until all switches and all hosts are automatically learned.
Step 6![]() Disable auto-learn on each VSAN. See the“Disabling Auto-learning” section.
Disable auto-learn on each VSAN. See the“Disabling Auto-learning” section.
Step 7![]() Issue a CFS commit to copy this configuration to all switches in the fabric. See the “Committing the Changes” section. At this point, the auto-learned entries from every switch are combined into a static active database that is distributed to all switches.
Issue a CFS commit to copy this configuration to all switches in the fabric. See the “Committing the Changes” section. At this point, the auto-learned entries from every switch are combined into a static active database that is distributed to all switches.
Step 8![]() Copy the active database to the configure database on each VSAN. See the “Copying the Port Security Database” section.
Copy the active database to the configure database on each VSAN. See the “Copying the Port Security Database” section.
Step 9![]() Issue a CFS commit to copy this configuration to all switches in the fabric. See the “Committing the Changes” section. This ensures that the configure database is the same on all switches in the fabric.
Issue a CFS commit to copy this configuration to all switches in the fabric. See the “Committing the Changes” section. This ensures that the configure database is the same on all switches in the fabric.
Step 10![]() Copy the running configuration to the startup configuration, using the fabric option. This saves the port security configure database to the startup configuration on all switches in the fabric.
Copy the running configuration to the startup configuration, using the fabric option. This saves the port security configure database to the startup configuration on all switches in the fabric.
Configuring Port Security with Auto-Learning without CFS
To configure port security using auto-learning without CFS, follow these steps:
Step 1![]() Enable port security. See the “Enabling Port Security” section.
Enable port security. See the “Enabling Port Security” section.
Step 2![]() Activate port security on each VSAN. This turns on auto-learning by default. See the “Activating Port Security” section.
Activate port security on each VSAN. This turns on auto-learning by default. See the “Activating Port Security” section.
Step 3![]() Wait until all switches and all hosts are automatically learned.
Wait until all switches and all hosts are automatically learned.
Step 4![]() Disable auto-learn on each VSAN. See the “Disabling Auto-learning” section.
Disable auto-learn on each VSAN. See the “Disabling Auto-learning” section.
Step 5![]() Copy the active database to the configure database on each VSAN. See the “Copying the Port Security Database” section.
Copy the active database to the configure database on each VSAN. See the “Copying the Port Security Database” section.
Step 6![]() Copy the running configuration to the startup configuration This saves the port security configure database to the startup configuration.
Copy the running configuration to the startup configuration This saves the port security configure database to the startup configuration.
Step 7![]() Repeat Step 1 through Step 6 for all switches in the fabric.
Repeat Step 1 through Step 6 for all switches in the fabric.
Configuring Port Security with Manual Database Configuration
To configure port security and manually configure the port security database, follow these steps:
Step 1![]() Enable port security. See the “Enabling Port Security” section.
Enable port security. See the “Enabling Port Security” section.
Step 2![]() Manually configure all port security entries into the configure database on each VSAN. See the “Port Security Manual Configuration” section.
Manually configure all port security entries into the configure database on each VSAN. See the “Port Security Manual Configuration” section.
Step 3![]() Activate port security on each VSAN. This turns on auto-learning by default. See the “Activating Port Security” section.
Activate port security on each VSAN. This turns on auto-learning by default. See the “Activating Port Security” section.
Step 4![]() Disable auto-learn on each VSAN. See the “Disabling Auto-learning” section.
Disable auto-learn on each VSAN. See the “Disabling Auto-learning” section.
Step 5![]() Copy the running configuration to the startup configuration This saves the port security configure database to the startup configuration.
Copy the running configuration to the startup configuration This saves the port security configure database to the startup configuration.
Step 6![]() Repeat Step 1 through Step 5 for all switches in the fabric.
Repeat Step 1 through Step 5 for all switches in the fabric.
Configuring Port Security Using the Configuration Wizard
The Port Security Configuration wizard provides step-by-step procedures for setting up the Port Security Policy for a selected VSAN. The Port Security Configuration wizard also supports the central management through CFS, making it possible to complete the entire configuration at one place.
The wizard automatically conducts few essential operations. For example, if you want central management, the wizard conducts operations to check CFS capability, enable CFS, and issue CFS commit at the proper stages.
To manage security at a particular port, you do not need to run through the wizard to configure the port security policy from the VSAN wide, but you can directly edit accesses on the port itself. This operation can be done through the Port Binding dialog box. If the port's belonging switch has not enabled port security yet, the dialog box enables security first. If the port security is enabled, the dialog box will edit the policy database based on user operations.
Prerequisites
The prerequisites for configuring port security are as follows:
- Port security is enabled on the switch.
- Port security policy should be defined either manually by editing bound devices or switches or ports or by using autolearning.
- Port Security policy is activated.
- Activated and configured databases are synchronized through copy.
- Activated database is copied to be the startup configuration.
- CFS should be enabled on all switches in the VSAN. A CFS master switch is selected to do all configurations. All changes will be distributed to the VSAN through the CFS commit command.
To configure port security, follow these steps:
Step 1![]() Click the Port Security
Click the Port Security  button on the toolbar.
Before launching the Port Security Setup Wizard, Fabric Manager checks the CFS capability of the switches in the VSAN.
If VSAN context is not available, the wizard prompts to select VSAN as shown in Figure 12-1.
Figure 12-1 Select VSAN Window
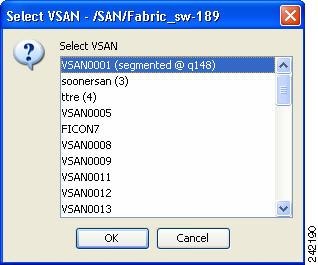
Step 2![]() Select the VSAN from the list and click OK.
Select the VSAN from the list and click OK.
You see the first page of the Port Security Setup Wizard as shown in Figure 12-2.
Figure 12-2 Select Master Switch Page
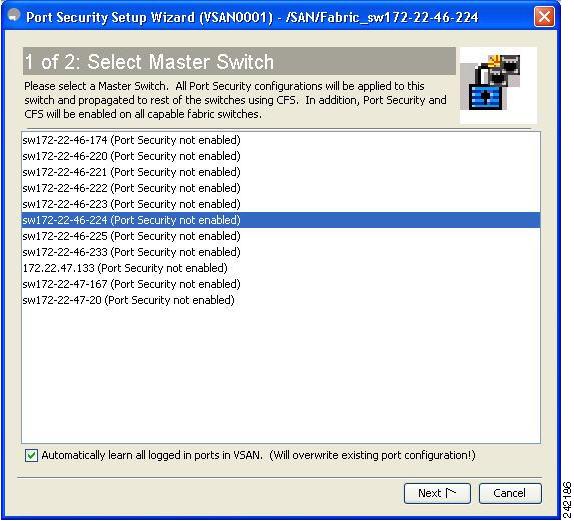
Step 3![]() Do the following in the Select Master Switch page:
Do the following in the Select Master Switch page:
- Select the required master switch.
- Select Automatically learn all logged in ports in VSAN to Autolearn port configuration.
You see Edit and Activate Configuration page as shown in Figure 12-3.
Figure 12-3 Edit and Activate Configuration Page
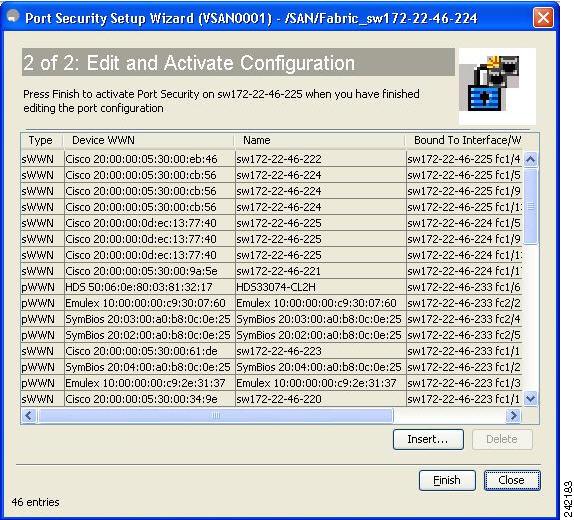
Step 5![]() Click Insert to create port binding.
Click Insert to create port binding.
You see the Insert Port Security Devices dialog box as shown in Figure 12-4.
Figure 12-4 I nsert Port Security Devices Dialog Box
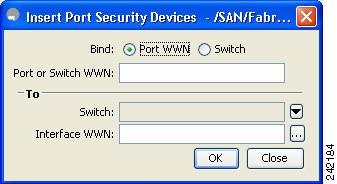
Step 6![]() Two types of port binding can be created using the Insert Port Security Devices dialog box:
Two types of port binding can be created using the Insert Port Security Devices dialog box:
- Port WWN -pWWN bound to an interface WWN.
- Switch -Switch WWN bound to an interface. (Mainly useful for ISL binding).
Step 7![]() Select the type of port binding by clicking the radio buttons and enter the supporting values.
Select the type of port binding by clicking the radio buttons and enter the supporting values.
Step 9![]() Click Close to exit the Insert Port Security window.
Click Close to exit the Insert Port Security window.
Note![]() To delete an entry in the Edit and Activate Configuration page of the wizard, select the entry and click the Delete button.
To delete an entry in the Edit and Activate Configuration page of the wizard, select the entry and click the Delete button.
Step 10![]() Click Finish to complete the Port Security Configuration for the selected switch.
Click Finish to complete the Port Security Configuration for the selected switch.
Enabling Port Security
By default, the port security feature is disabled in all switches in the Cisco MDS 9000 Family.
To enable port security, follow these steps:
|
|
|
|
|---|---|---|
To enable port security using Fabric Manager, follow these steps:
Step 1![]() Expand a VSAN and then select Port Security in the Logical Domains pane.
Expand a VSAN and then select Port Security in the Logical Domains pane.
You see the port security configuration for that VSAN in the Information pane (see Figure 12-5).
Figure 12-5 Port Security Configuration
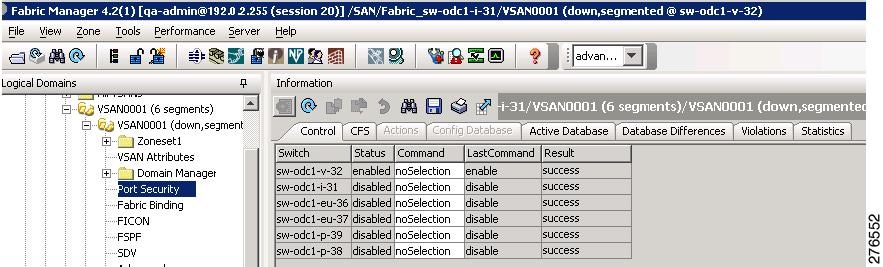
You see the information show in Figure 12-6.

Step 3![]() Enable CFS on all participating switches in the VSAN by clicking each entry in the Global column and selecting enable.
Enable CFS on all participating switches in the VSAN by clicking each entry in the Global column and selecting enable.
Step 4![]() Click Apply Changes to enable CFS distribution for the port security feature.
Click Apply Changes to enable CFS distribution for the port security feature.
You see the port security enable state for all switches in the selected VSAN (see Figure 12-7).
Figure 12-7 Port Security Configuration
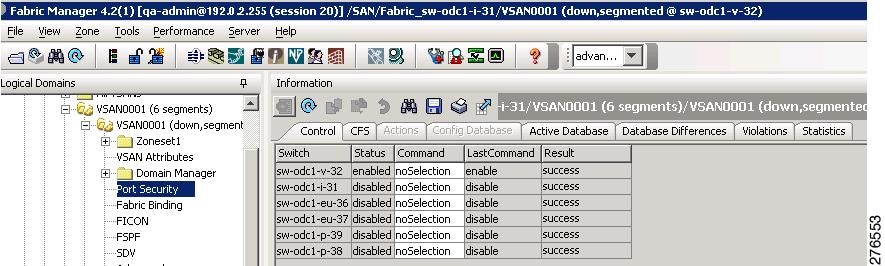
Step 6![]() Set the Command column to enable for each switch in the VSAN.
Set the Command column to enable for each switch in the VSAN.
Step 7![]() Click the CFS tab and set the Command column to commit on all participating switches in the VSAN.
Click the CFS tab and set the Command column to commit on all participating switches in the VSAN.
Step 8![]() Click Apply Changes to distribute the enabled port security to all switches in the VSAN.
Click Apply Changes to distribute the enabled port security to all switches in the VSAN.
Port Security Activation
Activating Port Security
To activate the port security feature, follow these steps:
To activate port security using Fabric Manager, follow these steps:
Step 1![]() Expand a VSAN and select Port Security in the Logical Domains pane.
Expand a VSAN and select Port Security in the Logical Domains pane.
You see the port security configuration for that VSAN in the Information pane.
Step 3![]() Click in the Action column under Activation, next to the switch or VSAN on which you want to activate port security. You see a drop-down menu with the following options:
Click in the Action column under Activation, next to the switch or VSAN on which you want to activate port security. You see a drop-down menu with the following options:
- activate —Valid port security settings are activated.
- activate (TurnLearningOff) —Valid port security settings are activated and auto-learn turned off.
- forceActivate —Activation is forced.
- forceActivate(TurnLearningOff) —Activation is forced and auto-learn is turned off.
- deactivate —All currently active port security settings are deactivated.
- NoSelection — No action is taken.
Step 4![]() Set the Action field you want for that switch.
Set the Action field you want for that switch.
Step 5![]() Uncheck the AutoLearn check box for each switch in the VSAN to disable auto-learning.
Uncheck the AutoLearn check box for each switch in the VSAN to disable auto-learning.
Step 6![]() Click the CFS tab and set the command column to commit on all participating switches in the VSAN.
Click the CFS tab and set the command column to commit on all participating switches in the VSAN.
Step 7![]() Click Apply Changes in Fabric Manager or Apply in Device Manager to save these changes.
Click Apply Changes in Fabric Manager or Apply in Device Manager to save these changes.
Note![]() If required, you can disable auto-learning (see the “Disabling Auto-learning” section).
If required, you can disable auto-learning (see the “Disabling Auto-learning” section).
Database Activation Rejection
Database activation is rejected in the following cases:
- Missing or conflicting entries exist in the configuration database but not in the active database.
- The auto-learning feature was enabled before the activation. To reactivate a database in this state, disable auto-learning.
- The exact security is not configured for each PortChannel member.
- The configured database is empty but the active database is not.
If the database activation is rejected due to one or more conflicts listed in the previous section, you may decide to proceed by forcing the port security activation.
Forcing Port Security Activation
If the port security activation request is rejected, you can force the activation.
Note![]() An activation using the force option can log out existing devices if they violate the active database.
An activation using the force option can log out existing devices if they violate the active database.
You can view missing or conflicting entries using the port-security database diff active vsan command in EXEC mode.
To forcefully activate the port security database, follow these steps:
|
|
|
|
|---|---|---|
Forces the VSAN 1 port security database to activate despite conflicts. |
To forcefully activate the port security database using Fabric Manager, follow these steps:
Step 1![]() Expand a VSAN and select Port Security in the Logical Domains pane.
Expand a VSAN and select Port Security in the Logical Domains pane.
You see the port security configuration for that VSAN in the Information pane.
Step 3![]() Click in the Action column under Activation, next to the switch or VSAN on which you want to activate port security and select the forceactivate option.
Click in the Action column under Activation, next to the switch or VSAN on which you want to activate port security and select the forceactivate option.
Step 4![]() Set the Action field you want for that switch.
Set the Action field you want for that switch.
Step 5![]() Click the CFS tab and set the command column to commit on all participating switches in the VSAN.
Click the CFS tab and set the command column to commit on all participating switches in the VSAN.
Step 6![]() Click Apply Changes in Fabric Manager or Apply in Device Manager to save these changes.
Click Apply Changes in Fabric Manager or Apply in Device Manager to save these changes.
Database Reactivation
To reactivate the port security database, follow these steps:
Tip![]() If auto-learning is enabled, and you cannot activate the database, you will not be allowed to proceed without the force option until you disable auto-learning.
If auto-learning is enabled, and you cannot activate the database, you will not be allowed to proceed without the force option until you disable auto-learning.
To reactivate the port security database using Fabric Manager, follow these steps:
Step 2![]() Copy the active database to the configured database.
Copy the active database to the configured database.
Tip If the active database is empty, you cannot perform this step.
Step 3![]() Make the required changes to the configuration database.
Make the required changes to the configuration database.
Copying an Active Database to the Config Database
To copy the active database to the config database using Fabric Manager, follow these steps:
Step 1![]() Expand a VSAN and select Port Security in the Logical Domains pane.
Expand a VSAN and select Port Security in the Logical Domains pane.
You see the port security configuration for that VSAN in the Information pane.
You see the switches for that VSAN.
Step 3![]() Check the CopyActive ToConfig check box next to the switch for which you want to copy the database.
Check the CopyActive ToConfig check box next to the switch for which you want to copy the database.
The active database is copied to the config database when the security setting is activated.
Step 4![]() Uncheck the CopyActive ToConfig check box if you do not want the database copied when the security setting is activated.
Uncheck the CopyActive ToConfig check box if you do not want the database copied when the security setting is activated.
Step 5![]() Click the CFS tab and set the command column to commit on all participating switches in the VSAN.
Click the CFS tab and set the command column to commit on all participating switches in the VSAN.
Step 6![]() Click Apply Changes to save these changes or click Undo Changes to discard any unsaved changes.
Click Apply Changes to save these changes or click Undo Changes to discard any unsaved changes.
Displaying Activated Port Security Settings
To display active port security settings using Fabric Manager, follow these steps:
Step 1![]() Expand a VSAN and select Port Security in the Logical Domains pane.
Expand a VSAN and select Port Security in the Logical Domains pane.
You see the port security configuration for that VSAN in the Information pane.
Step 2![]() Click the Active Database tab.
Click the Active Database tab.
You see the active port security settings for that VSAN.
Displaying Port Security Statistics
To display port security statistics using Fabric Manager, follow these steps:
Step 1![]() Expand a VSAN and select Port Security in the Logical Domains pane.
Expand a VSAN and select Port Security in the Logical Domains pane.
You see the port security configuration for that VSAN in the Information pane.
Step 2![]() Click the Statistics tab.
Click the Statistics tab.
You see the port security statistics for that VSAN.
Displaying Port Security Violations
Port violations are invalid login attempts (for example, login requests from unauthorized Fibre Channel devices). You can display a list of these attempts on a per-VSAN basis, using Fabric Manager.
To display port security violations, follow these steps:
Step 1![]() Expand a VSAN and select Port Security in the Logical Domains pane.
Expand a VSAN and select Port Security in the Logical Domains pane.
You see the port security configuration for that VSAN in the Information pane.
Step 2![]() Click the Violations tab. You see the port security violations for that VSAN.
Click the Violations tab. You see the port security violations for that VSAN.
Auto-learning
This section contains the following topics:
- About Enabling Auto-learning
- Enabling Auto-learning
- Disabling Auto-learning
- Auto-learning Device Authorization
- Authorization Scenarios
About Enabling Auto-learning
The state of the auto-learning configuration depends on the state of the port security feature:
- If the port security feature is not activated, auto-learning is disabled by default.
- If the port security feature is activated, auto-learning is enabled by default (unless you explicitly disabled this option).
Tip![]() If auto-learning is enabled on a VSAN, you can only activate the database for that VSAN by using the force option.
If auto-learning is enabled on a VSAN, you can only activate the database for that VSAN by using the force option.
Enabling Auto-learning
To enable auto-learning, follow these steps:
|
|
|
|
|---|---|---|
Enables auto-learning so the switch can learn about any device that is allowed to access VSAN 1. These devices are logged in the port security active database. |
To enable auto-learning using Fabric Manager, follow these steps:
Step 1![]() Expand a VSAN and select Port Security in the Logical Domains pane.
Expand a VSAN and select Port Security in the Logical Domains pane.
You see the port security configuration for that VSAN in the Information pane (see Figure 12-8).
Figure 12-8 Port Security Configuration

Step 3![]() Click in the Action column under Activation, next to the switch or VSAN on which you want to activate port security. You see a drop-down menu with the following options:
Click in the Action column under Activation, next to the switch or VSAN on which you want to activate port security. You see a drop-down menu with the following options:
- activate —Valid port security settings are activated.
- activate (TurnLearningOff) —Valid port security settings are activated and auto-learn turned off.
- forceActivate —Activation is forced.
- forceActivate(TurnLearningOff) —Activation is forced and auto-learn is turned off.
- deactivate —All currently active port security settings are deactivated.
- NoSelection — No action is taken.
Step 4![]() Select one of the port security options for that switch.
Select one of the port security options for that switch.
Step 5![]() Check the AutoLearn check box for each switch in the VSAN to enable auto-learning.
Check the AutoLearn check box for each switch in the VSAN to enable auto-learning.
Step 6![]() Click the Apply Changes icon to save these changes.
Click the Apply Changes icon to save these changes.
Disabling Auto-learning
To disable auto-learning, follow these steps:
|
|
|
|
|---|---|---|
Disables auto-learning and stops the switch from learning about new devices accessing the switch. Enforces the database contents based on the devices learned up to this point. |
To disable auto-learning using Fabric Manager, follow these steps:
Step 1![]() Expand a VSAN and select Port Security in the Logical Domains pane.
Expand a VSAN and select Port Security in the Logical Domains pane.
You see the port security configuration for that VSAN in the Information pane (see Figure 12-8).
You see the switches for that VSAN.
Step 3![]() Uncheck the AutoLearn check box next to the switch if you want to disable auto-learning.
Uncheck the AutoLearn check box next to the switch if you want to disable auto-learning.
Step 4![]() Click the Apply Changes icon to save these changes.
Click the Apply Changes icon to save these changes.
Auto-learning Device Authorization
Table 12-1 summarizes the authorized connection conditions for device requests.
|
|
|
|
|
|---|---|---|---|
Authorization Scenarios
Assume that the port security feature is activated and the following conditions are specified in the active database:
- A pWWN (P1) is allowed access through interface fc1/1 (F1).
- A pWWN (P2) is allowed access through interface fc1/1 (F1).
- A nWWN (N1) is allowed access through interface fc1/2 (F2).
- Any WWN is allowed access through interface fc1/3 (F3).
- A nWWN (N3) is allowed access through any interface.
- A pWWN (P3) is allowed access through interface fc1/4 (F4).
- A sWWN (S1) is allowed access through interface fc1/10-13 (F10 to F13).
- A pWWN (P10) is allowed access through interface fc1/11 (F11).
Table 12-2 summarizes the port security authorization results for this active database. The conditions listed refer to the conditions from Table 12-1 .
|
|
|
|
|
|---|---|---|---|
Port Security Manual Configuration
To configure port security on any switch in the Cisco MDS 9000 Family, follow these steps:
Step 1![]() Identify the WWN of the ports that need to be secured.
Identify the WWN of the ports that need to be secured.
Step 2![]() Secure the fWWN to an authorized nWWN or pWWN.
Secure the fWWN to an authorized nWWN or pWWN.
Step 3![]() Activate the port security database.
Activate the port security database.
Step 4![]() Verify your configuration.
Verify your configuration.
This section includes the following topics:
About WWN Identification
If you decide to manually configure port security, be sure to adhere to the following guidelines:
- Identify switch ports by the interface or by the fWWN.
- Identify devices by the pWWN or by the nWWN.
- If an Nx port is allowed to log in to SAN switch port Fx, then that Nx port can only log in through the specified Fx port.
- If an Nx port’s nWWN is bound to an Fx port WWN, then all pWWNs in the Nx port are implicitly paired with the Fx port.
- TE port checking is done on each VSAN in the allowed VSAN list of the trunk port.
- All PortChannel xE ports must be configured with the same set of WWNs in the same PortChannel.
- E port security is implemented in the port VSAN of the E port. In this case the sWWN is used to secure authorization checks.
- Once activated, the config database can be modified without any effect on the active database.
- By saving the running configuration, you save the configuration database and activated entries in the active database. Learned entries in the active database are not saved.
Adding Authorized Port Pairs
To add authorized port pairs for port security, follow these steps:
After identifying the WWN pairs that need to be bound, add those pairs to the port security database.
Tip![]() Remote switch binding can be specified at the local switch. To specify the remote interfaces, you can use either the fWWN or sWWN-interface combination.
Remote switch binding can be specified at the local switch. To specify the remote interfaces, you can use either the fWWN or sWWN-interface combination.
To add authorized port pairs for port security using Fabric Manager, follow these steps:
Step 1![]() Expand a VSAN and select Port Security in the Logical Domains pane.
Expand a VSAN and select Port Security in the Logical Domains pane.
Step 2![]() Click the Config Database tab.
Click the Config Database tab.
Step 3![]() Click Create Row to add an authorized port pair.
Click Create Row to add an authorized port pair.
You see the Create Port Security dialog box shown in Figure 12-9.
Figure 12-9 Create Port Security Dialog Box

Step 4![]() Double-click the device from the available list for which you want to create the port security setting.
Double-click the device from the available list for which you want to create the port security setting.
Step 5![]() Double-click the port from the available list to which you want to bind the device.
Double-click the port from the available list to which you want to bind the device.
Step 6![]() Click Create to create the port security setting.
Click Create to create the port security setting.
Step 7![]() Click the Apply Changes icon to save these changes.
Click the Apply Changes icon to save these changes.
Deleting Port Security Setting
To delete a port security setting from the configured database on a switch, follow these steps:
Step 1![]() Expand a VSAN and select Port Security in the Logical Domains pane.
Expand a VSAN and select Port Security in the Logical Domains pane.
Step 2![]() Click the Config Database tab.
Click the Config Database tab.
You see the configured port security settings for that VSAN.
Step 3![]() Click the row you want to delete.
Click the row you want to delete.
You see the confirmation dialog box.
Step 5![]() Click Yes to delete the row, or click No to close the confirmation dialog box without deleting the row.
Click Yes to delete the row, or click No to close the confirmation dialog box without deleting the row.
Step 6![]() Click the Apply Changes icon to save these changes.
Click the Apply Changes icon to save these changes.
Port Security Configuration Distribution
The port security feature uses the Cisco Fabric Services (CFS) infrastructure to enable efficient database management, provide a single point of configuration for the entire fabric in the VSAN, and enforce the port security policies throughout the fabric.
This section includes the following topics:
- Enabling Distribution
- Locking the Fabric
- Committing the Changes
- Discarding the Changes
- Activation and Auto-learning Configuration Distribution
Enabling Distribution
To enable the port security distribution, follow these steps:
|
|
|
|
|---|---|---|
For example, if you activate port security, follow up by disabling auto-learning, and commit the changes in the pending database, then the net result of your actions is the same as issuing a port-security activate vsan vsan-id no-auto-learn command.
All the configurations performed in distributed mode are stored in a pending (temporary) database. If you modify the configuration, you need to commit or discard the pending database changes to the configurations. The fabric remains locked during this period. Changes to the pending database are not reflected in the configurations until you commit the changes.
Note![]() Port activation or deactivation and auto-learning enable or disable do not take effect until after a CFS commit if CFS distribution is enabled. Always follow any one of these operations with a CFS commit to ensure proper configuration. See the “Activation and Auto-learning Configuration Distribution” section.
Port activation or deactivation and auto-learning enable or disable do not take effect until after a CFS commit if CFS distribution is enabled. Always follow any one of these operations with a CFS commit to ensure proper configuration. See the “Activation and Auto-learning Configuration Distribution” section.
Tip![]() In this case, we recommend that you perform a commit at the end of each operation: after you activate port security and after you enable auto learning.
In this case, we recommend that you perform a commit at the end of each operation: after you activate port security and after you enable auto learning.
To enable distribution using Fabric Manager, follow these steps:
Step 1![]() Expand a VSAN and select Port Security in the Logical Domains pane.
Expand a VSAN and select Port Security in the Logical Domains pane.
You see the port security configuration for that VSAN in the Information pane (see Figure 12-8).
You see the switches for that VSAN.
Step 3![]() In the Command column, select enable or disable from the drop-down menu.
In the Command column, select enable or disable from the drop-down menu.
Step 4![]() Click the Apply Changes icon to save the changes.
Click the Apply Changes icon to save the changes.
Locking the Fabric
The first action that modifies the existing configuration creates the pending database and locks the feature in the VSAN. After you lock the fabric, the following situations apply:
- No other user can make any configuration changes to this feature.
- A copy of the configuration database becomes the pending database.
To display the CFS lock information, use the show cfs lock command. For more information, see the Cisco MDS 9000 Family Command Reference.
Committing the Changes
If you commit the changes made to the configurations, the configurations in the pending database are distributed to other switches. On a successful commit, the configuration change is applied throughout the fabric and the lock is released.
To commit the port security configuration changes for the specified VSAN, follow these steps:
|
|
|
|
|---|---|---|
Discarding the Changes
If you discard (abort) the changes made to the pending database, the configuration remains unaffected and the lock is released.
To display the CFS lock information, use the show cfs lock command. For more information, see the Cisco MDS 9000 Family Command Reference.
To discard the port security configuration changes for the specified VSAN, follow these steps:
|
|
|
|
|---|---|---|
Discards the port security changes in the specified VSAN and clears the pending configuration database. |
Activation and Auto-learning Configuration Distribution
Activation and auto-learning configurations in distributed mode are remembered as actions to be performed when you commit the changes in the pending database.
Learned entries are temporary and do not have any role in determining if a login is authorized or not. As such, learned entries do not participate in distribution. When you disable learning and commit the changes in the pending database, the learned entries become static entries in the active database and are distributed to all switches in the fabric. After the commit, the active database on all switches is identical.
If the pending database contains more than one activation and auto-learning configuration when you commit the changes, then the activation and auto-learning changes are consolidated and the behavior may change (see Table 12-3 ).
|
|
|
|
|
|---|---|---|---|
| A and B exist in the configuration database, activation is not done and devices C,D are logged in. |
1. |
configuration database = {A,B} active database = {A,B, C1, D*} |
|
configuration database = {A,B, E} |
|||
| A and B exist in the configuration database, activation is not done and devices C,D are logged in. |
1. |
||
configuration database = {A,B} pending database = {A,B + activation to be enabled + |
|||
configuration database = {A,B} active database = {A,B} and devices C and D are logged out. This is equal to an activation with auto-learning disabled. |
|
|
Tip![]() In this case, we recommend that you perform a commit at the end of each operation: after you activate port security and after you enable auto-learning.
In this case, we recommend that you perform a commit at the end of each operation: after you activate port security and after you enable auto-learning.
Database Merge Guidelines
A database merge refers to a union of the configuration database and static (unlearned) entries in the active database.
When merging the database between two fabrics, follow these guidelines:
- Verify that the activation status and the auto-learning status is the same in both fabrics.
- Verify that the combined number of configurations for each VSAN in both databases does not exceed 2 K.

Database Interaction
Table 12-4 lists the differences and interaction between the active and configuration databases.
Note![]() You can overwrite the configuration database with the active database using the port-security database copy vsan command. The port-security database diff active vsan command in EXEC mode lists the differences between the active database and the configuration database.
You can overwrite the configuration database with the active database using the port-security database copy vsan command. The port-security database diff active vsan command in EXEC mode lists the differences between the active database and the configuration database.
This section includes the following topics:
- Database Scenarios
- Copying the Port Security Database
- Deleting the Port Security Database
- Cleaning the Port Security Database
Database Scenarios
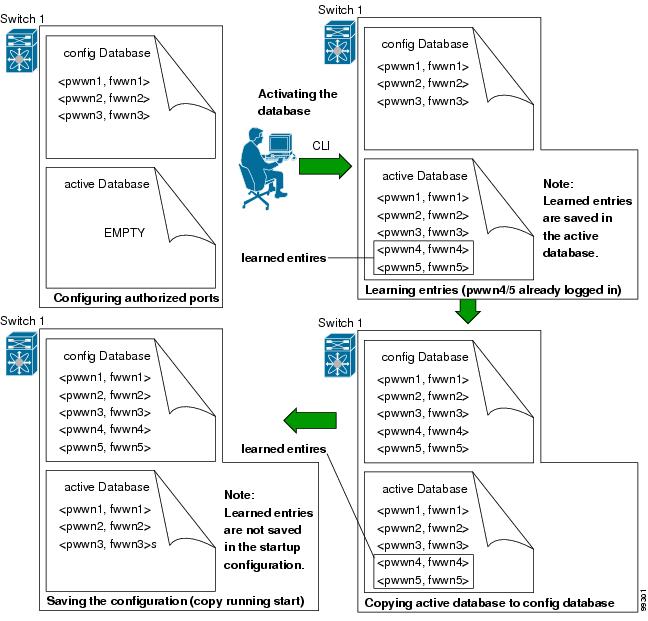
Figure 12-10 depicts various scenarios to depict the active database and the configuration database status based on port security configurations.
Figure 12-10 Port Security Database Scenarios
Copying the Port Security Database
Use the port-security database copy vsan command to copy from the active to the configured database. If the active database is empty, this command is not accepted.
Use the port-security database diff active vsan command to view the differences between the active database and the configuration database. This command can be used when resolving conflicts.
Use the port-security database diff config vsan command to obtain information on the differences between the configuration database and the active database.
Tip![]() We recommend that youcopy the active database to the config database issue the port-security database copy vsan command after disabling auto-learning. This action will ensure that the configuration database is in sync with the active database. If distribution is enabled, this command creates a temporary copy (and consequently a fabric lock) of the configuration database. If you lock the fabric, you need to commit the changes to the configuration databases in all the switches.
We recommend that youcopy the active database to the config database issue the port-security database copy vsan command after disabling auto-learning. This action will ensure that the configuration database is in sync with the active database. If distribution is enabled, this command creates a temporary copy (and consequently a fabric lock) of the configuration database. If you lock the fabric, you need to commit the changes to the configuration databases in all the switches.
To copy the active database to the configuration database, using Fabric Manager, follow these steps:
Step 1![]() Expand a Fabric, expand a VSAN and then select Port Security in the Logical Domains pane.
Expand a Fabric, expand a VSAN and then select Port Security in the Logical Domains pane.
Step 2![]() Click the Actions tab. You see all the configuration databases.
Click the Actions tab. You see all the configuration databases.
Step 3![]() Select the appropriate configuration database and check the Copy Active to Config check box.
Select the appropriate configuration database and check the Copy Active to Config check box.
Step 4![]() Click the Apply Changes icon to save your changes.
Click the Apply Changes icon to save your changes.
To view the differences between the active database and the configuration database using Fabric Manager, follow these steps:
Step 1![]() Expand a Fabric, expand a VSAN and then select Port Security in the Logical Domains pane.
Expand a Fabric, expand a VSAN and then select Port Security in the Logical Domains pane.
You see the Port Security information in the Information pane.
Step 2![]() Click the Database Differences tab. You see all the configuration databases.
Click the Database Differences tab. You see all the configuration databases.
Step 3![]() Select the appropriate configuration database. Select the Active or Config option to compare the differences between the selected database and the active or configuration database.
Select the appropriate configuration database. Select the Active or Config option to compare the differences between the selected database and the active or configuration database.
Step 4![]() Click the Apply Changes icon to save your changes.
Click the Apply Changes icon to save your changes.
Deleting the Port Security Database
Tip![]() If the distribution is enabled, the deletion creates a copy of the database. An explicit deletionport-security commit command is required to actually delete the database.
If the distribution is enabled, the deletion creates a copy of the database. An explicit deletionport-security commit command is required to actually delete the database.
Use the no port-security database vsan command in configuration mode to delete the configured database for a specified VSAN
To delete a port security database using Fabric Manager, follow these steps:
Step 1![]() Expand a Fabric, expand a VSAN and then select Port Security in the Logical Domains pane.
Expand a Fabric, expand a VSAN and then select Port Security in the Logical Domains pane.
You see the Port Security information in the Information pane.
Step 2![]() Click the Config Database tab. You see all the configuration databases.
Click the Config Database tab. You see all the configuration databases.
Step 3![]() Select the appropriate configuration database and click the Delete Row button.
Select the appropriate configuration database and click the Delete Row button.
Step 4![]() Click Yes if you want to delete the configuration database.
Click Yes if you want to delete the configuration database.
Cleaning the Port Security Database
Use the clear port-security statistics vsan command to clear all existing statistics from the port security database for a specified VSAN.
Use the clear port-security database auto-learn interface command to clear any learned entries in the active database for a specified interface within a VSAN.
Use the clear port-security database auto-learn vsan command to clear any learned entries in the active database for the entire VSAN.
Note![]() The clear port-security database auto-learn and clear port-security statistics commands are only relevant to the local switch and do not acquire locks. Also, learned entries are only local to the switch and do not participate in distribution.
The clear port-security database auto-learn and clear port-security statistics commands are only relevant to the local switch and do not acquire locks. Also, learned entries are only local to the switch and do not participate in distribution.
Use the port-security clear vsan command to clear the pending session in the VSAN from any switch in the VSAN.
To clear all existing statistics from the port security database for a specified VSAN using Fabric Manager, follow these steps:
Step 1![]() Expand a Fabric, expand a VSAN and then select Port Security in the Logical Domains pane.
Expand a Fabric, expand a VSAN and then select Port Security in the Logical Domains pane.
You see the Port Security information in the Information pane (see Figure 12-8).
Step 2![]() Click the Statistics tab.
Click the Statistics tab.
You see all the configuration databases.
Step 3![]() Select the appropriate configuration database and check the Clear option.
Select the appropriate configuration database and check the Clear option.
Step 4![]() Click the Apply Changes icon to save your changes.
Click the Apply Changes icon to save your changes.
To clear any learned entries in the active database for a specified interface within a VSAN using Fabric Manager, follow these steps:
Step 1![]() Expand a Fabric, expand a VSAN and then select Port Security in the Logical Domains pane.
Expand a Fabric, expand a VSAN and then select Port Security in the Logical Domains pane.
You see the Port Security information in the Information pane.
Step 2![]() Select the Actions tab. You see all the configuration databases.
Select the Actions tab. You see all the configuration databases.
Step 3![]() Select the appropriate configuration database and check the AutoLearn option.
Select the appropriate configuration database and check the AutoLearn option.
Step 4![]() Click the Apply Changes icon to save your changes.
Click the Apply Changes icon to save your changes.
Note![]() You can clear the Statistics and the AutoLearn option only for switches that are local and do not acquire locks. Also, learned entries are only local to the switch and do not participate in distribution.
You can clear the Statistics and the AutoLearn option only for switches that are local and do not acquire locks. Also, learned entries are only local to the switch and do not participate in distribution.
Displaying Port Security Configuration
The show port-security database commands display the configured port security information (see Examples 12-1 to 12-11 ).
Example 12-1 Displays the Contents of the Port Security Configuration Database
You can optionally specify a fWWN and a VSAN, or an interface and a VSAN in the show port-security command to view the output of the activated port security (see Example 12-2).
Example 12-2 Displays the Port Security Configuration Database in VSAN 1
Example 12-3 Displays the Activated Database
Example 12-4 Displays the Contents of the Temporary Configuration Database
Example 12-5 Displays the Difference Between the Temporary Configuration Database and the Configuration Database
The access information for each port can be individually displayed. If you specify the fWWN or interface options, all devices that are paired in the active database (at that point) with the given fWWN or the interface are displayed (see Examples 12-6 to 12-8 ).
Example 12-6 Displays the Wildcard fWWN Port Security in VSAN 1
Example 12-7 Displays the Configured fWWN Port Security in VSAN 1
Example 12-8 Displays the Interface Port Information in VSAN 2
The port security statistics are constantly updated and available at any time (see Example 12-9).
Example 12-9 Displays the Port Security Statistics
To verify the status of the active database and the auto-learning configuration, use the show port-security status command (see Example 12-10).
Example 12-10 Displays the Port Security Status
The show port-security command displays the previous 100 violations by default (see Example 12-11).
Example 12-11 Displays the Violations in the Port Security Database
The show port-security command issued with the last number option displays only the specified number of entries that appear first.
Default Settings
Table 12-5 lists the default settings for all port security features in any switch.
|
|
|
|---|---|
| Note Enabling distribution enables it on all VSANs in the switch. |
 Feedback