- Index
- New and Changed Information
- Preface
- Overview
- Configuring FIPS
- Configuring Users and Common Roles
- Configuring Security Features on an External AAA Server
- Configuring IPv4 and IPv6 Access Control Lists
- Configuring Certificate Authorities and Digital Certificates
- Configuring IPSec Network Security
- Configuring FC-SP and DHCHAP
- Configuring Port Security
- Configuring Fabric Binding
- Configuring Cisco TrustSec Fibre Channel Link Encryption
Cisco Fabric Manager Security Configuration Guide
Bias-Free Language
The documentation set for this product strives to use bias-free language. For the purposes of this documentation set, bias-free is defined as language that does not imply discrimination based on age, disability, gender, racial identity, ethnic identity, sexual orientation, socioeconomic status, and intersectionality. Exceptions may be present in the documentation due to language that is hardcoded in the user interfaces of the product software, language used based on RFP documentation, or language that is used by a referenced third-party product. Learn more about how Cisco is using Inclusive Language.
- Updated:
- May 17, 2011
Chapter: Configuring Users and Common Roles
Configuring Users and Common Roles
The CLI and SNMP use common roles in all switches in the Cisco MDS 9000 Family. You can use the CLI to modify a role that was created using SNMP and vice versa.
Users, passwords, and roles for all CLI and SNMP users are the same. A user configured through the CLI can access the switch using SNMP (for example, the Fabric Manager or the Device Manager) and vice versa.
This chapter includes the following sections:
•![]() Recovering the Administrator Password
Recovering the Administrator Password
Role-Based Authorization
Switches in the Cisco MDS 9000 Family perform authentication based on roles. Role-based authorization limits access to switch operations by assigning users to roles. This kind of authentication restricts you to management operations based on the roles to which you have been added.
When you execute a command, perform command completion, or obtain context-sensitive help, the switch software allows the operation to progress if you have permission to access that command.
This section includes the following topics:
•![]() Configuring Roles and Profiles
Configuring Roles and Profiles
•![]() Configuring Rules and Features for Each Role
Configuring Rules and Features for Each Role
•![]() Displaying Role-Based Information
Displaying Role-Based Information
About Roles
Each role can contain multiple users and each user can be part of multiple roles. For example, if role1 users are only allowed access to configuration commands, and role2 users are only allowed access to debug commands, then if Joe belongs to both role1 and role2, he can access configuration as well as debug commands.

Note ![]() If you belong to multiple roles, you can execute a union of all the commands permitted by these roles. Access to a command takes priority over being denied access to a command. For example, suppose you belong to a TechDocs group and you were denied access to configuration commands. However, you also belong to the engineering group and have access to configuration commands. In this case, you will have access to configuration commands.
If you belong to multiple roles, you can execute a union of all the commands permitted by these roles. Access to a command takes priority over being denied access to a command. For example, suppose you belong to a TechDocs group and you were denied access to configuration commands. However, you also belong to the engineering group and have access to configuration commands. In this case, you will have access to configuration commands.

Tip ![]() Any role, when created, does not allow access to the required commands immediately. The administrator must configure appropriate rules for each role to allow access to the required commands.
Any role, when created, does not allow access to the required commands immediately. The administrator must configure appropriate rules for each role to allow access to the required commands.
Configuring Roles and Profiles
Note ![]() Only users belonging to the network-admin role can create roles.
Only users belonging to the network-admin role can create roles.
To create an additional role or to modify the profile for an existing role using Fabric Manager, follow these steps:
Step 1 ![]() Expand Switches > Security and then select Users and Roles from the Physical Attributes pane.
Expand Switches > Security and then select Users and Roles from the Physical Attributes pane.
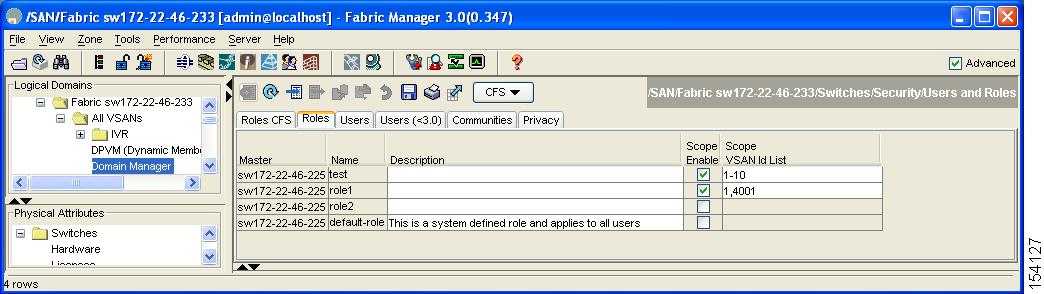
Step 2 ![]() Click the Roles tab in the Information pane.
Click the Roles tab in the Information pane.
You see the information as shown in Figure 3-1
Figure 3-1 Roles Tab in Users and Roles Screen
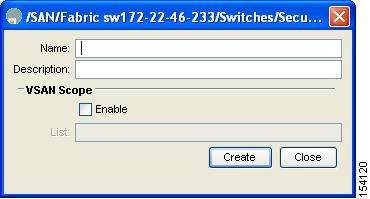
Step 3 ![]() Click Create Row to create a role in Fabric Manager.
Click Create Row to create a role in Fabric Manager.
You see the Create Roles dialog box in Figure 3-2.
Figure 3-2 Create Roles Dialog Box
Step 4 ![]() Select the switches on which to configure a role.
Select the switches on which to configure a role.
Step 5 ![]() Enter the name of the role in the Name field.
Enter the name of the role in the Name field.
Step 6 ![]() Enter the description of the role in the Description field.
Enter the description of the role in the Description field.
Step 7 ![]() (Optional) Check the Enable check box to enable the VSAN scope and enter the list of VSANs in the Scope field to which you want to restrict this role.
(Optional) Check the Enable check box to enable the VSAN scope and enter the list of VSANs in the Scope field to which you want to restrict this role.
Step 8 ![]() Click Create to create the role.
Click Create to create the role.
Note ![]() Device Manager automatically creates six roles that are required for Device Manager to display a view of a switch. These roles are system, snmp, module, interface, hardware, and environment.
Device Manager automatically creates six roles that are required for Device Manager to display a view of a switch. These roles are system, snmp, module, interface, hardware, and environment.
Deleting Common Roles
To delete a common role using Fabric Manager, follow these steps:
Step 1 ![]() Expand Switches > Security and then select Users and Roles from the Physical Attributes pane.
Expand Switches > Security and then select Users and Roles from the Physical Attributes pane.
Step 2 ![]() Click the Roles tab in the Information pane.
Click the Roles tab in the Information pane.
Step 3 ![]() Click the role you want to delete.
Click the role you want to delete.
Step 4 ![]() Click Delete Row to delete the common role.
Click Delete Row to delete the common role.
Step 5 ![]() Click Yes to confirm the deletion or No to cancel it.
Click Yes to confirm the deletion or No to cancel it.
Configuring Rules and Features for Each Role
Up to 16 rules can be configured for each role. These rules reflect what CLI commands are allowed. The user-specified rule number determines the order in which the rules are applied. For example, rule 1 is applied before rule 2, which is applied before rule 3, and so on. A user not belonging to the network-admin role cannot perform commands related to roles.
For example, if user A is permitted to perform all show CLI commands, user A cannot view the output of the show role CLI command if user A does not belong to the network-admin role.
A rule specifies operations that can be performed by a specific role. Each rule consists of a rule number, a rule type (permit or deny), a CLI command type (for example, config, clear, show, exec, debug), and an optional feature name (for example, FSPF, zone, VSAN, fcping, or interface).
Note ![]() In this case, exec CLI commands refer to all commands in the EXEC mode that are not included in the show, debug, and clear CLI command categories.
In this case, exec CLI commands refer to all commands in the EXEC mode that are not included in the show, debug, and clear CLI command categories.
Modifying Rules
To modify the rules for an existing role using Device Manager, follow these steps:
Step 1 ![]() Choose Security > Roles.
Choose Security > Roles.
You see the Roles dialog box shown in Figure 3-3.
Figure 3-3 Roles Dialog Box in Device Manager
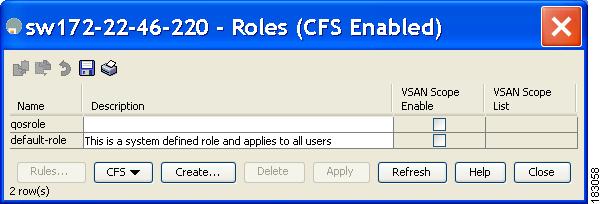
Step 2 ![]() Click the role for which you want to edit the rules.
Click the role for which you want to edit the rules.
Step 3 ![]() Click Rules to view the rules for the role.
Click Rules to view the rules for the role.
You see the Edit Role Rules dialog box shown in Figure 3-4.
Figure 3-4 Edit Role Rules Dialog Box

Step 4 ![]() Edit the rules you want to enable or disable for the common role.
Edit the rules you want to enable or disable for the common role.
Step 5 ![]() Click Apply to apply the new rules.
Click Apply to apply the new rules.
Rule 1 is applied first, thus permitting, for example, sangroup users access to all config CLI commands. Rule 2 is applied next, denying FSPF configuration to sangroup users. As a result, sangroup users can perform all other config CLI commands, except fspf CLI configuration commands.
Note ![]() The order of rule placement is important. If you had swapped these two rules and issued the deny config feature fspf rule first and issued the permit config rule next, you would be allowing all sangroup users to perform all configuration commands because the second rule globally overrode the first rule.
The order of rule placement is important. If you had swapped these two rules and issued the deny config feature fspf rule first and issued the permit config rule next, you would be allowing all sangroup users to perform all configuration commands because the second rule globally overrode the first rule.
Configuring the VSAN Policy
Configuring the VSAN policy requires the ENTERPRISE_PKG license (For more information, see Cisco MDS 9000 Family NX-OS Licensing Guide).
You can configure a role so that it only allows tasks to be performed for a selected set of VSANs. By default, the VSAN policy for any role is permit, which allows tasks to be performed for all VSANs. You can configure a role that only allows tasks to be performed for a selected set of VSANs. To selectively allow VSANs for a role, set the VSAN policy to deny, and then set the configuration to permit or the appropriate VSANs.
Note ![]() Users configured in roles where the VSAN policy is set to deny cannot modify the configuration for E ports. They can only modify the configuration for F or FL ports (depending on whether the configured rules allow such configuration to be made). This is to prevent such users from modifying configurations that may impact the core topology of the fabric.
Users configured in roles where the VSAN policy is set to deny cannot modify the configuration for E ports. They can only modify the configuration for F or FL ports (depending on whether the configured rules allow such configuration to be made). This is to prevent such users from modifying configurations that may impact the core topology of the fabric.
Tip ![]() Roles can be used to create VSAN administrators. Depending on the configured rules, these VSAN administrators can configure MDS features (for example, zone, fcdomain, or VSAN properties) for their VSANs without affecting other VSANs. Also, if the role permits operations in multiple VSANs, then the VSAN administrators can change VSAN membership of F or FL ports among these VSANs.
Roles can be used to create VSAN administrators. Depending on the configured rules, these VSAN administrators can configure MDS features (for example, zone, fcdomain, or VSAN properties) for their VSANs without affecting other VSANs. Also, if the role permits operations in multiple VSANs, then the VSAN administrators can change VSAN membership of F or FL ports among these VSANs.
Users belonging to roles in which the VSAN policy is set to deny are referred to as VSAN-restricted users.
Modifying the VSAN Policy
To modify the VSAN policy for an existing role using Fabric Manager, follow these steps:
Step 1 ![]() Expand Switches > Security and then select Users and Roles from the Physical Attributes pane.
Expand Switches > Security and then select Users and Roles from the Physical Attributes pane.
Step 2 ![]() Click the Roles tab in the Information pane.
Click the Roles tab in the Information pane.
Step 3 ![]() Check the Scope Enable check box if you want to enable the VSAN scope and restrict this role to a subset of VSANs.
Check the Scope Enable check box if you want to enable the VSAN scope and restrict this role to a subset of VSANs.
Step 4 ![]() Enter the list of VSANs in the Scope VSAN Id List field that you want to restrict this role to.
Enter the list of VSANs in the Scope VSAN Id List field that you want to restrict this role to.
Step 5 ![]() Click Apply Changes to save these changes.
Click Apply Changes to save these changes.
Displaying Role-Based Information
The rules are displayed by rule number and are based on each role. All roles are displayed if the role name is not specified.
To view rules for a role using Device Manager, follow these steps:
Step 1 ![]() Click Security > Roles.
Click Security > Roles.
You see the Roles dialog box.
Step 2 ![]() Select a role name and click Rules.
Select a role name and click Rules.
You see the Rules dialog box.
Step 3 ![]() Click Summary to get a summarized view of the rules configured for this role.
Click Summary to get a summarized view of the rules configured for this role.
Role Distributions
Role-based configurations use the Cisco Fabric Services (CFS) infrastructure to enable efficient database management, and to provide a single point of configuration for the entire fabric.
The following configurations are distributed:
•![]() Role names and descriptions
Role names and descriptions
•![]() List of rules for the roles
List of rules for the roles
•![]() VSAN policy and the list of permitted VSANs
VSAN policy and the list of permitted VSANs
This section includes the following topics:
•![]() Committing Role-Based Configuration Changes
Committing Role-Based Configuration Changes
•![]() Discarding Role-Based Configuration Changes
Discarding Role-Based Configuration Changes
•![]() Enabling Role-Based Configuration Distribution
Enabling Role-Based Configuration Distribution
•![]() Displaying Roles When Distribution is Enabled
Displaying Roles When Distribution is Enabled
About Role Databases
Role-based configurations use two databases to accept and implement configurations.
•![]() Configuration database—The running database currently enforced by the fabric.
Configuration database—The running database currently enforced by the fabric.
•![]() Pending database—Your subsequent configuration changes are stored in the pending database. If you modify the configuration, you need to commit or discard the pending database changes to the configuration database. The fabric remains locked during this period. Changes to the pending database are not reflected in the configuration database until you commit the changes.
Pending database—Your subsequent configuration changes are stored in the pending database. If you modify the configuration, you need to commit or discard the pending database changes to the configuration database. The fabric remains locked during this period. Changes to the pending database are not reflected in the configuration database until you commit the changes.
Locking the Fabric
The first action that modifies the database creates the pending database and locks the feature in the entire fabric. Once you lock the fabric, the following situations apply:
•![]() No other user can make any configuration changes to this feature.
No other user can make any configuration changes to this feature.
•![]() A copy of the configuration database becomes the pending database along with the first change.
A copy of the configuration database becomes the pending database along with the first change.
Committing Role-Based Configuration Changes
If you commit the changes made to the pending database, the configuration is committed to all the switches in the fabric. On a successful commit, the configuration change is applied throughout the fabric and the lock is released. The configuration database now contains the committed changes and the pending database is now cleared.
To commit role-based configuration changes using Fabric Manager, follow these steps:
Step 1 ![]() Expand Switches > Security and then select Users and Roles in the Physical Attributes pane.
Expand Switches > Security and then select Users and Roles in the Physical Attributes pane.
Step 2 ![]() Click the Roles CFS tab in the Information pane.
Click the Roles CFS tab in the Information pane.
You see the screen shown in Figure 3-5.
Figure 3-5 Roles CFS Tab

Step 3 ![]() Set the Global drop-down menu to enable to enable CFS.
Set the Global drop-down menu to enable to enable CFS.
Step 4 ![]() Click the Apply Changes icon to save this change.
Click the Apply Changes icon to save this change.
Step 5 ![]() Set the Config Action drop-down menu to commit to commit the roles using CFS.
Set the Config Action drop-down menu to commit to commit the roles using CFS.
Step 6 ![]() Click the Apply Changes icon to save this change.
Click the Apply Changes icon to save this change.
Discarding Role-Based Configuration Changes
If you discard (abort) the changes made to the pending database, the configuration database remains unaffected and the lock is released.
To discard role-based configuration changes using Fabric Manager, follow these steps:
Step 1 ![]() Expand Switches > Security and then select Users and Roles in the Physical Attributes pane.
Expand Switches > Security and then select Users and Roles in the Physical Attributes pane.
Step 2 ![]() Click the Roles CFS tab in the Information pane.
Click the Roles CFS tab in the Information pane.
Step 3 ![]() Set the Config Action drop-down menu to abort to discard any uncommitted changes.
Set the Config Action drop-down menu to abort to discard any uncommitted changes.
Step 4 ![]() Click the Apply Changes icon to save this change.
Click the Apply Changes icon to save this change.
Enabling Role-Based Configuration Distribution
To enable role-based configuration distribution using Fabric Manager, follow these steps:
Step 1 ![]() Expand Switches > Security and then select Users and Roles in the Physical Attributes pane.
Expand Switches > Security and then select Users and Roles in the Physical Attributes pane.
Step 2 ![]() Click the Roles CFS tab in the Information pane.
Click the Roles CFS tab in the Information pane.
Step 3 ![]() Set the Global drop-down menu to enable to enable CFS distribution.
Set the Global drop-down menu to enable to enable CFS distribution.
Step 4 ![]() Click the Apply Changes icon to save this change.
Click the Apply Changes icon to save this change.
Clearing Sessions
To forcibly clear the existing role session in the fabric using Fabric Manager, follow these steps:
Step 1 ![]() Expand Switches > Security and then select Users and Roles in the Physical Attributes pane.
Expand Switches > Security and then select Users and Roles in the Physical Attributes pane.
Step 2 ![]() Click the Roles CFS tab in the Information pane.
Click the Roles CFS tab in the Information pane.
Step 3 ![]() Set the Config Action drop-down menu to clear to clear the pending database.
Set the Config Action drop-down menu to clear to clear the pending database.
Step 4 ![]() Click the Apply Changes icon to save this change.
Click the Apply Changes icon to save this change.

Database Merge Guidelines
Fabric merge does not modify the role database on a switch. If two fabrics merge, and the fabrics have different role databases, the software generates an alert message.
•![]() Verify that the role database is identical on all switches in the entire fabric.
Verify that the role database is identical on all switches in the entire fabric.
•![]() Be sure to edit the role database on any switch to the desired database and then commit it. This synchronizes the role databases on all the switches in the fabric.
Be sure to edit the role database on any switch to the desired database and then commit it. This synchronizes the role databases on all the switches in the fabric.
Displaying Roles When Distribution is Enabled
To view the roles using Fabric Manager, follow these steps:
Step 1 ![]() Expand Switches > Security and then select Users and Roles in the Physical Attributes pane.
Expand Switches > Security and then select Users and Roles in the Physical Attributes pane.
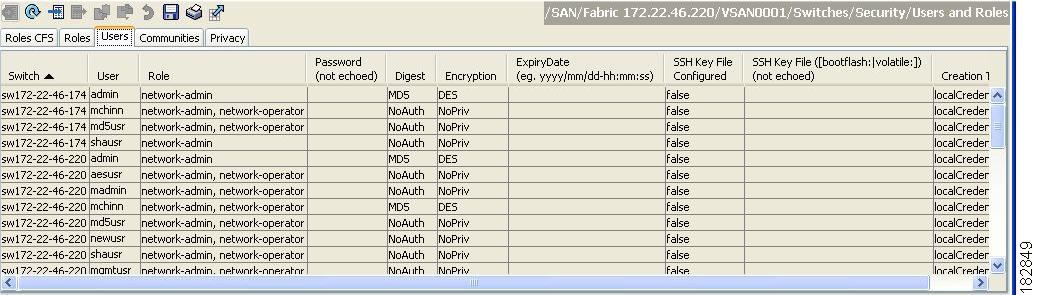
Step 2 ![]() Click the Users tab in the Information pane (see Figure 3-6).
Click the Users tab in the Information pane (see Figure 3-6).
Figure 3-6 Roles CFS Tab
Step 3 ![]() Set the Config View As drop-down value to pending to view the pending database or set the Config View as drop-down menu to running to view the running database.
Set the Config View As drop-down value to pending to view the pending database or set the Config View as drop-down menu to running to view the running database.
Step 4 ![]() Click Apply Changes to save this change.
Click Apply Changes to save this change.
Configuring Common Roles
The CLI and SNMP in all switches in the Cisco MDS 9000 Family use common roles. You can use SNMP to modify a role that was created using the CLI and vice versa (see Figure 3-7).
Figure 3-7 Common Roles
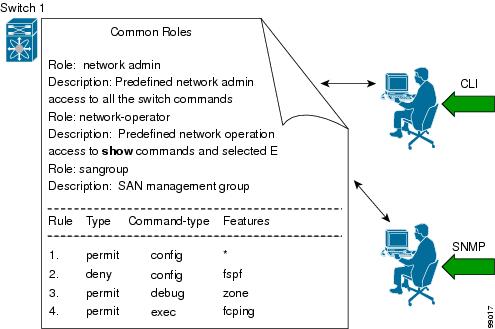
Each role in SNMP is the same as a role created or modified through the CLI (see the "Role-Based Authorization" section).
Each role can be restricted to one or more VSANs as required.
You can create new roles or modify existing roles using SNMP or the CLI.
•![]() SNMP—Use the CISCO-COMMON-ROLES-MIB to configure or modify roles. Refer to the Cisco MDS 9000 Family MIB Quick Reference.
SNMP—Use the CISCO-COMMON-ROLES-MIB to configure or modify roles. Refer to the Cisco MDS 9000 Family MIB Quick Reference.
•![]() CLI—Use the role name command.
CLI—Use the role name command.
Mapping of CLI Operations to SNMP
SNMP has only three possible operations: GET, SET, and NOTIFY. The CLI has five possible operations: DEBUG, SHOW, CONFIG, CLEAR, and EXEC.
Note ![]() NOTIFY does not have any restrictions like the syslog messages in the CLI.
NOTIFY does not have any restrictions like the syslog messages in the CLI.
Table 3-1 explains how the CLI operations are mapped to the SNMP operations.
|
|
|
|---|---|
DEBUG |
Ignored |
SHOW |
GET |
CONFIG |
SET |
CLEAR |
SET |
EXEC |
SET |
Example 3-1 shows the privileges and rules mapping CLI operations to SNMP operations for a role named my_role.
Example 3-1 Displays CLI Operation to SNMP Operation Mapping
switch# show role name my_role
Role:my_role
vsan policy:permit (default)
---------------------------------------------
Rule Type Command-type Feature
---------------------------------------------
1. permit clear *
2. deny clear ntp
3. permit config *
4. deny config ntp
5. permit debug *
6. deny debug ntp
7. permit show *
8. deny show ntp
9. permit exec *
Note ![]() Although CONFIG is denied for NTP in rule 4, rule 9 allows the SET to NTP MIB objects because EXEC also maps to the SNMP SET operation.
Although CONFIG is denied for NTP in rule 4, rule 9 allows the SET to NTP MIB objects because EXEC also maps to the SNMP SET operation.
Configuring User Accounts
Every Cisco MDS 9000 Family switch user has the account information stored by the system. Your authentication information, user name, user password, password expiration date, and role membership are stored in your user profile.
The tasks explained in this section enable you to create users and modify the profile of an existing user. These tasks are restricted to privileged users as determined by your administrator.
This section includes the following topics:
•![]() Displaying User Account Information
Displaying User Account Information
Creating Users Guidelines
The passphrase specified in the snmp-server user option and the password specified username option are synchronized.
By default, the user account does not expire unless you explicitly configure it to expire. The expire option determines the date on which the user account is disabled. The date is specified in the YYYY-MM-DD format.
When creating users, note the following guidelines:
•![]() You can configure up to a maximum of 256 users on a switch.
You can configure up to a maximum of 256 users on a switch.
•![]() The following words are reserved and cannot be used to configure users: bin, daemon, adm, lp, sync, shutdown, halt, mail, news, uucp, operator, games, gopher, ftp, nobody, nscd, mailnull, rpc, rpcuser, xfs, gdm, mtsuser, ftpuser, man, and sys.
The following words are reserved and cannot be used to configure users: bin, daemon, adm, lp, sync, shutdown, halt, mail, news, uucp, operator, games, gopher, ftp, nobody, nscd, mailnull, rpc, rpcuser, xfs, gdm, mtsuser, ftpuser, man, and sys.
•![]() User passwords are not displayed in the switch configuration file.
User passwords are not displayed in the switch configuration file.
•![]() If a password is trivial (short, easy-to-decipher), your password configuration is rejected. Be sure to configure a strong password as shown in the sample configuration. Passwords are case-sensitive. "admin" is no longer the default password for any Cisco MDS 9000 Family switch. You must explicitly configure a strong password.
If a password is trivial (short, easy-to-decipher), your password configuration is rejected. Be sure to configure a strong password as shown in the sample configuration. Passwords are case-sensitive. "admin" is no longer the default password for any Cisco MDS 9000 Family switch. You must explicitly configure a strong password.
Checking Password Strength
You can check the strength of the configured password.
When you enable password checking, the NX-OS software allows you to create strong passwords only.
Characteristics of Strong Passwords
A strong password has the following characteristics:
•![]() At least eight characters long
At least eight characters long
•![]() Does not contain many consecutive characters (such as "abcd")
Does not contain many consecutive characters (such as "abcd")
•![]() Does not contain many repeating characters (such as "aaabbb")
Does not contain many repeating characters (such as "aaabbb")
•![]() Does not contain dictionary words
Does not contain dictionary words
•![]() Does not contain proper names
Does not contain proper names
•![]() Contains both upper- and lower-case characters
Contains both upper- and lower-case characters
•![]() Contains numbers
Contains numbers
The following are examples of strong passwords:
•![]() If2CoM18
If2CoM18
•![]() 2004AsdfLkj30
2004AsdfLkj30
•![]() Cb1955S21
Cb1955S21
Configuring Users
Before configuring users, make sure that you have configured roles to associate with the users that you are creating.
Note ![]() As of Cisco SAN-OS Release 3.1(2b), Fabric Manager automatically checks whether encryption is enabled, which allows you to create users.
As of Cisco SAN-OS Release 3.1(2b), Fabric Manager automatically checks whether encryption is enabled, which allows you to create users.
To configure a new user or to modify the profile of an existing user using Fabric Manager, follow these steps:
Step 1 ![]() Expand Switches > Security and then select Users and Roles from the Physical Attributes pane.
Expand Switches > Security and then select Users and Roles from the Physical Attributes pane.
Step 2 ![]() Click the Users tab in the Information pane to see a list of users (see Figure 3-8).
Click the Users tab in the Information pane to see a list of users (see Figure 3-8).
Figure 3-8 Users Listed Under the Users Tab
Step 3 ![]() Click the Create Row icon.
Click the Create Row icon.
You see the Users - Create dialog box as shown in Figure 3-9.
Figure 3-9 Users - Create Dialog Box
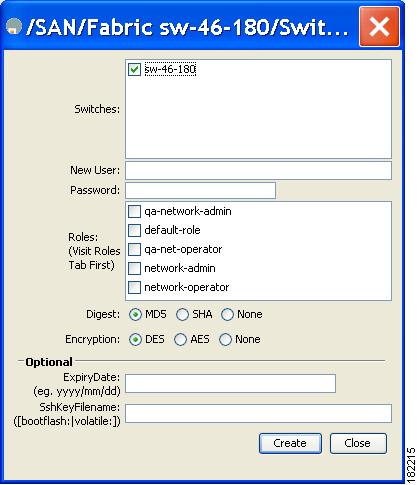
Step 4 ![]() (Optional) Alter the Switches check boxes to specify one or more switches.
(Optional) Alter the Switches check boxes to specify one or more switches.
Step 5 ![]() Enter the user name in the New User field.
Enter the user name in the New User field.
Step 6 ![]() Enter the password for the user.
Enter the password for the user.
Step 7 ![]() Check the roles that you want to associate with this user.
Check the roles that you want to associate with this user.
See the "Configuring Rules and Features for Each Role" section.
Step 8 ![]() Select the appropriate option for the type of authentication protocol used. The default value is MD5.
Select the appropriate option for the type of authentication protocol used. The default value is MD5.
Step 9 ![]() Select the appropriate option for the type of privacy protocol used. The default value is DES.
Select the appropriate option for the type of privacy protocol used. The default value is DES.
Step 10 ![]() (Optional) Enter the expiry date for this user.
(Optional) Enter the expiry date for this user.
Step 11 ![]() (Optional) Enter the SSH Key filename.
(Optional) Enter the SSH Key filename.
Step 12 ![]() Click Create to create the entry.
Click Create to create the entry.
Deleting a User
To delete a user using Fabric Manager, follow these steps:
Step 1 ![]() Expand Switches > Security and then select Users and Roles from the Physical Attributes pane.
Expand Switches > Security and then select Users and Roles from the Physical Attributes pane.
Step 2 ![]() Click the Users tab in the Information pane to see a list of users.
Click the Users tab in the Information pane to see a list of users.
Step 3 ![]() Click the name of the user you want to delete.
Click the name of the user you want to delete.
Step 4 ![]() Click Delete Row to delete the selected user.
Click Delete Row to delete the selected user.
Step 5 ![]() Click Apply Changes to save this change.
Click Apply Changes to save this change.
Displaying User Account Information
To display information about configured user accounts using Fabric Manager, follow these steps:
Step 1 ![]() Expand Security and then select Users and Roles in the Physical Attributes pane.
Expand Security and then select Users and Roles in the Physical Attributes pane.
Step 2 ![]() Click the Users tab.
Click the Users tab.
You see the list of SNMP users shown in Figure 3-10 in the Information pane.
Figure 3-10 Users Listed Under the Users Tab
Configuring SSH Services
A secure SSH connection, with a RSA key is available as default on all Cisco MDS 9000 Family switches. If you require a secure SSH connection with DSA key, you need to disable the default SSH connection, Generate a DSA key and then enable the SSH connection (see the "Generating the SSH Server Key Pair" section).
This section includes the following topics:
•![]() Generating the SSH Server Key Pair
Generating the SSH Server Key Pair
•![]() Generating the SSH Server Key Pair
Generating the SSH Server Key Pair
•![]() Overwriting a Generated Key Pair
Overwriting a Generated Key Pair
•![]() Enabling SSH or Telnet Service
Enabling SSH or Telnet Service
•![]() SSH Authentication Using Digital Certificates
SSH Authentication Using Digital Certificates
•![]() PasswordfreeFile copy and SSH
PasswordfreeFile copy and SSH
About SSH
SSH provides secure communications to the Cisco NX-OS CLI. You can use SSH keys for the following SSH options:
•![]() SSH2 using RSA
SSH2 using RSA
•![]() SSH2 using DSA
SSH2 using DSA
Generating the SSH Server Key Pair
Ensure that you have an SSH server key pair with the appropriate version before enabling the SSH service. Generate the SSH server key pair according to the SSH client version used. The number of bits specified for each key pair ranges from 768 to 2048.
The SSH service accepts two types of key pairs for use by SSH version 2.
•![]() The dsa option generates the DSA key pair for the SSH version 2 protocol.
The dsa option generates the DSA key pair for the SSH version 2 protocol.
•![]() The rsa option generates the RSA keypair for the SSH version 2 protocol.
The rsa option generates the RSA keypair for the SSH version 2 protocol.
Caution
To generate the SSH key pair using Fabric Manager, follow these steps:
Step 1 ![]() Expand Switches > Security and then select SSH and Telnet.
Expand Switches > Security and then select SSH and Telnet.
You see the configuration shown in Figure 3-11 in the Information pane.
Figure 3-11 SSH and Telnet Configuration
Step 2 ![]() Click the Create Row icon.
Click the Create Row icon.
You see the SSH and Telnet Key - Create dialog box (see Figure 3-12).
Figure 3-12 SSH and Telnet - Create Dialog Box

Step 3 ![]() Check the switches you want to assign to this SSH key pair.
Check the switches you want to assign to this SSH key pair.
Step 4 ![]() Choose the key pair option type from the listed Protocols. The listed protocols are SSH1, SSH2(rsa), and SSH2(dsa).
Choose the key pair option type from the listed Protocols. The listed protocols are SSH1, SSH2(rsa), and SSH2(dsa).
Step 5 ![]() Set the number of bits that will be used to generate the key pairs in the NumBits drop-down menu.
Set the number of bits that will be used to generate the key pairs in the NumBits drop-down menu.
Step 6 ![]() Click Create to generate these keys.
Click Create to generate these keys.
Note ![]() 1856 DSA NumberKeys are not supported by switches that running Cisco MDS NX-OS software version 4.1(1) and later.
1856 DSA NumberKeys are not supported by switches that running Cisco MDS NX-OS software version 4.1(1) and later.
Specifying the SSH Key
You can specify an SSH key to log in using the SSH client without being prompted for a password. You can specify the SSH key in three different formats:
•![]() Open SSH format
Open SSH format
•![]() IETF SECSH format
IETF SECSH format
•![]() Public Key Certificate in PEM format
Public Key Certificate in PEM format
Overwriting a Generated Key Pair
If the SSH key pair option is already generated for the required version, you can force the switch to overwrite the previously generated key pair.
To overwrite the previously generated key pair using Fabric Manager, follow these steps:
Step 1 ![]() Expand Switches > Security and then select SSH and Telnet.
Expand Switches > Security and then select SSH and Telnet.
You see the configuration in the Information pane.
Step 2 ![]() Highlight the key that you want to overwrite and click Delete Row.
Highlight the key that you want to overwrite and click Delete Row.
Step 3 ![]() Click the Apply Changes icon to save these changes.
Click the Apply Changes icon to save these changes.
Step 4 ![]() Click the Create Row icon.
Click the Create Row icon.
You see the SSH and Telnet Key - Create dialog box.
Step 5 ![]() Check the switches you want to assign this SSH key pair.
Check the switches you want to assign this SSH key pair.
Step 6 ![]() Choose the key pair option type from the Protocols radio buttons.
Choose the key pair option type from the Protocols radio buttons.
Step 7 ![]() Set the number of bits that will be used to generate the key pairs in the NumBits drop-down menu.
Set the number of bits that will be used to generate the key pairs in the NumBits drop-down menu.
Step 8 ![]() Click Create to generate these keys.
Click Create to generate these keys.
Enabling SSH or Telnet Service
By default, the SSH service is enabled with the RSA key.
Note ![]() If you are logging in to a switch through SSH and you have issued the aaa authentication login default none CLI command, you must enter one or more key strokes to log in. If you press the Enter key without entering at least one keystroke, your log in will be rejected.
If you are logging in to a switch through SSH and you have issued the aaa authentication login default none CLI command, you must enter one or more key strokes to log in. If you press the Enter key without entering at least one keystroke, your log in will be rejected.
Fabric Manager enables SSH automatically when you configure it.
To enable or disable SSH using Fabric Manager, follow these steps:
Step 1 ![]() Expand Switches > Security and then select SSH and Telnet.
Expand Switches > Security and then select SSH and Telnet.
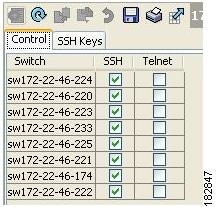
Step 2 ![]() Select the Control tab and check an SSH check box or Telnet check box for each switch (see Figure 3-13).
Select the Control tab and check an SSH check box or Telnet check box for each switch (see Figure 3-13).
Figure 3-13 Control Tab under SSH and Telnet
Step 3 ![]() Click the Apply Changes icon to save this change.
Click the Apply Changes icon to save this change.
SSH Authentication Using Digital Certificates
SSH authentication on the Cisco MDS 9000 Family switches provide X.509 digital certificate support for host authentication. An X.509 digital certificate is a data item that vouches for the origin and integrity of a message. It contains encryption keys for secured communications and is "signed" by a trusted certification authority (CA) to verify the identity of the presenter. The X.509 digital certificate support provides either DSA or RSA algorithms for authentication.
The certificate infrastructure uses the first certificate that supports the Secure Socket Layer (SSL) and is returned by the security infrastructure, either through query or notification. Verification of certificates is successful if the certificates are from any of the trusted CAs.
You can configure your switch for either SSH authentication using an X.509 certificate or SSH authentication using a Public Key Certificate, but not both. If either of them is configured and the authentication fails, you will be prompted for a password.
For more information on CAs and digital certificates, see Chapter 6, "Configuring Certificate Authorities and Digital Certificates."
PasswordfreeFile copy and SSH
Secure Shell (SSH) public key authentication can be used to achieve password free logins. SCP and SFTP uses SSH in the background and hence these copy protocols can be used for a password free copy with public key authentication. The NX-OS version only supports the SCP and STFP client functionality.
You can create an RSA/DSA identity which can be used for authentication with ssh. The identity will consist of two parts: public and private keys. The public and the private keys are generated by the switch or can be generated externally and imported to the switch. For import purposes, the keys should be in OPENSSH format.
To use the key on a host machine hosting an SSH server, you must transfer the public key file to the machine and add the contents of it to the file 'authorized_keys' in your ssh directory (e.g. $HOME/.ssh) on the server. For import and export of private keys, the key will be protected by encryption. You will be asked to enter a Passphrase for the same. If you enter a passphrase, the private key is protected by encryption. If you leave the password field blank, the key will not be encrypted.
If you need to copy the keys to another switch, you will have to export the keys out of the switch to a host machine and then import the same to other switches from that machine.
•![]() The key files are persistent across reload.
The key files are persistent across reload.
Changing Administrator Password Using Fabric Manager
To change the administrator password in Fabric Manager, follow these steps:
Step 1 ![]() Click the Open tab in the control panel.
Click the Open tab in the control panel.
Step 2 ![]() Choose the password field to change the password for an already existing user for the fabric.
Choose the password field to change the password for an already existing user for the fabric.
Step 3 ![]() Click Open to open the fabric.
Click Open to open the fabric.
Note ![]() New password will be saved after the fabric is open. The user name and password fields are editable in the Fabric tab only after you unmanage the fabric.
New password will be saved after the fabric is open. The user name and password fields are editable in the Fabric tab only after you unmanage the fabric.
Recovering the Administrator Password
You can recover the administrator password using one of two methods:
•![]() From the CLI with a user name that has network-admin privileges.
From the CLI with a user name that has network-admin privileges.
•![]() Power cycling the switch.
Power cycling the switch.
Note ![]() To recover an administrator's password, refer to the Cisco MDS 9000 Family NX-OS Security Configuration Guide.
To recover an administrator's password, refer to the Cisco MDS 9000 Family NX-OS Security Configuration Guide.
Default Settings
Table 3-2 lists the default settings for all switch security features in any switch.
 Feedback