Configuring Host-Based IDS and IPS Devices
Available Languages
Table Of Contents
Configuring Host-Based IDS and IPS Devices
Entercept Entercept 2.5 and 4.0
Extracting Entercept Agent Information into a CSV file (for Entercept Version 2.5)
Create a CSV file for Entercept Agents in Version 2.5
Define the MARS Appliance as an SNMP Trap Target
Specific the Events to Generate SNMP Traps for MARS
Add and Configure an Entercept Console and its Agents in MARS
Add the Entercept Console Host to MARS
Add Entercept Agents Using a Seed File
Cisco Security Agent 4.x and 5.x Device
Configure CSA Management Center to Generate Required Data
Configure CSA MC to Forward SNMP Notifications to MARS
Export CSA Agent Information to File
Add and Configure a CSA MC Device in MARS
Troubleshooting CSA Agent Installs
Configuring Host-Based IDS and IPS Devices
Revised: September 10, 2007Host-based intrusion detection and prevention devices provide MARS with detailed information about attacks seen at the host level, rather than the network level. They also provide information about the host operating system and successful prevention of attacks, both of which provide more targeted data for false positive analysis.
This chapter explains how to bootstrap and add the following host-based IDS and IPS devices to MARS:
•
Entercept Entercept 2.5 and 4.0
•
Entercept Entercept 2.5 and 4.0
To configure Entercept in MARS, you must perform the following tasks:
1.
2.
3.
4.
5.
The following sections provide details on performing each of these tasks:
•
•
•
Extracting Entercept Agent Information into a CSV file (for Entercept Version 2.5)

Note
When you configure the MARS box to add Entercept agents, you can extract them from the database file on the Entercept console, instead of typing the mapping for each agent.
Create a CSV file for Entercept Agents in Version 2.5
Step 1
Step 2
Step 3
Step 4
A sample agents.txt file could be:1,3,"entercept1",6,1,1,1,438,1,"127.0.0.1",0,,1051055867,2086where the fields are: AgentID, AgentTypeID, ComputerName, ComputerType,NewFlag, StatusID, OperatingModeID, VersionID, VersionModeID, IP,License, Note, NoConnection, and UpTime.
Define the MARS Appliance as an SNMP Trap Target
Step 1
Step 2
Step 3
Step 4
Step 5
Step 6
a.
b.
c.
d.
e.
f.
g.
Specific the Events to Generate SNMP Traps for MARS
Step 1
Step 2
Step 3
Step 4
Step 5
Step 6
Step 7
Step 8
Add and Configure an Entercept Console and its Agents in MARS
Adding an Entercept device has two distinct steps. First, you add configuration information for the for the Entercept Console host. Second, you add the agents managed by that console.
•
•
•
Add the Entercept Console Host to MARS
Step 1
Step 2
Step 3
Step 4
Step 5
Step 6
Step 7
Step 8
Step 9
Step 10
Step 11
You could now add the agents.
Add Entercept Agents Manually
Step 1
Step 2
Step 3
Adding new device
•
•
Step 4
Add Entercept Agents Using a Seed File
Step 1
Step 2
•
Step 3
Cisco Security Agent 4.x and 5.x Device
To enable Cisco Security Agent (CSA) as a reporting device in MARS, you must identify the CSA Management Console (CSA MC) as the reporting device. The CSA MC receives alerts from the CSA agents that it monitors, and it forwards those alerts to MARS as SNMP notifications.
When MARS receives the SNMP notification, the source IP address in the notification is that of the CSA agent that originally triggered the event, rather than the CSA MC that forwarded it. Therefore, MARS requires host definitions for each of the CSA agents that can potentially trigger an event. These definitions are added as sub-components under the device definition of the CSA MC.
As of MARS, release 4.1.1, the MARS Appliance discovers CSA agents as they generate alerts, eliminating the need to manually define them. MARS parses the alert to identify the CSA agent hostname and to discover the host operating system (OS). MARS uses this information to add any undefined agents as children of the CSA MC as a host with either the Generic Windows (all Windows) or Generic (Unix or Linux) operating system value. You are still required to define the CSA MC; however, you are not required to define each agent. The default topology presentation for discovered CSA agents is within a cloud.
Note
Prior to 4.1.1., you were required to manually add each agent or by using an exported hosts file, as defined in Export CSA Agent Information to File.
Note
This section contains the following topics:
•
•
•
Configure CSA Management Center to Generate Required Data
To bootstrap CSA, you must configure the CSA MC to forward SNMP notifications to the MARS Appliance. In addition, you can export the list of CSA agents in a format that MARS can import. However, this export operation is not necessary, as MARS discovers the agents as they generate notifications.
This section contains the following topics:
•
•
Configure CSA MC to Forward SNMP Notifications to MARS
The only required configuration is to ensure that CSA MC forwards the SNMP notifications that it receives from agents to MARS. From these notifications, MARS is able to discover the agent and its relevant settings. It is also from these events that MARS learns about the host-level activities transpiring on your network.
To forward all notifications to the MARS Appliance, follow these steps:
Step 1
Step 2
Step 3
Step 4
Step 5
Step 6
Step 7
Step 8
Step 9
Export CSA Agent Information to File
With the release of MARS 4.1.1, you are no longer required to define each Cisco CSA agent, as they are discovered as a device sends an SNMP notification to the CSA Management Console (CSA MC).
Note
To export the all hosts report as a tab-delimited file, follow these steps:
Step 1
When accessing the CSA MC, you must use a fully qualified domain name in the URL. If you use the CiscoWorks Desktop to launch CSA MC, the ActiveX reports do not display.
Step 2
Step 3
Step 4
Step 5
A window appears that contains the host details.
Step 6
Step 7
Step 8
Step 9
Step 10
Step 11
You will return to this file when adding the CSA device n the MARS web interface, as defined in Add and Configure a CSA MC Device in MARS.
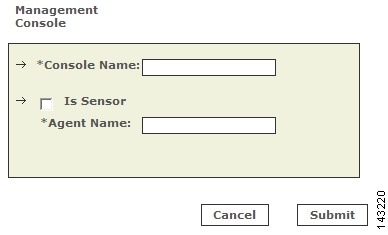
Add and Configure a CSA MC Device in MARS
Before you can identify the agents, you must add the CSA MC to MARS. All CSA agents forward notifications to the CSA MC, and the CSA MC forwards SNMP notifications to MARS. Once you define the CSA MC and activate the device. MARS can discover the agents that are managed by that CSA MC. However, you can also chose to manually add the agents.
To add a CSA MC to MARS, follow these steps:
Step 1
Step 2
Step 3
Step 4
Step 5
Step 6
•
•
Note
Step 7
Step 8
Step 9
•
•
•
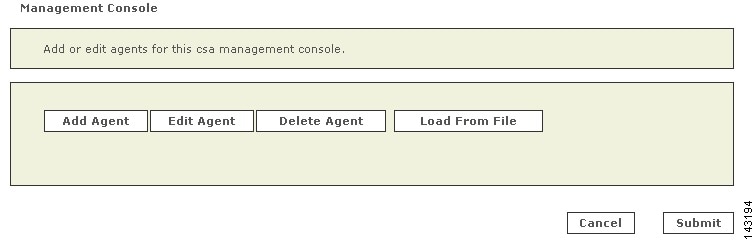
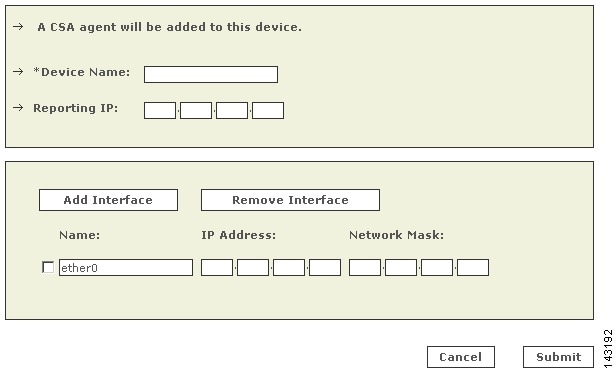
Add a CSA Agent Manually
You can manually add a CSA Agent as a child of the CSA MC. This feature allows you to represent all of your agents, even if they have not generated any notifications.
To add CSA agents manually, follow these steps:
Step 1
Step 2
Step 3
Step 4
Step 5
•
A page displays with the values pre-populated for hostname, reporting IP address, and at least one interface.
•
Step 6
This value should reflect the DNS entry for this device.
Step 7
Step 8
The interface settings are used for attack path calculation. It is very important that you identify any dual-homed hosts by defining each interface.
Step 9
Step 10
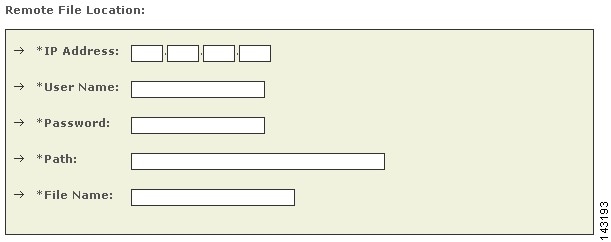
Add CSA Agents From File
You can add the complete list of hosts on which CSA Agents are installed by exporting the all hosts report from CSA MC and importing that file into MARS. The only advantage to adding agents using an export file is that the first notification received that originates from the agent is not attributed to the CSA MC.
To add CSA agents from a file, follow these steps:
Step 1
Step 2
Step 3
Step 4
a

Caution
Step 5
Step 6
Step 7
Step 8
\<path_here>\.Step 9
Step 10
The following message displays and the hosts are added as agents of the CSA MC:
Success:Status: OKStep 11
Troubleshooting CSA Agent Installs
When importing CSA agents from a file, the following messages can occur.
 Feedback