Configuring the Umbrella DNS Connector for Cisco Secure Firewall Management Center
This document describes how to set up the Umbrella DNS Connector in the Secure Firewall management center.
Benefits of the Umbrella Connector
Cisco Umbrella DNS Connection in management center helps to redirect DNS queries to Cisco Umbrella. This allows Cisco Umbrella to validate requests, whether to be allowed or blocked based on the domain names and applies DNS based security policy on the request. If you use Cisco Umbrella, you can configure the Cisco Umbrella Connection to redirect DNS queries to Cisco Umbrella.
The Umbrella Connector is part of the system’s DNS inspection. If your existing DNS inspection policy map decides to block or drop a request based on your DNS inspection settings, the request is not forwarded to Cisco Umbrella. Thus, you have two lines of protection: your local DNS inspection policy and your Cisco Umbrella cloud-based policy.
When redirecting DNS lookup requests to Cisco Umbrella, the Umbrella Connector adds an EDNS (Extension mechanisms for DNS) record. An EDNS record includes the device identifier information, organization ID, and client IP address. Your cloud-based policy can use those criteria to control access in addition to the reputation of the FQDN. You can also elect to encrypt the DNS request using DNSCrypt to ensure the privacy of usernames and internal IP addresses.
System Requirements
The table below shows the supported platforms for this procedure:
|
Product |
Version |
|---|---|
|
Firepower Threat Defense |
6.6.0 and later |
|
Firewall Management Center |
7.2 and later |
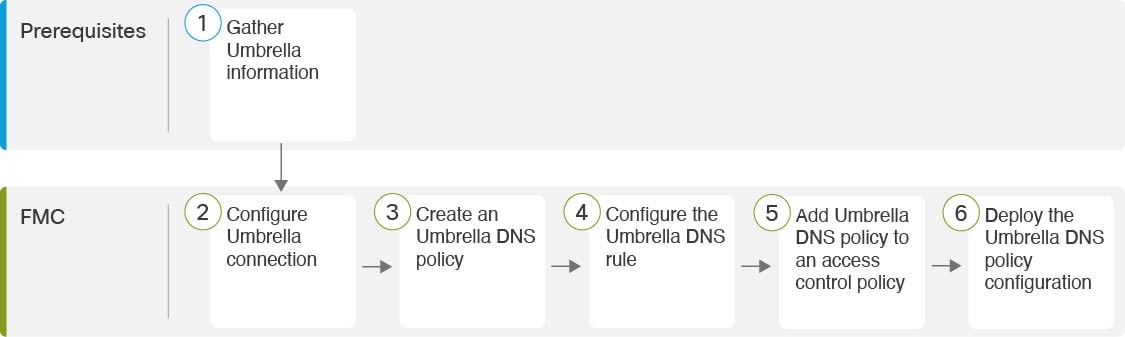
Configure the Management Center Umbrella DNS Connector
|
|
Prerequisites |
|
|
|
Management Center |
|
|
|
Management Center |
|
|
|
Management Center |
|
|
|
Management Center |
Associate the Umbrella DNS Policy with an Access Control Policy |
|
|
Management Center |
Gather Umbrella Prerequisites
Before you begin
-
Establish an account with Cisco Umbrella at https://umbrella.cisco.com, and log into Umbrella at http://login.umbrella.com.
-
The Umbrella account must be configured with DNS policies.
-
Install the DigiCert intermediate certificate in the management center (Device > Certificates). The following is the certificate to copy and paste:
-----BEGIN CERTIFICATE-----
MIIE6jCCA9KgAwIBAgIQCjUI1VwpKwF9+K1lwA/35DANBgkqhkiG9w0BAQsFADBhMQswCQYDVQQG
EwJVUzEVMBMGA1UEChMMRGlnaUNlcnQgSW5jMRkwFwYDVQQLExB3d3cuZGlnaWNlcnQuY29tMSAw
HgYDVQQDExdEaWdpQ2VydCBHbG9iYWwgUm9vdCBDQTAeFw0yMDA5MjQwMDAwMDBaFw0zMDA5MjMy
MzU5NTlaME8xCzAJBgNVBAYTAlVTMRUwEwYDVQQKEwxEaWdpQ2VydCBJbmMxKTAnBgNVBAMTIERp
Z2lDZXJ0IFRMUyBSU0EgU0hBMjU2IDIwMjAgQ0ExMIIBIjANBgkqhkiG9w0BAQEFAAOCAQ8AMIIB
CgKCAQEAwUuzZUdwvN1PWNvsnO3DZuUfMRNUrUpmRh8sCuxkB+Uu3Ny5CiDt3+PE0J6aqXodgojl
EVbbHp9YwlHnLDQNLtKS4VbL8Xlfs7uHyiUDe5pSQWYQYE9XE0nw6Ddng9/n00tnTCJRpt8OmRDt
V1F0JuJ9x8piLhMbfyOIJVNvwTRYAIuE//i+p1hJInuWraKImxW8oHzf6VGo1bDtN+I2tIJLYrVJ
muzHZ9bjPvXj1hJeRPG/cUJ9WIQDgLGBAfr5yjK7tI4nhyfFK3TUqNaX3sNk+crOU6JWvHgXjkkD
Ka77SU+kFbnO8lwZV21reacroicgE7XQPUDTITAHk+qZ9QIDAQABo4IBrjCCAaowHQYDVR0OBBYE
FLdrouqoqoSMeeq02g+YssWVdrn0MB8GA1UdIwQYMBaAFAPeUDVW0Uy7ZvCj4hsbw5eyPdFVMA4G
A1UdDwEB/wQEAwIBhjAdBgNVHSUEFjAUBggrBgEFBQcDAQYIKwYBBQUHAwIwEgYDVR0TAQH/BAgw
BgEB/wIBADB2BggrBgEFBQcBAQRqMGgwJAYIKwYBBQUHMAGGGGh0dHA6Ly9vY3NwLmRpZ2ljZXJ0
LmNvbTBABggrBgEFBQcwAoY0aHR0cDovL2NhY2VydHMuZGlnaWNlcnQuY29tL0RpZ2lDZXJ0R2xv
YmFsUm9vdENBLmNydDB7BgNVHR8EdDByMDegNaAzhjFodHRwOi8vY3JsMy5kaWdpY2VydC5jb20v
RGlnaUNlcnRHbG9iYWxSb290Q0EuY3JsMDegNaAzhjFodHRwOi8vY3JsNC5kaWdpY2VydC5jb20v
RGlnaUNlcnRHbG9iYWxSb290Q0EuY3JsMDAGA1UdIAQpMCcwBwYFZ4EMAQEwCAYGZ4EMAQIBMAgG
BmeBDAECAjAIBgZngQwBAgMwDQYJKoZIhvcNAQELBQADggEBAHert3onPa679n/gWlbJhKrKW3EX
3SJH/E6f7tDBpATho+vFScH90cnfjK+URSxGKqNjOSD5nkoklEHIqdninFQFBstcHL4AGw+oWv8Z
u2XHFq8hVt1hBcnpj5h232sb0HIMULkwKXq/YFkQZhM6LawVEWwtIwwCPgU7/uWhnOKK24fXSuhe
50gG66sSmvKvhMNbg0qZgYOrAKHKCjxMoiWJKiKnpPMzTFuMLhoClw+dj20tlQj7T9rxkTgl4Zxu
YRiHas6xuwAwapu3r9rxxZf+ingkquqTgLozZXq8oXfpf2kUCwA/d5KxTVtzhwoT0JzI8ks5T1KE
SaZMkE4f97Q=
-----END CERTIFICATE-----
When you add the certificate in the management center, ensure that you check the CA Only check box.
-
Obtain the following data from Umbrella:
-
Organization ID
-
Network Device Key
-
Network Device Secret
-
Legacy Network Device Token
-
-
Ensure that the management center is connected to the internet.
-
Ensure that the base license with the export-controlled feature option is enabled in the management center.
-
Ensure that the DNS server is configured to resolve api.opendns.com.
-
Ensure that the management center can resolve management.api.umbrella.com for policy configuration.
-
Configure the threat defense route to api.opendns.com.
Procedure
|
Step 1 |
In the Umbrella dashboard, choose . 
|
|
Step 2 |
Obtain the Organization ID from the URL: Copy the number displayed in the URL and paste it in the Organization ID field in the management center Umbrella Connection Details page. |
|
Step 3 |
Click Umbrella Network Devices.
|
|
Step 4 |
Click Legacy Network Devices.
|
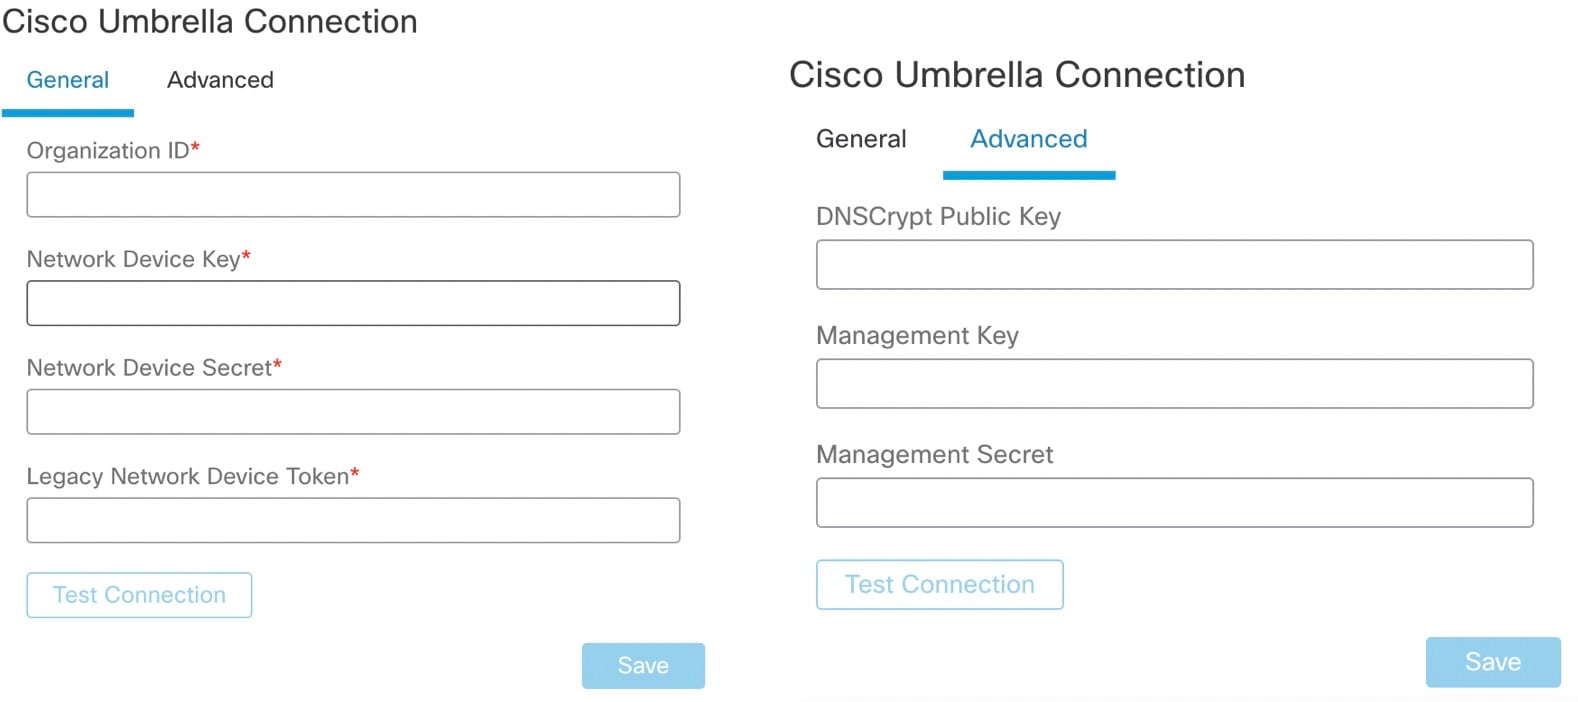
Configure the Umbrella Connection
Procedure
|
Step 1 |
In the management center, choose . |
|
Step 2 |
Obtain the following details and add them to the General settings:
|
|
Step 3 |
Under Advanced, configure the following optional settings:
|
|
Step 4 |
Click Test Connection—Test if the Cisco Umbrella Cloud is reachable from the management center. When you provide the required organization ID and network device details, the umbrella connection is created. |
|
Step 5 |
Once the information has been added, click Save to save the connection details. |
Create an Umbrella DNS Policy
Procedure
|
Step 1 |
In the management center, choose . All existing DNS policies will be shown. |
|
Step 2 |
Click . |
|
Step 3 |
Enter a name and description for the policy, then click Save. |
(Optional) Configure the Umbrella DNS Rule
Procedure
|
Step 1 |
Choose . |
|
Step 2 |
Click the Edit ( |
|
Step 3 |
Navigate to the correct rule, and click the Edit ( 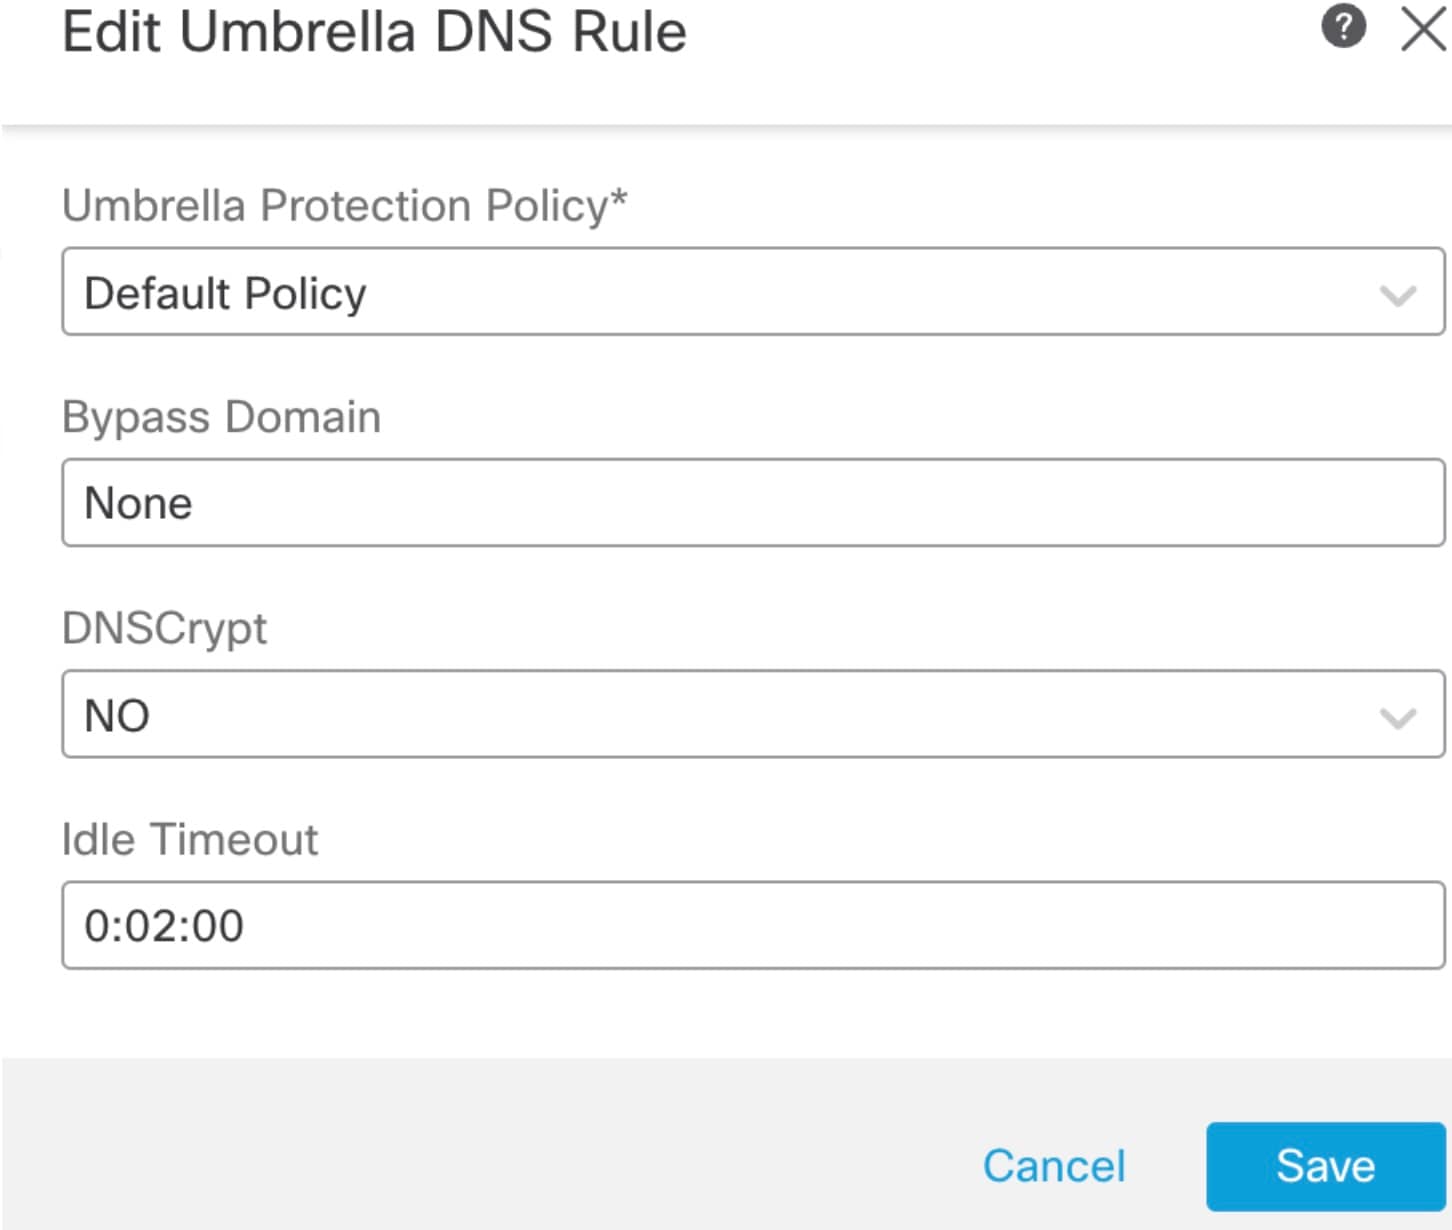
|
 )
)
Associate the Umbrella DNS Policy with an Access Control Policy
Procedure
|
Step 1 |
Navigate to and select the Access Policy to edit. |
|
Step 2 |
Select Security Intelligence. |
|
Step 3 |
Under Umbrella DNS Policy, select the policy to be used for the Umbrella DNS Policy. 
|
|
Step 4 |
Select Save to save all changes. |
Deploy Changes
Procedure
|
Step 1 |
On the management center menu bar, click Deploy and then select Deployment. |
|
Step 2 |
Identify and choose the devices on which you want to deploy configuration changes.
|
|
Step 3 |
(Optional) Click Estimate to get a rough estimate of the deployment duration. |
|
Step 4 |
Click Deploy. |
|
Step 5 |
If the system identifies errors or warnings in the changes to be deployed, it displays them in the Validation Messages window. To view complete details, click the arrow icon before the warnings or errors. You have the following choices:
|
 )
) )
)Validate Deployment
Procedure
|
Step 1 |
After the deployment is complete, validate the deployment in the management center. |
|
Step 2 |
Select , then the Deployment History icon. |
|
Step 3 |
Select the job associated with the Umbrella Connector. |
|
Step 4 |
Select the Transcript
Details ( The following command line interface transcript is generated: Example: |
Troubleshooting Deployment Issues
Legacy Network Device Token Not Configured
-
Possible Cause Umbrella connection details were not added to the Integration tab. Use Configure the Umbrella Connection to configure the details within the Integration tab.
-
Possible Cause The management center does not have a connection to the internet. Without internet connectivity, management center is unable to connect to the Umbrella cloud.
-
Possible Cause Umbrella connection details were added, but the information is not correct. Use Configure the Umbrella Connection to input the proper information and test the connection to ensure that Umbrella is connected.
Export-Controlled Features Not Enabled
You can enable (register) or disable (release) optional licenses. You must enable a license to use the features controlled by the license.
If you no longer want to use the features covered by an optional term license, you can disable the license. Disabling the license releases it in your Cisco Smart Software Manager account, so that you can apply it to another device.
You can also enable evaluation versions of these licenses when running in evaluation mode. In evaluation mode, the licenses are not registered with Cisco Smart Software Manager until you register the device. However, you cannot enable the RA VPN or Carrier license in evaluation mode.
Before you begin
Before disabling a license, ensure that you are not using it. Rewrite or delete any policies that require the license.
For units operating in a high availability configuration, you enable or disable licenses on the active unit only. The change is reflected on the standby unit the next time you deploy the configuration, when the standby unit requests (or frees) the necessary licenses. When enabling licenses, you must ensure that your Cisco Smart Software Manager account has sufficient licenses available, or you could have one unit compliant while the other unit is non-compliant.
Procedure
|
Step 1 |
Click the name of the device in the menu, then click View Configuration in the Smart License summary. |
|
Step 2 |
Click the Enable/Disable control for each optional license as desired.
|
|
Step 3 |
If you enabled the RA VPN license, select the type of license you have available in your account. You can use any of the following licenses: Plus, Apex, or VPN Only. You can select Plus and Apex if you have both licenses and you want to use them both. |
 Feedback