Release Notes for Cisco Intrusion Prevention System 6.1(2)E3
Available Languages
Table Of Contents
Release Notes for Cisco Intrusion Prevention System 6.1(2)E3
IPS Management and Event Viewers
Cisco Security Intelligence Operations
Before Upgrading to Cisco IPS 6.1(2)E3
Backing Up and Restoring the Configuration File Using a Remote Server
Obtaining Software on Cisco.com
Upgrading to Cisco IPS 6.1(2)E3
After Upgrading to Cisco IPS 6.1(2)E3
Importing a New SSL Certificate
Service Programs for IPS Products
Obtaining and Installing the License Key
Understanding Password Recovery
Recovering the Appliance Password
Recovering the AIP SSM Password
Recovering the AIM IPS Password
Recovering the NME IPS Password
Verifying the State of Password Recovery
Troubleshooting Password Recovery
Obtaining Documentation and Submitting a Service Request
Release Notes for Cisco Intrusion Prevention System 6.1(2)E3
Published: December 19, 2008, OL-18881-01Revised: August 1, 2012
Contents
•
IPS Management and Event Viewers
•
•
•
•
•

Caution
IPS 6.1(2)E3 File List
The following files are part of Cisco IPS 6.1(2)E3:
•
–
•
–
–
–
•
–
–
–
–
–
–
–
–
–
–
•
–
–
–
•
–
–
–
For More Information
For the procedure for obtaining these files on Cisco.com, see Obtaining Software on Cisco.com.
Supported Platforms

Note
Cisco IPS 6.1(2)E3 is supported on the following platforms:
•
•
•
•
•
•
•
•
•
•
Supported Servers
The following FTP servers are supported for IPS software updates:
•
•
•
•
•
The following HTTP/HTTPS servers are supported for IPS software updates:
•
•
ROMMON and TFTP
ROMMON uses TFTP to download an image and launch it. TFTP does not address network issues such as latency or error recovery. It does implement a limited packet integrity check so that packets arriving in sequence with the correct integrity value have an extremely low probability of error. But TFTP does not offer pipelining so the total transfer time is equal to the number of packets to be transferred times the network average RTT. Because of this limitation, we recommend that the TFTP server be located on the same LAN segment as the sensor. Any network with an RTT less than a 100 milliseconds should provide reliable delivery of the image. Be aware that some TFTP servers limit the maximum file size that can be transferred to ~32 MB.
For More Information
•
•
IPS Management and Event Viewers
Use the following tools for configuring Cisco IPS 6.1(2)E3 sensors:
•
•
•
•
•
Use the following tools for monitoring Cisco IPS 6.1(2)E3 sensors:
•
•
•
Note
For More Information
For more information about SSL certificates, see Importing a New SSL Certificate.
Cisco Security Intelligence Operations
The Cisco Security Intelligence Operations site on Cisco.com provides intelligence reports about current vulnerabilities and security threats. It also has reports on other security topics that help you protect your network and deploy your security systems to reduce organizational risk.
You should be aware of the most recent security threats so that you can most effectively secure and manage your network. Cisco Security Intelligence Operations contains the top ten intelligence reports listed by date, severity, urgency, and whether there is a new signature available to deal with the threat.
Cisco Security Intelligence Operations contains a Security News section that lists security articles of interest. There are related security tools and links.
You can access Cisco Security Intelligence Operations at this URL:
http://tools.cisco.com/security/center/home.x
Cisco Security Intelligence Operations is also a repository of information for individual signatures, including signature ID, type, structure, and description.
You can search for security alerts and signatures at this URL:
http://tools.cisco.com/security/center/search.x
New and Changed Information
Cisco IPS 6.1(2)E3 includes the following new features:
•
IPS 6.1(2)E3 provides support for a 10-Gigabit Ethernet network interface card for the IPS 4260 and IPS 4270-20.
•
IPS 6.1(2)E3 modifies the upgrade scripts to migrate the current health monitor information during upgrades. IPS 6.1(1) added the health monitor feature so you can monitor the health and welfare of the sensor. You can enable or disable the various metrics and tune the parameters to tailor the metrics to your own needs. This information is now preserved during the upgrade to IPS 6.1(2)E3.
•
IPS 6.1(2)E3 modifies the upgrade scripts to migrate the opasswd file during upgrades. The /etc/security/opasswd file preserves a specified number of previous passwords to disallow use of old passwords. The old passwords are now preserved during an upgrade to IPS 6.1(2)E3.
•
In previous releases, if a hardware or driver level software issue caused a sensor kernel panic, the sensor was left in an unresponsive state, meaning you could not log in to the service account. In IPS 6.1(2)E3, if a sensor kernel panic occurs, the sensor reboots.
•
The resolution of this defect modified the idle time algorithm of the sensor by applying additional CPU to polling of the NICs to decrease the polling interval and reduce latency. This results in the CPU usage being reported higher than in previous releases, including using external tools such as top and ps.
You can notice this additional CPU load on single-CPU platforms, as well as the primary CPU of multi-core systems. Since the additional CPU load that is reported while polling is actually available to process packets, and reduces as inspection load goes up, it does not negatively affect the overall throughput of the IPS.
The best indication of sensor load is shown under the Processing Load Percentage section in the show statistics virtual-sensor command output and on the IME Home Page.
For More Information
For the procedure for obtaining information about sensor health, for the CLI refer to Configuring Health Status Information, for IDM refer to Configuring Sensor Health, and for IME refer to Configuring Sensor Health.
MySDN Decommissioned
Because MySDN has been decommissioned, the URL in older versions of IDM and IME is no longer functional. If you are using IPS 6.0 or later, we recommend that you upgrade your version of IDM and IME.
You can upgrade to the following versions to get the functioning MySDN URL:
•
•
•
If you are using version IPS 5.x, you must look up signature information manually at this URL:
http://tools.cisco.com/security/center/search.x
For More Information
For detailed information on MySDN, for IDM refer to MySDN, and for IME refer to MySDN.
Before Upgrading to Cisco IPS 6.1(2)E3
This section describes the actions you should take before upgrading to Cisco IPS 6.1(2)E3. It contains the following topics:
•
•
Perform These Tasks
Before you upgrade your sensors to Cisco IPS 6.1(2)E3, make sure you perform the following tasks:
•
•
•
If you need to downgrade a signature update, you will know what version you had, and you can then apply the configuration you saved when you backed up your configuration.
For More Information
•
•
•
•
Backing Up and Restoring the Configuration File Using a Remote Server
Note
Use the copy [/erase] source_url destination_url keyword command to copy the configuration file to a remote server. You can then restore the current configuration from the remote server. You are prompted to back up the current configuration first.
Options
The following options apply:
•
This keyword only applies to the current-config; the backup-config is always overwritten. If this keyword is specified for destination current-config, the source configuration is applied to the system default configuration. If it is not specified for the destination current-config, the source configuration is merged with the current-config.
•
•
•
•
The exact format of the source and destination URLs varies according to the file. Here are the valid types:
•
ftp:[//[username@] location]/relativeDirectory]/filename
ftp:[//[username@]location]//absoluteDirectory]/filename
•
scp:[//[username@] location]/relativeDirectory]/filename
scp:[//[username@] location]//absoluteDirectory]/filename
Note
•
http:[[/[username@]location]/directory]/filename
•
https:[[/[username@]location]/directory]/filename
Note
Caution
Backing Up the Current Configuration to a Remote Server
To back up your current configuration to a remote server, follow these steps:
Step 1
Step 2 Back up the current configuration to the remote server.sensor# copy current-config scp://user@192.0.2.0//configuration/cfg current-configPassword: ********Warning: Copying over the current configuration may leave the box in an unstable state.Would you like to copy current-config to backup-config before proceeding? [yes]:Step 3 Enter yes to copy the current configuration to a backup configuration.cfg 100% |************************************************| 36124 00:00
Restoring the Current Configuration From a Backup File
To restore your current configuration from a backup file, follow these steps:
Step 1
Step 2 Back up the current configuration to the remote server.sensor# copy scp://user@192.0.2.0//configuration/cfg current-configPassword: ********Warning: Copying over the current configuration may leave the box in an unstable state.Would you like to copy current-config to backup-config before proceeding? [yes]:Step 3 Enter yes to copy the current configuration to a backup configuration.cfg 100% |************************************************| 36124 00:00Warning: Replacing existing network-settings may leave the box in an unstable state.Would you like to replace existing network settings (host-ipaddress/netmask/gateway/access-list) on sensor before proceeding? [no]:sensor#Step 4
For More Information
•
•
Obtaining Software on Cisco.com
You can find major and minor updates, service packs, signature and signature engine updates, system and recovery files, firmware upgrades, and readmes on the Download Software site on Cisco.com.
Signature updates are posted to Cisco.com approximately every week, more often if needed. Service packs are posted to Cisco.com as needed. Major and minor updates are also posted periodically. Check Cisco.com regularly for the latest IPS software.
Note
Downloading IPS Software
To download software on Cisco.com, follow these steps:
Step 1
Step 2
Step 3
Step 4
Step 5
Step 6
Note
Step 7
Step 8
Step 9
Step 10
•
The Cisco Systems Inc. Encryption Software Usage Handling and Distribution Policy appears.
•
The Encryption Software Export/Distribution Form appears.
If you previously filled out the Encryption Software Export Distribution Authorization form, and read and accepted the Cisco Systems Inc. Encryption Software Usage Handling and Distribution Policy, these forms are not displayed again. The File Download dialog box appears.
Step 11
Step 12
Note
IPS Software Versioning
When you download IPS software images from Cisco.com, you should understand the versioning scheme so that you know which files are base files, which are cumulative, and which are incremental.
Major Update
A major update contains new functionality or an architectural change in the product. For example, the Cisco IPS 6.0 base version includes everything (except deprecated features) since the previous major release (the minor update features, service pack fixes, and signature updates) plus any new changes. Major update 6.0(1) requires 5.x. With each major update there are corresponding system and recovery packages.
Note
Minor Update
A minor update is incremental to the major version. Minor updates are also base versions for service packs. The first minor update for 6.0 is 6.1(1). Minor updates are released for minor enhancements to the product. Minor updates contain all previous minor features (except deprecated features), service pack fixes, signature updates since the last major version, and the new minor features being released. You can install the minor updates on the previous major or minor version (and often even on earlier versions). The minimum supported version needed to upgrade to the newest minor version is listed in the Readme that accompanies the minor update. With each minor update there are corresponding system and recovery packages.
Service Pack
A service pack is cumulative following a base version release (minor or major). Service packs are used for the release of defect fixes with no new enhancements. Service packs contain all service pack fixes since the last base version (minor or major) and the new defect fixes being released. Service packs require the minor version. The minimum supported version needed to upgrade to the newest service pack is listed in the Readme that accompanies the service pack. Service packs also include the latest engine update. For example, if service pack 6.0(3) is released, and E3 is the latest engine level, the service pack is released as 6.0(3)E3.
Patch Release
A patch release is used to address defects that are identified in the upgrade binaries after a software release. Rather than waiting until the next major or minor update, or service pack to address these defects, a patch can be posted. Patches include all prior patch releases within the associated service pack level. The patches roll in to the next official major or minor update, or service pack.
Before you can install a patch release, the most recent major or minor update, or service pack must be installed. For example, patch release 5.0(1p1) requires 5.0(1).
Note
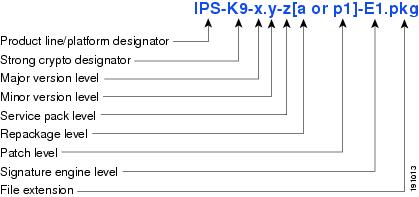
Figure 1 illustrates what each part of the IPS software file represents for major and minor updates, service packs, and patch releases.
Figure 1 IPS Software File Name for Major and Minor Updates, Service Packs, and Patch Releases
Signature Update
A signature update is a package file containing a set of rules designed to recognize malicious network activities. Signature updates are released independently from other software updates. Each time a major or minor update is released, you can install signature updates on the new version and the next oldest version for a period of at least six months. Signature updates are dependent on a required signature engine version. Because of this, a req designator lists the signature engine required to support a particular signature update.
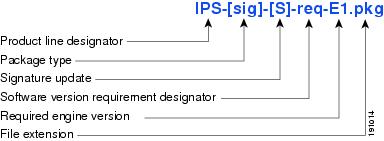
Figure 2 illustrates what each part of the IPS software file represents for signature updates.
Figure 2 IPS Software File Name for Signature Updates
Signature Engine Update
A signature engine update is an executable file containing binary code to support new signature updates. Signature engine files require a specific service pack, which is also identified by the req designator.
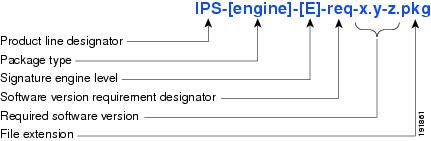
Figure 3 illustrates what each part of the IPS software file represents for signature engine updates.
Figure 3 IPS Software File Name for Signature Engine Updates
Recovery and System Image Files
Recovery and system image files contain separate versions for the installer and the underlying application. The installer version contains a major and minor version field. The major version is incremented by one of any major changes to the image installer, for example, switching from .tar to rpm or changing kernels. The minor version can be incremented by any one of the following:
•
•
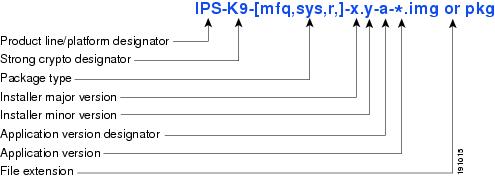
Figure 4 illustrates what each part of the IPS software file represents for recovery and system image files.
Figure 4 IPS Software File Name for Recovery and System Image Files
Software Release Examples
Table 1 lists platform-independent Cisco IPS 6.x software release examples. Refer to the Readmes that accompany the software files for detailed instructions on how to install the files.
Table 1 Platform-Independent Release Examples
Signature update1
Weekly
sig
S700
IPS-sig-S700-req-E1.pkg
Signature engine update2
As needed
engine
E1
IPS-engine-E1-req-6.1-3.pkg
Service packs3
Semi-annually
or as needed—
6.1(3)
IPS-K9-6.1-3-E1.pkg
Minor version update4
Annually
—
6.1(1)
IPS-K9-6.1-1-E1.pkg
Major version update5
Annually
—
6.0(1)
IPS-K9-6.0-1-E1.pkg
Patch release6
As needed
patch
6.0(1p1)
IPS-K9-patch-6.0-1pl-E1.pkg
Recovery package7
Annually or as needed
r
1.1-6.0(1)
IPS-K9-r-1.1-a-6.0-1-E1.pkg
1 Signature updates include the latest cumulative IPS signatures.
2 Signature engine updates add new engines or engine parameters that are used by new signatures in later signature updates.
3 Service packs include defect fixes.
4 Minor versions include new minor version features and/or minor version functionality.
5 Major versions include new major version functionality or new architecture.
6 Patch releases are for interim fixes.
7 The r 1.1 can be revised to r 1.2 if it is necessary to release a new recovery package that contains the same underlying application image. If there are defect fixes for the installer, for example, the underlying application version may still be 6.0(1), but the recovery partition image will be r 1.2.
Table 2 describes platform-dependent software release examples.
Table 2 Platform-Dependent Release Examples
System image1
Annually
sys
Separate file for each sensor platform
IPS-4240-K9-sys-1.1-a-6.0-1-E1.img
Maintenance partition image2
Annually
mp
IDSM2
c6svc-mp.2-1-2.bin.gz
Bootloader
As needed
bl
AIM IPS
NME IPSpse_aim_x.y.z.bin
pse_nme_x.y.z.bin
where x, y, z is the release numberMini-kernel
As needed
mini-kernel
AIM IPS
NME IPSpse_mini_kernel_1.1.10.64.bz2
1 The system image includes the combined recovery and application image used to reimage an entire sensor.
2 The maintenance partition image includes the full image for the IDSM2 maintenance partition. The file is installed from but does not affect the IDSM2 application partition.
Table 3 describes the platform identifiers used in platform-specific names.
Upgrading to Cisco IPS 6.1(2)E3
This section provides information on upgrading to Cisco IPS 6.1(2)E3, and contains the following topics:
Upgrade Notes and Caveats
The following upgrade notes and caveats apply to upgrading to 6.1(2)E3:
•
•
•
•
•
•
•
•
•
•
•
For More Information
•
•
•
•
•
•
Upgrading to IPS 6.1(2)E3
Caution
Caution
To upgrade the sensor, follow these steps:
Step 1
Step 2
Step 3
sensor# configure terminalStep 4
sensor(config)# upgrade url/IPS-K9-6.1-2-E3.pkgThe URL points to where the update file is located, for example, to retrieve the update using FTP, enter the following:
sensor(config)# upgrade ftp://username@ip_address//directory/IPS-K9-6.1-2-E3.pkgStep 5
Enter password: ********Step 6
Note
Note
For More Information
•
•
After Upgrading to Cisco IPS 6.1(2)E3
This section provides information about what to do after you install Cisco IPS 6.1(2)E3. It contains the following topics:
•
Comparing Configurations
Compare your backed up and saved configuration with the output of the show configuration command after upgrading to 6.1(2)E3 to verify that all the configuration has been properly converted.
Caution
For More Information
•
•
Importing a New SSL Certificate
If necessary, import the new SSL certificate for the upgraded sensor in to each tool being used to monitor the sensor.
For More Information
For the procedure for configuring TLS/SSL, for the CLI refer to Configuring TLS, for IDM refer to Configuring Trusted Hosts, and for IME refer to Configuring Trusted Hosts.
Logging In to IDM
IDM is a web-based, Java Web Start application that enables you to configure and manage your sensor. The web server for IDM resides on the sensor. You can access it through Internet Explorer or Firefox web browsers.
To log in to IDM, follow these steps:
Step 1
https://sensor_ip_address
Note
Note
Step 2
Step 3
Step 4
Step 5
Note
Step 6
Please wait while IDM is loading the current configuration from the sensor.The main window of IDM appears.
Note
Note
Licensing the Sensor
This section describes how to obtain a license key and how to license the sensor using the CLI, IDM, or IME. It contains the following topics:
•
•
Understanding the License
Although the sensor functions without the license key, you must have a license key to obtain signature updates. To obtain a license key, you must have the following:
•
•
•
Trial license keys are also available. If you cannot get your sensor licensed because of problems with your contract, you can obtain a 60-day trial license that supports signature updates that require licensing.
You can obtain a license key from the Cisco.com licensing server, which is then delivered to the sensor. Or, you can update the license key from a license key provided in a local file. Go to http://www.cisco.com/go/license and click IPS Signature Subscription Service to apply for a license key.
You can view the status of the license key in these places:
•
•
•
•
Whenever you start IDM, IME, or the CLI, you are informed of your license status—whether you have a trial, invalid, or expired license key. With no license key, an invalid license key, or an expired license key, you can continue to use IDM, IME, and the CLI, but you cannot download signature updates.
If you already have a valid license on the sensor, you can click Download on the License pane to download a copy of your license key to the computer that IDM or IME is running on and save it to a local file. You can then replace a lost or corrupted license, or reinstall your license after you have reimaged the sensor.
For More Information
For the procedure for using the show version command in the CLI, refer to Displaying Version Information.
Service Programs for IPS Products
You must have a Cisco Services for IPS service contract for any IPS product so that you can download a license key and obtain the latest IPS signature updates. If you have a direct relationship with Cisco Systems, contact your account manager or service account manager to purchase the Cisco Services for IPS service contract. If you do not have a direct relationship with Cisco Systems, you can purchase the service account from a one-tier or two-tier partner.
When you purchase the following IPS products you must also purchase a Cisco Services for IPS service contract:
•
•
•
•
•
•
•
When you purchase an ASA 5500 series adaptive security appliance product that does not contain IPS, you must purchase a SMARTnet contract.
Note
When you purchase an ASA 5500 series adaptive security appliance product that ships with the AIP SSM installed, or if you purchase it to add to your ASA 5500 series adaptive security appliance product, you must purchase the Cisco Services for IPS service contract.
Note
For example, if you purchased an ASA 5510 and then later wanted to add IPS and purchased an ASA-SSM-AIP-10-K9, you must now purchase the Cisco Services for IPS service contract. After you have the Cisco Services for IPS service contract, you must also have your product serial number to apply for the license key.
Caution
Obtaining and Installing the License Key
You can install the license key through the CLI, IDM, or IME. This section describes how to obtain and install the license key, and contains the following topics:
Using IDM or IME
Note
To obtain and install the license key, follow these steps:
Step 1
Step 2
Step 3
•
•
Step 4
Step 5
Step 6
Step 7
Caution
Step 8
Step 9
Step 10
Step 11
Step 12
Step 13
Step 14
For More Information
For information on how to obtain a service contract, see Service Programs for IPS Products.
Using the CLI
Caution
Use the copy source-url license_file_name license-key command to copy the license key to your sensor.
The following options apply:
•
•
•
•
The exact format of the source and destination URLs varies according to the file. Here are the valid types:
•
ftp:[//[username@] location]/relativeDirectory]/filename
ftp:[//[username@]location]//absoluteDirectory]/filename
•
scp:[//[username@] location]/relativeDirectory]/filename
scp:[//[username@] location]//absoluteDirectory]/filename
Note
•
http:[[/[username@]location]/directory]/filename
•
https:[[/[username@]location]/directory]/filename
Note
Installing the License Key
To install the license key, follow these steps:
Step 1
Note
Step 2
Note
Step 3
Step 4
Step 5
sensor# copy scp://user@10.89.147.3://tftpboot/dev.lic license-keyPassword: *******Step 6
sensor# show versionApplication Partition:Cisco Intrusion Prevention System, Version 6.1(2)E3Host:Realm Keys key1.0Signature Definition:Signature Update S372.0 2008-12-10Virus Update V1.4 2007-03-02OS Version: 2.4.30-IDS-smp-bigphysPlatform: IPS4270-20-K9Serial Number: USE729N34VLicensed, expires: 31-Dec-2009 UTCSensor up-time is 3:20.Using 1898029056 out of 4029317120 bytes of available memory (47% usage)system is using 17.7M out of 29.0M bytes of available disk space (61% usage)application-data is using 50.3M out of 174.7M bytes of available disk space(30% usage)boot is using 40.8M out of 75.9M bytes of available disk space (57% usage)MainApp M-2008_DEC_09_18_05 (Release) 2008-12-09T18:05:56-0600 RunningAnalysisEngine M-2008_DEC_09_18_05 (Release) 2008-12-09T18:05:56-0600 RunningCLI M-2008_DEC_09_18_05 (Release) 2008-12-09T18:05:56-0600Upgrade History:IPS-K9-6.1-2-E3 18:05:00 UTC Tue Dec 09 2008Recovery Partition Version 1.1 - 6.1(2)E3Host Certificate Valid from: 18-Dec-2008 to 19-Dec-2010sensor#Step 7
sensor# copy license-key scp://user@10.89.147.3://tftpboot/dev.licPassword: *******sensor#
For More Information
•
•
•
Installing Cisco IME
If you have a version of Cisco IPS Event Viewer installed, the Install wizard prompts you to remove it before installing IME.
IME event monitoring is also supported in IOS-IPS versions that support the Cisco IPS 5.x/6.x signature format. We recommend IOS-IPS 12.4(15)T4 if you intend to use IME to monitor an IOS IPS device. Some of the new IME functionality including health monitoring is not supported.
Caution
Caution
Note
To install IME, follow these steps:
Step 1
Step 2
Step 3
Step 4
Step 5
Step 6
Step 7
Restrictions and Limitations
The following restrictions and limitations apply to Cisco IPS 6.1(2)E3 software and the products that run 6.1(2)E3:
•
•
•
•
•
•
•
The AIM IPS and NME IPS and the IOS firewall complement abilities of each other to create security zones in the network and inspect traffic in those zones. Because and the IOS firewall operate independently, sometimes they are unaware of the activities of the other. In this situation, the IOS firewall is the best defense against a SYN flood attack.
•
•
•
•
•
•
This is true for any string that is used by CLI as an identifier, for example, names of time periods, inspect maps, server and URL lists, and interfaces.
•
•
•
For More Information
For more information on interoperability between modules, refer to Interoperability With Other IPS Modules.
Recovering the Password
For most IPS platforms, you can now recover the password on the sensor rather than using the service account or reimaging the sensor. This section describes how to recover the password for the various IPS platforms. It contains the following topics:
•
•
•
•
•
•
•
•
Understanding Password Recovery
Password recovery implementations vary according to IPS platform requirements. Password recovery is implemented only for the cisco administrative account and is enabled by default. The IPS administrator can then recover user passwords for other accounts using the CLI. The cisco user password reverts to cisco and must be changed after the next login.
Note
Table 4 lists the password recovery methods according to platform.
For More Information
For more information on when and how to disable password recovery, see Disabling Password Recovery.
Recovering the Appliance Password
This section describes the two ways to recover the password for appliances. It contains the following topics:
Using the GRUB Menu
For 4200 series appliances, the password recovery is found in the GRUB menu, which appears during bootup. When the GRUB menu appears, press any key to pause the boot process.
Note
To recover the password on appliances, follow these steps:
Step 1
The following menu appears:
GNU GRUB version 0.94 (632K lower / 523264K upper memory)-------------------------------------------0: Cisco IPS1: Cisco IPS Recovery2: Cisco IPS Clear Password (cisco)-------------------------------------------Use the ^ and v keys to select which entry is highlighted.Press enter to boot the selected OS, 'e' to edit theCommands before booting, or 'c' for a command-line.Highlighted entry is 0:Step 2
Step 3
For More Information
For more information on connecting an appliance to a terminal server, refer to Connecting an Appliance to a Terminal Server.
Using ROMMON
For the IPS 4240 and IPS 4255 you can use the ROMMON to recover the password. To access the ROMMON CLI, reboot the sensor from a terminal server or direct connection and interrupt the boot process.
To recover the password using the ROMMON CLI, follow these steps:
Step 1
Step 2
The boot code either pauses for 10 seconds or displays something similar to one of the following:
•
Evaluating boot options•
Use BREAK or ESC to interrupt bootStep 3
confreg 0x7bootSample ROMMON session:
Booting system, please wait...CISCO SYSTEMSEmbedded BIOS Version 1.0(11)2 01/25/06 13:21:26.17...Evaluating BIOS Options...Launch BIOS Extension to setup ROMMONCisco Systems ROMMON Version (1.0(11)2) #0: Thu Jan 26 10:43:08 PST 2006Platform IPS-4240-K9Use BREAK or ESC to interrupt boot.Use SPACE to begin boot immediately.Boot interrupted.Management0/0Link is UPMAC Address:000b.fcfa.d155Use ? for help.rommon #0> confreg 0x7Update Config Register (0x7) in NVRAM...rommon #1> boot
Recovering the IDSM2 Password
To recover the password for the IDSM2, you must install a special password recovery image file. This installation only resets the password, all other configuration remains intact. The password recovery image is version-dependent and can be found on the Cisco Download Software site. For IPS 6.x, download WS-SVC-IDSM2-K9-a-6.0-password-recovery.bin.gz. For IPS 7.x, download WS-SVC-IDSM2-K9-a-7.0-password-recovery.bin.gz.
FTP is the only supported protocol for image installations, so make sure you put the password recovery image file on an FTP server that is accessible to the switch. You must have administrative access to the Cisco 6500 series switch to recover the password on the IDSM2.
During the password recovery image installation, the following message appears:
Upgrading will wipe out the contents on the hard disk.Do you want to proceed installing it [y|n]:This message is in error. Installing the password recovery image does not remove any configuration, it only resets the login account.
Once you have downloaded the password recovery image file, follow the instructions to install the system image file but substitute the password recovery image file for the system image file. The IDSM2 should reboot in to the primary partition after installing the recovery image file. If it does not, enter the following command from the switch:
hw-module module module_number reset hdd:1
Note
For More Information
•
•
Recovering the AIP SSM Password
You can reset the password to the default (cisco) for the AIP SSM using the CLI or the ASDM. Resetting the password causes it to reboot. IPS services are not available during a reboot.
Note
Use the hw-module module slot_number password-reset command to reset the password to the default cisco. If the module in the specified slot has an IPS version that does not support password recovery, the following error message is displayed:
ERROR: the module in slot <n> does not support password recovery.Resetting the Password Using the CLI
To reset the password on the AIP SSM, follow these steps:
Step 1
asa# show moduleMod Card Type Model Serial No.--- -------------------------------------------- ------------------ -----------0 ASA 5510 Adaptive Security Appliance ASA5510 JMX1135L0971 ASA 5500 Series Security Services Module-40 ASA-SSM-40 JAF1214AMRLMod MAC Address Range Hw Version Fw Version Sw Version--- --------------------------------- ------------ ------------ ---------------0 001b.d5e8.e0c8 to 001b.d5e8.e0cc 2.0 1.0(11)2 8.4(3)1 001e.f737.205f to 001e.f737.205f 1.0 1.0(14)5 7.0(7)E4Mod SSM Application Name Status SSM Application Version--- ------------------------------ ---------------- --------------------------1 IPS Up 7.0(7)E4Mod Status Data Plane Status Compatibility--- ------------------ --------------------- -------------0 Up Sys Not Applicable1 Up UpStep 2
asa# hw-module module 1 password-resetReset the password on module in slot 1? [confirm]Step 3
Password-Reset issued for slot 1.Step 4
asa# show module 1Mod Card Type Model Serial No.--- -------------------------------------------- ------------------ -----------1 ASA 5500 Series Security Services Module-40 ASA-SSM-40 JAF1214AMRLMod MAC Address Range Hw Version Fw Version Sw Version--- --------------------------------- ------------ ------------ ---------------1 001e.f737.205f to 001e.f737.205f 1.0 1.0(14)5 7.0(7)E4Mod SSM Application Name Status SSM Application Version--- ------------------------------ ---------------- --------------------------1 IPS Up 7.0(7)E4Mod Status Data Plane Status Compatibility--- ------------------ --------------------- -------------1 Up UpStep 5
asa# session 1Opening command session with slot 1.Connected to slot 1. Escape character sequence is 'CTRL-^X'.Step 6
login: ciscoPassword: ciscoYou are required to change your password immediately (password aged)Changing password for cisco.(current) password: ciscoStep 7
New password: new passwordRetype new password: new password***NOTICE***This product contains cryptographic features and is subject to United States and local country laws governing import, export, transfer and use. Delivery of Cisco cryptographic products does not imply third-party authority to import, export, distribute or use encryption. Importers, exporters, distributors and users are responsible for compliance with U.S. and local country laws. By using this product you agree to comply with applicable laws and regulations. If you are unable to comply with U.S. and local laws, return this product immediately.A summary of U.S. laws governing Cisco cryptographic products may be found at: http://www.cisco.com/wwl/export/crypto/tool/stqrg.htmlIf you require further assistance please contact us by sending email to export@cisco.com.***LICENSE NOTICE***There is no license key installed on this IPS platform. The system will continue to operate with the currently installed signature set. A valid license must be obtained in order to apply signature updates. Please go to http://www.cisco.com/go/license to obtain a new license or install a license.aip_ssm#
Using the ASDM
To reset the password in the ASDM, follow these steps:
Step 1
Note
Step 2
Step 3
Recovering the AIM IPS Password
To recover the password for the AIM IPS, use the clear password command. You must have console access to AIM-IPS and administrative access to the router.
To recover the password for the AIM IPS, follow these steps:
Step 1
Step 2
router> enableStep 3
router# show run | include ids-sensorinterface IDS-Sensor0/0router#Step 4
router# service-module ids-sensor slot/port sessionExample
router# service-module ids-sensor 0/0 sessionStep 5
Step 6
router# service-module ids-sensor 0/0 resetStep 7
Step 8
Step 9
ServicesEngine boot-loader# clear passwordThe AIM IPS reboots. The password is reset to cisco. Log in to the CLI with username cisco and password cisco. You can then change the password.
Recovering the NME IPS Password
To recover the password for the NME IPS, use the clear password command. You must have console access to the NME IPS and administrative access to the router.
To recover the password for the NME IPS, follow these steps:
Step 1
Step 2
router> enableStep 3
router# show run | include ids-sensorinterface IDS-Sensor1/0router#Step 4
router# service-module ids-sensor slot/port sessionExample
router# service-module ids-sensor 1/0 sessionStep 5
Step 6
router# service-module ids-sensor 1/0 resetStep 7
Step 8
Step 9
ServicesEngine boot-loader# clear passwordThe NME IPS reboots. The password is reset to cisco. Log in to the CLI with username cisco and password cisco. You can then change the password.
Disabling Password Recovery
Caution
Password recovery is enabled by default. You can disable password recovery through the CLI or IDM.
Disabling Password Recovery Using the CLI
To disable password recovery in the CLI, follow these steps:
Step 1
Step 2
sensor# configure terminalStep 3
sensor(config)# service hostStep 4
sensor(config-hos)# password-recovery disallowed
Disabling Password Recovery Using IDM
To disable password recovery in IDM, follow these steps:
Step 1
Step 2
Step 3
For More Information
•
•
Verifying the State of Password Recovery
Use the show settings | include password command to verify whether password recovery is enabled. To verify whether password recovery is enabled, follow these steps:
Step 1
Step 2
sensor# configure terminalsensor (config)# service hostsensor (config-hos)#Step 3
sensor(config-hos)# show settings | include passwordpassword-recovery: allowed <defaulted>sensor(config-hos)#
Troubleshooting Password Recovery
To troubleshoot password recovery, pay attention to the following:
•
•
•
•
Upgrading will wipe out the contents on the storage media. You can ignore this message. Only the password is reset when you use the specified password recovery image.For More Information
•
•
•
Caveats
This section describes the Bug Toolkit, lists the resolved and known caveats, and contains the following topics:
Bug Toolkit
For the most complete and up-to-date list of caveats, use the Bug Toolkit to refer to the caveat release note. You can use the Bug Toolkit to search for known bugs based on software version, feature set, and keywords. The resulting matrix shows when each bug was integrated, or fixed if applicable. It also lets you save the results of a search in Bug Groups, and also create persistent Alert Agents that can feed those groups with new defect alerts.
Note
If you are a registered Cisco.com user, you can view the Bug Toolkit at this URL:
http://tools.cisco.com/Support/BugToolKit/action.do?hdnAction=searchBugs
To become a registered cisco.com user, go to this URL:
http://tools.cisco.com/RPF/register/register.do
Resolved Caveats
The following issues have been resolved in this release:
•
•
•
•
•
•
•
•
•
•
•
•
•
•
•
•
•
•
•
•
•
•
•
•
•
•
•
•
•
•
•
•
•
•
•
•
•
•
•
•
•
•
•
IPS 6.1(2)E3 Caveats
The following issues are found in Cisco IPS 6.1(2)E3:
•
•
•
•
•
•
•
•
•
•
•
•
•
•
•
•
•
•
•
•
•
•
•
•
•
•
•
•
•
•
Related Documentation
For more information on Cisco IPS 6.1, refer to the following documentation found at this URL:
http://www.cisco.com/en/US/products/hw/vpndevc/ps4077/tsd_products_support_series_home.html
•
•
•
•
•
•
•
•
Obtaining Documentation and Submitting a Service Request
For information on obtaining documentation, submitting a service request, and gathering additional information, see the monthly What's New in Cisco Product Documentation, which also lists all new and revised Cisco technical documentation, at:
http://www.cisco.com/en/US/docs/general/whatsnew/whatsnew.html
Subscribe to the What's New in Cisco Product Documentation as an RSS feed and set content to be delivered directly to your desktop using a reader application. The RSS feeds are a free service. Cisco currently supports RSS Version 2.0.
This document is to be used in conjunction with the documents listed in the "Related Documentation" section.
Cisco and the Cisco logo are trademarks or registered trademarks of Cisco and/or its affiliates in the U.S. and other countries. To view a list of Cisco trademarks, go to this URL: www.cisco.com/go/trademarks. Third-party trademarks mentioned are the property of their respective owners. The use of the word partner does not imply a partnership relationship between Cisco and any other company. (1110R)
Copyright © 2008-2012 Cisco Systems, Inc. All rights reserved.
 Feedback
Contact Cisco
- Open a Support Case

- (Requires a Cisco Service Contract)