Advanced AnyConnect VPN Deployments for Firepower Threat Defense with FMC
This document shows how to deploy advanced AnyConnect VPN for the Cisco FTD on Cisco FMC using FlexConfig, including Dynamic Split Tunneling and LDAP attribute maps.
Dynamic Split Tunneling
The following topics explain dynamic split tunneling for Cisco Firepower Threat Defense (FTD) and how to configure it using FlexConfig in Cisco Firepower Management Center (FMC) 6.4. This configuration can apply to subsequent releases that do not directly support dynamic split tunneling.
About Dynamic Split Tunneling
Static split tunneling involves defining the IP addresses of hosts and networks that should be included in or excluded from the remote access VPN tunnel. You can enhance split tunneling by defining dynamic split tunneling.
With dynamic split tunneling, you can fine-tune split tunneling based on DNS domain names. Because the IP addresses associated with full-qualified domain names (FQDN) can change or simply differ based on region, defining split tunneling based on DNS names provides a more dynamic definition of which traffic should, or should not, be included in the remote access VPN tunnel. If any addresses returned for excluded domain names are within the address pool included in the VPN, those addresses will then be excluded.
Excluded domains are not blocked. Instead, traffic to those domains is kept outside the VPN tunnel. For example, you could send traffic to Cisco WebEx on the public Internet, thus freeing bandwidth in your VPN tunnel for traffic that is targeted to servers within your protected network.
From versions 7.0 or later, you can configure this feature using the FMC UI. For more information, see Configure AnyConnect Dynamic Split Tunnel on FTD Managed by FMC. For older versions of FMC you need to configure it using FlexConfig as instructed in Configure Dynamic Split Tunneling Using FlexConfig.
Configure Dynamic Split Tunneling Using FlexConfig
Dynamic split tunnel configuration is based on creating a custom AnyConnect attribute of the type dynamic-split-exclude-domains, then adding that attribute to the group policies used in your RA VPN connection profiles.
Note that you can also create a dynamic-split-include-domains custom attribute to define domains to include in the tunnel that would otherwise be excluded based on IP address. This example looks at excluding domains, however.
Before you begin
This configuration requires at minimum AnyConnect 4.5.
This example assumes you have already configured remote access VPN and it is functioning correctly. This includes creating the group policies to which you add the dynamic split tunneling attribute. Do not use FlexConfig to create the group policy, use it to edit an existing group policy only.
You do not need to have configured static IP-address-based split tunneling when you define a dynamic exclude list. However, if you decide to create a dynamic include list, you must have enabled split tunneling and excluded some IP addresses. Dynamic split tunneling to include domains is meaningful only if you are including traffic that would otherwise be excluded in an IP-address-based split-tunnel situation.
Procedure
|
Step 1 |
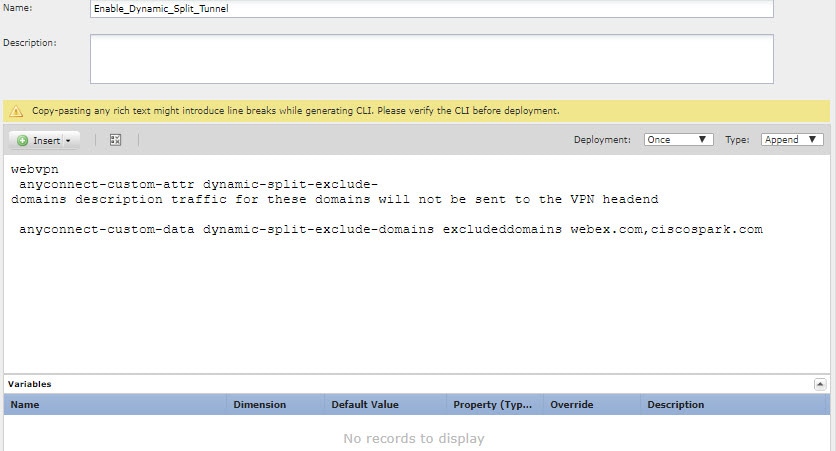
Create the deploy-once/append FlexConfig object that creates the dynamic split tunneling custom attribute and assigns to the attribute the domain names that should be excluded from the VPN tunnel and instead be sent over the public Internet.
|
|
Step 2 |
(Recommended.) If you use custom group policies, create a deploy-once/append FlexConfig object to configure the dynamic split tunnel custom attribute in the group policies. The system will not negate changes you make to custom group policies, so you need to deploy the changes once. If you use multiple group policies, you could use a single FlexConfig object to add the custom attribute to each policy in turn. Alternatively, you could create one FlexConfig object per group policy. The outcome will be the same, so the choice is based on your own requirements for modularizing your FlexConfig policy. On the FlexConfig Objects page, click Add FlexConfig Object, configure the following properties, and click Save.
The object should look similar to the following: 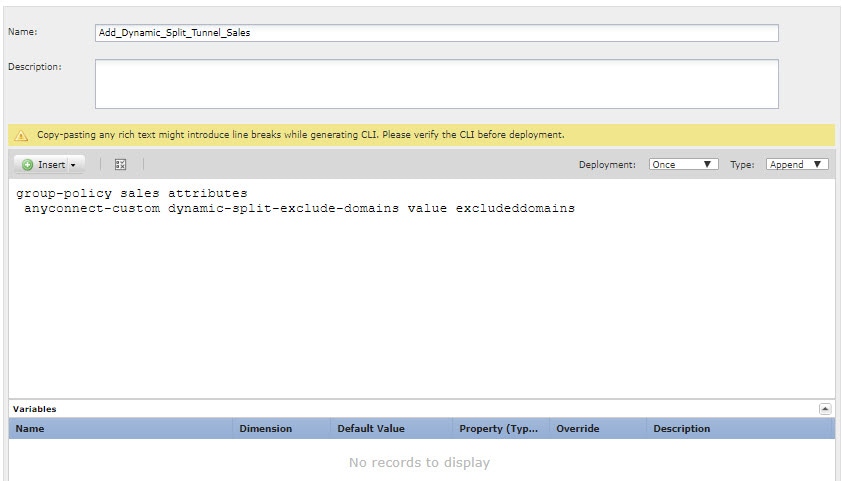 |
|
Step 3 |
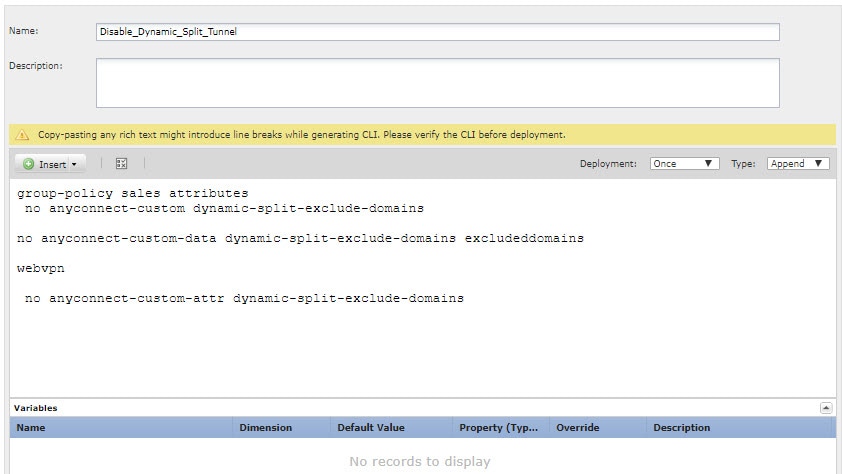
(Not recommended.) If you use the default group policy, named DfltGrpPolicy, create a deploy-everytime/append FlexConfig object to configure the dynamic split tunnel custom attribute in the group policy. You must deploy this object every time, because on each deployment, the system will negate any custom changes to the default policy. We recommend that you create custom group policies rather than use DfltGroupPolicy. On the FlexConfig Objects page, click Add FlexConfig Object, configure the following properties, and click Save.
The object should look similar to the following: 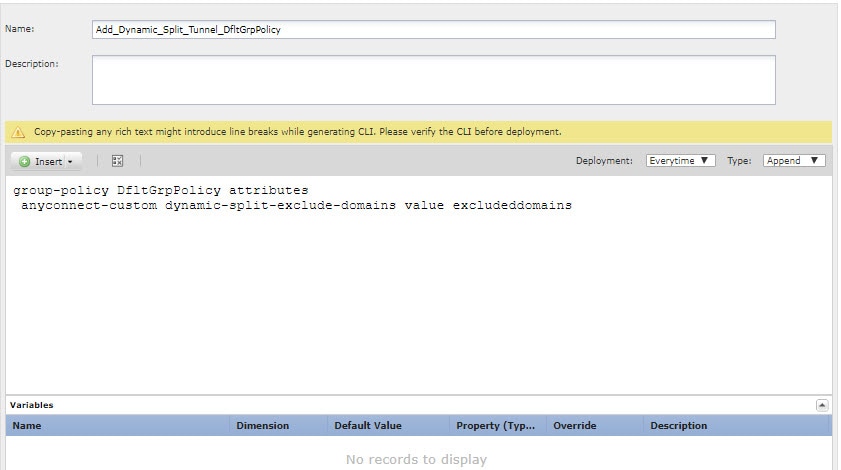 |
|
Step 4 |
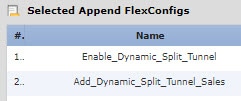
Create the FlexConfig policy that deploys these objects.
|
|
Step 5 |
Deploy your changes. |
|
Step 6 |
Verify the configuration.
|
Remove Dynamic Split Tunneling Using FlexConfig
If you no longer want to use split tunneling, you must create a FlexConfig object to remove the configuration from the devices to which you deployed the feature. Simply removing the FlexConfig objects from the FlexConfig policy is not sufficient.
Procedure
|
Step 1 |
Create the deploy-once/append FlexConfig object that removes the custom attribute from each group policy that uses it, then deletes the attribute. You must first remove the attribute from custom policies before you delete it. If you try to delete an attribute that is currently being used, the system will prevent you and you will see a deployment error. So, you must insert the commands in the right order for this object to work correctly.
|
|
Step 2 |
Edit the FlexConfig policy to remove the dynamic split tunneling objects and add the object that removes the configuration.
|
|
Step 3 |
Deploy your changes. |
LDAP Attribute Maps for AnyConnect Configuration
If you use Active Directory (AD)/LDAP for authenticating remote access VPN users, you can use LDAP attribute maps to adjust the AnyConnect configuration and behavior based on attributes returned from the AD/LDAP server.
About LDAP Attribute Maps
An LDAP attribute map equates attributes that exist in the Active Directory (AD)/LDAP server with Cisco attribute names. Then, when the AD/LDAP server returns authentication to the FTD device during remote access VPN connection establishment, the FTD device can use the information to adjust how the AnyConnect client completes the connection.
For example, you can map the AD/LDAP memberOf attribute to the Cisco Group-Policy attribute. You would then equate the values you would get from AD/LDAP to the names of RA VPN group policies that you have defined for the VPN. If the FTD device finds a Group-Policy attribute for a user, AnyConnect will try to establish the RA VPN connection using that group policy name.
After you create an LDAP attribute map, you then attach it to the AD/LDAP server configuration. Thus, you can have different maps for different AD/LDAP servers: the maps are not tied directly to the RA VPN connection profile or group policies.
You can find a list of supported Cisco attributes for LDAP authorization in the ASA 8.4/8.6 Configuration Guide, https://www.cisco.com/c/en/us/td/docs/security/asa/asa84/configuration/guide/asa_84_cli_config/ref_extserver.html#pgfId-1773708.
From versions 6.7 or later, you can configure this feature using the FMC UI. For more information, see Configure RA VPN with LDAP Authentication and Authorization for FTD. For older versions of FMC you need to configure it using FlexConfig as instructed in Control Group Policy Usage with LDAP Attribute Maps.
Control Group Policy Usage with LDAP Attribute Maps
A typical use for LDAP attribute maps is to control the group policy that is assigned to a user based on the user’s AD/LDAP group membership. To do this, you map values of the memberOf AD/LDAP attribute to values of the Cisco Group-Policy attribute.
As an overview, to use an LDAP map, you must:
-
Create the map using the ldap attribute-map name command, where name is the name of the map, not the name of an attribute.
-
Map an AD/LDAP attribute to a Cisco attribute, by name, using the map-name ldap_attribute_name Cisco_attribute_name command.
-
Map the values you expect to see in the AD/LDAP attribute to relevant values in the Cisco attribute, using the map-value ldap_attribute_name ldap_value Cisco_value command.
-
Attach the LDAP attribute map to one or more AD/LDAP server using the ldap-attribute-map name command. Notice the subtle difference between the command that adds a map to the AD/LDAP server and the command that creates the map itself. The only difference is that the entire command is hyphenated, whereas the base command that creates the map is simply ldap . Note that you need to use the aaa-server name host server_address command to enter the right mode to attach the map.
The following procedure explains the end to end process.
Before you begin
This procedure should work with any AnyConnect version.
This example assumes you have already configured remote access VPN and it is functioning correctly. The VPN must use AD/LDAP as the authentication server, and this must be configured. You also must configure all group policies already: do not configure them in FlexConfig.
The goal is to map users to the following RA VPN group policies:
-
APP-SSL-VPN Managers (AD/LDAP) users should use the group policy named LabAdminAccessGroupPolicy.
-
Engineering (AD/LDAP) users should use the group policy named VPNAccessGroupPolicy.
Procedure
|
Step 1 |
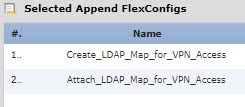
Create the deploy-once/append FlexConfig object that creates the LDAP map, including attribute/value mappings. This object creates the map only, it does not assign the map to an AD/LDAP server.
|
|
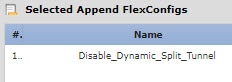
Step 2 |
Create the deploy-everytime/append FlexConfig object that assigns the map to an AD/LDAP server. Because you define the AD/LDAP realm directly in Firepower Management Center, your FlexConfig changes to the realm will be removed during each deployment. Therefore, you must configure them again at the end of each deployment job. On the FlexConfig Objects page, click Add FlexConfig Object, configure the following properties, and click Save.
The object should look similar to the following: 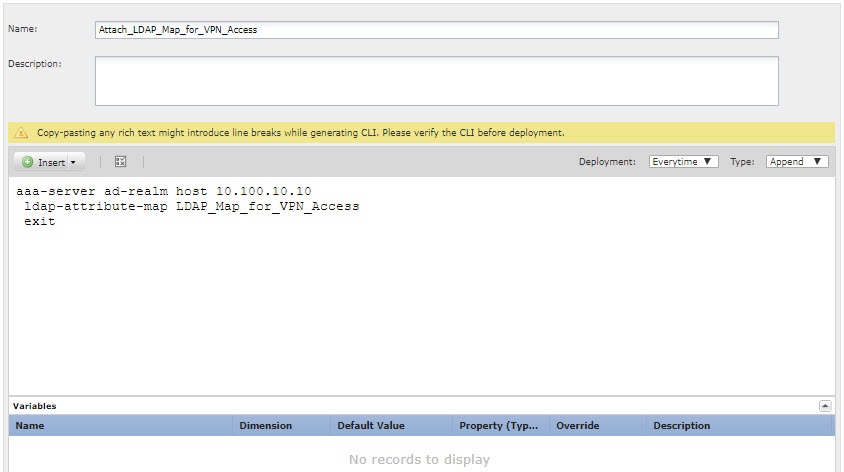 |
|
Step 3 |
Create the FlexConfig policy that deploys these objects.
|
|
Step 4 |
Deploy your changes. |
|
Step 5 |
Verify the configuration. You can verify the commands were configured on each FTD device. Use an SSH session to the device, or the CLI tool in FMC (, click the device, then Advanced Troubleshooting and select the Threat Defense CLI tab). Following are the commands that will show the configuration.
|
Remove LDAP Attribute Maps
If you no longer want to use the LDAP attribute map, you must create a FlexConfig object to remove the configuration from the devices to which you deployed the feature. Simply removing the FlexConfig objects from the FlexConfig policy is not sufficient.
However, for a quick fix if you are encountering a problem, you could simply remove the FlexConfig object that assigns the map to the AD/LDAP server and deploy changes. The deployment process removes any modifications made to managed features, so the ldap-attribute-map command that assigns the map to the server will be removed. This means that the map will continue to exist in the device configuration, but it will not be used by any AD/LDAP server.
The following procedure explains how to remove the map.
Procedure
|
Step 1 |
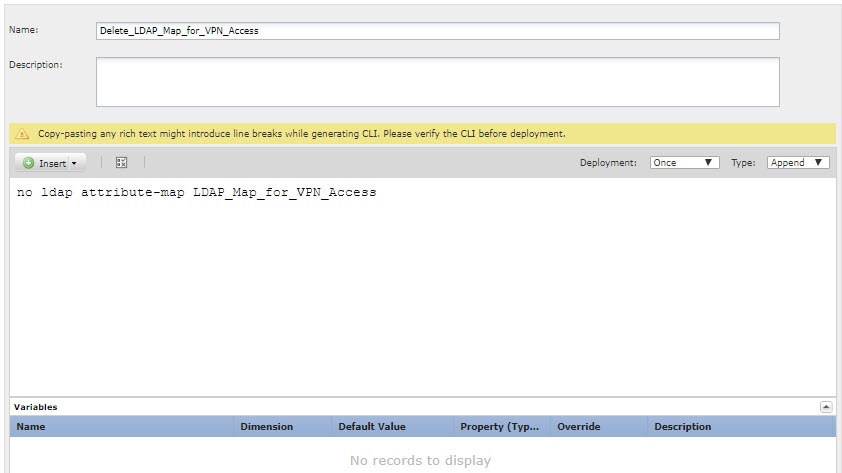
Create the deploy-once/append FlexConfig object that deletes the LDAP attribute map. Normally, you must first remove any commands that use an object before you delete the object. However, because the AD/LDAP realm is a managed feature, the deployment job will have already removed those commands. Thus, you simply must delete the attribute map.
|
|
Step 2 |
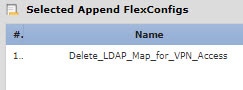
Edit the FlexConfig policy to remove the objects that create and assign the LDAP attribute map, and add the object that deletes the map.
|
|
Step 3 |
Deploy your changes. |
Customize the AnyConnect Icon and Logo
You can customize the icon and logo for the AnyConnect app on Windows and Linux client machines. The names of the icons are pre-defined, and there are specific limits to the file type and size for the images you upload.
Although you can use any filename if you deploy your own executable to customize the GUI, this example assumes you are simply swapping icons and logos without deploying a fully-customized framework.
There are a number of images you can replace, and their file names differ based on platform. For complete information on customization options, file names, types, and sizes, please see the chapter on customizing and localizing the AnyConnect client and installer in the Cisco AnyConnect Secure Mobility Client Administrator Guide. For example, the chapter for the 4.8 client is available at:
 Note |
You can do this customization with any FTD device, regardless of which tool you use to manage it. However, FlexConfig for these commands will work in FMC only. |
Before you begin
For the purposes of this example, we will replace the following images for Windows clients. Note that if your image is a different size than the maximum, the system will automatically resize it to the maximum, and stretch the image if necessary.
-
app_logo.png
This application logo image is the application icon, and it can have a maximum size of 128 x 128 pixels.
-
company_logo.png
This company logo image appears in the top-left corner of the tray flyout and Advanced dialogs. The maximum size is 97 x 58 pixels.
-
company_logo_alt.png
The alternative company logo image appears in the bottom-right corner of the About dialog box. The maximum size is 97 x 58 pixels.
To upload these files, you must place them on a server that the FTD device can access. You can use a TFTP, FTP, HTTP, HTTPS, or SCP server. The URLs to get images from these files can include paths and uesrname/password, as required by your server setup. This example will use TFTP.
Procedure
|
Step 1 |
Upload the image files to each FTD device that is acting as an RA VPN headend that should use the customized icons and logos. |
||
|
Step 2 |
Use the import webvpn command in the diagnostic CLI to instruct AnyConnect to download these images when installing itself on client machines. import webvpn AnyConnect-customization type resource platform win name filename disk0:/directoryname/filename This command is for Windows. For Linux, replace the win keyword with linux or linux-64 , as appropriate for your clients. For example, to import the files uploaded in the previous step, and assuming we are still in the diagnostic CLI:
|
||
|
Step 3 |
Verify the configuration:
|
What to do next
If you want to return to the default images, use the revert webvpn command (in the diagnostic CLI privileged EXEC mode) for each image you customized. You can do this in a deploy-once/append FlexConfig, which makes more sense because you would probably be doing this after running the RA VPN for some time. FlexConfig would save you the effort of making SSH connections to each device, and let you accomplish the task in a single deployment job. The command is:
revert webvpn AnyConnect-customization type resource platform win name filename
As with import webvpn , replace win with linux or linux-64 if you customized those client platforms, and issue the command separately for each image filename you imported. For example:
ftdv1# revert webvpn AnyConnect-customization type resource platform win
name app_logo.png

ftdv1# revert webvpn AnyConnect-customization type resource platform win
name company_logo.png

ftdv1# revert webvpn AnyConnect-customization type resource platform win
name company_logo_alt.png
Configure AnyConnect Modules and Profiles Using FlexConfig
The AnyConnect package includes modules for a variety of features, such as the AMP enabler, that you can optionally use to provide additional services to RA VPN connections. Each module includes a profile that you can edit to make the module work according to your requirements. To enable these modules and profiles on FTD, you need to use FlexConfig.
You need to configure only those modules that you intend to use. Each module has its own profile editor, which is included in the AnyConnect Profile Editor package that you can download and install on a Windows system.
Because the AnyConnect package file includes all of the modules, you do not upload the modules themselves. You only need to upload the profiles used by the modules, to customize the module behavior to work in your remote access VPN configuration.
From versions 6.7 or later, you can configure this feature using the FMC UI. For more information, see Configure Secure Client Modules on a Threat Defense using Cisco Secure Firewall Management Center.
In versions 6.4 to 6.6, you can enable Per App VPN on an FTD using FlexConfig. Use the following procedure for this configuration:
Before you begin
Before you can upload client profiles, you must do the following.
-
Download and install the stand-alone AnyConnect “Profile Editor - Windows / Standalone installer (MSI).” The installation file is for Windows only, and has the file name tools-anyconnect-profileeditor-win-<version>-k9.msi, where <version> is the AnyConnect version. For example, tools-anyconnect-win-4.8.03036-profileeditor-k9.msi. You must also install Java JRE 1.6 (or higher) before installing the profile editor. Obtain the AnyConnect profile editor from software.cisco.com in the AnyConnect Secure Mobility Client category.
-
Use the profile editors to create the profiles you need. For detailed information, see the editor’s online help.
In this example, we will upload profiles and enable all modules. The example assumes you already have a functioning RA VPN and you have created all group policies using FMC.
Procedure
|
Step 1 |
Upload the profiles to each FTD device that is acting as an RA VPN headend that should use the customized module profiles. |
|
Step 2 |
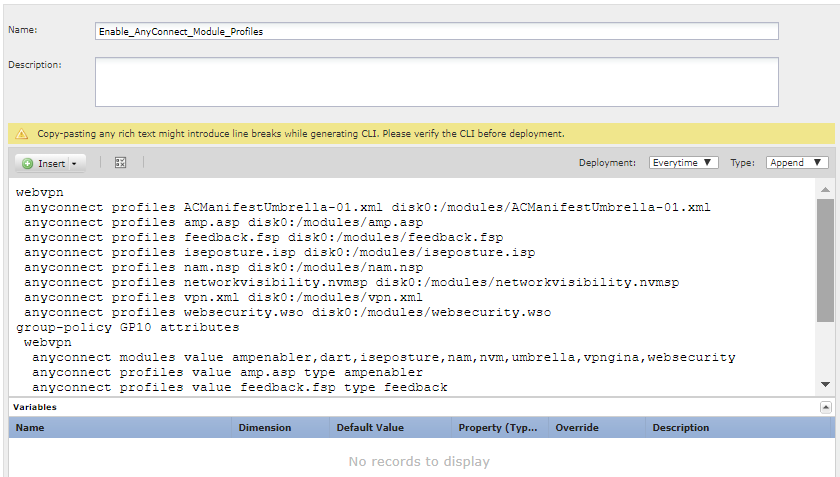
Create the deploy-everytime/append FlexConfig object that identifies the profiles for each module, and enables the modules for each group profile in the RA VPN.
|
|
Step 3 |
Create the FlexConfig policy that deploys this object.
|
|
Step 4 |
Deploy your changes. |
What to do next
Because you are making changes to managed features, to remove the module configuration, simply delete the FlexConfig object from the FlexConfig policy, then redeploy the configuration. The deployment job will remove the configuration changes.
If you want to remove the profiles from the devices, you must log into each device’s CLI and use the delete command in privileged EXEC mode in the diagnostic CLI.
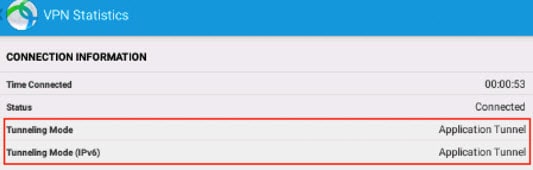
Application-Based (Per App) Remote Access VPN on Mobile Devices
When you support mobile devices, such as phones running Android or iOS, you can use Mobile Device Manager (MDM) applications to fine-tune VPN access so that only supported applications are allowed to use the VPN tunnel. By restricting the remote access VPN to approved applications, you can reduce the load on the VPN headend and also protect the corporate network from malicious applications installed on these mobile devices.
To use a per-app remote access VPN, you must install and configure a third-party MDM application. It is in the MDM that you define the list of approved applications that can be used over the VPN tunnel. Explaining how to configure and use the third-party MDM that you select is outside the scope of this document.
From versions 7.0 or later, you can configure this feature using the FMC UI. For more information, see Configure Application-Based Remote Access VPN (Per App VPN) on Mobile Devices Using Cisco Secure Firewall Management Center.
In versions 6.4 to 6.7, you can enable Per App VPN on an FTD using FlexConfig. The following topics explain how to enable per-app VPN on the FTD headend using FlexConfig, so that your MDM can apply your policies on mobile devices.
About Application-Based (Per App) VPNs
When you use AnyConnect to establish a VPN connection from a mobile device, all the traffic including the traffic from personal applications is routed through the VPN.
If you instead want to route corporate applications only through the VPN, so that non-corporate traffic is excluded from the VPN, you can use Per App VPN to select which applications should be tunneled through the VPN.
You configure Per App VPN using the perapp AnyConnect custom attribute. Adding this attribute to a remote access VPN group profile automatically limits the tunnel to the explicitly identified applications. Traffic from all other applications is automatically excluded from the tunnel.
Configuring Per App VPN has the following main benefits:
-
Performance—It limits traffic in the VPN to the traffic that needs to go to the corporate network. Thus, you free up resources at the head end of the RA VPN.
-
Protection—Because only traffic from approved applications is allowed, it protects the corporate tunnel from unapproved malicious applications that a user might unwittingly install on the mobile device. Because these applications are not included in the tunnel, traffic from them is never sent to the head end.
The Mobile Device Manager (MDM) running on the mobile endpoint enforces the PerApp VPN policy on the applications.
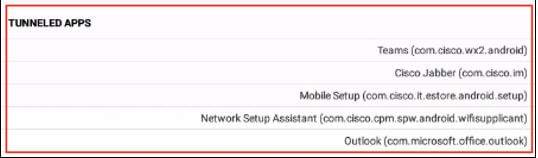
Determining the Application IDs for Mobile Apps
Before configuring the FTD headend to allow application-based VPN from mobile devices, you need to determine which apps should be allowed in the tunnel.
We strongly recommend that you configure the per-app policy in the Mobile Device Manager (MDM) that you select to provide the service on the user’s mobile device. This greatly simplifies the headend configuration.
If you instead decide that you also want to configure the list of allowed apps on the headend, you need to determine the application IDs for each application on each type of endpoint.
The application ID, called the bundle ID in iOS, is a reverse DNS name. You can use an asterisk as a wildcard. For example, *.* indicates all applications, com.cisco.* indicates all Cisco applications.
To determine the application IDs:
-
Android—Go to Google Play in a web browser and select the Apps category. Click on (or hover over) an application that you want to allow, then look at the URL. The app id is in the URL, on the id= parameter. For example, the following URL is for Facebook Messenger, so the app id is com.facebook.orca.
https://play.google.com/store/apps/details?id=com.facebook.orca
For applications that are not available through Google Play, such as your own applications, download a package name viewer application to extract the app ID. There are many of these applications available, one of them should provide what you need, but Cisco does not endorse any of them.
-
iOS—There is no straight-forward way to get the bundle ID. Following is one way to find it:
-
Use a desktop web browser such as Chrome to search for the application name.
-
In the search results, look for the link to download the app from the Apple App Store. For example, Facebook Messager would be similar to:
https://apps.apple.com/us/app/messenger/id454638411
-
Copy the number after the id string. In this example, 454638411.
-
Open a new browser window, and add the number to the end of the following URL:
https://itunes.apple.com/lookup?id=
For this example: https://itunes.apple.com/lookup?id=454638411
-
You will be prompted to download a text file, usually named 1.txt. Download the file.
-
Open the file in a text editor such as WordPad, and search for bundleId. For example:
"bundleId":"com.facebook.Messenger",
In this example, the bundle ID is com.facebook.Messenger. Use this as the app ID.
-
Once you have your list of application IDs, you can configure the policy as explained in Configure Application-Based (Per App) VPN Tunnels.
Configure Application-Based (Per App) VPN Tunnels
After you install and configure your Mobile Device Manager (MDM) software solution, you can enable application-based (per app) VPN on the FTD headend device. Once enabled on the headend, your MDM software will start controlling which applications are tunneled over the VPN to the corporate network.
Before you begin
This feature requires the AnyConnect Plus or Apex license. It works on Android and iOS devices only.
This example assumes you have already configured remote access VPN and it is functioning correctly.
You must also have already installed and configured a third-party Mobile Device Manager. You configure the applications that will be allowed in the VPN in the MDM itself, not on the FTD headend device. Instead, the best practice is to simply enable per-app VPN in FTD, then use the MDM to configure and implement your per-app policy. The following example assumes you are using this approach rather than specifying the applications on the FTD headend.
Procedure
|
Step 1 |
Download the Cisco AnyConnect Enterprise Application Selector from software.cisco.com. You can find this application under the AnyConnect Secure Mobility Client v4.x category. You must be running Java 7 to run the application jar file. |
|
Step 2 |
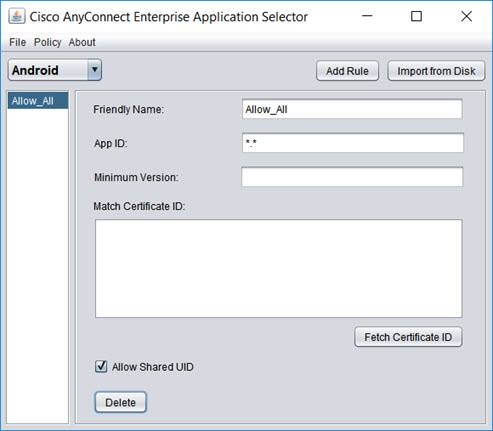
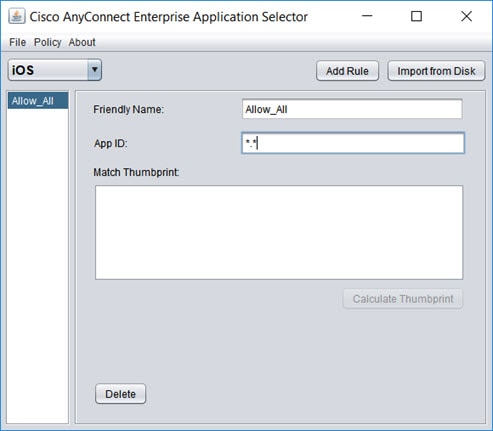
Define the Per App VPN policy using the AnyConnect Enterprise Application Selector. We recommend that you create a simple Allow All policy, and define the allowed apps in the MDM configuration. However, you can specify a list of applications to allow and control the list from the headend. If you want to include specific applications, create a separate rule for each application, using a unique friendly name and the application’s app ID. For information on getting the app IDs, see Determining the Application IDs for Mobile Apps. The following procedure explains how to create an Allow All policy that supports both Android and iOS platforms.
|
|
Step 3 |
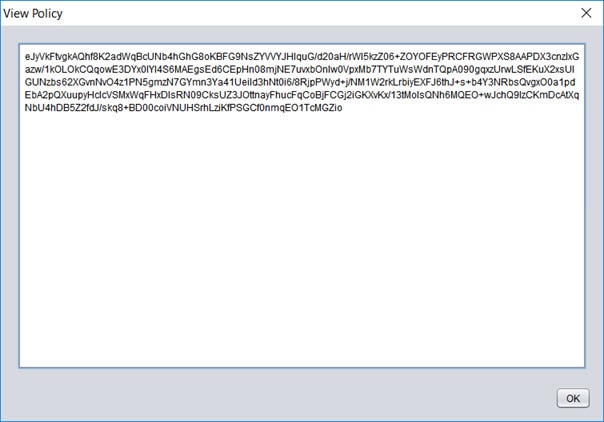
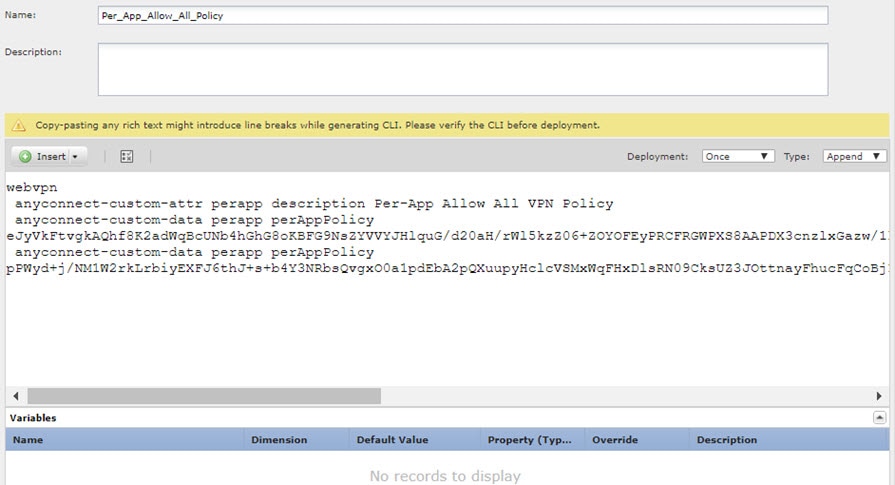
Create the deploy-once/append FlexConfig object that creates the perapp custom attribute and assigns to the attribute the per-app base64 policy created in the AnyConnect Enterprise Application Selector.
|
|
Step 4 |
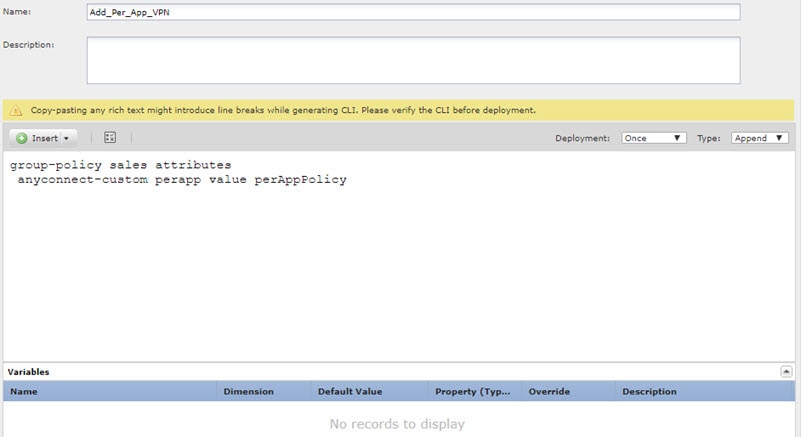
If you use custom group policies, create a deploy-once/append FlexConfig object to configure the dynamic split tunnel custom attribute in the group policies. If you use the default group policy, named DfltGrpPolicy, create a deploy-everytime/append FlexConfig object to configure the dynamic split tunnel custom attribute in the group policy. You must deploy this object every time, because on each deployment, the system will negate any custom changes to the default policy. For custom group policies, unlike the default group policy, the system will not negate changes you make, so you need to deploy the changes once. If you use multiple group policies, you could use a single FlexConfig object to add the custom attribute to each policy in turn. Alternatively, you could create one FlexConfig object per group policy. The outcome will be the same, so the choice is based on your own requirements for modularizing your FlexConfig policy. The following procedure is for the “sales” custom group policy. We recommend that you use custom groups rather than the default group.
|
|
Step 5 |
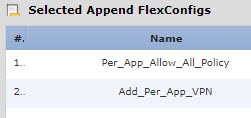
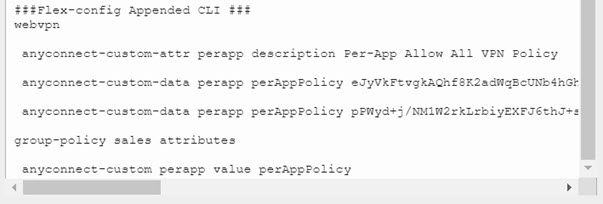
Create the FlexConfig policy that deploys these objects.
|
|
Step 6 |
Deploy your changes. |
|
Step 7 |
Verify the configuration.
|
What to do next
If you no longer want to use Per App VPN, you must create a FlexConfig object to remove the configuration from the FTD devices. In addition, you will need to remove the MDM; see the MDM documentation for instructions.
For the FTD headend, create a deploy-once/append FlexConfig object that contains the commands needed to remove the custom attribute from each group policy that uses it, and then delete the custom attribute. For example, if the custom attribute is used by two group policies, DfltGrpPolicy and sales, and the attribute is named perAppPolicy, the commands would be the following:
group-policy DfltGrpPolicy attributes
 no anyconnect-custom perapp

group-policy sales attributes
 no anyconnect-custom perapp

no anyconnect-custom-data perapp perAppPolicy

webvpn
 no anyconnect-custom-attr perapp
Then, in the FlexConfig policy, remove the objects that create and assign the attribute, and add this new object. Deploy the configuration and the per-app feature will be removed from the group policies.
 Feedback