CLI Book 1: Cisco ASA Series General Operations CLI Configuration Guide, 9.2
Bias-Free Language
The documentation set for this product strives to use bias-free language. For the purposes of this documentation set, bias-free is defined as language that does not imply discrimination based on age, disability, gender, racial identity, ethnic identity, sexual orientation, socioeconomic status, and intersectionality. Exceptions may be present in the documentation due to language that is hardcoded in the user interfaces of the product software, language used based on RFP documentation, or language that is used by a referenced third-party product. Learn more about how Cisco is using Inclusive Language.
- Updated:
- March 18, 2014
Chapter: Digital Certificates
- Information About Digital Certificates
- Configuring Key Pairs
- Removing Key Pairs
- Configuring Trustpoints
- Configuring CRLs for a Trustpoint
- Exporting a Trustpoint Configuration
- Importing a Trustpoint Configuration
- Configuring CA Certificate Map Rules
- Obtaining Certificates Manually
- Obtaining Certificates Automatically with SCEP
- Configuring Proxy Support for SCEP Requests
- Enabling the Local CA Server
- Configuring the Local CA Server
- Customizing the Local CA Server
- Debugging the Local CA Server
- Disabling the Local CA Server
- Deleting the Local CA Server
- Configuring Local CA Certificate Characteristics
- Configuring the Issuer Name
- Configuring the CA Certificate Lifetime
- Configuring the User Certificate Lifetime
- Configuring the CRL Lifetime
- Configuring the Server Keysize
- Setting Up External Local CA File Storage
- Downloading CRLs
- Storing CRLs
- Setting Up Enrollment Parameters
- Adding and Enrolling Users
- Renewing Users
- Restoring Users
- Removing Users
- Revoking Certificates
- Maintaining the Local CA Certificate Database
- Rolling Over Local CA Certificates
- Archiving the Local CA Server Certificate and Keypair
Digital Certificates
This chapter describes how to configure digital certificates and includes the following sections:
Information About Digital Certificates
CAs are responsible for managing certificate requests and issuing digital certificates. A digital certificate includes information that identifies a user or device, such as a name, serial number, company, department, or IP address. A digital certificate also includes a copy of the public key for the user or device. A CA can be a trusted third party, such as VeriSign, or a private (in-house) CA that you establish within your organization.

Tip![]() For an example of a scenario that includes certificate configuration and load balancing, see the following URL: https://supportforums.cisco.com/docs/DOC-5964.
For an example of a scenario that includes certificate configuration and load balancing, see the following URL: https://supportforums.cisco.com/docs/DOC-5964.
This section includes the following topics:
- Public Key Cryptography
- Certificate Scalability
- Key Pairs
- Trustpoints
- Revocation Checking
- The Local CA
- Using Certificates and User Login Credentials
Public Key Cryptography
Digital signatures, enabled by public key cryptography, provide a way to authenticate devices and users. In public key cryptography, such as the RSA encryption system, each user has a key pair containing both a public and a private key. The keys act as complements, and anything encrypted with one of the keys can be decrypted with the other.
In simple terms, a signature is formed when data is encrypted with a private key. The signature is attached to the data and sent to the receiver. The receiver applies the public key of the sender to the data. If the signature sent with the data matches the result of applying the public key to the data, the validity of the message is established.
This process relies on the receiver having a copy of the public key of the sender and a high degree of certainty that this key belongs to the sender, not to someone pretending to be the sender.
Obtaining the public key of a sender is normally handled externally or through an operation performed at installation. For example, most web browsers are configured with the root certificates of several CAs by default. For VPN, the IKE protocol, a component of IPsec, can use digital signatures to authenticate peer devices before setting up security associations.
Certificate Scalability
Without digital certificates, you must manually configure each IPsec peer for each peer with which it communicates; as a result, each new peer that you add to a network would require a configuration change on each peer with which it needs to communicate securely.
When you use digital certificates, each peer is enrolled with a CA. When two peers try to communicate, they exchange certificates and digitally sign data to authenticate each other. When a new peer is added to the network, you enroll that peer with a CA and none of the other peers need modification. When the new peer attempts an IPsec connection, certificates are automatically exchanged and the peer can be authenticated.
With a CA, a peer authenticates itself to the remote peer by sending a certificate to the remote peer and performing some public key cryptography. Each peer sends its unique certificate, which was issued by the CA. This process works because each certificate encapsulates the public key for the associated peer, each certificate is authenticated by the CA, and all participating peers recognize the CA as an authenticating authority. The process is called IKE with an RSA signature.
The peer can continue sending its certificate for multiple IPsec sessions, and to multiple IPsec peers, until the certificate expires. When its certificate expires, the peer administrator must obtain a new one from the CA.
CAs can also revoke certificates for peers that no longer participate in IPsec. Revoked certificates are not recognized as valid by other peers. Revoked certificates are listed in a CRL, which each peer may check before accepting a certificate from another peer.
Some CAs have an RA as part of their implementation. An RA is a server that acts as a proxy for the CA, so that CA functions can continue when the CA is unavailable.
Key Pairs
Key pairs are RSA keys, which have the following characteristics:
- RSA keys can be used for SSH or SSL.
- SCEP enrollment supports the certification of RSA keys.
- For the purposes of generating keys, the maximum key modulus for RSA keys is 2048 bits. The default size is 1024. Many SSL connections using identity certificates with RSA key pairs that exceed 1024 bits can cause a high CPU usage on the ASA and rejected clientless logins.
- For signature operations, the supported maximum key size is 4096 bits. We recommend using a key size of at least 2048.
- You can generate a general purpose RSA key pair, used for both signing and encryption, or you can generate separate RSA key pairs for each purpose. Separate signing and encryption keys help to reduce exposure of the keys, because SSL uses a key for encryption but not signing. However, IKE uses a key for signing but not encryption. By using separate keys for each, exposure of the keys is minimized.
Trustpoints
Trustpoints let you manage and track CAs and certificates. A trustpoint is a representation of a CA or identity pair. A trustpoint includes the identity of the CA, CA-specific configuration parameters, and an association with one, enrolled identity certificate.
After you have defined a trustpoint, you can reference it by name in commands requiring that you specify a CA. You can configure many trustpoints.

Note![]() If an ASA has multiple trustpoints that share the same CA, only one of these trustpoints sharing the CA can be used to validate user certificates. To control which trustpoint sharing a CA is used for validation of user certificates issued by that CA, use the support-user-cert-validation command.
If an ASA has multiple trustpoints that share the same CA, only one of these trustpoints sharing the CA can be used to validate user certificates. To control which trustpoint sharing a CA is used for validation of user certificates issued by that CA, use the support-user-cert-validation command.
For automatic enrollment, a trustpoint must be configured with an enrollment URL, and the CA that the trustpoint represents must be available on the network and must support SCEP.
You can export and import the keypair and issued certificates associated with a trustpoint in PKCS12 format. This format is useful to manually duplicate a trustpoint configuration on a different ASA.
Certificate Enrollment
The ASA needs a CA certificate for each trustpoint and one or two certificates for itself, depending upon the configuration of the keys used by the trustpoint. If the trustpoint uses separate RSA keys for signing and encryption, the ASA needs two certificates, one for each purpose. In other key configurations, only one certificate is needed.
The ASA supports automatic enrollment with SCEP and with manual enrollment, which lets you paste a base-64-encoded certificate directly into the terminal. For site-to-site VPNs, you must enroll each ASA. For remote access VPNs, you must enroll each ASA and each remote access VPN client.
Proxy for SCEP Requests
The ASA can proxy SCEP requests between AnyConnect and a third-party CA. The CA only needs to be accessible to the ASA if it is acting as the proxy. For the ASA to provide this service, the user must authenticate using any of the methods supported by AAA before the ASA sends an enrollment request. You can also use host scan and dynamic access policies to enforce rules of eligibility to enroll.
The ASA supports this feature only with an AnyConnect SSL or IKEv2 VPN session. It supports all SCEP-compliant CAs, including IOS CS, Windows Server 2003 CA, and Windows Server 2008 CA.
Clientless (browser-based) access does not support SCEP proxy, although WebLaunch—clientless-initiated AnyConnect—does support it.
Revocation Checking
When a certificate is issued, it is valid for a fixed period of time. Sometimes a CA revokes a certificate before this time period expires; for example, because of security concerns or a change of name or association. CAs periodically issue a signed list of revoked certificates. Enabling revocation checking forces the ASA to check that the CA has not revoked a certificate each time that it uses the certificate for authentication.
When you enable revocation checking, the ASA checks certificate revocation status during the PKI certificate validation process, which can use either CRL checking, OCSP, or both. OCSP is only used when the first method returns an error (for example, indicating that the server is unavailable).
With CRL checking, the ASA retrieves, parses, and caches CRLs, which provide a complete list of revoked (and unrevoked) certificates with their certificate serial numbers. The ASA evaluates certificates according to CRLs, also called authority revocation lists, from the identity certificate up the chain of subordinate certificate authorities.
OCSP offers a more scalable method of checking revocation status in that it localizes certificate status through a validation authority, which it queries for status of a specific certificate.
Supported CA Servers
The ASA supports the following CA servers:
Cisco IOS CS, ASA Local CA, and third-party X.509 compliant CA vendors including, but not limited to:
CRLs
CRLs provide the ASA with one way of determining whether a certificate that is within its valid time range has been revoked by the issuing CA. CRL configuration is part of configuration of a trustpoint.
You can configure the ASA to make CRL checks mandatory when authenticating a certificate by using the revocation-check crl command. You can also make the CRL check optional by using the revocation-check crl none command, which allows the certificate authentication to succeed when the CA is unavailable to provide updated CRL data.
The ASA can retrieve CRLs from CAs using HTTP, SCEP, or LDAP. CRLs retrieved for each trustpoint are cached for a configurable amount of time for each trustpoint.
When the ASA has cached a CRL for longer than the amount of time it is configured to cache CRLs, the ASA considers the CRL too old to be reliable, or “stale.” The ASA tries to retrieve a newer version of the CRL the next time that a certificate authentication requires a check of the stale CRL.
The ASA caches CRLs for an amount of time determined by the following two factors:
- The number of minutes specified with the cache-time command. The default value is 60 minutes.
- The NextUpdate field in the CRLs retrieved, which may be absent from CRLs. You control whether the ASA requires and uses the NextUpdate field with the enforcenextupdate command.
The ASA uses these two factors in the following ways:
- If the NextUpdate field is not required, the ASA marks CRLs as stale after the length of time defined by the cache-time command.
- If the NextUpdate field is required, the ASA marks CRLs as stale at the sooner of the two times specified by the cache-time command and the NextUpdate field. For example, if the cache-time command is set to 100 minutes and the NextUpdate field specifies that the next update is 70 minutes away, the ASA marks CRLs as stale in 70 minutes.
If the ASA has insufficient memory to store all CRLs cached for a given trustpoint, it deletes the least recently used CRL to make room for a newly retrieved CRL.
OCSP
OCSP provides the ASA with a way of determining whether a certificate that is within its valid time range has been revoked by the issuing CA. OCSP configuration is part of trustpoint configuration.
OCSP localizes certificate status on a validation authority (an OCSP server, also called the responder) which the ASA queries for the status of a specific certificate. This method provides better scalability and more up-to-date revocation status than does CRL checking, and helps organizations with large PKI installations deploy and expand secure networks.
Note![]() The ASA allows a five-second time skew for OCSP responses.
The ASA allows a five-second time skew for OCSP responses.
You can configure the ASA to make OCSP checks mandatory when authenticating a certificate by using the revocation-check ocsp command. You can also make the OCSP check optional by using the revocation-check ocsp none command, which allows the certificate authentication to succeed when the validation authority is unavailable to provide updated OCSP data.
OCSP provides three ways to define the OCSP server URL. The ASA uses these servers in the following order:
1.![]() The OCSP URL defined in a match certificate override rule by using the match certificate command).
The OCSP URL defined in a match certificate override rule by using the match certificate command).
2.![]() The OCSP URL configured by using the ocsp url command.
The OCSP URL configured by using the ocsp url command.
3.![]() The AIA field of the client certificate.
The AIA field of the client certificate.
Note![]() To configure a trustpoint to validate a self-signed OCSP responder certificate, you import the self-signed responder certificate into its own trustpoint as a trusted CA certificate. Then you configure the match certificate command in the client certificate validating trustpoint to use the trustpoint that includes the self-signed OCSP responder certificate to validate the responder certificate. Use the same procedure for configuring validating responder certificates external to the validation path of the client certificate.
To configure a trustpoint to validate a self-signed OCSP responder certificate, you import the self-signed responder certificate into its own trustpoint as a trusted CA certificate. Then you configure the match certificate command in the client certificate validating trustpoint to use the trustpoint that includes the self-signed OCSP responder certificate to validate the responder certificate. Use the same procedure for configuring validating responder certificates external to the validation path of the client certificate.
The OCSP server (responder) certificate usually signs the OCSP response. After receiving the response, the ASA tries to verify the responder certificate. The CA normally sets the lifetime of the OCSP responder certificate to a relatively short period to minimize the chance of being compromised. The CA usually also includes an ocsp-no-check extension in the responder certificate, which indicates that this certificate does not need revocation status checking. However, if this extension is not present, the ASA tries to check revocation status using the same method specified in the trustpoint. If the responder certificate is not verifiable, revocation checks fail. To avoid this possibility, use the revocation-check none command to configure the responder certificate validating trustpoint, and use the revocation-check ocsp command to configure the client certificate.
The Local CA
The local CA performs the following tasks:
- Integrates basic certificate authority operation on the ASA.
- Deploys certificates.
- Provides secure revocation checking of issued certificates.
- Provides a certificate authority on the ASA for use with browser-based and client-based SSL VPN connections.
- Provides trusted digital certificates to users, without the need to rely on external certificate authorization.
- Provides a secure, in-house authority for certificate authentication and offers straightforward user enrollment by means of a website login.
Storage for Local CA Files
The ASA accesses and implements user information, issued certificates, and revocation lists using a local CA database. This database resides in local flash memory by default, or can be configured to reside on an external file system that is mounted and accessible to the ASA.
No limits exist on the number of users that can be stored in the local CA user database; however, if flash memory storage issues arise, syslogs are generated to alert the administrator to take action, and the local CA could be disabled until the storage issues are resolved. Flash memory can store a database with 3500 users or less; however, a database of more than 3500 users requires external storage.
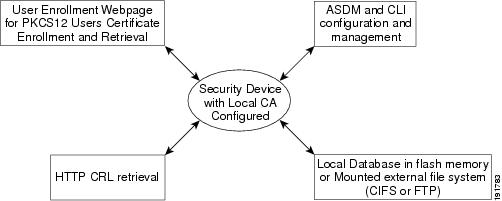
The Local CA Server
After you configure a local CA server on the ASA, users can enroll for a certificate by logging into a website and entering a username and a one-time password that is provided by the local CA administrator to validate their eligibility for enrollment.
As shown in Figure 42-1, the local CA server resides on the ASA and handles enrollment requests from website users and CRL inquiries coming from other certificate validating devices and ASAs. Local CA database and configuration files are maintained either on the ASA flash memory (default storage) or on a separate storage device.
Using Certificates and User Login Credentials
The following section describes the different methods of using certificates and user login credentials (username and password) for authentication and authorization. These methods apply to IPsec, AnyConnect, and Clientless SSL VPN.
In all cases, LDAP authorization does not use the password as a credential. RADIUS authorization uses either a common password for all users or the username as a password.
Using User Login Credentials
The default method for authentication and authorization uses the user login credentials.
–![]() Enabled by the authentication server group setting in the tunnel group (also called ASDM Connection Profile)
Enabled by the authentication server group setting in the tunnel group (also called ASDM Connection Profile)
–![]() Uses the username and password as credentials
Uses the username and password as credentials
–![]() Enabled by the authorization server group setting in the tunnel group (also called ASDM Connection Profile)
Enabled by the authorization server group setting in the tunnel group (also called ASDM Connection Profile)
Using Certificates
If user digital certificates are configured, the ASA first validates the certificate. It does not, however, use any of the DNs from certificates as a username for the authentication.
If both authentication and authorization are enabled, the ASA uses the user login credentials for both user authentication and authorization.
–![]() Enabled by the authentication server group setting
Enabled by the authentication server group setting
–![]() Uses the username and password as credentials
Uses the username and password as credentials
–![]() Enabled by the authorization server group setting
Enabled by the authorization server group setting
–![]() Uses the username as a credential
Uses the username as a credential
If authentication is disabled and authorization is enabled, the ASA uses the primary DN field for authorization.
–![]() DISABLED (set to None) by the authentication server group setting
DISABLED (set to None) by the authentication server group setting
–![]() Enabled by the authorization server group setting
Enabled by the authorization server group setting
–![]() Uses the username value of the certificate primary DN field as a credential
Uses the username value of the certificate primary DN field as a credential
Note![]() If the primary DN field is not present in the certificate, the ASA uses the secondary DN field value as the username for the authorization request.
If the primary DN field is not present in the certificate, the ASA uses the secondary DN field value as the username for the authorization request.
For example, consider a user certificate that includes the following Subject DN fields and values:
If the Primary DN = EA (E-mail Address) and the Secondary DN = CN (Common Name), then the username used in the authorization request would be anyuser@example.com.
Licensing Requirements for Digital Certificates
|
|
|
|---|---|
Prerequisites for Local Certificates
Local certificates have the following prerequisites:
- Make sure that the ASA is configured correctly to support certificates. An incorrectly configured ASA can cause enrollment to fail or request a certificate that includes inaccurate information.
- Make sure that the hostname and domain name of the ASA are configured correctly. To view the currently configured hostname and domain name, enter the show running-config command. For information about configuring the hostname and domain name, see Configuring the Hostname, Domain Name, and Passwords.
- Make sure that the ASA clock is set accurately before configuring the CA. Certificates have a date and time that they become valid and expire. When the ASA enrolls with a CA and obtains a certificate, the ASA checks that the current time is within the valid range for the certificate. If it is outside that range, enrollment fails. For information about setting the clock, see Setting the Date and Time.
Prerequisites for SCEP Proxy Support
Configuring the ASA as a proxy to submit requests for third-party certificates has the following requirements:
- AnyConnect Secure Mobility Client 3.0 or later must be running at the endpoint.
- The authentication method, configured in the connection profile for your group policy, must be set to use both AAA and certificate authentication.
- An SSL port must be open for IKEv2 VPN connections.
- The CA must be in auto-grant mode.
Guidelines and Limitations
This section includes the guidelines and limitations for this feature.
- Supported in single and multiple context mode for a local CA.
- Supported in single context mode only for third-party CAs.
Supported in routed and transparent firewall mode.
- Does not support replicating sessions in Stateful Failover.
- Does not support failover for local CAs.
- For ASAs that are configured as CA servers or clients, limit the validity period of the certificate to less than the recommended end date of 03:14:08 UTC, January 19, 2038. This guideline also applies to imported certificates from third-party vendors.
- You cannot configure the local CA when failover is enabled. You can only configure the local CA server for standalone ASAs without failover. For more information, see CSCty43366.
- When a certificate enrollment is completed, the ASA stores a PKCS12 file containing the user's keypair and certificate chain, which requires about 2 KB of flash memory or disk space per enrollment. The actual amount of disk space depends on the configured RSA key size and certificate fields. Keep this guideline in mind when adding a large number of pending certificate enrollments on an ASA with a limited amount of available flash memory, because these PKCS12 files are stored in flash memory for the duration of the configured enrollment retrieval timeout. We recommend using a key size of at least 2048.
- The lifetime ca-certificate command takes effect when the local CA server certificate is first generated (that is, when you initially configure the local CA server and issue the no shutdown command). When the CA certificate expires, the configured lifetime value is used to generate the new CA certificate. You cannot change the lifetime value for existing CA certificates.
- You should configure the ASA to use an identity certificate to protect ASDM traffic and HTTPS traffic to the management interface. Identity certificates that are automatically generated with SCEP are regenerated after each reboot, so make sure that you manually install your own identity certificates. For an example of this procedure that applies only to SSL, see the following URL: http://www.cisco.com/en/US/products/ps6120/products_configuration_example09186a00809fcf91.shtml.
- The ASA and the AnyConnect clients can only validate certificates in which the X520Serialnumber field (the serial number in the Subject Name) is in PrintableString format. If the serial number format uses encoding such as UTF8, the certificate authorization will fail.
- Use only valid characters and values for certificate parameters when you import them on the ASA.
- To use a wildcard (*) symbol, make sure that you use encoding on the CA server that allows this character in the string value. Although RFC 5280 recommends using either a UTF8String or PrintableString, you should use UTF8String because PrintableString does not recognize the wildcard as a valid character. The ASA rejects the imported certificate if an invalid character or value is found during the import. For example:
Configuring Digital Certificates
This section describes how to configure local CA certificates. Make sure that you follow the sequence of tasks listed to correctly configure this type of digital certificate. This section includes the following topics:
- Configuring Key Pairs
- Removing Key Pairs
- Configuring Trustpoints
- Configuring CRLs for a Trustpoint
- Exporting a Trustpoint Configuration
- Importing a Trustpoint Configuration
- Configuring CA Certificate Map Rules
- Obtaining Certificates Manually
- Obtaining Certificates Automatically with SCEP
- Configuring Proxy Support for SCEP Requests
- Enabling the Local CA Server
- Configuring the Local CA Server
- Customizing the Local CA Server
- Debugging the Local CA Server
- Disabling the Local CA Server
- Deleting the Local CA Server
- Configuring Local CA Certificate Characteristics
Configuring Key Pairs
To generate key pairs, perform the following steps:
Removing Key Pairs
To remove key pairs, perform the following steps:
|
|
|
|---|---|
|
|
Examples
The following example shows how to remove key pairs:
Configuring Trustpoints
To configure a trustpoint, perform the following steps:
Configuring CRLs for a Trustpoint
To use mandatory or optional CRL checking during certificate authentication, you must configure CRLs for each trustpoint. To configure CRLs for a trustpoint, perform the following steps:
Exporting a Trustpoint Configuration
To export a trustpoint configuration, enter the following command:
Examples
The following example exports PKCS12 data for the trustpoint Main with the passphrase Wh0zits:
ciscoasa (config)# crypto ca export Main pkcs12 Wh0zits
Exported pkcs12 follows:
Importing a Trustpoint Configuration
To import a trustpoint configuration, enter the following command:
Examples
The following example manually imports PKCS12 data to the trustpoint Main with the passphrase Wh0zits:
ciscoasa (config)# crypto ca import Main pkcs12 Wh0zits
The following example manually imports a certificate for the trustpoint Main:
ciscoasa (config)# crypto ca import Main certificate
Configuring CA Certificate Map Rules
You can configure rules based on the Issuer and Subject fields of a certificate. Using the rules you create, you can map IPsec peer certificates to tunnel groups with the tunnel-group-map command. The ASA supports one CA certificate map, which can include many rules.
To configure a CA certificate map rule, perform the following steps:
Obtaining Certificates Manually
To obtain certificates manually, perform the following steps:
|
|
|
|
|---|---|---|
|
ciscoasa(config)# crypto ca authenticate Main Enter the base 64 encoded CA certificate. End with a blank line or the word "quit" on a line by itself MIIDRTCCAu+gAwIBAgIQKVcqP/KW74VP0NZzL+JbRTANBgkqhkiG9w0BAQUFADCB /7QEM8izy0EOTSErKu7Nd76jwf5e4qttkQ== INFO: Certificate has the following attributes: Fingerprint: 24b81433 409b3fd5 e5431699 8d490d34 Do you accept this certificate? [yes/no]: y |
Imports the CA certificate for the configured trustpoint. Note This step assumes that you have already obtained a base-64 encoded CA certificate from the CA represented by the trustpoint. Whether a trustpoint requires that you manually obtain certificates is determined by the use of the enrollment terminal command when you configure the trustpoint. For more information, see Configuring Trustpoints. |
|
|
ciscoasa(config)# crypto ca enroll Main % Start certificate enrollment.. % The fully-qualified domain name in the certificate will be: securityappliance.example.com % Include the device serial number in the subject name? [yes/no]: n Display Certificate Request to terminal? [yes/no]: y MIIBoDCCAQkCAQAwIzEhMB8GCSqGSIb3DQEJAhYSRmVyYWxQaXguY2lzY28uY29t [ certificate request data omitted ] jF4waw68eOxQxVmdgMWeQ+RbIOYmvt8g6hnBTrd0GdqjjVLt |
Enrolls the ASA with the trustpoint. Generates a certificate for signing data and depending on the type of keys that you have configured, for encrypting data. If you use separate RSA keys for signing and encryption, the crypto ca enroll command displays two certificate requests, one for each key. If you use general-purpose RSA keys for both signing and encryption, the crypto ca enroll command displays one certificate request. To complete enrollment, obtain a certificate for all certificate requests generated by the crypto ca enroll command from the CA represented by the applicable trustpoint. Make sure that the certificate is in base-64 format. |
|
|
% The fully-qualified domain name in the certificate will be: securityappliance.example.com Enter the base 64 encoded certificate. End with a blank line or the word “quit” on a line by itself |
Imports each certificate you receive from the CA. Requests that you paste the certificate to the terminal in base-64 format. |
|
|
|
Verifies that the enrollment process was successful by displaying certificate details issued for the ASA and the CA certificate for the trustpoint. |
|
|
|
Saves the running configuration. Repeat these steps for each trustpoint that you configure for manual enrollment. |
Obtaining Certificates Automatically with SCEP
To obtain certificates automatically using SCEP, perform the following steps:
|
|
|
|
|---|---|---|
|
|
Obtains the CA certificate for the configured trustpoint. Note This step assumes that you have already obtained a base-64 encoded CA certificate from the CA represented by the trustpoint. When you configure the trustpoint, use of the enrollment url command determines whether or not you must obtain certificates automatically via SCEP. For more information, see Configuring Trustpoints. |
|
|
|
Enrolls the ASA with the trustpoint. Retrieves a certificate for signing data and depending on the type of keys that you have configured, for encrypting data. Before entering this command, contact the CA administrator, who may need to authenticate the enrollment request manually before the CA grants certificates. If the ASA does not receive a certificate from the CA within one minute (the default) of sending a certificate request, it resends the certificate request. The ASA continues sending a certificate request each minute until a certificate is received. If the fully qualified domain name configured for the trustpoint is not identical to the fully qualified domain name of the ASA, including the case of the characters, a warning appears. To resolve this issue, exit the enrollment process, make any necessary corrections, and reenter the crypto ca enroll command. Note If the ASA reboots after you have issued the crypto ca enroll command but before you have received the certificate, reenter the crypto ca enroll command and notify the CA administrator. |
|
|
ciscoasa/contexta(config)# show crypto ca server certificate Main |
Verifies that the enrollment process was successful by displaying certificate details issued for the ASA and the CA certificate for the trustpoint. |
|
|
|
Configuring Proxy Support for SCEP Requests
To configure the ASA to authenticate remote access endpoints using third-party CAs, perform the following steps:
Enabling the Local CA Server
Before enabling the local CA server, you must first create a passphrase of at least seven characters to encode and archive a PKCS12 file that includes the local CA certificate and keypair to be generated. The passphrase unlocks the PKCS12 archive if the CA certificate or keypair is lost.
To enable the local CA server, perform the following commands:
Examples
The following example enables the local CA server:
hostname (config)# crypto ca server
ciscoasa (config-ca-server)# no shutdown
The following is sample output that shows local CA server configuration and status:
Configuring the Local CA Server
To configure the local CA server, perform the following commands:
Examples
The following example shows how to configure and enable the local CA server using the predefined default values for all required parameters:
hostname (config)# crypto ca server
hostname (config-ca-server) # smtp from-address SecurityAdmin@example.com
hostname (config-ca-server)# subject-name-default cn=engineer, o=asc Systems, c=US
hostname (config-ca-server)# no shutdown
Customizing the Local CA Server
To configure a customized local CA server, perform the following commands:
Debugging the Local CA Server
To debug the newly configured local CA server, perform the following commands:
Disabling the Local CA Server
To disable the local CA server, perform the following commands:
Deleting the Local CA Server
To delete an existing local CA server (either enabled or disabled), enter one of the following commands:
Configuring Local CA Certificate Characteristics
You can configure the following characteristics of local CA certificates:
- The name of the certificate issuer as it appears on all user certificates.
- The lifetime of the local CA certificates (server and user) and the CRL.
- The length of the public and private keypairs associated with local CA and user certificates.
This section includes the following topics:
- Configuring the Issuer Name
- Configuring the CA Certificate Lifetime
- Configuring the User Certificate Lifetime
- Configuring the CRL Lifetime
- Configuring the Server Keysize
- Setting Up External Local CA File Storage
- Downloading CRLs
- Storing CRLs
- Setting Up Enrollment Parameters
- Adding and Enrolling Users
- Renewing Users
- Restoring Users
- Removing Users
- Revoking Certificates
- Maintaining the Local CA Certificate Database
- Rolling Over Local CA Certificates
- Archiving the Local CA Server Certificate and Keypair
Configuring the Issuer Name
To configure the certificate issuer name, perform the following commands:
Configuring the CA Certificate Lifetime
To configure the local CA server certificate lifetime, perform the following commands:
Configuring the User Certificate Lifetime
To configure the user certificate lifetime, perform the following commands:
Configuring the CRL Lifetime
To configure the CRL lifetime, perform the following commands:
Configuring the Server Keysize
To configure the server keysize, perform the following commands:
Examples
The following is sample output that shows two user certificates in the database.
Renewal allowed until: Not Allowed
Number of times user notified: 0
PKCS12 file stored until: 12:45:52 UTC Fri Jan 4 2017
issued: 12:45:52 UTC Thu Jan 3 2008
expired: 12:17:37 UTC Sun Dec 31 2017
Renewal allowed until: Not Allowed
Number of times user notified: 0
PKCS12 file stored until: 12:27:59 UTC Fri Jan 4 2008
issued: 12:27:59 UTC Thu Jan 3 2008
expired: 12:17:37 UTC Sun Dec 31 2017
Setting Up External Local CA File Storage
You can store the local CA server configuration, users, issued certificates, and CRLs in the local CA server database either in flash memory or in an external local CA file system. To configure external local CA file storage, perform the following steps:
Examples
The following example shows the list of local CA files that appear in flash memory or in external storage:
Downloading CRLs
To make the CRL available for HTTP download on a given interface or port, perform the following commands:
Storing CRLs
To establish a specific location for the automatically generated CRL of the local CA, perform the following site-to-site task in either single or multiiple context mode:
|
|
|
|
|---|---|---|
|
|
Enters local ca server configuration mode. Allows you to configure and manage a local CA. |
|
|
|
Specifies the CDP to be included in all issued certificates. If you do not configure a specific location for the CDP, the default URL location is http:// hostname.domain /+CSCOCA+/asa_ca.crl. The local CA updates and reissues the CRL each time a user certificate is revoked or unrevoked. If no revocation changes occur, the CRL is reissued once each CRL lifetime. If this command is set to serve the CRL directly from the local CA ASA, see Downloading CRLs for instructions about opening a port on an interface to make the CRL accessible from that interface. The CRL exists for other devices to validate the revocation of certificates issued by the local CA. In addition, the local CA tracks all issued certificates and status within its own certificate database. Revocation checking is performed when a validating party needs to validate a user certificate by retrieving the revocation status from an external server, which might be the CA that issued the certificate or a server designated by the CA. |
Setting Up Enrollment Parameters
To set up enrollment parameters, perform the following commands:
Adding and Enrolling Users
To add a user who is eligible for enrollment in the local CA database, perform the following commands:
Renewing Users
To specify the timing of renewal notices, perform the following steps:
Restoring Users
To restore a user and a previously revoked certificate that was issued by the local CA server, perform the following steps:
Removing Users
To delete a user from the user database by username, perform the following steps:
Revoking Certificates
To revoke a user certificate, perform the following steps:
Maintaining the Local CA Certificate Database
To maintain the local CA certificate database, make sure that you save the certificate database file, LOCAL-CA-SERVER.cdb, with the write memory command each time that a change to the database occurs. The local CA certificate database includes the following files:
Rolling Over Local CA Certificates
Thirty days before the local CA certificate expires, a rollover replacement certificate is generated, and a syslog message informs the administrator that it is time for local CA rollover. The new local CA certificate must be imported onto all necessary devices before the current certificate expires. If the administrator does not respond by installing the rollover certificate as the new local CA certificate, validations may fail.
The local CA certificate rolls over automatically after expiration using the same keypair. The rollover certificate is available for export in base 64 format.
Examples
The following example shows a base 64 encoded local CA certificate:
Archiving the Local CA Server Certificate and Keypair
To archive the local CA server certificate and keypair, enter the following command:
Monitoring Digital Certificates
To display certificate configuration and database information, enter one or more of the following commands:
Examples
The following example shows an RSA general-purpose key:
The following example shows the local CA CRL:
hostname (config)# show crypto ca server crl
Certificate Revocation List:
Issuer: cn=xx5520-1-3-2007-1
This Update: 13:32:53 UTC Jan 4 2010
Next Update: 13:32:53 UTC Feb 3 2010
Number of CRL entries: 2
CRL size: 270 bytes
Revoked Certificates:
Serial Number: 0x6f
Revocation Date: 12:30:01 UTC Jan 4 2010
Serial Number: 0x47
Revocation Date: 13:32:48 UTC Jan 4 2010
The following example shows one user on-hold:
hostname (config)# show crypto ca server user-db on-hold
username: wilma101
email: <None>
dn: <None>
allowed: <not allowed>
notified: 0
hostname (config)#
The following example shows output of the show running-config command, in which local CA certificate map rules appear:
Feature History for Certificate Management
Table 42-1 lists each feature change and the platform release in which it was implemented.
 Feedback