- Preface
- New and Changed Information in Release 4.3.x
- Preconfiguring Physical Interfaces on Cisco IOS XR Software
- Configuring ATM Interfaces on Cisco IOS XR Software
- Advanced Configuration and Modification of the Management Ethernet Interface on Cisco IOS XR Software
- Configuring Ethernet Interfaces on Cisco IOS XR Software
- Configuring Ethernet OAM on Cisco IOS XR Software
- Configuring Link Bundling on Cisco IOS XR Software
- Configuring Virtual Loopback and Null Interfaces on Cisco IOS XR Software
- Configuring Channelized SONET/SDH on Cisco IOS XR Software
- Configuring Circuit Emulation over Packet on Cisco IOS XR Software
- Configuring Clear Channel SONET Controllers on Cisco IOS XR Software
- Configuring Clear Channel T3/E3 and Channelized T3 and T1/E1 Controllers on Cisco IOS XR Software
- Configuring POS Interfaces on Cisco IOS XR Software
- Configuring Serial Interfaces on Cisco IOS XR Software
- Configuring Frame Relay on Cisco IOS XR Software
- Configuring PPP on Cisco IOS XR Software
- Configuring 802.1Q VLAN Interfaces on Cisco IOS XR Software
- Configuring Tunnel Interfaces on Cisco IOS XR Software
- Index
Cisco IOS XR Interface and Hardware Component Configuration Guide for the Cisco XR 12000 Series Router, Release 4.3.x
Bias-Free Language
The documentation set for this product strives to use bias-free language. For the purposes of this documentation set, bias-free is defined as language that does not imply discrimination based on age, disability, gender, racial identity, ethnic identity, sexual orientation, socioeconomic status, and intersectionality. Exceptions may be present in the documentation due to language that is hardcoded in the user interfaces of the product software, language used based on RFP documentation, or language that is used by a referenced third-party product. Learn more about how Cisco is using Inclusive Language.
- Updated:
- December 20, 2012
Chapter: Configuring PPP on Cisco IOS XR Software
- Contents
- Prerequisites for Configuring PPP
- Information About PPP
- How to Configure PPP
Configuring PPP on Cisco IOS XR Software
This module describes the configuration of Point-to-Point Protocol (PPP) on POS and serial interfaces on the Cisco XR 12000 Series Router.
Feature History for Configuring PPP Interfaces
on Cisco IOS XR Software
Contents
•![]() Prerequisites for Configuring PPP
Prerequisites for Configuring PPP
•![]() Configuration Examples for PPP
Configuration Examples for PPP
Prerequisites for Configuring PPP
You must be in a user group associated with a task group that includes the proper task IDs. The command reference guides include the task IDs required for each command. If you suspect user group assignment is preventing you from using a command, contact your AAA administrator for assistance.
Before you can configure PPP authentication on a POS or serial interface, be sure that the following tasks and conditions are met:
•![]() Your hardware must support POS or serial interfaces.
Your hardware must support POS or serial interfaces.
•![]() You have enabled PPP encapsulation on your interface with the encap ppp command, as described in the appropriate module:
You have enabled PPP encapsulation on your interface with the encap ppp command, as described in the appropriate module:
–![]() To enable PPP encapsulation on a POS interface, see the Configuring POS Interfaces on Cisco IOS XR Software module in this manual.
To enable PPP encapsulation on a POS interface, see the Configuring POS Interfaces on Cisco IOS XR Software module in this manual.
–![]() To enable PPP encapsulation on a serial interface, see the Configuring Serial Interfaces on Cisco IOS XR Sotware module in this manual.
To enable PPP encapsulation on a serial interface, see the Configuring Serial Interfaces on Cisco IOS XR Sotware module in this manual.
Information About PPP
To configure PPP and related features, you should understand the information in this section:
PPP Authentication
When PPP authentication is configured on an interface, a host requires that the other host uniquely identify itself with a secure password before establishing a PPP connection. The password is unique and is known to both hosts.
PPP supports the following authentication protocols:
•![]() Challenge-Handshake Authentication Protocol (CHAP)
Challenge-Handshake Authentication Protocol (CHAP)
•![]() Microsoft extension to the CHAP protocol (MS-CHAP)
Microsoft extension to the CHAP protocol (MS-CHAP)
•![]() Password Authentication Protocol (PAP).
Password Authentication Protocol (PAP).
When you first enable PPP on a POS or serial interface, no authentication is enabled on the interface until you configure a CHAP, MS-CHAP, or PAP secret password under that interface. Keep the following information in mind when configuring PPP on an interface:
•![]() CHAP, MS-CHAP, and PAP can be configured on a single interface; however, only one authentication method is used at any one time. The order in which the authentication protocols are used is determined by the peer during the LCP negotiations. The first authentication method used is the one that is also supported by the peer.
CHAP, MS-CHAP, and PAP can be configured on a single interface; however, only one authentication method is used at any one time. The order in which the authentication protocols are used is determined by the peer during the LCP negotiations. The first authentication method used is the one that is also supported by the peer.
•![]() PAP is the least secure authentication protocol available on POS and serial interfaces. To ensure higher security for information that is sent over POS and serial interfaces, we recommend configuring CHAP or MS-CHAP authentication in addition to PAP authentication.
PAP is the least secure authentication protocol available on POS and serial interfaces. To ensure higher security for information that is sent over POS and serial interfaces, we recommend configuring CHAP or MS-CHAP authentication in addition to PAP authentication.
•![]() Enabling or disabling PPP authentication does not effect the local router's willingness to authenticate itself to the remote device.
Enabling or disabling PPP authentication does not effect the local router's willingness to authenticate itself to the remote device.
•![]() The ppp authentication command is also used to specify the order in which CHAP, MS-CHAP, and PAP authentication is selected on the interface. You can enable CHAP, MS-CHAP, or PAP in any order. If you enable all three methods, the first method specified is requested during link negotiation. If the peer suggests using the second method, or refuses the first method, the second method is tried. Some remote devices support only one method. Base the order in which you specify methods on the remote device's ability to correctly negotiate the appropriate method and on the level of data line security you require. PAP usernames and passwords are sent as clear text strings, which can be intercepted and reused.
The ppp authentication command is also used to specify the order in which CHAP, MS-CHAP, and PAP authentication is selected on the interface. You can enable CHAP, MS-CHAP, or PAP in any order. If you enable all three methods, the first method specified is requested during link negotiation. If the peer suggests using the second method, or refuses the first method, the second method is tried. Some remote devices support only one method. Base the order in which you specify methods on the remote device's ability to correctly negotiate the appropriate method and on the level of data line security you require. PAP usernames and passwords are sent as clear text strings, which can be intercepted and reused.

PAP Authentication
PAP provides a simple method for a remote node to establish its identity using a two-way handshake. After a PPP link is established between two hosts, a username and password pair is repeatedly sent by the remote node across the link (in clear text) until authentication is acknowledged, or until the connection is terminated.
PAP is not a secure authentication protocol. Passwords are sent across the link in clear text and there is no protection from playback or trial-and-error attacks. The remote node is in control of the frequency and timing of the login attempts.
CHAP Authentication
CHAP is defined in RFC 1994, and it verifies the identity of the peer by means of a three-way handshake. The steps that follow provide a general overview of the CHAP process:
Step 1 ![]() The CHAP authenticator sends a challenge message to the peer.
The CHAP authenticator sends a challenge message to the peer.
Step 2 ![]() The peer responds with a value calculated through a one-way hash function.
The peer responds with a value calculated through a one-way hash function.
Step 3 ![]() The authenticator checks the response against its own calculation of the expected hash value. If the values match, then the authentication is successful. If the values do not match, then the connection is terminated.
The authenticator checks the response against its own calculation of the expected hash value. If the values match, then the authentication is successful. If the values do not match, then the connection is terminated.
This authentication method depends on a CHAP password known only to the authenticator and the peer. The CHAP password is not sent over the link. Although the authentication is only one-way, you can negotiate CHAP in both directions, with the help of the same CHAP password set for mutual authentication.

Note ![]() For CHAP authentication to be valid, the CHAP password must be identical on both hosts.
For CHAP authentication to be valid, the CHAP password must be identical on both hosts.
MS-CHAP Authentication
Microsoft Challenge Handshake Authentication Protocol (MS-CHAP) is the Microsoft version of CHAP and is an extension to RFC 1994. MS-CHAP follows the same authentication process used by CHAP. In this case, however, authentication occurs between a PC using Microsoft Windows NT or Microsoft Windows 95 and a Cisco router or access server acting as a network access server (NAS).
Note ![]() For MS-CHAP authentication to be valid, the MS-CHAP password must be identical on both hosts.
For MS-CHAP authentication to be valid, the MS-CHAP password must be identical on both hosts.
Multilink PPP
Multilink Point-to-Point Protocol (MLPPP) provides a method for combining multiple physical links into one logical link. The implementation combines multiple PPP interfaces into one multilink interface. MLPPP performs the fragmenting, reassembling, and sequencing of datagrams across multiple PPP links.
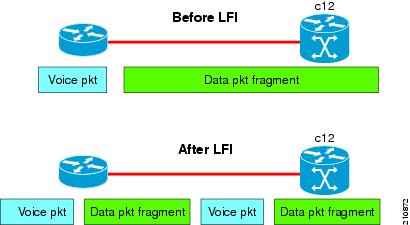
Link Fragmentation and Interleaving (LFI) is designed for MLPPP interfaces and is required when integrating voice and data on low-speed interfaces.
Link Fragmentation and Interleaving (LFI) provides stability for delay-sensitive traffic, such as voice or video, traveling on the same circuit as data. Voice is susceptible to increased latency and jitter when the network processes large packets on low-speed interfaces. LFI reduces delay and jitter by fragmenting large datagrams and interleaving them with low-delay traffic packets.
Figure 23 Link Fragmentation Interleave
MLPPP Feature Summary
MLPPP in Cisco IOS XR provides the same features that are supported on PPP Serial interfaces with the exception of QoS. It also provides the following additional features:
•![]() Fragment sizes of 128, 256, and 512 bytes.
Fragment sizes of 128, 256, and 512 bytes.
•![]() Long sequence numbers (24-bit).
Long sequence numbers (24-bit).
•![]() Lost fragment detection timeout period of 80 milliseconds.
Lost fragment detection timeout period of 80 milliseconds.
•![]() Minimum-active-links configuration option.
Minimum-active-links configuration option.
•![]() LCP echo request/reply support over multilink interface.
LCP echo request/reply support over multilink interface.
•![]() Full T1 and E1 framed and unframed links.
Full T1 and E1 framed and unframed links.
IPHC Over MLPPP
The 8-Port Channelized T1/E1 SPA supports IPHC over MLPPP. For more information about IPHC and how to configure it, see the "Configuring Serial Interfaces on Cisco IOS XR Software" module in the Cisco IOS XR Interface and Hardware Component Configuration Guide for the Cisco XR 12000 Series Router.
T3 SONET Channels
The Cisco XR 12000 Series Router supports T3 channelized SONET on the following hardware:
•![]() Cisco 1-Port Channelized OC-3/STM-1 SPA
Cisco 1-Port Channelized OC-3/STM-1 SPA
•![]() Cisco 1-Port Channelized OC-12/DS0 SPA
Cisco 1-Port Channelized OC-12/DS0 SPA
•![]() Cisco 1-Port Channelized OC-48/STM-16 SPA
Cisco 1-Port Channelized OC-48/STM-16 SPA
Channelized SONET provides the ability to transport multiple T3 channels over the same physical link.
For more detailed information about configuring channelized SONET, T3 and T1 controllers, serial interfaces, and SONET APS, see the following related modules:
•![]() "Configuring Channelized SONET/SDH on Cisco IOS XR Software"
"Configuring Channelized SONET/SDH on Cisco IOS XR Software"
•![]() "Configuring Clear Channel SONET Controllers on Cisco IOS XR Software"
"Configuring Clear Channel SONET Controllers on Cisco IOS XR Software"
•![]() "Configuring Clear Channel T3/E3 and Channelized T3 and T1/E1 Controllers on Cisco IOS XR Software"
"Configuring Clear Channel T3/E3 and Channelized T3 and T1/E1 Controllers on Cisco IOS XR Software"
•![]() "Configuring Serial Interfaces on Cisco IOS XR Sotware"
"Configuring Serial Interfaces on Cisco IOS XR Sotware"
How to Configure PPP
This section includes the following procedures:
•![]() Modifying the Default PPP Configuration
Modifying the Default PPP Configuration
•![]() Configuring PPP Authentication
Configuring PPP Authentication
•![]() Disabling an Authentication Protocol
Disabling an Authentication Protocol
Modifying the Default PPP Configuration
When you first enable PPP on an interface, the following default configuration applies:
•![]() The interface resets itself immediately after an authentication failure.
The interface resets itself immediately after an authentication failure.
•![]() The maximum number of configuration requests without response permitted before all requests are stopped is 10.
The maximum number of configuration requests without response permitted before all requests are stopped is 10.
•![]() The maximum number of consecutive Configure Negative Acknowledgments (CONFNAKs) permitted before terminating a negotiation is 5.
The maximum number of consecutive Configure Negative Acknowledgments (CONFNAKs) permitted before terminating a negotiation is 5.
•![]() The maximum number of terminate requests (TermReqs) without response permitted before the Link Control Protocol (LCP) or Network Control Protocol (NCP) is closed is 2.
The maximum number of terminate requests (TermReqs) without response permitted before the Link Control Protocol (LCP) or Network Control Protocol (NCP) is closed is 2.
•![]() Maximum time to wait for a response to an authentication packet is 10 seconds.
Maximum time to wait for a response to an authentication packet is 10 seconds.
•![]() Maximum time to wait for a response during PPP negotiation is 3 seconds.
Maximum time to wait for a response during PPP negotiation is 3 seconds.
This task explains how to modify the basic PPP configuration on serial and POS interfaces that have PPP encapsulation enabled. The commands in this task apply to all authentication types supported by PPP (CHAP, MS-CHAP, and PAP).
Prerequisites
You must enable PPP encapsulation on the interface with the encapsulation ppp command.
•![]() To enable PPP encapsulation on a POS interface, see the Configuring POS Interfaces on Cisco IOS XR Software module in this manual.
To enable PPP encapsulation on a POS interface, see the Configuring POS Interfaces on Cisco IOS XR Software module in this manual.
•![]() To enable PPP encapsulation on an interface, see the Configuring Serial Interfaces on Cisco IOS XR Sotware module in this manual.
To enable PPP encapsulation on an interface, see the Configuring Serial Interfaces on Cisco IOS XR Sotware module in this manual.
SUMMARY STEPS
1. ![]() configure
configure
2. ![]() interface type interface-path-id
interface type interface-path-id
3. ![]() ppp max-bad-auth retries
ppp max-bad-auth retries
4. ![]() ppp max-configure retries
ppp max-configure retries
5. ![]() ppp max-failure retries
ppp max-failure retries
6. ![]() ppp max-terminate number
ppp max-terminate number
7. ![]() ppp timeout authentication seconds
ppp timeout authentication seconds
8. ![]() ppp timeout retry seconds
ppp timeout retry seconds
9. ![]() end
end
or
commit
10. ![]() show ppp interfaces {type interface-path-id | all | brief {type interface-path-id | all | location node-id} | detail {type interface-path-id | all | location node-id} | location node-id}
show ppp interfaces {type interface-path-id | all | brief {type interface-path-id | all | location node-id} | detail {type interface-path-id | all | location node-id} | location node-id}
DETAILED STEPS
Configuring PPP Authentication
This section contains the following procedures:
•![]() Enabling PAP, CHAP, and MS-CHAP Authentication
Enabling PAP, CHAP, and MS-CHAP Authentication
•![]() Configuring a PAP Authentication Password
Configuring a PAP Authentication Password
•![]() Configuring a CHAP Authentication Password
Configuring a CHAP Authentication Password
•![]() Configuring an MS-CHAP Authentication Password
Configuring an MS-CHAP Authentication Password
Enabling PAP, CHAP, and MS-CHAP Authentication
This task explains how to enable PAP, CHAP, and MS-CHAP authentication on a serial or POS interface.
Prerequisites
You must enable PPP encapsulation on the interface with the encapsulation ppp command, as described in the following modules:
•![]() To enable PPP encapsulation on a POS interface, see the Configuring POS Interfaces on Cisco IOS XR Software module in this manual.
To enable PPP encapsulation on a POS interface, see the Configuring POS Interfaces on Cisco IOS XR Software module in this manual.
•![]() To enable PPP encapsulation on an interface, see the Configuring Serial Interfaces on Cisco IOS XR Sotware module in this manual.
To enable PPP encapsulation on an interface, see the Configuring Serial Interfaces on Cisco IOS XR Sotware module in this manual.
SUMMARY STEPS
1. ![]() configure
configure
2. ![]() interface type interface-path-id
interface type interface-path-id
3. ![]() ppp authentication protocol [protocol [protocol]] [list-name | default]
ppp authentication protocol [protocol [protocol]] [list-name | default]
4. ![]() end
end
or
commit
5. ![]() show ppp interfaces {type interface-path-id | all | brief {type interface-path-id | all | location node-id} | detail {type interface-path-id | all | location node-id} | location node-id}
show ppp interfaces {type interface-path-id | all | brief {type interface-path-id | all | location node-id} | detail {type interface-path-id | all | location node-id} | location node-id}
DETAILED STEPS
Where To Go Next
Configure a PAP, CHAP, or MS-CHAP authentication password, as described in the appropriate section:
•![]() If you enabled PAP on an interface, configure a PAP authentication username and password, as described in the "Configuring a PAP Authentication Password" section.
If you enabled PAP on an interface, configure a PAP authentication username and password, as described in the "Configuring a PAP Authentication Password" section.
•![]() If you enabled CHAP on an interface, configure a CHAP authentication password, as described in the "Configuring a CHAP Authentication Password" section
If you enabled CHAP on an interface, configure a CHAP authentication password, as described in the "Configuring a CHAP Authentication Password" section
•![]() If you enabled MS-CHAP on an interface, configure an MS-CHAP authentication password, as described in the "Configuring an MS-CHAP Authentication Password" section
If you enabled MS-CHAP on an interface, configure an MS-CHAP authentication password, as described in the "Configuring an MS-CHAP Authentication Password" section
Configuring a PAP Authentication Password
This task explains how to enable and configure PAP authentication on a serial or POS interface.
Note ![]() PAP is the least secure authentication protocol available on POS and interfaces. To ensure higher security for information that is sent over POS and interfaces, we recommend configuring CHAP or MS-CHAP authentication in addition to PAP authentication.
PAP is the least secure authentication protocol available on POS and interfaces. To ensure higher security for information that is sent over POS and interfaces, we recommend configuring CHAP or MS-CHAP authentication in addition to PAP authentication.
Prerequisites
You must enable PAP authentication on the interface with the ppp authentication command, as described in the "Enabling PAP, CHAP, and MS-CHAP Authentication" section.
SUMMARY STEPS
1. ![]() configure
configure
2. ![]() interface type interface-path-id
interface type interface-path-id
3. ![]() ppp pap sent-username username password [clear | encrypted] password
ppp pap sent-username username password [clear | encrypted] password
4. ![]() end
end
or
commit
5. ![]() show running-config
show running-config
DETAILED STEPS
Configuring a CHAP Authentication Password
This task explains how to enable CHAP authentication and configure a CHAP password on a serial or POS interface.
Prerequisites
You must enable CHAP authentication on the interface with the ppp authentication command, as described in the "Enabling PAP, CHAP, and MS-CHAP Authentication" section.
Restrictions
The same CHAP password must be configured on both host endpoints.
SUMMARY STEPS
1. ![]() configure
configure
2. ![]() interface type interface-path-id
interface type interface-path-id
3. ![]() ppp chap password [clear | encrypted] password
ppp chap password [clear | encrypted] password
4. ![]() end
end
or
commit
5. ![]() show running-config
show running-config
DETAILED STEPS
Configuring an MS-CHAP Authentication Password
This task explains how to enable MS-CHAP authentication and configure an MS-CHAP password on a serial or POS interface.
Prerequisites
You must enable MS-CHAP authentication on the interface with the ppp authentication command, as described in the "Enabling PAP, CHAP, and MS-CHAP Authentication" section.
Restrictions
The same MS-CHAP password must be configured on both host endpoints.
SUMMARY STEPS
1. ![]() configure
configure
2. ![]() interface type interface-path-id
interface type interface-path-id
3. ![]() ppp ms-chap password [clear | encrypted] password
ppp ms-chap password [clear | encrypted] password
4. ![]() end
end
or
commit
5. ![]() show running-config
show running-config
DETAILED STEPS
Disabling an Authentication Protocol
This section contains the following procedures:
•![]() Disabling PAP Authentication on an Interface
Disabling PAP Authentication on an Interface
•![]() Disabling CHAP Authentication on an Interface
Disabling CHAP Authentication on an Interface
•![]() Disabling MS-CHAP Authentication on an Interface
Disabling MS-CHAP Authentication on an Interface
Disabling PAP Authentication on an Interface
This task explains how to disable PAP authentication on a serial or POS interface.
SUMMARY STEPS
1. ![]() configure
configure
2. ![]() interface type interface-path-id
interface type interface-path-id
3. ![]() ppp pap refuse
ppp pap refuse
4. ![]() end
end
or
commit
5. ![]() show running-config
show running-config
DETAILED STEPS
Disabling CHAP Authentication on an Interface
This task explains how to disable CHAP authentication on a serial or POS interface.
SUMMARY STEPS
1. ![]() configure
configure
2. ![]() interface type interface-path-id
interface type interface-path-id
3. ![]() ppp chap refuse
ppp chap refuse
4. ![]() end
end
or
commit
5. ![]() show running-config
show running-config
DETAILED STEPS
Disabling MS-CHAP Authentication on an Interface
This task explains how to disable MS-CHAP authentication on a serial or POS interface.
SUMMARY STEPS
1. ![]() configure
configure
2. ![]() interface type interface-path-id
interface type interface-path-id
3. ![]() ppp ms-chap refuse
ppp ms-chap refuse
4. ![]() end
end
or
commit
5. ![]() show running-config
show running-config
DETAILED STEPS
Configuring Multilink PPP
This section contains the following procedures:
•![]() Configuring MLPPP Optional Features
Configuring MLPPP Optional Features
Prerequisites
Before configuring MLPPP, be sure you have one of the SPAs listed here installed. Both MLPPP and LFI are supported on the following SIPs and SPAs:
•![]() Cisco XR 12000 SIP-401
Cisco XR 12000 SIP-401
•![]() Cisco XR 12000 SIP-501
Cisco XR 12000 SIP-501
•![]() Cisco XR 12000 SIP-601
Cisco XR 12000 SIP-601
•![]() Cisco 1-Port Channelized STM-1/OC-3 SPA
Cisco 1-Port Channelized STM-1/OC-3 SPA
•![]() Cisco 1-Port Channelized OC-12/STM-4 SPA
Cisco 1-Port Channelized OC-12/STM-4 SPA
•![]() Cisco 2-Port and 4-Port Channelized T3 SPAs (SPA-2XCT3/DS0, SPA-4XCT3/DS0)
Cisco 2-Port and 4-Port Channelized T3 SPAs (SPA-2XCT3/DS0, SPA-4XCT3/DS0)
•![]() Cisco 8-Port Channelized T1/E1 SPA
Cisco 8-Port Channelized T1/E1 SPA
•![]() Cisco 1-Port Channelized OC-12 Line Card (Supports MLPPP only)
Cisco 1-Port Channelized OC-12 Line Card (Supports MLPPP only)
Restrictions
MLPPP for Cisco IOS XR software has the following restrictions:
•![]() Only full rate T1s are supported.
Only full rate T1s are supported.
•![]() All links in a bundle must belong to the same SPA.
All links in a bundle must belong to the same SPA.
•![]() All links in a bundle must operate at the same speed.
All links in a bundle must operate at the same speed.
•![]() A maximum of 12 links per bundle is supported.
A maximum of 12 links per bundle is supported.
•![]() A maximum of 28 bundles is supported on the 2-Port Channelized T3 SPA.
A maximum of 28 bundles is supported on the 2-Port Channelized T3 SPA.
•![]() A maximum of 56 bundles is supported on the 4-Port Channelized T3 SPA.
A maximum of 56 bundles is supported on the 4-Port Channelized T3 SPA.
•![]() A maximum of 224 bundles is supported per line card.
A maximum of 224 bundles is supported per line card.
•![]() All serial links in an MLPPP bundle inherit the value of the mtu command from the multilink interface. Therefore, you should not configure the mtu command on a serial interface before configuring it as a member of an MLPPP bundle. The Cisco IOS XR software blocks the following:
All serial links in an MLPPP bundle inherit the value of the mtu command from the multilink interface. Therefore, you should not configure the mtu command on a serial interface before configuring it as a member of an MLPPP bundle. The Cisco IOS XR software blocks the following:
–![]() Attempts to configure a serial interface as a member of an MLPPP bundle if the interface is configured with a nondefault MTU value.
Attempts to configure a serial interface as a member of an MLPPP bundle if the interface is configured with a nondefault MTU value.
–![]() Attempts to change the mtu command value for a serial interface that is configured as a member of an MLPPP bundle.
Attempts to change the mtu command value for a serial interface that is configured as a member of an MLPPP bundle.
In Cisco IOS XR software, multilink processing is controlled by a hardware module called the Multilink Controller, which consists of an ASIC, network processor, and CPU working in conjunction. The MgmtMultilink Controller makes the multilink interfaces behave like the serial interfaces of channelized SPAs.
Configuring the Controller
Perform this task to configure the controller.
SUMMARY STEPS
1. ![]() configure
configure
2. ![]() controller type interface-path-id
controller type interface-path-id
3. ![]() mode type
mode type
4. ![]() clock source {internal | line}
clock source {internal | line}
5. ![]() exit
exit
6. ![]() controller t1 interface-path-id
controller t1 interface-path-id
7. ![]() channel-group channel-group-number
channel-group channel-group-number
8. ![]() timeslots range
timeslots range
9. ![]() exit
exit
10. ![]() exit
exit
11. ![]() controller mgmtmultilink interface-path-id
controller mgmtmultilink interface-path-id
12. ![]() bundle bundle-id
bundle bundle-id
13. ![]() end
end
or
commit
DETAILED STEPS
Configuring the Interfaces
Perform this task to configure the interfaces.
Restrictions
•![]() All serial links in an MLPPP bundle inherit the value of the mtu command from the multilink interface. Therefore, you should not configure the mtu command on a serial interface before configuring it as a member of an MLPPP bundle. The Cisco IOS XR software blocks the following:
All serial links in an MLPPP bundle inherit the value of the mtu command from the multilink interface. Therefore, you should not configure the mtu command on a serial interface before configuring it as a member of an MLPPP bundle. The Cisco IOS XR software blocks the following:
–![]() Attempts to configure a serial interface as a member of an MLPPP bundle if the interface is configured with a nondefault MTU value.
Attempts to configure a serial interface as a member of an MLPPP bundle if the interface is configured with a nondefault MTU value.
–![]() Attempts to change the mtu command value for a serial interface that is configured as a member of an MLPPP bundle.
Attempts to change the mtu command value for a serial interface that is configured as a member of an MLPPP bundle.
SUMMARY STEPS
1. ![]() configure
configure
2. ![]() interface multilink interface-path-id
interface multilink interface-path-id
3. ![]() ipv4 address address/mask
ipv4 address address/mask
4. ![]() multilink fragment-size bytes
multilink fragment-size bytes
5. ![]() keepalive {interval | disable}[retry]
keepalive {interval | disable}[retry]
6. ![]() exit
exit
7. ![]() interface type interface-path-id
interface type interface-path-id
8. ![]() encapsulation type
encapsulation type
9. ![]() multilink group group-id
multilink group group-id
10. ![]() end
end
or
commit
DETAILED STEPS
Configuring MLPPP Optional Features
Perform this task to configure either of the following optional features:
•![]() Minimum number of active links
Minimum number of active links
•![]() Multilink interleave
Multilink interleave
Note ![]() Minimum number active links must be configured at both endpoints.
Minimum number active links must be configured at both endpoints.
SUMMARY STEPS
1. ![]() configure
configure
2. ![]() interface multilink interface-path-id
interface multilink interface-path-id
3. ![]() multilink
multilink
4. ![]() ppp multilink minimum-active links value
ppp multilink minimum-active links value
5. ![]() multilink interleave
multilink interleave
6. ![]() no shutdown
no shutdown
7. ![]() end
end
or
commit
DETAILED STEPS
Configuration Examples for PPP
This section provides the following configuration examples:
•![]() Configuring a POS Interface with PPP Encapsulation: Example
Configuring a POS Interface with PPP Encapsulation: Example
•![]() Configuring a Serial Interface with PPP Encapsulation: Example
Configuring a Serial Interface with PPP Encapsulation: Example
•![]() Verifying Multilink PPP Configurations
Verifying Multilink PPP Configurations
Configuring a POS Interface with PPP Encapsulation: Example
The following example shows how to create and configure a POS interface with PPP encapsulation:
RP/0/0/CPU0:router# configure
RP/0/0/CPU0:router(config)# interface POS 0/3/0/0
RP/0/0/CPU0:router(config-if)# ipv4 address 172.18.189.38 255.255.255.224
RP/0/0/CPU0:router(config-if)# encapsulation ppp
RP/0/0/CPU0:router(config-if)# no shutdown
RP/0/0/CPU0:router(config-if)# ppp pap sent-username P1_TEST-8 password xxxx
RP/0/0/CPU0:router(config-if)# ppp authentication chap pap MIS-access
RP/0/0/CPU0:router(config-if)# ppp chap password encrypted xxxx
RP/0/0/CPU0:router(config-if)# end
Uncommitted changes found, commit them? [yes]: yes
The following example shows how to configure POS interface 0/3/0/1 to allow two additional retries after an initial authentication failure (for a total of three failed authentication attempts):
RP/0/0/CPU0:router# configure
RP/0/0/CPU0:router(config)# interface POS 0/3/0/1
RP/0/0/CPU0:router(config-if)# ppp max-bad-auth
3
Configuring a Serial Interface with PPP Encapsulation: Example
The following example shows how to create and configure a serial interface with PPP MS-CHAP encapsulation:
RP/0/0/CPU0:router# configure
RP/0/0/CPU0:router(config)# interface serial 0/3/0/0/0:0
RP/0/0/CPU0:router(config-if)# ipv4 address 172.18.189.38 255.255.255.224
RP/0/0/CPU0:router(config-if)# encapsulation ppp
RP/0/0/CPU0:router(config-if)# no shutdown
RP/0/0/CPU0:router(config-if)# ppp authentication ms-chap MIS-access
RP/0/0/CPU0:router(config-if)# ppp ms-chap password encrypted xxxx
RP/0/0/CPU0:router(config-if)# end
Uncommitted changes found, commit them? [yes]: yes
Configuring MLPPP: Example
RP/0/0/CPU0:router# configure
RP/0/0/CPU0:router(config)# controller t3 0/1/0/0/1
RP/0/0/CPU0:router# mode t1
RP/0/0/CPU0:router(config-t3)# clock source internal
RP/0/0/CPU0:router(config-t3)# exit
RP/0/0/CPU0:router(config)# controller t1 0/1/0/0/1/1
RP/0/0/CPU0:router(config-t1)# channel-group 0
RP/0/0/CPU0:router(config-t1-channel_group)# timeslots 1-24
RP/0/0/CPU0:router(config-t1-channel_group)# exit
RP/0/0/CPU0:router(config-t1)# exit
RP/0/0/CPU0:router(config)# controller mgmtmultilink 0/1/0/0
RP/0/0/CPU0:router(config-mgmtmultilink)# bundle 20
RP/0/0/CPU0:router(config-t3)# commit
RP/0/0/CPU0:router(config-t3)# exit
RP/0/0/CPU0:router(config)# interface multilink 0/1/0/0/20
RP/0/0/CPU0:router(config-if)# ipv4 address 80.170.0.1/24
RP/0/0/CPU0:router(config-if)# multilink fragment-size 128
RP/0/0/CPU0:router(config-if)# keepalive
disable
RP/0/0/CPU0:router(config-if)# exit
RP/0/0/CPU0:router(config)# interface serial 0/1/0/0/1/1:0
RP/0/0/CPU0:router(config-if)# encapsulation ppp
RP/0/0/CPU0:router(config-if)# multilink group 20
RP/0/0/CPU0:router(config-t3)# commit
RP/0/0/CPU0:router(config-t3)# exit
RP/0/0/CPU0:router(config)# interface multilink 0/1/0/0/1
RP/0/0/CPU0:router(config-if)# multilink
RP/0/0/CPU0:router(config-if-multilink)# ppp multilink minimum-active links 10
RP/0/0/CPU0:router(config-if-multilink)# multilink interleave
RP/0/0/CPU0:router(config-if-mutlilink)# no shutdown
RP/0/0/CPU0:router(config-t3)# commit
Verifying Multilink PPP Configurations
Use the following show commands to verify and troubleshoot your multilink configurations:
•![]() show multilink interfaces: Examples
show multilink interfaces: Examples
•![]() show ppp interfaces multilink: Example
show ppp interfaces multilink: Example
•![]() show ppp interface serial: Example
show ppp interface serial: Example
•![]() show imds interface multilink: Example
show imds interface multilink: Example
show multilink interfaces: Examples
RP/0/0/CPU0:Router# show multilink interfaces Serial 0/4/3/1/10:0
Mon Sep 21 09:24:19.604 UTC
Serial0/4/3/1/10:0 is up, line protocol is up
Encapsulation: PPP
Multilink group id: 6
Member status: ACTIVE
RP/0/0/CPU0:Router# show multilink interfaces Multilink 0/4/3/0/3
Mon Sep 21 09:17:12.131 UTC
Multilink0/4/3/0/3 is up, line protocol is up
Fragmentation: disabled
Interleave: disabled
Encapsulation: PPP
Member Links: 1 active, 1 inactive
- Serial0/4/3/1/5:0 is up, line protocol is up
Encapsulation: PPP
Multilink group id: 3
Member status: ACTIVE
- Serial0/4/3/1/6:0 is administratively down, line protocol is administratively down
Encapsulation: PPP
Multilink group id: 3
Member status: INACTIVE : LCP has not been negotiated
Fragmentation Statistics
Input Fragmented packets 0 Input Fragmented bytes 0
Output Fragmented packets 0 Output Fragmented bytes 0
Input Unfragmented packets 0 Input Unfragmented bytes 0
Output Unfragmented packets 0 Output Unfragmented bytes 0
Input Reassembled packets 0 Input Reassembled bytes 0
RP/0/5/CPU0:Mav-IOX-Rahul#sho multilink interfaces Serial 0/4/3/1/10:0
Mon Sep 21 09:24:19.604 UTC
Serial0/4/3/1/10:0 is up, line protocol is up
Encapsulation: PPP
Multilink group id: 6
Member status: ACTIVE
RP/0/0/CPU0:Router# show multilink interfaces
Mon Sep 21 09:15:10.679 UTC
Multilink0/4/3/0/1 is up, line protocol is up
Fragmentation: disabled
Interleave: disabled
Encapsulation: FR
Member Links: 1 active, 1 inactive
- Serial0/4/3/1/2:0: INACTIVE : Down (Member link idle)
- Serial0/4/3/1/1:0: ACTIVE : Up
Multilink0/4/3/0/10 is up, line protocol is down
Fragmentation: disabled
Interleave: disabled
Encapsulation: PPP
Member Links: 0 active, 0 inactive
Fragmentation Statistics
Input Fragmented packets 0 Input Fragmented bytes 0
Output Fragmented packets 0 Output Fragmented bytes 0
Input Unfragmented packets 0 Input Unfragmented bytes 0
Output Unfragmented packets 0 Output Unfragmented bytes 0
Input Reassembled packets 0 Input Reassembled bytes 0
Multilink0/4/3/0/100 is administratively down, line protocol is administratively down
Fragmentation: disabled
Interleave: disabled
Encapsulation: PPP
Member Links: 0 active, 0 inactive
Fragmentation Statistics
Input Fragmented packets 0 Input Fragmented bytes 0
Output Fragmented packets 0 Output Fragmented bytes 0
Input Unfragmented packets 0 Input Unfragmented bytes 0
Output Unfragmented packets 0 Output Unfragmented bytes 0
Input Reassembled packets 0 Input Reassembled bytes 0
Multilink0/4/3/0/2 is up, line protocol is up
Fragmentation: disabled
Interleave: disabled
Encapsulation: FR
Member Links: 2 active, 0 inactive
- Serial0/4/3/1/4:0: ACTIVE : Up
- Serial0/4/3/1/3:0: ACTIVE : Up
Multilink0/4/3/0/3 is up, line protocol is up
Fragmentation: disabled
Interleave: disabled
Encapsulation: PPP
Member Links: 1 active, 1 inactive
- Serial0/4/3/1/5:0: ACTIVE
- Serial0/4/3/1/6:0: INACTIVE : LCP has not been negotiated
Fragmentation Statistics
Input Fragmented packets 0 Input Fragmented bytes 0
Output Fragmented packets 0 Output Fragmented bytes 0
Input Unfragmented packets 0 Input Unfragmented bytes 0
Output Unfragmented packets 0 Output Unfragmented bytes 0
Input Reassembled packets 0 Input Reassembled bytes 0
Multilink0/4/3/0/4 is up, line protocol is up
Fragmentation: disabled
Interleave: disabled
Encapsulation: PPP
Member Links: 2 active, 0 inactive
- Serial0/4/3/1/8:0: ACTIVE
- Serial0/4/3/1/7:0: ACTIVE
Fragmentation Statistics
Input Fragmented packets 0 Input Fragmented bytes 0
Output Fragmented packets 0 Output Fragmented bytes 0
Input Unfragmented packets 0 Input Unfragmented bytes 0
Output Unfragmented packets 0 Output Unfragmented bytes 0
Input Reassembled packets 0 Input Reassembled bytes 0
Multilink0/4/3/0/5 is up, line protocol is up
Fragmentation: disabled
Interleave: enabled
Encapsulation: PPP
Member Links: 1 active, 0 inactive
- Serial0/4/3/1/9:0: ACTIVE
Fragmentation Statistics
Input Fragmented packets 0 Input Fragmented bytes 0
Output Fragmented packets 0 Output Fragmented bytes 0
Input Unfragmented packets 0 Input Unfragmented bytes 0
Output Unfragmented packets 0 Output Unfragmented bytes 0
Input Reassembled packets 0 Input Reassembled bytes 0
Multilink0/4/3/0/6 is up, line protocol is up
Fragmentation: disabled
Interleave: enabled
Encapsulation: PPP
Member Links: 1 active, 0 inactive
- Serial0/4/3/1/10:0: ACTIVE
Fragmentation Statistics
Input Fragmented packets 0 Input Fragmented bytes 0
Output Fragmented packets 0 Output Fragmented bytes 0
Input Unfragmented packets 0 Input Unfragmented bytes 0
Output Unfragmented packets 0 Output Unfragmented bytes 0
Input Reassembled packets 0 Input Reassembled bytes 0
Multilink0/4/3/0/7 is up, line protocol is down
Fragmentation: disabled
Interleave: enabled
Encapsulation: PPP
Member Links: 0 active, 1 inactive
- Serial0/4/3/1/11:0: INACTIVE : LCP has not been negotiated
Fragmentation Statistics
Input Fragmented packets 0 Input Fragmented bytes 0
Output Fragmented packets 0 Output Fragmented bytes 0
Input Unfragmented packets 0 Input Unfragmented bytes 0
Output Unfragmented packets 0 Output Unfragmented bytes 0
Input Reassembled packets 0 Input Reassembled bytes 0
Multilink0/4/3/0/8 is up, line protocol is down
Fragmentation: disabled
Interleave: enabled
Encapsulation: PPP
Member Links: 0 active, 1 inactive
- Serial0/4/3/1/12:0: INACTIVE : LCP has not been negotiated
Fragmentation Statistics
Input Fragmented packets 0 Input Fragmented bytes 0
Output Fragmented packets 0 Output Fragmented bytes 0
Input Unfragmented packets 0 Input Unfragmented bytes 0
Output Unfragmented packets 0 Output Unfragmented bytes 0
Input Reassembled packets 0 Input Reassembled bytes 0
show ppp interfaces multilink: Example
RP/0/0/CPU0:Router# show ppp interfaces multilink 0/3/1/0/1
Multilink 0/3/1/0/1 is up, line protocol is up
LCP: Open
Keepalives disabled
IPCP: Open
Local IPv4 address: 1.1.1.2
Peer IPv4 address: 1.1.1.1
Multilink
Member Links: 2 active, 1 inactive (min-active 1)
- Serial0/3/1/0/0:0: ACTIVE
- Serial0/3/1/0/1:0: ACTIVE
- Serial0/3/1/0/2:0: INACTIVE : LCP has not been negotiated
show ppp interface serial: Example
RP/0/0/CPU0:Router# show ppp interface Serial 0/3/1/0/0:0
Serial 0/3/1/0/0:0 is up, line protocol is up
LCP: Open
Keepalives disabled
Local MRU: 1500 bytes
Peer MRU: 1500 bytes
Local Bundle MRRU: 1596 bytes
Peer Bundle MRRU: 1500 bytes
Local Endpoint Discriminator: 1b61950e3e9ce8172c8289df0000003900000001
Peer Endpoint Discriminator: 7d046cd8390a4519087aefb90000003900000001
Authentication
Of Peer: <None>
Of Us: <None>
Multilink
Multilink group id: 1
Member status: ACTIVE
show imds interface multilink: Example
RP/0/0/CPU0:Router# show imds interface Multilink 0/3/1/0/1
IMDS INTERFACE DATA (Node 0x0)
Multilink0_3_1_0_1 (0x04001200)
-----------------------
flags: 0x0001002f type: 55 (IFT_MULTILINK) encap: 52 (ppp)
state: 3 (up) mtu: 1600 protocol count: 3
control parent: 0x04000800 data parent: 0x00000000
protocol capsulation state mtu
--------------- -------------------- --------------- --------
12 (ipv4)
26 (ipv4) 3 (up) 1500
47 (ipcp) 3 (up) 1500
16 (ppp_ctrl)
53 (ppp_ctrl) 3 (up) 1500
0 (Unknown)
139 (c_shim) 3 (up) 1600
52 (ppp) 3 (up) 1504
56 (queue_fifo) 3 (up) 1600
60 (txm_nopull) 3 (up) 1600
Additional References
These sections provide references related to PPP encapsulation.
Related Documents
Standards
|
|
|
|---|---|
No new or modified standards are supported by this feature, and support for existing standards has not been modified by this feature. |
— |
MIBs
RFCs
|
|
|
|---|---|
RFC-1661 |
The Point-to-Point Protocol (PPP) |
RFC- 1994 |
PPP Challenge Handshake Authentication Protocol (CHAP) |
Technical Assistance
 Feedback