Cisco IOx Fog Director User Guide
Available Languages
Table of Contents
Cisco IOx Fog Director User Guide
DHCP vs Static IP Address Configuration
Installing an App on a Device for the First Time
Stopping the Installation of an App
Reverting to an Older Version of an App
Restoring an App from the Back-up File
Removing an Installed App from Fog Director
Reconfiguring Apps on Selected Devices
Reconfiguring Apps on a Single Device
Finding the Root Cause of an App Failure on a Device
Retrying a Failed Installation
Obtaining Documentation and Submitting a Service Request
Cisco IOx Fog Director User Guide
Cisco IOx is an end-to-end application enablement platform that provides application hosting capabilities for different application types in a consistent and uniform manner across various Cisco network platforms. The IOx platform allows you to manage the whole life cycle of applications including development, distribution, deployment, hosting, monitoring, and management.
Cisco IOx comes with the following features:
- A common software infrastructure to host applications in network devices such that they are independent of heterogeneous hosting hardware.
- User friendly interface that makes it easy for developers and administrators to build and deploy IOx applications.
- Provides complete life cycle management capabilities for applications hosted on network devices.
Installing Fog Director
This section explains how to install Fog Director using OVA (Open Virtualization Archive) method.
Before You Begin
Before you begin the installation, make sure that your VMware infrastructure supports the following requirements:
Procedure
Step 1![]() Launch vSphere and connect to your VMware Host.
Launch vSphere and connect to your VMware Host.
Step 2![]() Choose File > Deploy OVF Template.
Choose File > Deploy OVF Template.
Step 3![]() Browse to the Fog Director OVA location and click Next.
Browse to the Fog Director OVA location and click Next.
Step 4![]() Follow the vSphere wizard instructions.
Follow the vSphere wizard instructions.
Step 5![]() After you deploy OVA successfully, you can access Fog Director by typing the following URL at your browser’s address bar: https://< ip-address >.
After you deploy OVA successfully, you can access Fog Director by typing the following URL at your browser’s address bar: https://< ip-address >.

Note![]() If you do not have a DHCP server, you must follow the Static IP Address configuration. See “DHCP vs Static IP Address Configuration” section.
If you do not have a DHCP server, you must follow the Static IP Address configuration. See “DHCP vs Static IP Address Configuration” section.
Note![]() The default username and password for SSH is fogdir/fogdir. The default username and password for Web interface is admin/admin.
The default username and password for SSH is fogdir/fogdir. The default username and password for Web interface is admin/admin.
DHCP vs Static IP Address Configuration
By default, the Fog Director OVA is configured to acquire an IP address from your DHCP server. If your environment does not have DHCP option, follow these steps to configure the IP address:
Step 1![]() Edit the interface file (sudo vi /etc/network/interfaces) and add appropriate values for IP address, Subnetmask, Default gateway, and Name server address (upto 3 address).
Edit the interface file (sudo vi /etc/network/interfaces) and add appropriate values for IP address, Subnetmask, Default gateway, and Name server address (upto 3 address).
Cisco IOx Fog Director
Fog Director enables you to manage the life-cycle of an App on multiple devices. It provides an App centric view and Device centric view to a network administrator. Fog Director enables an Administrator to do the following activities:
- Installation and uninstallation of Apps
- Starting and stopping Apps
- Viewing Apps status
- Collecting statistics, monitoring, and restarting Apps
- Upgrading Apps
- Backup and restore of App data
- Collecting Debug Logs
Figure 1 shows the App centric view of Fog Director:
Figure 1 App Centric View of Fog Director
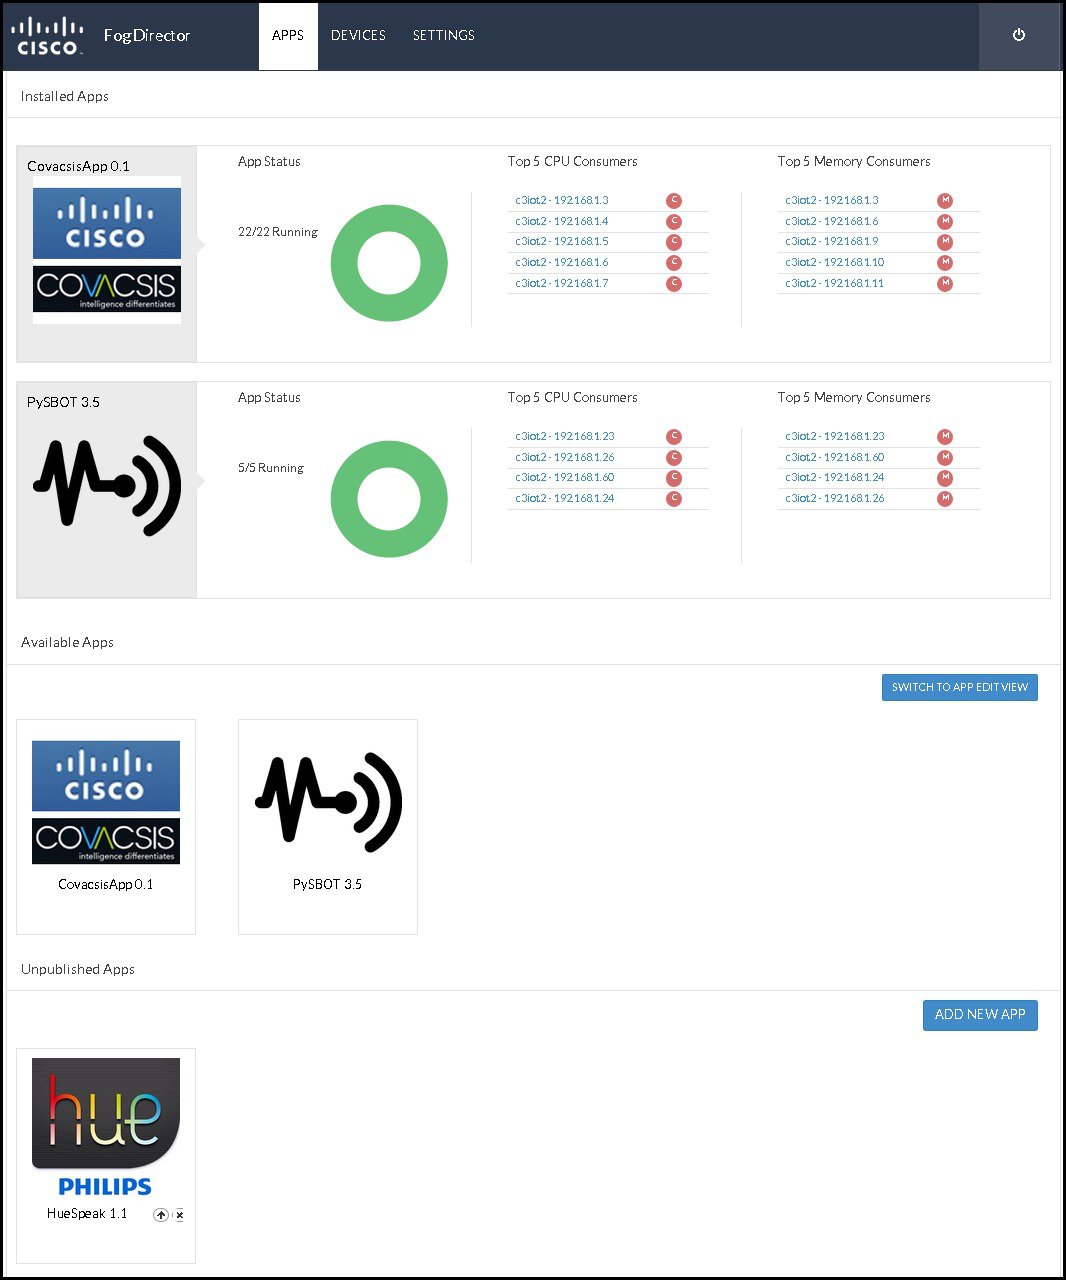
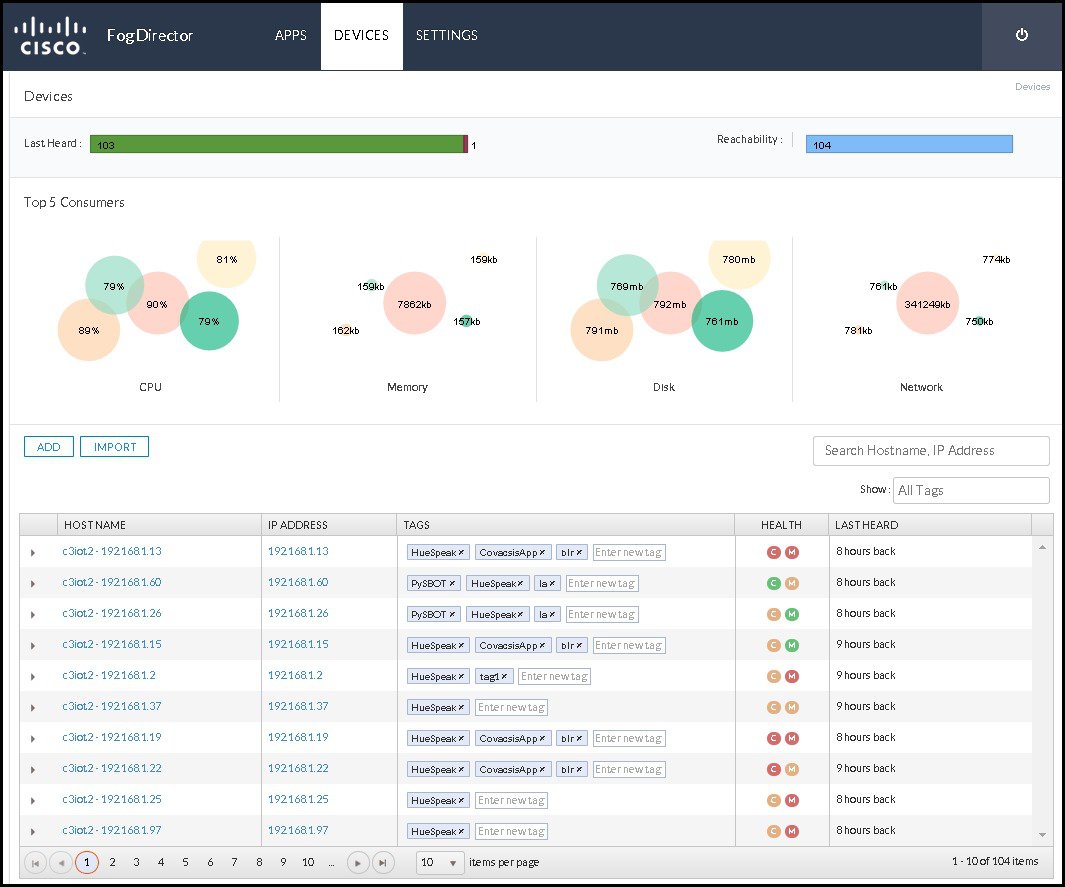
Figure 2 shows the Device centric view of Fog Director:
Figure 2 Device Centric View of Fog Director
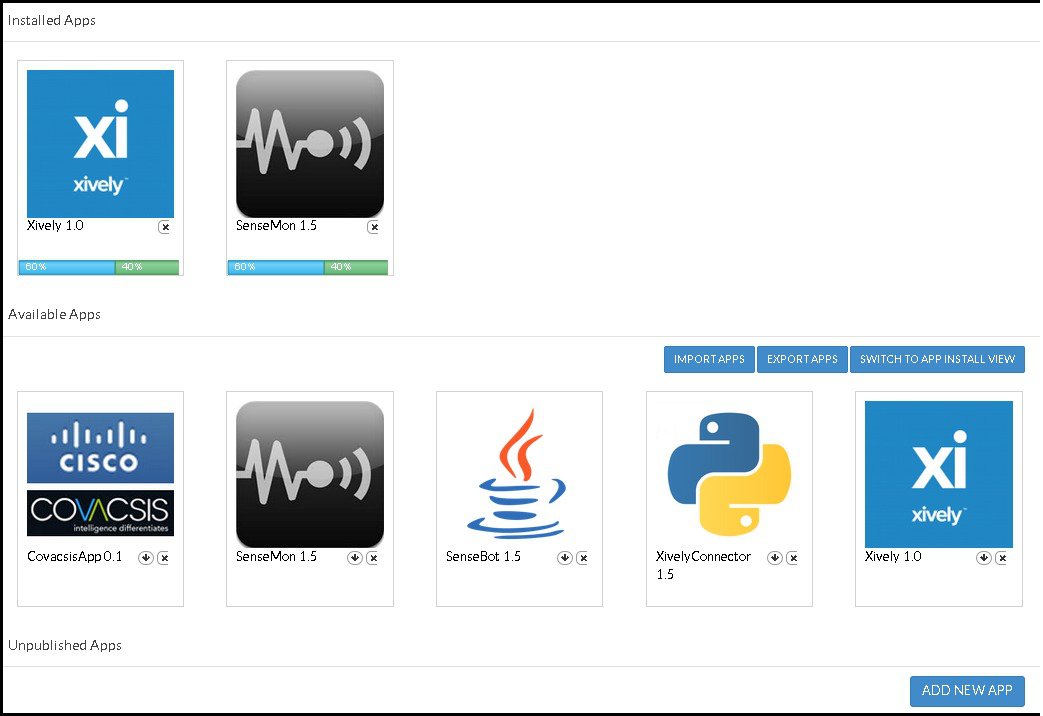
Unpublished Apps
A newly imported App is called an Unpublished App. An App in Unpublished state is not yet ready for deployment.
After you upload an App to the Fog Director, the App moves to the Unpublished App section. You have to publish this App before you install it on any devices. An unpublished App cannot be installed on a device before publishing it. After you publish an App, the App moves to the Available Apps section.
Available Apps
A published App is called an Available App. Available Apps can be installed on a device or devices.
Device
A device is an IOx capable Cisco IOS device. You can install Apps only on those devices that support Cisco IOx. The following devices support IOx starting from Cisco IOS Release 15.5(1)T:
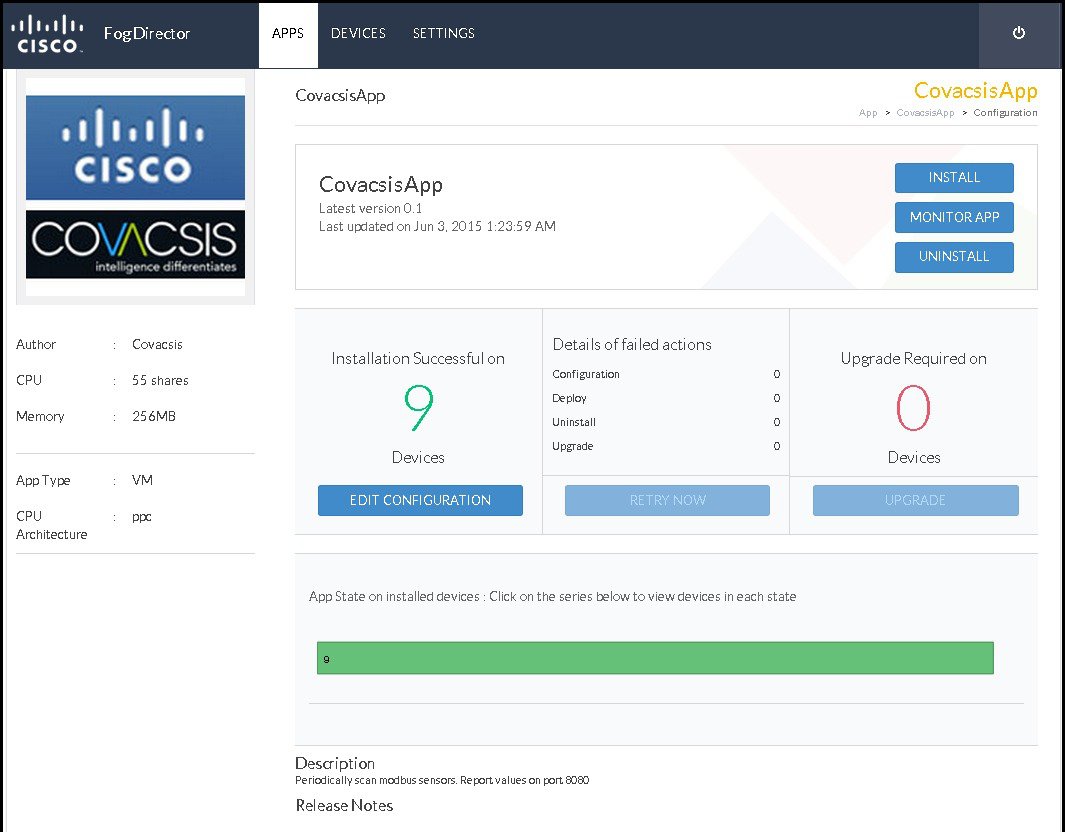
App Configuration Page
An App Configuration page acts as a hub of all App activities. A user can perform the following activities on an App Configuration page:
Figure 3 shows the App Configuration Page.
Figure 3 App Configuration Page
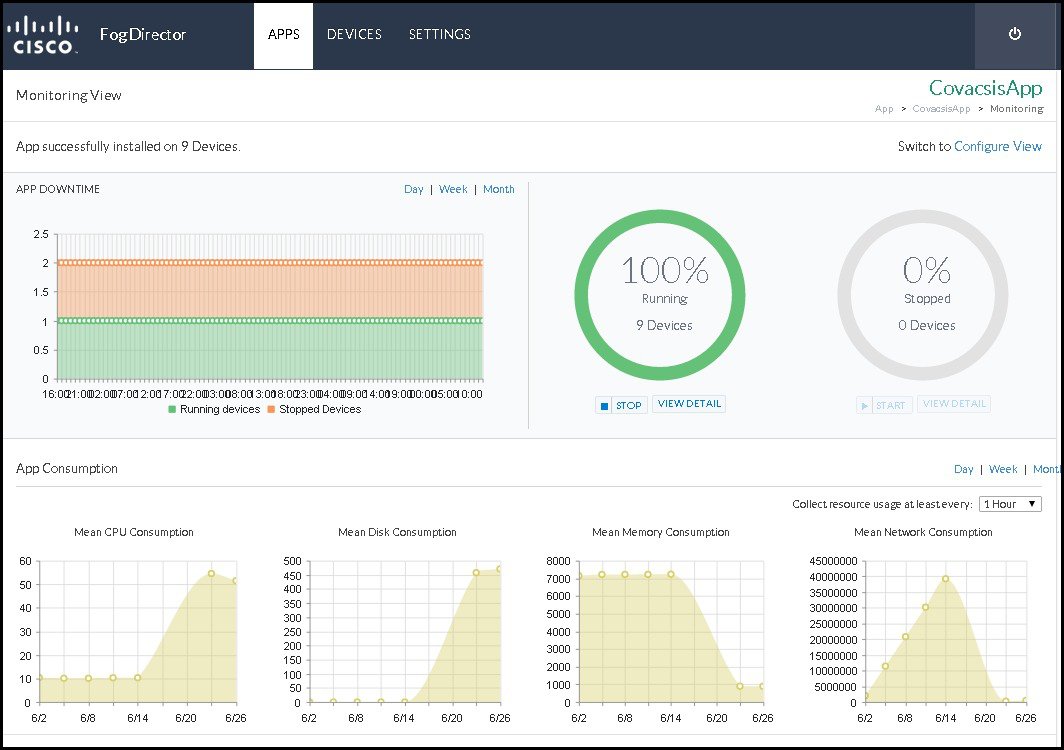
App Monitoring Page
An App Monitoring page acts as a hub of all App monitoring. A user can get all the monitoring parameters of an App from this page. Figure 4 shows the App Monitoring Page:
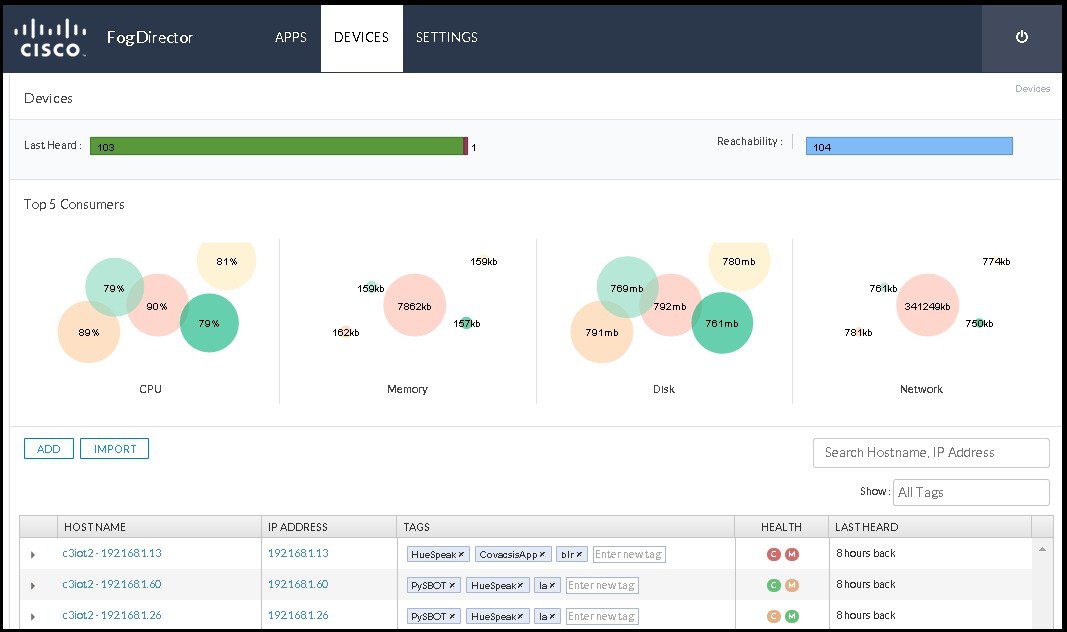
Device Management Page
Device Management page allows you to manage the IOx supported devices.This page lists all the devices added to the Fog Director. Figure 5 shows the Device Management Page:
Figure 5 Device Management Page
User Workflows
The following workflows help you perform some of the basic tasks that you will be performing after you set up Fog Director:
- Installing an App on a Device for the First Time
- Stopping the Installation of an App
- Upgrading an App on a Device
- Reverting to an Older Version of an App
- Restoring an App from the Back-up File
- Removing an Installed App from Fog Director
- Reconfiguring Apps on Selected Devices
- Reconfiguring Apps on a Single Device
- Troubleshooting Fog Director
- Troubleshooting a Device
- Finding the Root Cause of an App Failure on a Device
Installing an App on a Device for the First Time
This workflow shows how to install an App on a device when you use Fog Director for the first time:
Step 1![]() Add a device to Fog Director. For detailed information, see Adding Devices.
Add a device to Fog Director. For detailed information, see Adding Devices.
Step 2![]() Add an App to Fog Director. For detailed information, see Uploading Apps.
Add an App to Fog Director. For detailed information, see Uploading Apps.
Step 3![]() Publish the added App. For detailed information, see Publishing Apps.
Publish the added App. For detailed information, see Publishing Apps.
Step 4![]() Install the App on the device added in step 1. For detailed information, see Installing Apps.
Install the App on the device added in step 1. For detailed information, see Installing Apps.
Stopping the Installation of an App
You may want to stop the installation of an App when you realize that a new version of an App is problematic. In that scenario, you can stop further installation of an App. To disable App install button, follow these steps:
Step 2![]() In the Available App section, click SWITCH TO APP EDIT VIEW.
In the Available App section, click SWITCH TO APP EDIT VIEW.
Step 3![]() Click Unpublish button on the App icon. This will disable the Install button on the App Configuration Page.
Click Unpublish button on the App icon. This will disable the Install button on the App Configuration Page.
Upgrading an App on a Device
This workflow shows how to upgrade an already installed App on a device:
Step 1![]() Upload the latest version of the App to Fog Director. For detailed information, see Uploading Apps.
Upload the latest version of the App to Fog Director. For detailed information, see Uploading Apps.
Step 2![]() After you upload the latest version of an App, you can upgrade the App installed on devices. For detailed information, see Upgrading an App.
After you upload the latest version of an App, you can upgrade the App installed on devices. For detailed information, see Upgrading an App.
Step 3![]() Publish the upgraded App.
Publish the upgraded App.
Reverting to an Older Version of an App
You can revert to an older version of an App. There are two scenarios where you can revert to an older version:
Scenario 1: An older version of the App is in published state. In this scenario, if you want to revert to the older version, follow these steps:
Step 1![]() Uninstall the current version of the App from the device or devices.
Uninstall the current version of the App from the device or devices.
Step 2![]() Switch to App Edit View and unpublish the App. The App will revert to the older version.
Switch to App Edit View and unpublish the App. The App will revert to the older version.
Scenario 2: An older version of the App is not published. In this scenario, if you want to revert to the older version, follow these steps:
Step 1![]() Switch to App Edit View and unpublish the latest version of the App. The App moves to unpublished App section.
Switch to App Edit View and unpublish the latest version of the App. The App moves to unpublished App section.
Step 2![]() Remove the latest version of the App from the unpublished App section. The App will automatically revert to previous version.
Remove the latest version of the App from the unpublished App section. The App will automatically revert to previous version.
Restoring an App from the Back-up File
You can back-up Apps using the Export Apps functionality. This feature is available only in the App Edit view. The exported ZIP file can be imported into Fog Director using the import Apps functionality. For detailed information, see Importing Apps.
Removing an Installed App from Fog Director
This workflow shows how to remove an installed App from Fog Director:
Step 1![]() Choose the App from the installed Apps section.
Choose the App from the installed Apps section.
Step 2![]() Uninstall the selected App. For detailed information, see Uninstalling Apps.
Uninstall the selected App. For detailed information, see Uninstalling Apps.
Step 3![]() Switch to App Edit View and remove the App from the Installed Apps section.
Switch to App Edit View and remove the App from the Installed Apps section.
Step 4![]() Unpublish the App from the Available Apps section.
Unpublish the App from the Available Apps section.
Step 5![]() Remove the App from the Unpublished Apps section.
Remove the App from the Unpublished Apps section.
Reconfiguring Apps on Selected Devices
You can reconfigure the App parameter on multiple devices. After you apply the new configuration, it will be applied on the selected devices. You can also restart the Apps using config change. To reconfigure the App parameters on multiple devices, follow these steps:
Step 1![]() Choose the App from the Installed or Available App section.
Choose the App from the Installed or Available App section.
Step 2![]() Click Edit Configuration. The Device Listing page is displayed. This page lists all the devices where you can change the configuration parameters.
Click Edit Configuration. The Device Listing page is displayed. This page lists all the devices where you can change the configuration parameters.
Step 3![]() Select the device or devices from the list.
Select the device or devices from the list.
Step 4![]() Click Add Selected Devices. The selected devices will be listed
Click Add Selected Devices. The selected devices will be listed![]() below.
below.
Step 5![]() The Customize Configuration section lists the configuration parameters. Change the parameter value.
The Customize Configuration section lists the configuration parameters. Change the parameter value.
Step 6![]() Finally, click Done, Let’s Go.
Finally, click Done, Let’s Go.
Reconfiguring Apps on a Single Device
You can change the configuration parameters of an App on a single device. To reconfigure the App parameter on a single device, follow these steps:
Step 2![]() Select the device from the device list. The device details page is displayed. This page lists the App information if an App is installed on this device.
Select the device from the device list. The device details page is displayed. This page lists the App information if an App is installed on this device.
Step 3![]() Select the Edit Configuration tab and change the App parameter.
Select the Edit Configuration tab and change the App parameter.
Step 4![]() Finally, click RECONFIGURE APP.
Finally, click RECONFIGURE APP.
Troubleshooting Fog Director
This workflow shows how to troubleshoot Fog Director:
Step 2![]() Enable collection of debug logs. To enable collection of debug logs, click Yes.
Enable collection of debug logs. To enable collection of debug logs, click Yes.
Step 3![]() Reproduce the problem for which you are collecting the debugs.
Reproduce the problem for which you are collecting the debugs.
Step 4![]() After you reproduce the problem, click DOWNLOAD LOGS to download the debug logs.
After you reproduce the problem, click DOWNLOAD LOGS to download the debug logs.
Troubleshooting a Device
This workflow shows how to troubleshoot a device:
Step 2![]() Click on a Host Name. The Device Details page is displayed. To enable collection of debug logs, click Yes.
Click on a Host Name. The Device Details page is displayed. To enable collection of debug logs, click Yes.
Step 3![]() Reproduce the problem for which you are collecting the debugs.
Reproduce the problem for which you are collecting the debugs.
Step 4![]() After you reproduce the problem, click VIEW DEVICE LOGS or DOWNLOAD TECH SUPPORT LOGS to download the debug logs.
After you reproduce the problem, click VIEW DEVICE LOGS or DOWNLOAD TECH SUPPORT LOGS to download the debug logs.
Managing Apps and Devices
This section describes how to manage Apps and devices using Fog Director.
- Adding Devices
- Importing Devices
- Editing Devices
- Deleting Devices
- Tagging Devices
- Uploading Apps
- Publishing Apps
- Installing Apps
- Configuring Apps
- Upgrading an App
- Uninstalling Apps
- Exporting Apps
- Importing Apps
- Monitoring Apps
- Troubleshooting
Adding Devices
Before you install an App on a device, that device should be added to the Fog Director. To add a device, follow these steps:
Step 1![]() Log in to Fog Director.
Log in to Fog Director.
Step 2![]() Choose Devices from the menu.
Choose Devices from the menu.
Step 3![]() Click ADD button. Refer Figure 1-6.
Click ADD button. Refer Figure 1-6.
Step 4![]() Enter the device details in the Add New Device popup. The IP Address, Username, and Password are mandatory fields.
Enter the device details in the Add New Device popup. The IP Address, Username, and Password are mandatory fields.
Step 5![]() Click Save & Close to save the device information. Click Save & Add More if you want to add more devices after you save the device details.
Click Save & Close to save the device information. Click Save & Add More if you want to add more devices after you save the device details.
Importing Devices
You can import device information from a spreadsheet that lists all of your devices and attributes. To import the device information, follow these steps:
Step 3![]() Click Select Files to browse to the CSV file that contains the devices that you want to import. Table 1-1 lists the device details that should be part of the CSV file.
Click Select Files to browse to the CSV file that contains the devices that you want to import. Table 1-1 lists the device details that should be part of the CSV file.
Step 4![]() Select the CSV file and click Open.
Select the CSV file and click Open.
Note![]() You can download a sample CSV file from the import popup window. Table 1-1 lists the device details that should be part of the CSV file.
You can download a sample CSV file from the import popup window. Table 1-1 lists the device details that should be part of the CSV file.
Editing Devices
To edit device information, follow these steps:
Step 2![]() Expand the device information. Refer Figure 1-7.
Expand the device information. Refer Figure 1-7.
Step 4![]() Update the device information shown in the popup window.
Update the device information shown in the popup window.

Deleting Devices
To delete a device from the Fog Director, follow these steps:
Step 2![]() Expand the device information. Refer Figure 1-7.
Expand the device information. Refer Figure 1-7.
Tagging Devices
Tagging a device helps you group similar devices. For instance, you have 100 devices in a organization and out of that 100 devices, 30 devices are in ‘San Jose’. You create a tag ‘San Jose’ and apply that tag to all the devices that are in San Jose. Next time, when you want to see the devices in San Jose, you can use this tag and search for it. Note that you can apply multiple tags to the same device.
To tag a device, follow these steps:
Step 2![]() Enter the tag name in the ‘Enter New Tag’ field.
Enter the tag name in the ‘Enter New Tag’ field.
Uploading Apps
To upload an App, follow these steps:
Step 2![]() Click Add New App. Refer Figure 1-8.
Click Add New App. Refer Figure 1-8.
Step 4![]() Browse to the App in your local machine and select the App.
Browse to the App in your local machine and select the App.
Note![]() The App that you use here is the output of the IOx SDK.
The App that you use here is the output of the IOx SDK.
After you upload an App, the App moves to the Unpublished App section. Note that you have to publish an App before you install it on a device.
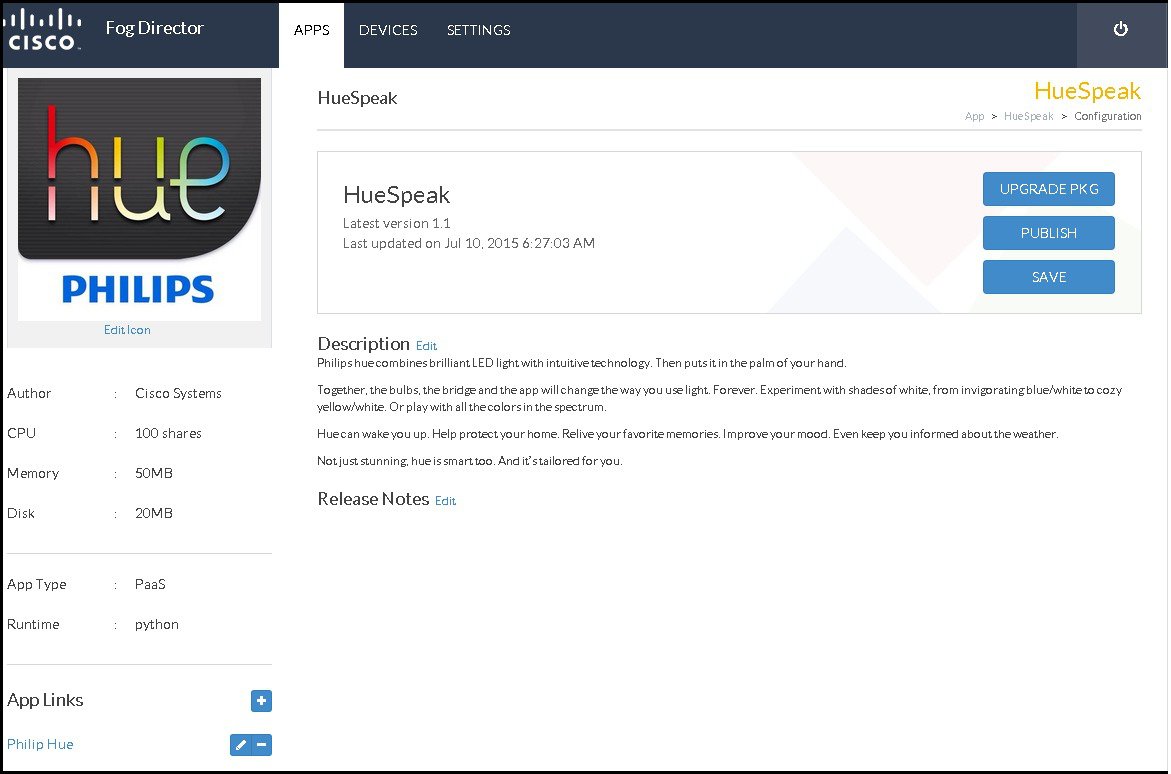
Editing App Information
After you upload an App, you can update the following App details:
- Description of the App.
- Release Notes information.
- App Icon. You can add a new icon or change the existing one.
- External links to an App.
To update the App information, do the following:
Step 1![]() In the Available App section, click SWITCH TO APP EDIT VIEW.
In the Available App section, click SWITCH TO APP EDIT VIEW.
Step 2![]() Choose the App from the list. The App page is displayed. Refer Figure 1-9.
Choose the App from the list. The App page is displayed. Refer Figure 1-9.
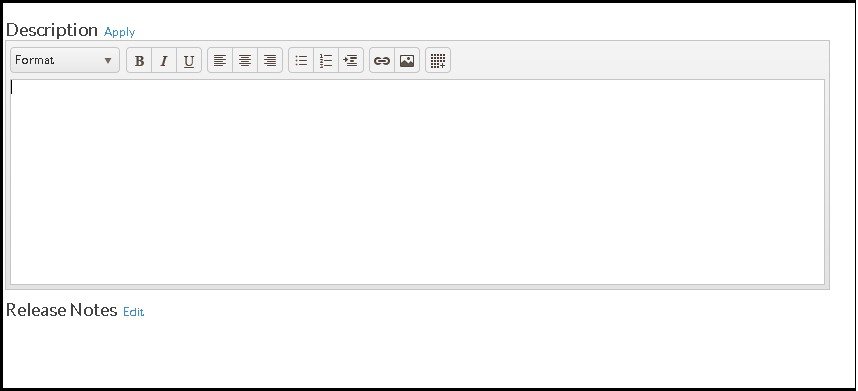
Step 3![]() To update the App Description, click the Edit link. The Description textbox appears. Refer Figure 1-10.
To update the App Description, click the Edit link. The Description textbox appears. Refer Figure 1-10.
Step 4![]() Enter the description in the textbox and click Apply.
Enter the description in the textbox and click Apply.
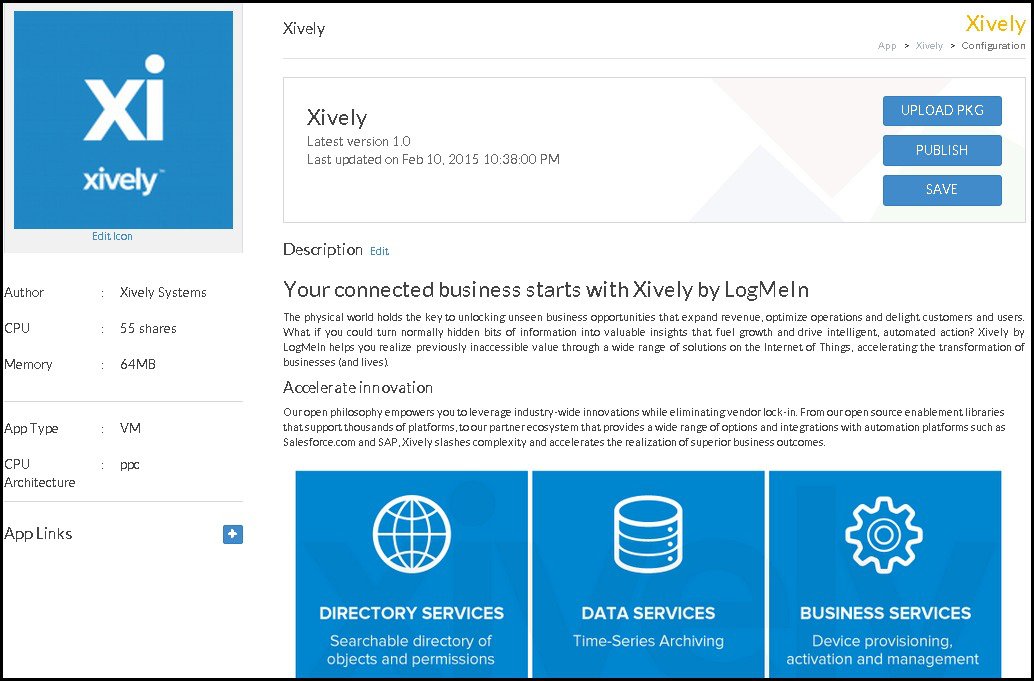
Figure 1-9 Editing App Information
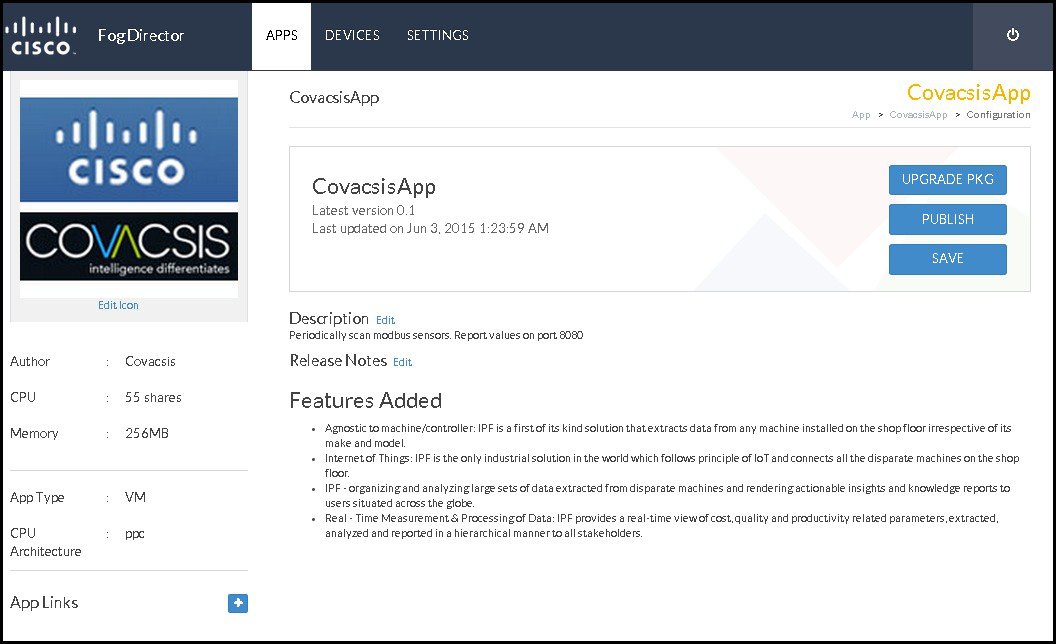
Figure 1-10 Adding Description
You can add external links to an App by clicking the + icon. Refer Figure 1-11.
Figure 1-11 Adding External App Links

Publishing Apps
After you upload an App, the App moves to Unpublished App section in Fog Director. To publish an App, follow these steps:
Step 1![]() Choose your App from the Unpublished App section. The App page is displayed. Refer Figure 1-12.
Choose your App from the Unpublished App section. The App page is displayed. Refer Figure 1-12.
Step 2![]() Click Publish. The App moves to Available App section.
Click Publish. The App moves to Available App section.
The Available App section lists the Apps that are published and available for installation.
Installing Apps
A published App is ready for installation. To install an App, follow these steps:
Step 1![]() Choose the App from the Available App section. The App Info page is displayed. Refer Figure 1-13.
Choose the App from the Available App section. The App Info page is displayed. Refer Figure 1-13.
Step 2![]() Click Install. The Device Listing page is displayed. This page lists the devices that are available for installation. Refer Figure 1-14.
Click Install. The Device Listing page is displayed. This page lists the devices that are available for installation. Refer Figure 1-14.
Step 3![]() Select the device or devices from the list.
Select the device or devices from the list.
Step 4![]() Click Add Selected Devices. The selected devices will be listed
Click Add Selected Devices. The selected devices will be listed![]() . If you want to remove any devices from the list, click the Action icon. You can also change the App specific configuration from this page. Click Customize Configuration and change the parameter values. Note that the Customize Configuration option will be visible only if the App contains a config_ini yaml file.
. If you want to remove any devices from the list, click the Action icon. You can also change the App specific configuration from this page. Click Customize Configuration and change the parameter values. Note that the Customize Configuration option will be visible only if the App contains a config_ini yaml file.
Step 5![]() Click Next. The Installation Summary page is displayed. Refer Figure 1-15. This page also displays the device and the network health information. The Network Health will tell you how many of the selected devices are reachable.
Click Next. The Installation Summary page is displayed. Refer Figure 1-15. This page also displays the device and the network health information. The Network Health will tell you how many of the selected devices are reachable.
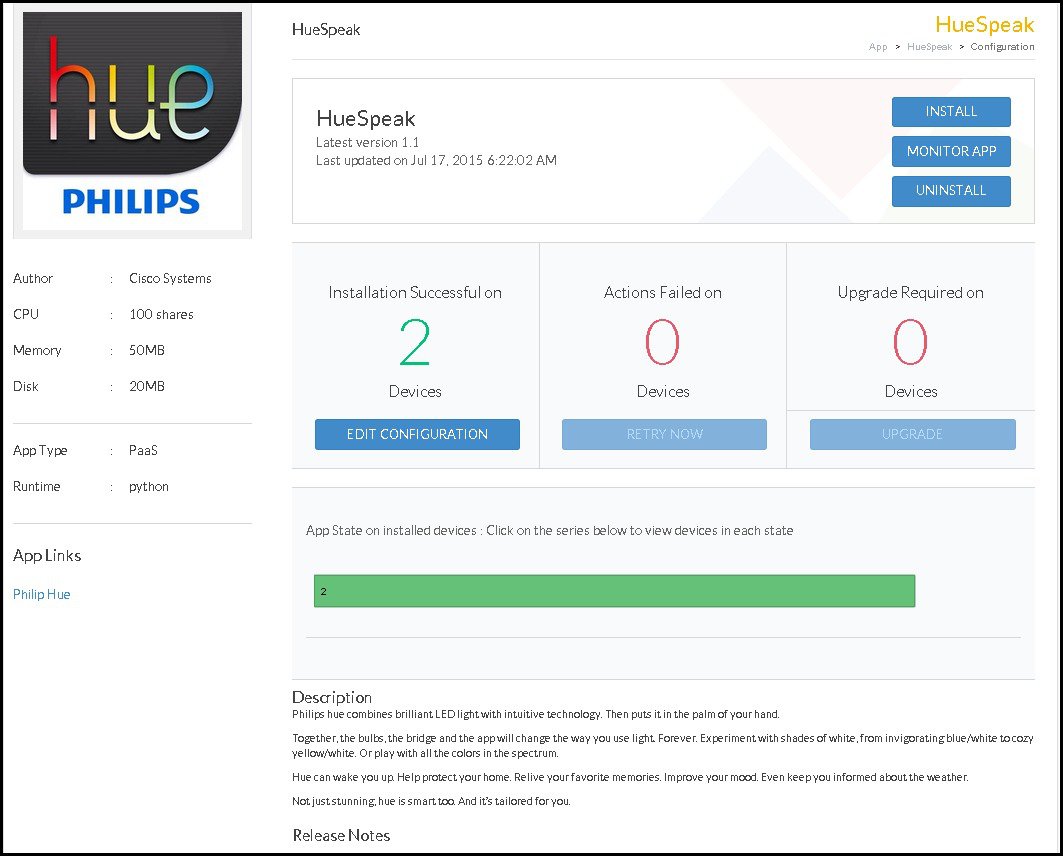
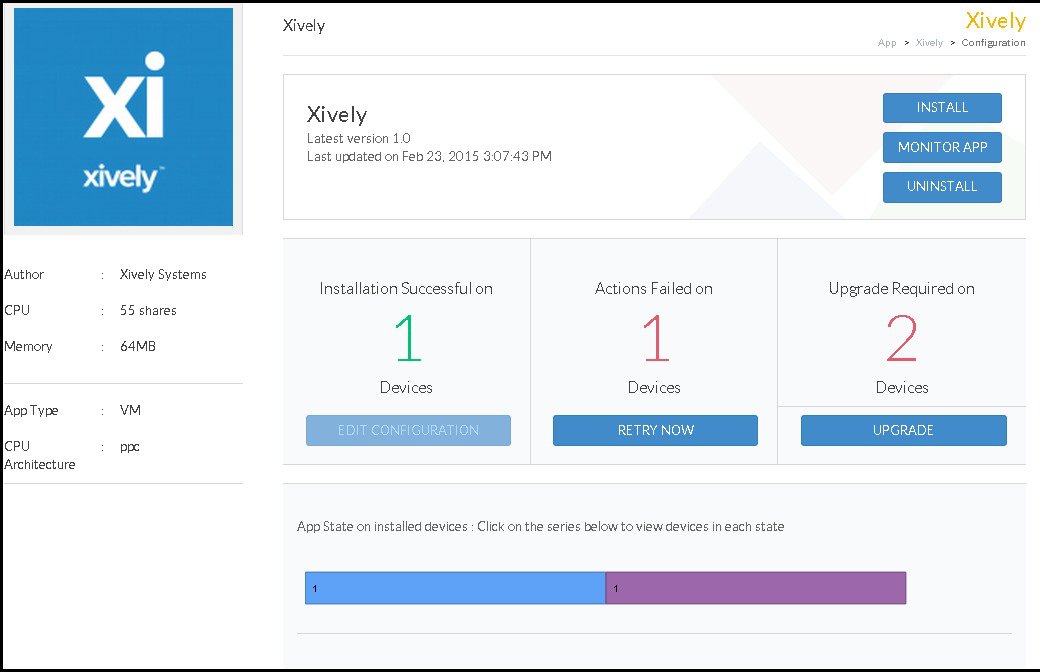
Step 6![]() Click Done, Let’s Go. The Device Installation page is displayed. This page tells you whether an App is installed successfully or not. If the App is not successfully installed, you can retry the installation. Refer Figure 1-16.
Click Done, Let’s Go. The Device Installation page is displayed. This page tells you whether an App is installed successfully or not. If the App is not successfully installed, you can retry the installation. Refer Figure 1-16.
Figure 1-13 App Information Page
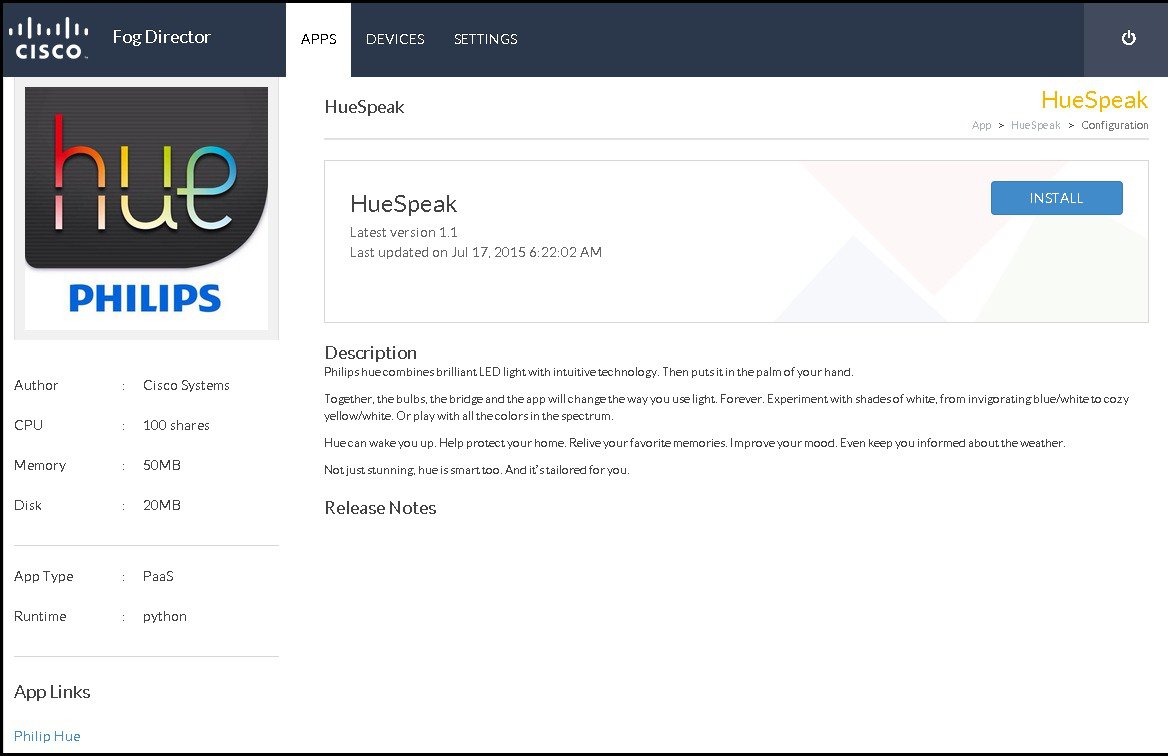
Figure 1-14 Device Filter Page
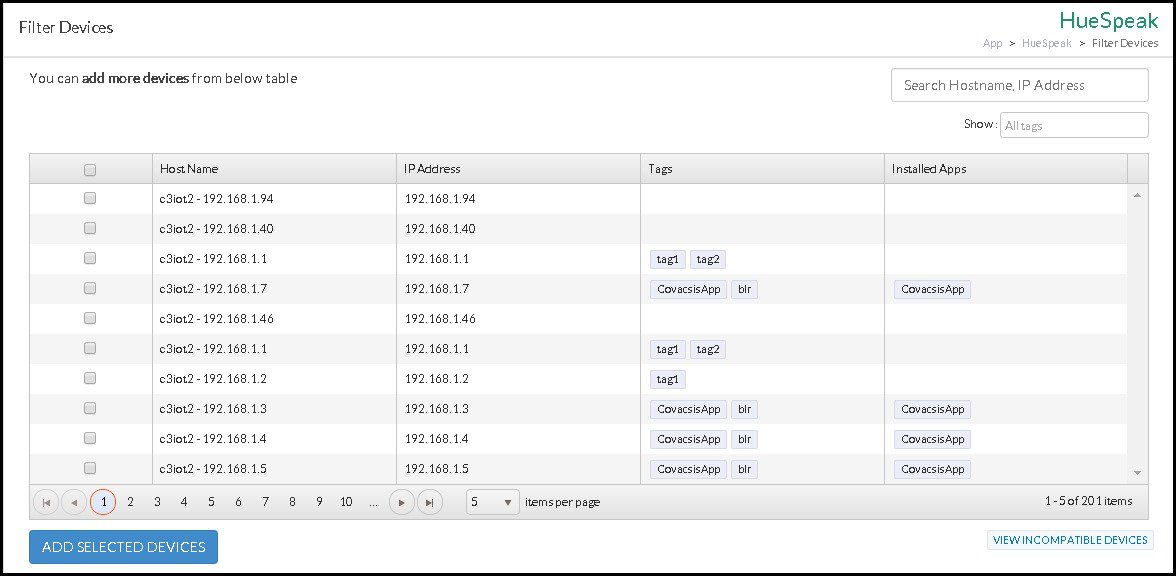
Figure 1-15 Install Summary Page

Figure 1-16 App Installation Status Page
Retrying a Failed Installation
If an App installation fails, you can redeploy it on devices where it failed.
To retry an installation, follow these steps:
Step 1![]() Choose the App from the Installed App section. The App page is displayed. Refer Figure 1-16.
Choose the App from the Installed App section. The App page is displayed. Refer Figure 1-16.
Step 2![]() Click RETRY NOW. Select Retry Actions page is displayed. Refer Figure 1-17.
Click RETRY NOW. Select Retry Actions page is displayed. Refer Figure 1-17.
Step 3![]() Select the device and click REDPLOY. Click REMOVE FOREVER if you want to remove the App from the selected devices.
Select the device and click REDPLOY. Click REMOVE FOREVER if you want to remove the App from the selected devices.

Configuring Apps
You can edit the configuration file of an App using the Edit Configuration option. An App can come with or without a configuration file. If an App does not have a configuration file, the Edit Configuration button will be disabled. To edit the configuration file of an App, follow these steps:
Step 1![]() Choose the App from the Installed or Available App section. The App Info page is displayed. Refer Figure 1-16.
Choose the App from the Installed or Available App section. The App Info page is displayed. Refer Figure 1-16.
Step 2![]() Click Edit Configuration. The Device Listing page is displayed. This page lists all the devices where you can change the configuration parameters.
Click Edit Configuration. The Device Listing page is displayed. This page lists all the devices where you can change the configuration parameters.
Step 3![]() Select the device or devices from the list.
Select the device or devices from the list.
Step 4![]() Click Add Selected Devices. The selected devices will be listed
Click Add Selected Devices. The selected devices will be listed![]() below.
below.
Step 5![]() The Customize Configuration section lists the configuration parameters. Change the parameter value.
The Customize Configuration section lists the configuration parameters. Change the parameter value.
Upgrading an App
Upgrade option allows you to upgrade Apps installed on devices. The Upgrade button in the Edit App page will be enabled only if there are new versions available for an App. An Administrator can upload the new version of an App to the Fog Director. To upload the new version of an App, follow these steps:
Step 2![]() Click SWITCH TO APP EDIT VIEW. Refer Figure 1-18.
Click SWITCH TO APP EDIT VIEW. Refer Figure 1-18.
Step 3![]() Choose the App from the Available App section. The App information page is displayed.
Choose the App from the Available App section. The App information page is displayed.
Step 4![]() Click UPLOAD PKG. Refer Figure 1-19.
Click UPLOAD PKG. Refer Figure 1-19.
Step 5![]() Click Select New App Package.
Click Select New App Package.
Step 6![]() Select the package and click OK.
Select the package and click OK.
The latest version of the App is now uploaded to the Fog Director. To upgrade the devices with the latest version, follow these steps:
Step 2![]() Choose the App from the Installed App section. The App information page is displayed. Refer Figure 1-20.
Choose the App from the Installed App section. The App information page is displayed. Refer Figure 1-20.
Step 3![]() Click UPGRDAE. The Device Filter Screen is displayed.
Click UPGRDAE. The Device Filter Screen is displayed.
Step 4![]() Select the device or devices from the list. Click ADD SELECTED DEVICES.
Select the device or devices from the list. Click ADD SELECTED DEVICES.
Step 5![]() Finally, click Done, Let’s Go.
Finally, click Done, Let’s Go.
Uninstalling Apps
To uninstall an App, follow these steps:
Step 1![]() Choose your App from the Installed Apps section. The App Info page is displayed.
Choose your App from the Installed Apps section. The App Info page is displayed.
Step 2![]() Click Uninstall. The Device Listing page is displayed. This page lists the devices where the App is installed.
Click Uninstall. The Device Listing page is displayed. This page lists the devices where the App is installed.
Step 3![]() Select the device or devices from the list.
Select the device or devices from the list.
Step 4![]() Click Add Selected Devices. The selected devices will be listed
Click Add Selected Devices. The selected devices will be listed![]() .
.
Step 5![]() Click Done, Let’s Go. The App is uninstalled from the selected devices.
Click Done, Let’s Go. The App is uninstalled from the selected devices.
Exporting Apps
Exporting Apps allows you to back up the Apps that are either in draft or published stage. To export an App, follow these steps:
Step 1![]() Click Export Apps button. The App is downloaded to your machine in a ZIP format.
Click Export Apps button. The App is downloaded to your machine in a ZIP format.
Importing Apps
An exported App can be imported back to the Fog Director. To import an App, follow these steps:
Step 1![]() Click Import Apps button.
Click Import Apps button.
Step 2![]() Click Select Apps Archive and select the App from the archive.
Click Select Apps Archive and select the App from the archive.
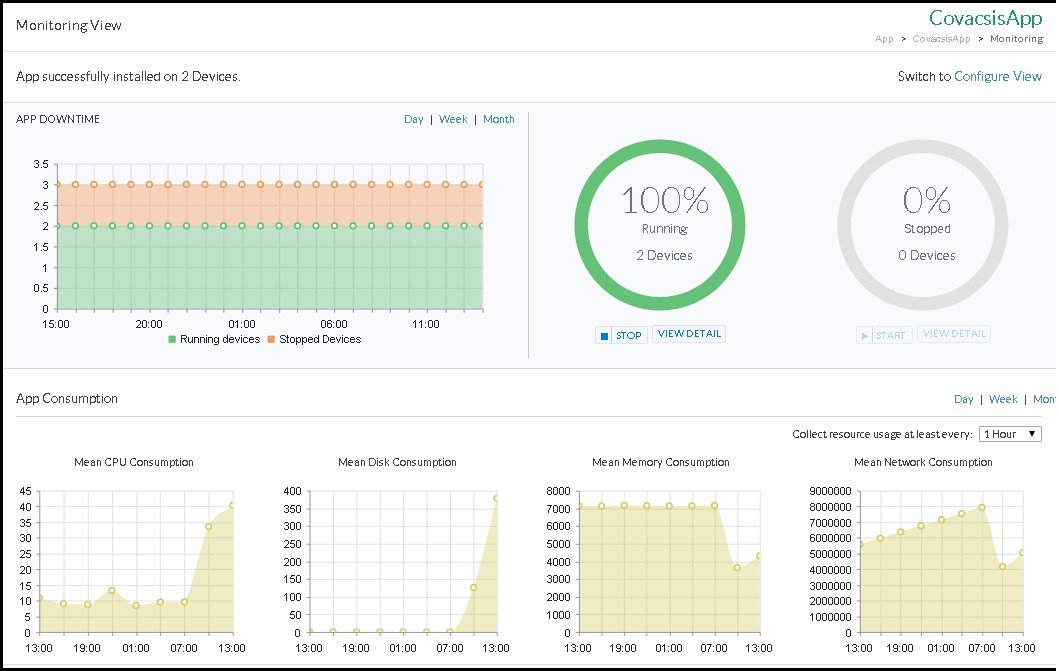
Monitoring Apps
Fog Director allows you to monitor the Apps installed on devices. The monitoring view of an App provides you the following details:
- App Downtime.
- On how many devices the App is currently running.
- On how many devices the App stopped running.
- How much CPU is consumed by the App.
- How much disk is consumed by the App.
- How much memory is consumed by the App.
- How much network is consumed by the App.
To monitor an App, follow these steps:
Step 1![]() Choose the App from the Installed Apps section. The App info page is displayed.
Choose the App from the Installed Apps section. The App info page is displayed.
Step 2![]() Click Monitor App. The Monitoring View page is displayed. Refer Figure 1-21.
Click Monitor App. The Monitoring View page is displayed. Refer Figure 1-21.
Figure 1-21 App Monitoring View
Troubleshooting
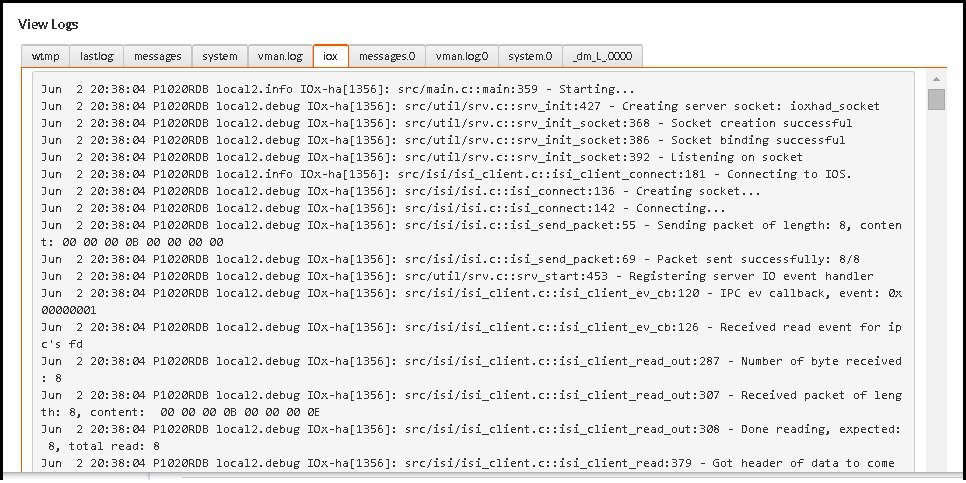
This section explains how to troubleshoot Fog Director using the Log files. Log files allow you to identify and troubleshoot issues faced by Devices and Apps. You can download the following log files:
Device Logs
Device Log provides you the log information about the devices hosted on Fog Director. If a device does not behave as expected, then this log file will file help you identify and troubleshoot the issues.
To generate Device Log, follow these steps:
Step 2![]() Click on a Host Name. The Device Details page is displayed. Refer Figure 1-22.
Click on a Host Name. The Device Details page is displayed. Refer Figure 1-22.
Step 3![]() Click on VIEW DEVICE LOGS. The View Log info page is displayed. Refer Figure 1-23.
Click on VIEW DEVICE LOGS. The View Log info page is displayed. Refer Figure 1-23.
Figure 1-22 Device Details Page

Figure 1-23 View Log Info Page
Tech Support Log
This is the log file that you should share with the Cisco Technical Support Team.
To generate Tech Support Log, follow these steps:
Step 2![]() Click on a Host Name. The Device Details page is displayed. Refer Figure 1-22.
Click on a Host Name. The Device Details page is displayed. Refer Figure 1-22.
Step 3![]() Click on DOWNLOAD TECH SUPPORT LOGS.
Click on DOWNLOAD TECH SUPPORT LOGS.
App Log
App Log lists the log information specific to Apps. This log file helps you identify and troubleshoot App specific issues.
To generate App Log, follow these steps:
Step 2![]() Click on a Host Name. The Device Details page is displayed along with App information. Refer Figure 1-24.
Click on a Host Name. The Device Details page is displayed along with App information. Refer Figure 1-24.
Step 3![]() Select the tab App Log. The App specific logs are displayed.
Select the tab App Log. The App specific logs are displayed.
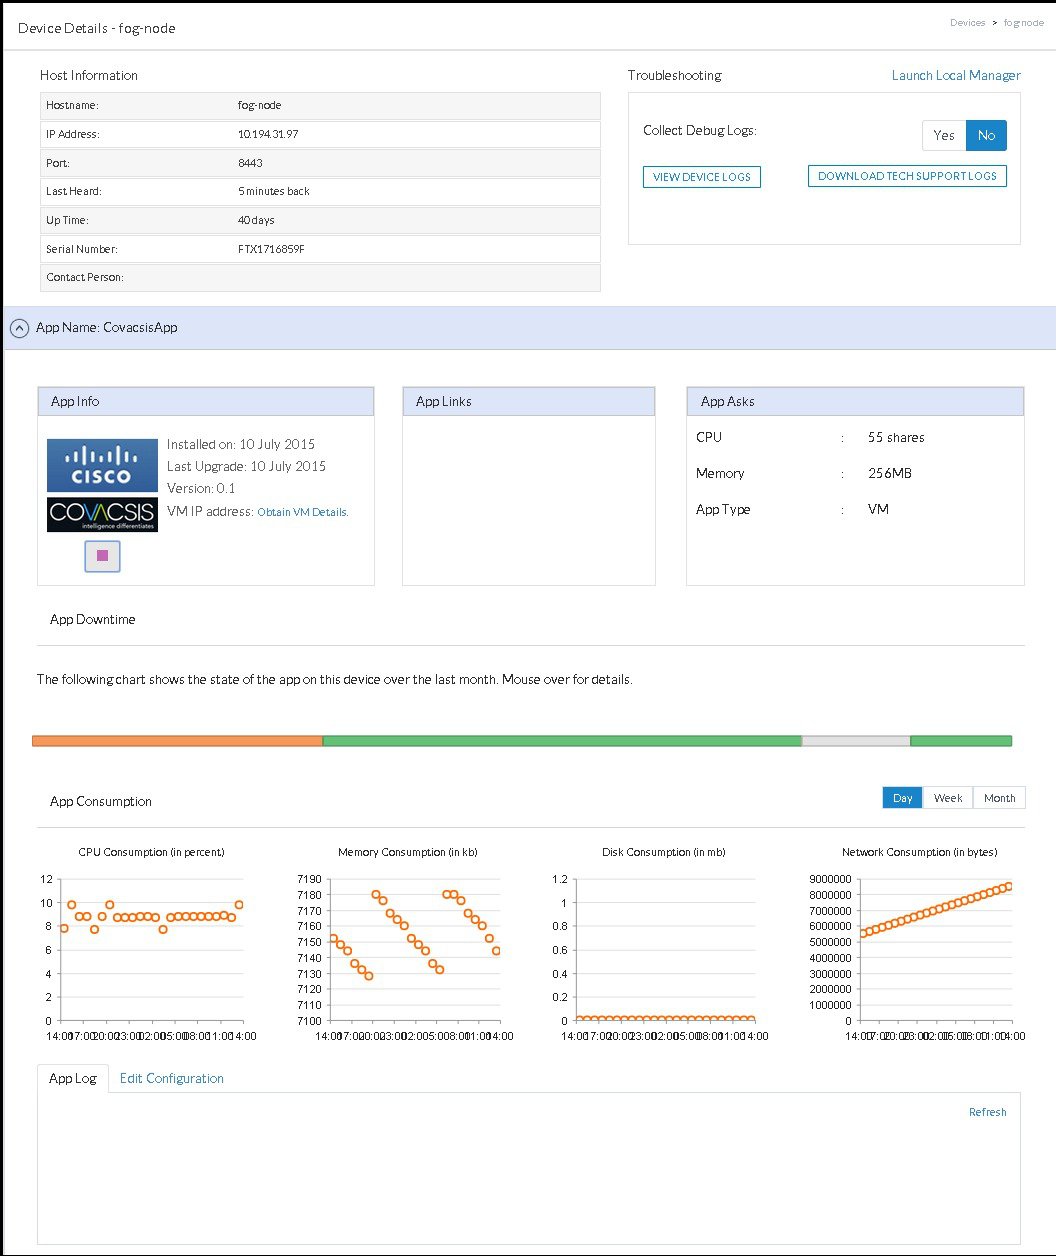
You can also access App Log files by selecting Monitoring Page -> View Detail -> App Log.
Frequently Asked Questions
I have a device with an App already installed on it. This App is installed using Fog Director. How do I ensure that the App does not go to unmanaged state when I add the device to Fog Director?
Step 1![]() Before you add the device to Fog Director, add the App to the Fog Director’s App repository.
Before you add the device to Fog Director, add the App to the Fog Director’s App repository.
Step 2![]() After you add the App successfully, add the device to Fog Director. Inventory collection from the device will keep the App package in local App repository in sync with the installed App.
After you add the App successfully, add the device to Fog Director. Inventory collection from the device will keep the App package in local App repository in sync with the installed App.
I have a device with an App already installed on it. This App is not installed using Fog Director. How do I ensure that the App does not go to unmanaged state when I add the device to Fog Director?
Step 1![]() Uninstall the App from the device using Cisco IOx-client or Cisco IOx Local Manager.
Uninstall the App from the device using Cisco IOx-client or Cisco IOx Local Manager.
Step 2![]() Add the App and device into Fog Director.
Add the App and device into Fog Director.
Step 3![]() After you add the App and Device, install the App on the device using Fog Director.
After you add the App and Device, install the App on the device using Fog Director.
I have an unmanaged App in the local App repository and I want to make this App manageable. How do I do it?
Step 1![]() Uninstall the unmanaged App from all devices. If you do not want to uninstall, you can delete the device from the Fog Director.
Uninstall the unmanaged App from all devices. If you do not want to uninstall, you can delete the device from the Fog Director.
Step 2![]() Remove the App from the installed App section.
Remove the App from the installed App section.
Step 3![]() Add this App to Local App Repository.
Add this App to Local App Repository.
Step 4![]() Install it on the device from where it is uninstalled.
Install it on the device from where it is uninstalled.
Caveats
Caveats describe unexpected behavior in Cisco IOx Fog Director.
Open Caveats
Table 1-2 lists the caveats that are open in Cisco IOx Fog Director Version 1.0:
Table 1-2 Open Caveats in Version 1.0
Related Documentation
In addition to this document, the Cisco IOx documentation set includes the following documents:
Obtaining Documentation and Submitting a Service Request
For information on obtaining documentation, using the Cisco Bug Search Tool (BST), submitting a service request, and gathering additional information, see What’s New in Cisco Product Documentation at: http://www.cisco.com/c/en/us/td/docs/general/whatsnew/whatsnew.html.
Subscribe to What’s New in Cisco Product Documentation, which lists all new and revised Cisco technical documentation, as an RSS feed and deliver content directly to your desktop using a reader application. The RSS feeds are a free service.
 Feedback