Installing the Door Groundstrap Retrofit Kit for the ONS 15454
Available Languages
Table Of Contents
Installing the Door Ground Strap Retrofit Kit for the ONS 15454
Install the Door Ground Strap Retrofit Kit
Installing the Door Ground Strap Retrofit Kit for the ONS 15454
Product Number: 15454-SA-ANSIThis document describes how to install the new door and door ground strap included in the ONS 15454 Door Ground Strap Retrofit Kit. You will need a Phillips screwdriver and an open end wrench (included in the kit).
Install the Door Ground Strap Retrofit Kit
Step 1
Open the front door.
Step 2
Step 3
Step 4
Step 5
Figure 1 Left fiber guide with new longer screw
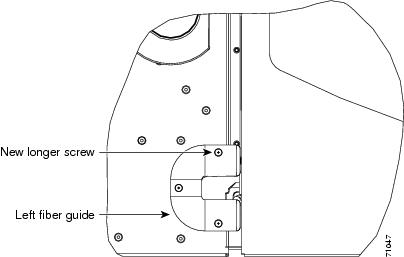
Step 6

Note
Step 7
Figure 2 Door Ground Strap Retrofit Kit assembly
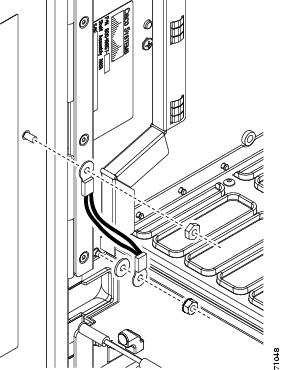
Step 8
a.
b.
c.
Note
Step 9
Step 10
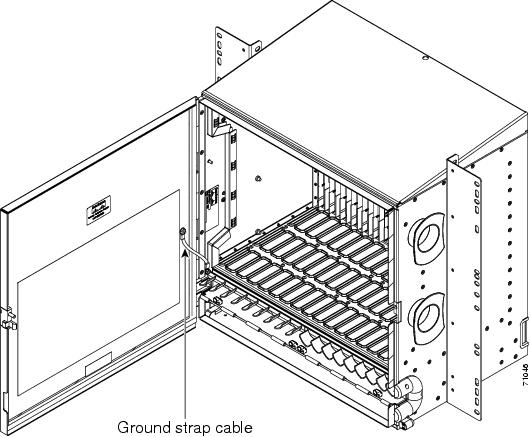
Figure 3 shows the shelf assembly with the Door Ground Strap Retrofit Kit installed.
Figure 3 Shelf assembly with Door Ground Strap Retrofit Kit installed
This document is to be used in conjunction with the Cisco ONS 15454 Installation and Operations Guide publication.
AccessPath, AtmDirector, Browse with Me, CCIP, CCSI, CD-PAC, CiscoLink, the Cisco Powered Network logo, Cisco Systems Networking Academy, the Cisco Systems Networking Academy logo, Cisco Unity, Fast Step, Follow Me Browsing, FormShare, FrameShare, IGX, Internet Quotient, IP/VC, iQ Breakthrough, iQ Expertise, iQ FastTrack, the iQ Logo, iQ Net Readiness Scorecard, MGX, the Networkers logo, ScriptBuilder, ScriptShare, SMARTnet, TransPath, Voice LAN, Wavelength Router, and WebViewer are trademarks of Cisco Systems, Inc.; Changing the Way We Work, Live, Play, and Learn, and Discover All That's Possible are service marks of Cisco Systems, Inc.; and Aironet, ASIST, BPX, Catalyst, CCDA, CCDP, CCIE, CCNA, CCNP, Cisco, the Cisco Certified Internetwork Expert logo, Cisco IOS, the Cisco IOS logo, Cisco Press, Cisco Systems, Cisco Systems Capital, the Cisco Systems logo, Empowering the Internet Generation, Enterprise/Solver, EtherChannel, EtherSwitch, FastHub, FastSwitch, GigaStack, IOS, IP/TV, LightStream, MICA, Network Registrar, Packet, PIX, Post-Routing, Pre-Routing, RateMUX, Registrar, SlideCast, StrataView Plus, Stratm, SwitchProbe, TeleRouter, and VCO are registered trademarks of Cisco Systems, Inc. and/or its affiliates in the U.S. and certain other countries.
All other trademarks mentioned in this document or Web site are the property of their respective owners. The use of the word partner does not imply a partnership relationship between Cisco and any other company. (0110R)
 Feedback
Contact Cisco
- Open a Support Case

- (Requires a Cisco Service Contract)