Getting Started
Available Languages
Table Of Contents
Configuring Your Cisco Device to Authenticate Cisco License Manager
Configuring Your Device License Agent
Creating and Managing User Profiles
Adding, Deleting, or Editing User Information
Discovering Devices Using the GUI
Adding a PAK to an Existing Folder
Obtaining a License by Selecting Devices
Deploying Licenses from Your Device
Getting Started
This section discusses first-time setup and provides an overview of recommended steps to quickly add users and devices and obtain and deploy licenses.
2.
Logging In
3.
4.
5.
6.
8.
9.
Use the following sequence of tasks to walk through how to use Cisco License Manager. This is a quick-start section designed to allow you to add a device quickly and deploy it. If you want to plan and set up your device and PAK folders first, see the online help for details on how to perform those steps.
Before You Begin
Before you use Cisco License Manager to acquire, deploy, and centrally track and manage your Cisco licenses, you should:
1.
2.
3.
4.
5.
–
–
–
This section will use discovery as the method for adding devices. For details on other ways to add devices to Cisco License Manager, see the online help.
6.
Getting Started Flowcharts
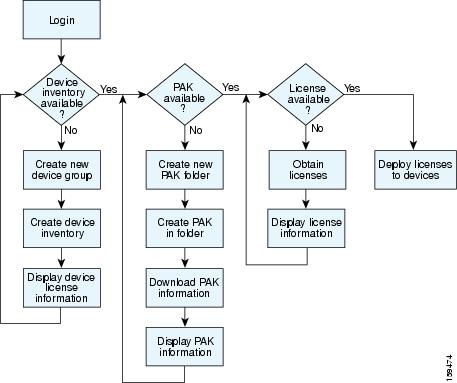
There are many features that make Cisco License Manager an easy tool to plan and manage your licenses. These take time and planning. If you plan to use all the features, see Figure 3-2 for a easy flowchart that includes creating customized group and device folder names.
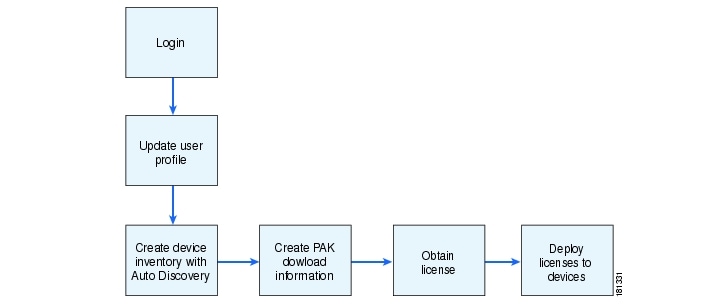
If you prefer to skip some optional steps so that you can more quickly use the product, see Figure 3-1. If you follow this flowchart, you will not be able to customize group or folder names.
Figure 3-1 Quick Start Flowchart
To find out how to get started, see the flowchart in Figure 3-2. This flowchart allows you to use all the features of Cisco License Manager.
Figure 3-2 Getting Started Flowchart
Configuring Your Cisco Device to Authenticate Cisco License Manager
There are several steps you need to take in order for your device to recognize Cisco License Manager and authenticate with your device.
1.
2.
3.
For in-depth details on these commands, see your Cisco IOS software documentation. For a description of the authentication methods, see Authentication Methods.
Configuring Your Device License Agent
To help you get your device license agent configured, enter the following at the command line:
license agent notify http://userpc01:80/clm/servlet/notify_URL_in_propsfile user password
The URL should correspond with what is setup in the target Cisco License Manager server. You can copy the value from NOTIFY_URL in the clm.properties file.
Authentication Methods
The three methods with which you can authenticate your Cisco devices are:
•
•
•
The ip http authentication command enables you to specify a particular authentication method for HTTP server users. The HTTP server uses the enable password method to authenticate a user at privilege level 15. Using the ip http authentication command you can specify enable, local, or authentication, authorization, and accounting (AAA) HTTP server user authentication.
For example:
ip http authentication ?where ? is one of the following:
aaa—Use AAA access control methods.
enable—Use enable passwords.
local—Use local username and passwords.
The corresponding username and password pairs that you configure on router are used during device creation or discovery in Cisco License Manager and the information is placed into the inventory. You can also add additional usernames and passwords in the Edit Password List window when you use the Discover Device feature.
Logging In
You will need to log into Cisco License Manager to ensure that your profile is updated and complete.
After the installation setup, only the admin user can log into Cisco License Manager using the reserved username admin and the password specified during setup. When you create other logins, you allow others to use all features.
To set up access for other users, see Adding, Deleting, or Editing User Information. The GUI supports up to 20 simultaneous users. Cisco License Manager times out after five minutes.
Step 1
Step 2
Figure 3-3 Cisco License Manager Login Window
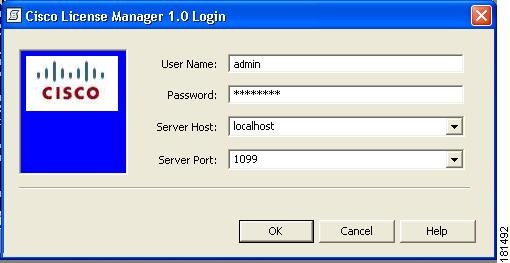
Step 3
The GUI appears.
To set up the administrator's profile or access for other users, see Creating and Managing User Profiles. Up to 20 simultaneous users are supported by the user interface. Cisco License Manager times out after a five minute period.
Creating and Managing User Profiles
The default user (admin) is created during the installation setup. Only the admin user can add other users. The admin user and any other users that are added have all privileges. The admin user cannot be deleted. A tiered level of authorization will be available in a future release.
Before you can receive license information, you must register and have a valid Cisco.com user ID. Each user must add their Cisco.com user ID and password, as well as their e-mail address, to their user profile for Cisco License Manager to work properly.
The user management portion of Cisco License Manager controls the authentication and authorization of its functions.
This section covers:
•
•
Adding Admin User Information
Before the admin user (or any user) can receive a license key file from Cisco.com, you must add the required information into your user profile.
Step 1
Step 2
Step 3
Adding, Deleting, or Editing User Information
The admin user can create new user accounts and delete users using the User Manager. Individual users can modify their own user information. Administrators can edit the admin password using Edit.

Note
Step 1
Step 2
Add users
Click Add. Enter the required information.1
Delete users
Select a user ID and click Delete.
Edit users
Select a user ID and click Edit. Update information as necessary.
1 The default password for new users is password.
For valid characters and guidelines for entering data, see the online help.
Discovering Devices Using the GUI
You can discover devices in a specific network using the GUI. You can also create a new device group and collect license information on those devices during the same discovery process. No other discover operations are allowed if one is already in progress.
When you add a device using the IP address, the UDI and Device ID parameters are automatically added into the database.
If you want to add a device manually, see the online help for detailed instructions.
Step 1
Step 2
Figure 3-4 Discover Device Window
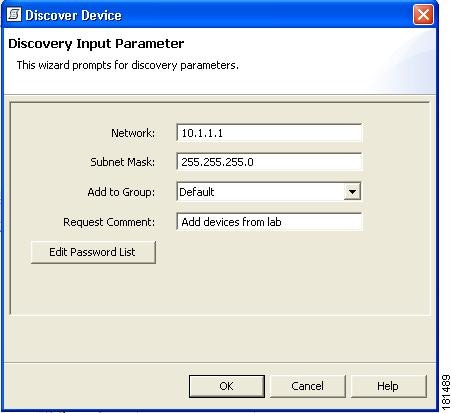
Step 3
Network
The IP address of the network on which you want to discover devices. For example, 172.0.0.0.
Subnet Mask
Defines which portion of the address is used to identify the network and which denotes the hosts.
Add to Group
List of existing device groups in which to add your devices. Newly discovered devices appear in the Default group unless you create a new device group before you discover devices. For more information about creating device groups, see the online help.
Request Comment
Tracking comment for data request.
Edit Password List
User/password pairs for accessing the device in the sub-network (see Editing the Password List for details).
Step 4
The device inventory updates with the list of discovered devices. The device status appears in the Alert View pane. For details, see Status and Log View Pane or the online help.
Note
Step 5
Editing the Password List
Devices are password-protected and require authentication in order to access device information. Depending on the authentication method that is set up on the device, the username and password required in this window are different.
For example:
•
•
•
Note
The Edit Password List window enables you to set up specific users to access device information and update licenses from Cisco License Manager.
Enter the appropriate values:
Device User Name
Enter your User ID based on which authentication method is on your device.
Password
Enter your user password.
Reenter Password
Confirm your user password.
Updating Device Information
To synchronize the information in the device inventory with the device, you need to poll the device for license information. To read more about how device polling occurs, see the online help.
Step 1
Figure 3-5 Devices Selector Pane
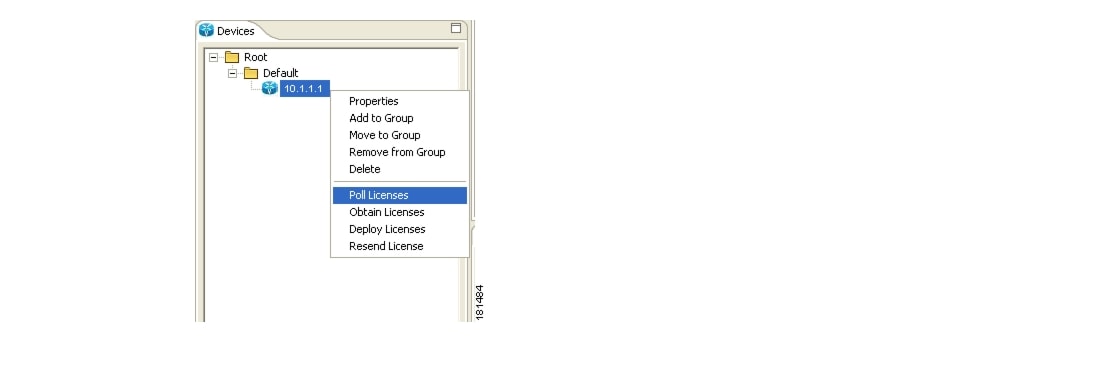
Step 2
A confirmation window appears. If you get errors, check to ensure that your device's UDI and IP address is entered correctly.
Step 3
Status messages for device polling appear in the View pane in the Server Request Status tab. For information on the Server Request Status tab, see Server Request Status View, page 1-11.
Adding a PAK to an Existing Folder
To deploy a license to a device, you must provide a valid PAK so that a license can be obtained from Cisco.com for this device.
Use this procedure to add a PAK into Cisco License Manager. To create a new PAK folder, see the online help.

Tip
Step 1
If you have selected something other than a PAK folder, this menu option may be dimmed.
Click Add.
The New Pak Name window appears. (See Figure 3-6.)
Figure 3-6 New PAK Name Window
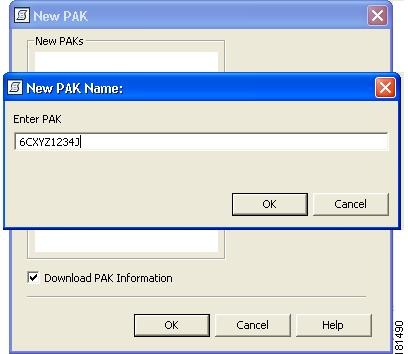
Step 2
You should have received your PAK with your shipment or from Cisco via e-mail if you ordered software upgrades.
Step 3
The PAK will appear in the Default PAK folder. For details about PAKs, see the online help.
Retrieving PAK Information
Some Cisco products require the use of a PAK that you must enter to receive a license key. You can use Cisco License Manager to enter your PAK, register your product, and obtain the license key instead of going to directly to Cisco.com. Then you can manage your licenses from your desktop and deploy them at your convenience.
Tip
To retrieve the PAK information, enter your PAK string in the Add PAK window. Cisco License Manager then accesses Cisco.com and receives the PAK information, which contains a list of SKUs. You can then continue the steps to obtain a license.
Step 1
If you have selected something other than a PAK folder, this menu option may be dimmed.
Step 2
Figure 3-7 New PAK Name Window
Step 3
The download begins and a Request Status window displays status.

Timesaver
Step 4
Step 5
Step 6
To close the status message, click the X in the upper right portion of the tab.
Cisco.com e-mails you the license if you have e-mail notification selected in your user profile.
Obtaining a License by Selecting Devices
You can obtain a license from Cisco either from the PAK Explorer pane, by selecting a SKU, or from the Devices selector, by choosing the device. This procedure describes obtaining a license using the device. (For details on obtaining a license using the SKU, see the online help.)
Step 1
If you have selected something other than a device, this menu option may be dimmed.
Figure 3-8 Obtain License By Device Window
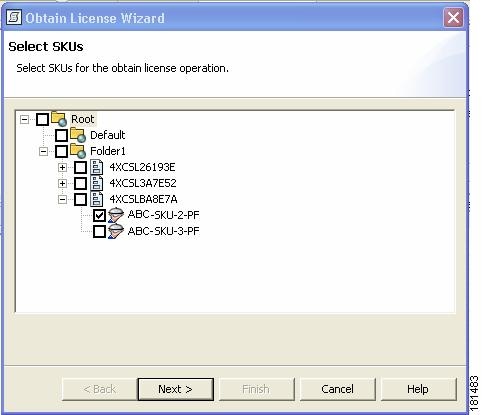
Step 2
Figure 3-9 Obtain License By Selecting SKU Window
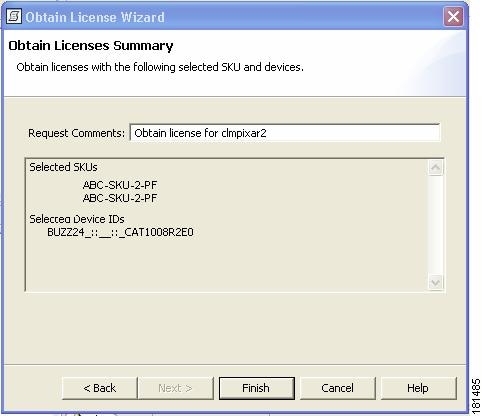
Step 3
Figure 3-10 Obtain License Summary Window
A Request Status window appears. The license information request is sent to Cisco.com's Cisco Product License Registration Server and is returned with a license ID that is comprised of the PAK ID and the device serial number.
Step 4
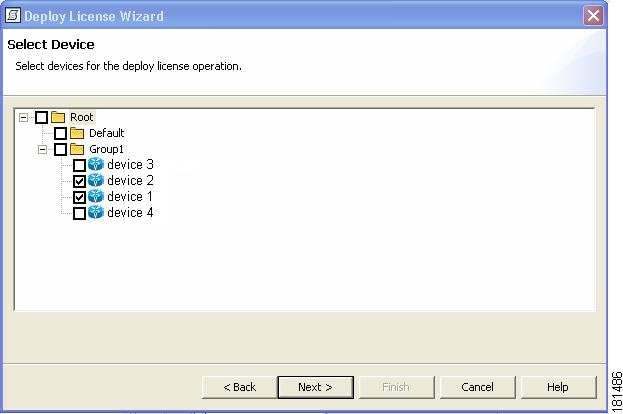
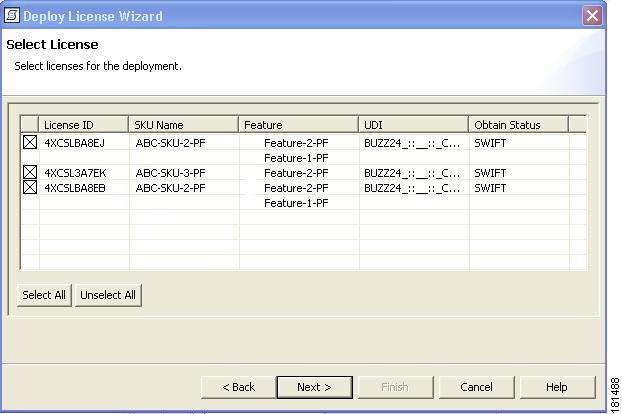
Deploying Licenses from Your Device
You can deploy a license from Cisco using your device information. There are two ways to deploy licenses.
•
•
This procedure describes how to deploy licenses by selecting a device.
Step 1
If you have selected something other than a device, this menu option may be dimmed.
Step 2
Figure 3-11 Deploy Licenses By Device Window
Step 3
Figure 3-12 Select Licenses for Deployment Window
Step 4
Figure 3-13 Deploy Licenses Summary Window

To view the deployment status, click on the Server Request Status tab. Then select the operations status message and click View.
Step 5
 Feedback