Installation Guide and Release Notes for Cisco Hosted Collaboration Mediation 1.0
Available Languages
Table Of Contents
Installation Guide and Release Notes for Cisco Hosted Collaboration Mediation, 1.0
Obtaining Documentation and Submitting a Service Request
Server Requirements for HCM Dashboard
Prerequisites for HCM Dashboard
Configuring a New Client and New User in ACS 5.1
Recommended Installation Options for MySQL Database Server 5.1
Installing and Starting HCM Dashboard in a Non-Cluster Setup
Configuring wrapper.log File Size
Installing HCM Dashboard in a Cluster Setup
Installing the HCM Mediation Component
Server Requirements for HCM Mediation Component
Prerequisites for HCM Mediation Component
Installing and Configuring JDK
Changing the Oracle Listener Host and Port Number
Installing and Configuring HCM Mediation Component
Uninstalling HCM Mediation Component
Installation Guide and Release Notes for Cisco Hosted Collaboration Mediation, 1.0
November 29, 2010, OL-23488-01This guide explains how to install Cisco Hosted Collaboration Mediation (HCM) 1.0 and describes the known problems that exist in HCM 1.0.
HCM 1.0 includes:
This document contains the following sections:
•
Installing the HCM Mediation Component
•
Introduction
This section contains the following topics:
•
Audience
This document is for network administrators and operators who monitor, maintain, and configure the status of the virtualized instances of Hosted Communications Services (HCS). This guide assumes that you are familiar with the following products and topics:
•
•
•
•
•
•
•
Product Documentation
Table 1 lists the HCM documentation set.
We sometimes update the documentation after original publication. Therefore, you should also review the documentation on Cisco.com for any updates. You must access the links in Table 1 for the most current HCM 1.0 documentation.
Table 1 Product Documentation
User Guide for Cisco Hosted Collaboration Mediation 1.0
On Cisco.com: http://www.cisco.com/en/US/products/ps11243/products_user_guide_list.html
Installation Guide and Release Notes for Cisco Hosted Collaboration Mediation 1.0 (this document)
On Cisco.com:
•
•
Programmer Guide for Cisco Hosted Collaboration Mediation Interface, 1.0
•
•
Open Source Used In Cisco Hosted Collaboration Mediation 1.0
On Cisco.com:
http://www.cisco.com/en/US/products/ps11243/products_licensing_information_listing.html
Obtaining Documentation and Submitting a Service Request
For information on obtaining documentation, submitting a service request, and gathering additional information, see the monthly What's New in Cisco Product Documentation, which also lists all new and revised Cisco technical documentation, at:
http://www.cisco.com/en/US/docs/general/whatsnew/whatsnew.html
Subscribe to the What's New in Cisco Product Documentation as a Really Simple Syndication (RSS) feed and set content to be delivered directly to your desktop using a reader application. The RSS feeds are a free service and Cisco currently supports RSS version 2.0.
Product Overview
This section describes the HCM 1.0 software. This section includes:
HCM Dashboard
HCM Dashboard should be used in a Managed Service Provider (MSP) Network Operations Center (NOC). HCM Dashboard provides a single-pane view of assurance data in the hosted environment and displays various summaries and reports. It acts as a bridge between customer-specific implementations of the following domain managers, in a virtualized environment:
•
•
•
•
HCM Dashboard aggregates data from multiple instances of these domain managers, so that if you log into the HCM Dashboard, you can view aggregated customer data in a single window. HCM Dashboard comprises a set of Administration and Dashboard portlets and a Diagnostics portlet.
The Administration portlets enable you to cross-launch to the web pages of the individual instances of CUOM, vCenter, FMS, and UCSM for customer-centric views.
The Dashboard portlets enable you to aggregate data from each virtualized instance of CUOM, vCenter, FMS, and UCSM.
HCM Mediation Component
HCM Mediation uses the TM Forum Shared Information/Data Model (SID) as the foundation data model. HCM Mediation implements the SID as its common model to create and maintain the data interoperability layer in HCS. It provides SID-based normalized API to the underlying domain managers. It also interfaces with CUPM and supports the CUPM connector.
Installing HCM Dashboard
This section explains how to install HCM Dashboard. The installation process takes approximately 15 minutes. HCM Dashboard can be installed in a cluster or a non-cluster setup. This section includes:

Note
•
•
•
•
•
•
•
Server Requirements for HCM Dashboard
Table 2 lists the server requirements for HCM Dashboard.
Prerequisites for HCM Dashboard
Before installing HCM Dashboard:
•
•
•
•
•
•
If you do not configure DNS, there will be an impact on the performance. This is because if HCM is located in the management zone, it does not have DNS access to the domain managers in the customer zone. In such cases, edit the etc\hosts on the HCM server, manually.
•
HCM supports both HTTP and HTTPS. We recommend that you enable HTTPS in CUOM because all the CUOM northbound interface (NBI) requests are over HTTPS.
Table 3 lists the applications and the corresponding port numbers that you must configure in HCM
Table 3 Port Numbers
CUOM NBI
44442
Client to server HTTP communication and listening CUOM notifications
8080
Client to server HTTPS communication
8443
Configuring a New Client and New User in ACS 5.1
This section explains how to add a new client and the procedure to add a new user. It includes:
Adding a New Client
To add a new client in ACS 5.1
Step 1
Step 2
The Network Devices page appears.
Step 3
The Create page appears.
Step 4
a.
For example, sol-tm-portal1.
b.
Do not select the Location details or the Device type in the Network Device Groups pane,
Step 5
a.
b.
Step 6
a.
•
•
b.
c.
You can enter any key value. This key is mapped in Step 10 of the Installing and Starting HCM Dashboard in a Non-Cluster Setup procedure.
Do not select any of the following radio buttons under the Single Connect Device check box:
•
•
Do not select the RADIUS check box.
For more information, see the Network Devices and AAA Clients section of the User Guide for the Cisco Secure Access Control System 5.1.
Adding a New User
To add a new user in Cisco ACS 5.1:
Step 1
Step 2
The Internal Users page appears.
Step 3
The Create page appears.
Step 4
a.
For example, admin001.
b.
For example, HCM Admin User.
c.
d.
Step 5
a.
For example, admin123.
b.
c.
d.
Step 6
To create multiple users, go to Step 3 and repeat the subsequent steps.
For more information, see the Managing Internal Identity Stores section of the User Guide for the Cisco Secure Access Control System 5.1.
Recommended Installation Options for MySQL Database Server 5.1
This section describes the recommended installation options for MySQL Database Server 5.1. The overall installation process takes approximately ten minutes. MySQL Database Server can be installed on the same server on which HCM is installed or it can be installed on a different server.
If there are more than 60 customers, we recommend that you install MySQL Database Server on a separate server.
You can download the MySQL Database Server 5.1 Windows Installer (mysql-5.1.50-win32.msi) from http://downloads.mysql.com/archives.php?p=mysql-5.1
The following are the recommended MySQL Database Server installation options:
•
•
a.
b.
c.
d.
Installing and Starting HCM Dashboard in a Non-Cluster Setup
To install HCM Dashboard in a non-cluster setup:
Step 1
Step 2
Step 3
The Hosted Collaboration Mediation InstallShield Wizard appears.
Step 4
Step 5
•
Or
•
Step 6
Figure 1 Database Server Details
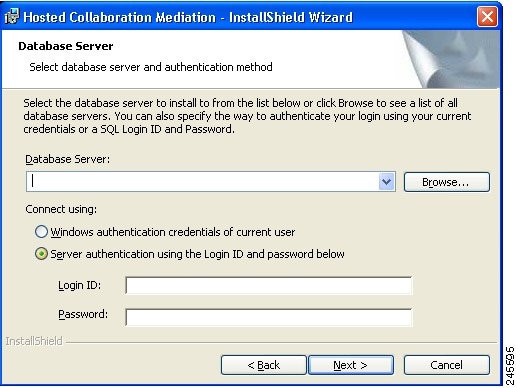
a.
b.
c.
d.
Step 7
Step 8
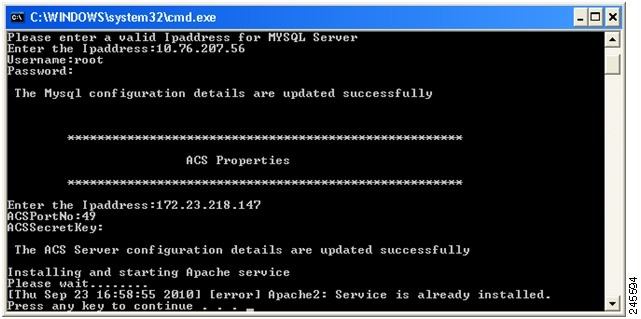
The MySQL Configuration command line window appears after a few minutes (See Figure 2).
Step 9
a.
b.
c.
Step 10
a.
b.
c.
Figure 2 Command Line Window
Step 11
The JBoss Server starts as a service after you update the MySQL and ACS details.
Step 12
Step 13
Portal_Server is the IP address or the machine name of the server on which HCM is installed and Port_Number is the port number used.
The HCM Login page appears.
Step 14
The default admin username is portaladmin and the default password is admin, but you can change it.
Step 15
Configuring wrapper.log File Size
You can configure the wrapper.log file size. You must configure the file size in the wrapper.conf file in the HCM Dashboard server.
To configure the file size:
Step 1
Step 2
Step 3
This ensures that the log file size does not exceed 2 MB.
Step 4
This ensures that only five of the latest log files are stored.
Installing HCM Dashboard in a Cluster Setup
To install the HCM Dashboard in a cluster setup:
Step 1
Step 2
Do not enter any details in the Database Server InstallShield Wizard.
Step 3
a.
b.
c.
# Define Node2
# modify the host as your host IP or DNS name.
worker.node2.port=8009
worker.node2.host=<secondary server ip>
worker.node2.type=ajp13
worker.node2.lbfactor=1
Add node2 for the secondary server in the cluster and node3 for the third server.
d.
worker.loadbalancer.balance_workers=node1,node2e.
f.
Step 4
a.
b.
c.
d.
e.
f.
<Engine name="jboss.web" defaultHost="localhost"jvmRoute="node2">g.
h.
i.
j.
Complete Step 1 to Step 4 to add more nodes.
Uninstalling HCM Dashboard
To uninstall HCM Dashboard:
Step 1
Step 2
Step 3
Step 4
The command line window closes after the JBoss server stops.
Step 5
Step 6
The command line window closes after the JBoss server is removed.
Step 7
Step 8
The following message appears in the dialog box:
Are you sure you want to uninstall this product?Step 9
Step 10
Step 11
The following path is a sample install directory path:
C:\Program Files (x86)\Hosted Collaboration Mediation.
Installing the HCM Mediation Component
This section explains how to install the HCM Mediation component. This section includes:
•
•
•
•
Server Requirements for HCM Mediation Component
Table 4 lists the server requirements for HCM Mediation component.
Prerequisites for HCM Mediation Component
Before installing HCM Mediation component:
•
The zip file is available in the HCM Product DVD.
•
•
•
–
–
To identify the Oracle listener host and the port number, enter this command at the command prompt:
>tnsping xe
The following is a sample response for this command:
Attempting to contact (DESCRIPTION = (ADDRESS = (PROTOCOL = TCP)(HOST=localhost)(PORT = 1521)) (CONNECT_DATA = (SERV
ER = DEDICATED) (SID = XE)))If the Oracle listener host or port number is not localhost or 1521, change the:
–
–
For more information, see Changing the Oracle Listener Host and Port Number
Installing and Configuring JDK
You must install the Java Development Kit (JDK) version 1.5.0_16. By default, the JDK is installed in the C:\Program Files\Java\jdk1.5.0_16 directory.
To add the Java environment variable:
Step 1
The System page appears displaying the basic information about your computer.
Step 2
The System Properties window appears.
Step 3
Step 4
The Environment Variables window appears.
Step 5
The New User Variable window appears.
Step 6
a.
b.
c.
The new environment variable appears in the User Variables for Administrator pane in the Environment Variables window.
Changing the Oracle Listener Host and Port Number
To change the Oracle listener host and port number:
Step 1
Step 2
•
•
Step 3
a.
b.
For details on how the data in these files should appear after installation, see How should the data in the tnsnames.ora and listener.ora files appear after installation?
Step 4
>stopdb
>lsnrctl stop
>lsnrctl start
>startdb
The listener host changes to localhost and the port number changes to 1521.
Step 5
>tnsping xe
Installing and Configuring HCM Mediation Component
To install the HCM Mediation component:
Step 1
Step 2
After you unzip the file, a new folder (HCM) appears in the C:\Install directory. The root directory is where the Mediation component is installed. For example, C:\HCM.
Step 3
To view the properties that you can modify in the build.properties file, see Which properties can be modified in the build.properties file?
Step 4
Step 5
The log is stored in the install.log file in the HCM Install_Directory.
Step 6
a.
b.
Uninstalling HCM Mediation Component
To uninstall the HCM Mediation component:
Step 1
Step 2
Step 3
Step 4
Step 5
The log is stored in the uninstall.log file in the HCM Install_Directory.
FAQs
This section lists the frequently asked questions for the HCM Mediation component.
Q.
A.
# location where you want to install HCM (For example,C:\Install\HCM)
root.dir=C:\Install_Directory
# http port
http.port= 8090
# https port
https.port = 8443
#
# DB Server information
#
# database system user
db.system.user=system
# database system user password
db.system.user.password=passwordQ.
A.
XE =
(DESCRIPTION =
(ADDRESS = (PROTOCOL = TCP)(HOST = localhost)(PORT = 1521))
(CONNECT_DATA =
(SERVER = DEDICATED)
(SERVICE_NAME = XE)
)
)
EXTPROC_CONNECTION_DATA =
(DESCRIPTION =
(ADDRESS_LIST =
(ADDRESS = (PROTOCOL = IPC)(KEY = EXTPROC_FOR_XE))
)
(CONNECT_DATA =
(SID = PLSExtProc)
(PRESENTATION = RO)
)
)
ORACLR_CONNECTION_DATA =
(DESCRIPTION =
(ADDRESS_LIST =
(ADDRESS = (PROTOCOL = IPC)(KEY = EXTPROC_FOR_XE))
)
(CONNECT_DATA =
(SID = CLRExtProc)
(PRESENTATION = RO)
)
)After installation, the data in the listener.ora file should look like:
SID_LIST_LISTENER =
(SID_LIST =
(SID_DESC =
(SID_NAME = PLSExtProc)
(ORACLE_HOME = C:\software\oraclexe\app\oracle\product\10.2.0\server)
(PROGRAM = extproc)
)
(SID_DESC =
(SID_NAME = CLRExtProc)
(ORACLE_HOME = C:\software\oraclexe\app\oracle\product\10.2.0\server)
(PROGRAM = extproc)
)
)
LISTENER =
(DESCRIPTION_LIST =
(DESCRIPTION =
(ADDRESS = (PROTOCOL = IPC)(KEY = EXTPROC_FOR_XE))
(ADDRESS = (PROTOCOL = TCP)(HOST = localhost)(PORT = 1521))
)
)
DEFAULT_SERVICE_LISTENER = (XE)Known Problems
This section describes the known problems that exist in the HCM 1.0 software.
Table 5 describes the known problems that exist in the HCM Dashboard.
Cisco and the Cisco Logo are trademarks of Cisco Systems, Inc. and/or its affiliates in the U.S. and other countries. A listing of Cisco's trademarks can be found at www.cisco.com/go/trademarks. Third party trademarks mentioned are the property of their respective owners. The use of the word partner does not imply a partnership relationship between Cisco and any other company. (1005R)
 Feedback