Installation Guide for Cisco Evolved Programmable Network Manager 2.1 and Maintenance Packs (2.1.x)
Bias-Free Language
The documentation set for this product strives to use bias-free language. For the purposes of this documentation set, bias-free is defined as language that does not imply discrimination based on age, disability, gender, racial identity, ethnic identity, sexual orientation, socioeconomic status, and intersectionality. Exceptions may be present in the documentation due to language that is hardcoded in the user interfaces of the product software, language used based on RFP documentation, or language that is used by a referenced third-party product. Learn more about how Cisco is using Inclusive Language.
- Updated:
- August 17, 2017
Chapter: Cisco EPN Manager 2.1 Installation
Cisco EPN Manager 2.1 Installation
This chapter provides the information required for planning your installation of Cisco EPN Manager 2.1 and ensuring that you meet all the prerequisites required for the installation. It also provides procedures for installing Cisco EPN Manager 2.1 in a standard environment. For high availability, see Cisco EPN Manager 2.1 High Availability Installation.
- Installation Overview for Cisco EPN Manager 2.1
- System Requirements
- Installation Prerequisites
- Install Cisco EPN Manager 2.1 (No HA)
- Uninstall Cisco EPN Manager

Note Before starting the installation procedure, please review the release notes for important information or issues relating to the installation.
Installation Overview for Cisco EPN Manager 2.1
Cisco EPN Manager 2.1 can be installed as a fresh installation either on a virtual machine or a bare metal server. If you are already using a previous version of Cisco EPN Manager, you can upgrade to Cisco EPN Manager 2.1 and thereby retain your data. See Upgrade to Cisco EPN Manager 2.1.
The following topics provide an overview of the Cisco EPN Manager 2.1 installation and upgrade options and provide additional useful installation-related information.
Note After installing any release or maintenance pack, it is recommended to check the Software Download site on Cisco.com for point patches and to install the latest available point patch for that release or maintenance pack. Information about the point patch and installation instructions can be found in the readme file supplied with the patch file on the Software Download site on Cisco.com.
Installation Options
You can install Cisco EPN Manager 2.1 either on a virtual machine (VM) or a bare metal server:
- OVA/VM installation—For a VM installation, install the provided Open Virtual Appliance (OVA) file on a dedicated server that complies with the requirements listed in OVA/VM Requirements. We recommend that you run only one Cisco EPN Manager VM instance per server hardware.
- ISO/bare metal installation—For a bare metal server installation, install the provided ISO image, which acts as a virtual boot that supports the Cisco Unified Computing System (UCS) server installation. The requirements are listed in Bare Metal Requirements. You can also use the ISO image to install Cisco EPN Manager on a VM. A built-in terminal or console server application called Cisco Integrated Management Controller (Cisco IMC) is used to install Cisco EPN Manager on the bare metal Cisco UCS server hardware.
Note Both OVA and ISO installations include the following:
- RHEL 6.7 operating system
- Oracle Database 12c Enterprise Edition Release 12.1.0.2 (64-bit production)
For information on the advantages and disadvantages of each of these installation types, contact your Cisco representative.
Note Cisco EPN Manager does not support independent user-installed Linux/Oracle patches. Any necessary patches are included in Cisco EPN Manager releases or point patches.
Upgrade Options
Cisco EPN Manager 2.0.4 or Cisco EPN Manager 2.0.4.2 (point patch 2) must be installed before you can upgrade to Cisco EPN Manager 2.1. For information on how to install Cisco EPN Manager 2.0.4, see the Cisco EPN Manager 2.0.4 Installation Guide . For information on how to install Cisco EPN Manager 2.0.4.2, see the readme file supplied with the patch file on the Software Download site on Cisco.com .
The following table lists the installation/upgrade paths for Cisco EPN Manager 2.1.
1. Install Cisco EPN Manager 2.0.4—See Cisco EPN Manager 2.0.4 Installation Guide |
|
1. Install Cisco EPN Manager 2.0.4 PP2 (2.0.4.2)—See the readme file provided with the software on the Software Download site on Cisco.com . |
|
There are two available upgrade options:
- In-Place Upgrade—This option is usually chosen when you are not using new hardware; in other words, you are performing the upgrade on the machine that is running the earlier version of Cisco EPN Manager. There is some downtime with this type of upgrade but after the upgrade, you do not have to restore your data from a backup. For more information, see In-Place Upgrade.
- Backup-Restore Upgrade—This upgrade option generally requires new hardware (although it is possible to use existing hardware). There is less downtime when performing this type of upgrade as the current version of Cisco EPN Manager remains operational while you install the new version on the new hardware. However, after the installation, you must restore your data from a backup. After starting the restore process, there will be a period during which some data will not be available on the new server until all the data has been copied over. For more information, see Backup-Restore Upgrade.
Note Cisco EPN Manager does not support automatic rollback to the previous version after an upgrade but you can manually revert to the previous version. See Revert to the Previous Version of Cisco EPN Manager for more information.
High Availability Overview
The Cisco EPN Manager high availability (HA) system ensures continued system operation in case of failure. HA uses a pair of linked, synchronized Cisco EPN Manager servers to minimize or eliminate the impact of application or hardware failures that may take place on either server.
The following figure shows the main components and process flows for a high availability deployment.
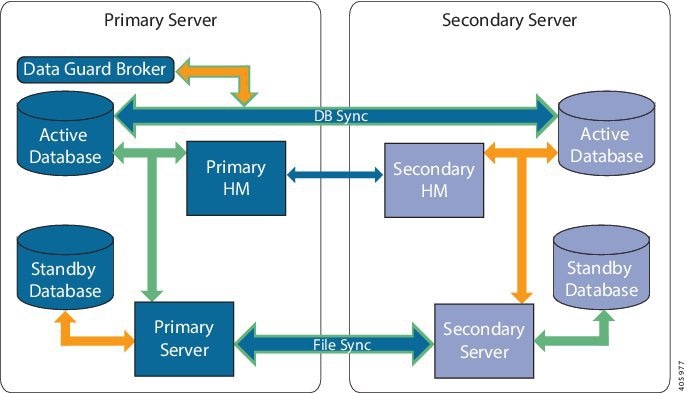
A high availability deployment consists of a primary and a secondary server with Health Monitor (HM) instances (running as application processes) on both servers. When the primary server fails (either automatically or because it is manually stopped), the secondary server takes over and manages the network while you restore access to the primary server. If the deployment is configured for automatic failover, the secondary server takes over the active role within two to three minutes after the failover.
When issues on the primary server are resolved and the server is in a running state, it remains in standby mode and begins syncing its data with the active secondary server. When a failback is triggered, the primary server again takes over the active role. This role switching between the primary and secondary servers happens within two to three minutes.
For more information about HA, see Cisco EPN Manager 2.1 High Availability Installation in this guide and see the High Availability sections in the Cisco Evolved Programmable Network Manager User and Administrator Guide .
Users Created During Installation
The following types of users are created during the installation process:
- Cisco EPN Manager CLI admin user—Used for advanced administrative operations such as stopping and restarting the application and creating remote backup repositories. Provides access to the CEPNM Admin CLI, a Cisco proprietary shell which provides secure and restricted access to the system (as compared with the Linux shell).
The password for the CLI admin user is user-defined during installation but can be changed at a later stage by entering the following command:
- Linux CLI admin user—Used for Linux-level administration purposes. Provides access to the Linux CLI, a Linux shell which provides all Linux commands. The Linux shell should only be used by Cisco technical support representatives. Regular system administrators should not use the Linux shell. The Linux shell can only be reached through the Cisco EPN Manager admin shell and CLI. The Linux CLI admin user can get Linux root-level privileges, primarily for debugging product-related operational issues.
- Cisco EPN Manager web GUI root user—Required for first-time login to the web GUI, and for creating other user accounts.
- ftp-user—Used for internal operations like image distribution to device or other operations that access external servers using FTP. The password is randomly generated and is changed periodically. Users with Admin privileges can change the ftp user password but this user-defined password will expire after a few months. Use this command to change the ftp user password:
- scpuser—Used for internal operations like image distribution to device or other operations that access external servers using SCP. The password is randomly generated and is changed periodically.
- prime—The system-generated account under which all the application processes run. No changes can be made.
- oracle—The system-generated account used by the Oracle process. No changes can be made.
Note The first four user accounts are associated with actual network users. Cisco EPN Manager uses the scpuser, prime, and oracle user accounts to perform internal operations and they cannot be changed in any way.
For more information about user types and managing users, see the Cisco Evolved Programmable Network Manager User and Administrator Guide.
System Requirements
The following sections list the requirements that must be met before installing Cisco EPN Manager 2.1:
- Hardware and Software Requirements
- Web Client Requirements
- Scale Requirements (Professional)
- Ports Used by Cisco EPN Manager
OVA/VM Requirements
The following table summarizes the OVA/VM system requirements for the Standard and Professional system size options. It is not recommended to use the Express and Express Plus system size options.
Note Due to the increase in services that are supported by Cisco EPN Manager, we recommend that you use the Professional system size option.
VMware ESXi version1 |
|||
Bare Metal Requirements
For bare metal installations, Cisco EPN Manager can only be installed on the Cisco UCS server (Gen 2) as a rack-mounted server with the requirements listed in the following sections.
Note As opposed to OVA/VM installations, bare metal installations will use the full server resources.
Bare Metal Requirements for Standard Deployments (No High Availability)
These are the minimum requirements for a standard deployment (no high availability).
Bare Metal Requirements for Remote High Availability Deployments
These requirements are for a remote high availability deployment. A remote deployment is one in which both servers are located on different subnets connected by a WAN. This is typical for deployments when the servers are geographically dispersed. For more information on high availability deployments, see Cisco EPN Manager 2.1 High Availability Installation.
Web Client Requirements
Cisco EPN Manager users access the product using a web browser client. The following lists the client and browser requirements.
- Hardware—Mac or Windows laptop or desktop compatible with one of the tested and supported browsers listed below.
- Browsers:
– Google Chrome versions 44 to 55
– Mozilla Firefox versions 39 to 51
– Microsoft Internet Explorer (IE) 11.0
Note Internet Explorer users have reported slower performance compared to other browsers, meaning that some GUI pages take longer to load in IE.
Scale Requirements (Professional)
The following table summarizes the maximum level of support for a professional system size deployment in both OVA/VM and ISO/bare metal installations.
These scale numbers are for a Cisco EPN Manager Professional deployment that uses the default system settings. The numbers represent an example combination of different devices for each device type. Keep in mind that scale considerations depend on a number of factors including interface count, polling frequency, and so on.
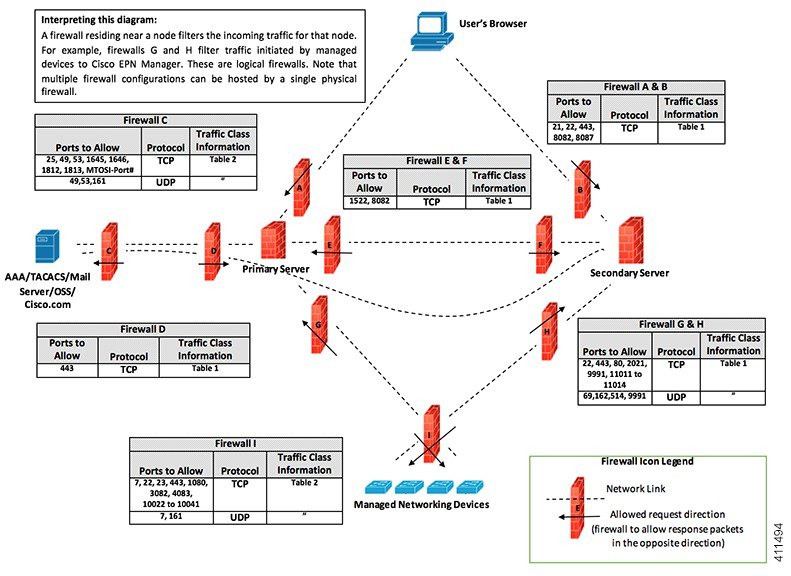
Ports Used by Cisco EPN Manager
Note The installation process uses the server's eth0 and eth1 Ethernet ports. If you use a different port, the system might not work properly.
The following table lists the ports that Cisco EPN Manager uses to listen for connection requests from devices. For security hardening, this table also specifies whether it is safe to disable the port without any adverse effects to the product.
As a general policy, any ports that are not needed and are not secure should be disabled. You need to first know which ports are enabled, and then decide which of these ports can be safely disabled without disrupting the normal functioning of Cisco EPN Manager. You can do this by listing the ports that are open and comparing it with a list of ports that are safe to disable. The built-in firewall in Cisco EPN Manager does not expose some of the listening ports. To view a list of the ports used in your deployment, log in as a Cisco EPN Manager CLI admin user and run the show security-status command. To view a list of all open listening ports, including those that are blocked by the built-in firewall, log in as the Linux CLI admin user and run the netstat -aln command.
In addition to the built-in firewall, you can also deploy additional network firewalls to block other unused ports and their traffic.
The following table lists the destination ports on external devices that may be protected by a firewall. These ports are used by Cisco EPN Manager to connect to network devices. You must open the required ports to allow Cisco EPN Manager to connect to these devices.
Upload or download images and perform configuration backup-restore for Cisco NCS 2000 devices using HTTPS. |
||
Communicate between primary and secondary HA servers (allows Oracle JDBC traffic for Oracle database synchronization between primary and secondary servers). |
||
Communicate with Cisco Optical Networking System (ONS) and Cisco NCS 2000 series devices using Socket Secure (SOCKS) protocol. |
||
Communicate with Cisco ONS and Cisco NCS 2000 devices using TL1 protocol. |
||
Communicate with Cisco ONS and Cisco NCS 2000 series devices using TL1 protocol. |
||
Communicate between primary and secondary HA servers to monitor each other's health using HTTPS. |
||
Passive FTP file transfers (for example, device configurations and report retrievals). |
||
Listen at NBI client connected to the Cisco EPN Manager server (after this port is configured by NBI client system, a registration notification message containing the port number is sent to Cisco EPN Manager server); refer to the Cisco Evolved Programmable Network Manager MTOSI API Guide for OSS Integration for more information. |
The following figure illustrates the ports information listed in the previous tables. Use this illustration to decide on the appropriate firewall configuration (allowing correct incoming traffic) for your network infrastructure. To identify the class of traffic, refer to the Usage column in Table 1 . We recommend that you disable the ports that are used by services that are not supported in Cisco EPN Manager.
Installation Prerequisites
- Licensing
- Prerequisites for OVA/VM Installations
- Prerequisites for ISO/Bare Metal Installations
- Verify the ISO Image or OVA Package
Licensing
Cisco EPN Manager includes a 90-day trial license that is automatically activated for first-time installations. To use the application beyond the trial period, you must obtain and install the necessary Cisco EPN Manager licenses for both production and non-production environments, as follows:
- Base license (required)
- Standby license (optional)—Obtain this license if you will have a high availability deployment with two Cisco EPN Manager servers configured in a redundancy configuration.
- NBI license (optional)—Obtain this license if you will be using MTOSI or REST northbound interface features
- Right-to-Manage licenses for the types and corresponding numbers of devices to be managed by Cisco EPN Manager
For a non-production environment (e.g., lab validation or development environment), please obtain and install a Cisco EPN Manager lab license for each Cisco EPN Manager lab installation. The lab license covers all Cisco EPN Manager options, including redundancy (HA), and unlimited right-to-manage scope.
Do not make copies of licenses.
To purchase Cisco EPN Manager licenses, please contact your local sales representative. For an Cisco EPN Manager purchasing guide, please see the Cisco EPN Manager Licensing and Ordering Guide .
For more information on the types of licenses available for Cisco EPN Manager, see the information on viewing and managing licenses in the Cisco Evolved Programmable Network Manager User and Administrator Guide .
Prerequisites for OVA/VM Installations
Before installing Cisco EPN Manager on a virtual machine, ensure that:
- Your deployment meets the general hardware and software requirements listed in System Requirements, and specifically in OVA/VM Requirements.
- VMware ESX/ESXi is installed and configured on the machine you plan to use as the Cisco EPN Manager server. See the VMware documentation for information on setting up and configuring a VMware host.
- The installed VMware ESX/ESXi host is reachable.
- The VMware vSphere client is installed on a Windows host (or laptop). See the VMware documentation for information on how to install the VMware vSphere client. After the virtual host is available on the network, you can browse to its IP address to display a web-based interface from which you can install the VMware vSphere client. The VMware vSphere client is Windows-based, so you must download and install the client using a Windows PC.
- The Cisco EPN Manager OVA is saved to the same machine where your VMware vSphere client is installed.
- The downloaded OVA package has been verified as described in Verify the ISO Image or OVA Package.
Prerequisites for ISO/Bare Metal Installations
Before installing Cisco EPN Manager using an ISO image, ensure that:
- Your deployment meets the general hardware and software requirements listed in System Requirements, and specifically in Bare Metal Requirements.
- The following software is installed:
– Java with JRE Version 1.6.0.14 or higher
– Flash Driver v9.0.246 or higher
- The downloaded ISO image has been verified as described in Verify the ISO Image or OVA Package.
Verify the ISO Image or OVA Package
Before installing Cisco EPN Manager, you need to verify the ISO image or OVA package. You do not need to verify the individual UBF files that are bundled inside the ISO image or OVA package.
Step 1 If you do not have openssl installed, download and install it (see http://www.openssl.org ).
Step 2 Download the following files from the Software Download site on Cisco.com , and place them in a temporary directory.
(The same certificate file (*.pem) is used to validate OVA and ISO files.)
Step 3 Move the ISO or OVA files, the certificate file, and the signature file to an alternate RHEL machine with openssl capability using a transfer method such as scp.
Step 4 Run the following command:
- cert-file is the certificate file (*.pem)
- sig-file is the signature file (*signature)
- product-file is the file to be verified
Step 5 If the result is Verified OK :
- For an OVA package, proceed to Step 6.
- For an ISO file, go to Install Cisco EPN Manager 2.1 (No HA).
Step 6 (OVA packages only) Verify the publisher and certificate chain using the VMware vSphere client.
a. Verify that Cisco Systems is the publisher:
– In the VMware vSphere client, choose F ile > Deploy OVF Template .
– Browse to the OVA installation file (*.ova) and select it, then click Next .
– Check whether the Publisher field in the OVF Template Details window displays Cisco Systems, Inc with a green check mark next to it. Do not proceed if the Publisher field displays No certificate present . This indicates that the image is not signed or the file is not from Cisco Systems or the file has been tampered with. Contact your Cisco representative.
Note Do not validate the image using the information in the Vendor field. This field does not authenticate Cisco Systems as the publisher.
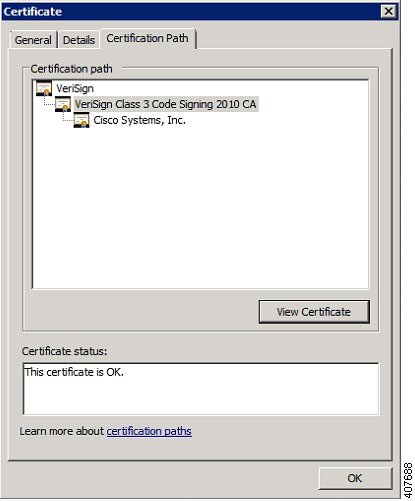
b. Check the certificate chain:
– In the OVF Template Details window, click the Cisco Systems, Inc. hyperlink in the Publisher field.
– In the Certificate window, click the Certification Path tab.
– In the Certification Path tab (which lists the certificate chain), ensure that the Certification Path area displays Cisco Systems, Inc. and the Certificate Status displays This certificate is OK , as shown in the following figure.
Install Cisco EPN Manager 2.1 (No HA)
Overview of the OVA/VM Installation Process
1. Make sure your deployment meets the requirements in System Requirements.
2. Make sure your deployment meets the prerequisites in Prerequisites for OVA/VM Installations. This includes verifying the OVA package.
3. Deploy the OVA from the VMware vSphere Client.
Deploy the OVA from the VMware vSphere Client
Step 1 Launch the VMware vSphere client.
Step 2 Choose File > Deploy OVF Template .
Step 3 In the Deploy OVF Template window, click Browse .
Step 4 Navigate to the OVA file, select it, then click Next .
Step 5 Accept the End User License Agreement, and in the OVF Template Details window, verify the OVA file details including the product name, version, and size, then click Accept .
Step 6 In the Name and Location window:
a. Specify a name and location for the template that you are deploying. The name must be unique within the inventory folder, and can contain up to 80 characters.
b. Select the configuration type as Standard or Professional based on your network size (see System Requirements).
Step 7 Select the cluster or host on which to install the OVA, then click Next .
Step 8 Select the destination storage for the OVA to be deployed, then click Next .
Step 9 Select the disk format as Thick Provision Lazy Zeroed or Thick Provision Eager Zeroed , then click Next .
Step 10 Select the network mapping based on the configured IP address, then click Next .
Step 11 In the Ready to Complete window:
b. (Optional) If you want the virtual machine to automatically start after the OVA deployment has finished, check the Power on after deployment check box.
This process might take a few minutes to complete. Check the progress bar in the Deploying Virtual Application window to monitor the task status. When the deployment task has successfully completed, a confirmation window appears.
Step 12 Click Close . The virtual appliance that you deployed is listed under the host, in the left pane of the VMware vSphere client.
Proceed to Install Cisco EPN Manager on the Server.
Install Cisco EPN Manager on the Server
Step 1 If you did not specify that the virtual appliance should automatically start after deployment (in the previous procedure), manually start the VM. In the VMware vSphere client, right-click the deployed virtual appliance, then choose Power > Power On .
Step 2 Click the Console tab, and at the localhost login prompt, enter setup .
Step 3 Enter the following parameters as you are prompted for them:
IP address of the primary DNS server. The console will prompt you to add a secondary nameserver. Enter: |
|
IP address of the secondary DNS server you want to use if the primary server cannot be reached. |
|
IP address or host name of the primary Network Time Protocol server you want to use (the default is time.nist.gov ). The console will prompt you to add a secondary NTP server. Enter: |
|
IP address of the secondary NTP server you want to use if the primary NTP server cannot be reached. |
|
The time zone you want to use. For a list of supported time zones, see the time zone reference in the Cisco Evolved Programmable Manager User and Administrator Guide . |
|
The clock time (based on the selected System Time Zone). The console will prompt you to change the system clock time. Enter: |
|
The name of the first administrative user ( admin by default). This is the Cisco EPN Manager CLI admin user that logs into the Cisco EPN Manager server using SSH. |
|
The password for the first administrative user. The password must be at least 8 characters long, and contain at least one number and one upper-case letter. |
When you have entered the necessary values, the installer application tests the network configuration parameters you entered. If the tests are successful, it begins installing Cisco EPN Manager.
Step 4 When the application installation is complete, you will be prompted to choose whether you want the newly-installed server to act as a secondary server in an HA implementation.
- Enter yes if you are using HA and you want this server to be the secondary server. Do not continue with the next step; go to Install Cisco EPN Manager 2.1 in a High Availability Deployment.
- Enter no if:
– You are using HA but you want this server to be the primary server.
Step 5 Enter a password for the Cisco EPN Manager web GUI root user (you will have to enter it twice). You will use this password to log into the web GUI for the first time and create other user accounts. (This account should be disabled after you create a new user account with the same level of privileges.)
Step 6 Review your settings and:
Step 7 (ISO/Bare Metal deployments) When the installation is complete:
a. After the server reboots and you are presented with a login prompt, log in using the Cisco EPN Manager CLI admin username and password you configured.
b. Synchronize the hardware and NTP clocks as described in Synchronize the Hardware and NTP Clock.
Step 8 (OVA/VM deployments) When the installation is complete and the virtual machine has rebooted:
a. Log into the virtual machine using the Cisco EPN Manager CLI admin username and password you configured in Step 3.
b. Stop and restart the Cisco EPN Manager server using the following commands:
Proceed to Uninstall Cisco EPN Manager .
Overview of the ISO/Bare Metal Installation Process
1. Make sure your deployment meets the requirements in System Requirements.
2. Make sure your deployment meets the prerequisites in Prerequisites for ISO/Bare Metal Installations. This includes verifying the ISO/bare metal image.
3. Configure the Cisco IMC Server.
4. Configure the Bare Metal Cisco UCS Server.
5. Install Cisco EPN Manager from an ISO Image.
6. Uninstall Cisco EPN Manager.
Note The installation procedure provided in these sections is specific to the UCS server type and hardware requirements described in Bare Metal Requirements
Configure the Cisco IMC Server
Cisco Integrated Management Controller (Cisco IMC) is the server management application that you can use to remotely access, configure, administer, and monitor the Cisco EPN Manager server.
Step 1 To access the console, attach a keyboard and monitor to the USB ports on the rear panel of the appliance or by using a KVM cable and connector.
Step 2 Power on the Cisco UCS server.
Step 3 Press F8 to enter the Cisco IMC configuration utility. You will need to press the function keys (F8, F6 and F2) more than once until the system responds. If you do not press F8 quickly enough and enter the EFI shell, press Ctrl-Alt-Del to reboot the system and press F8 again.
Step 4 In the Cisco IMC Configuration Utility window, from the IPV4 (Basic) area, enter the following:
- DHCP Enabled—Select this option to enable DHCP for dynamic network settings. Before you enable DHCP, your DHCP server must be preconfigured with the range of MAC addresses for this server.
- Cisco IMC IP—Enter the IP address of Cisco IMC.
- Subnetmask—Enter the subnet mask to append to the Cisco IMC IP address. It must be in the same subnet as the host router.
- Gateway—Enter the IP address of the default gateway router.
Step 5 Press F5 to refresh the page and display the new settings.
Step 6 (Optional) In the VLAN (Advanced) area, configure VLAN settings.
Step 7 Enter the Cisco IMC password. If you leave the Username and Password fields blank, the system uses the following default login credentials:
Step 8 When a prompt is returned, press F10 to save the configuration.
Step 9 Update the following fields as specified:
Step 10 Press F1 to view the additional settings.
Step 11 In the Additional Settings window, update the following fields:
Step 12 Press F10 to save the settings.
Step 13 Open a browser and enter the following URL:
Where Cisco IMC_IP_address is the Cisco IMC IP address that you entered in Step 9.
Step 14 Log into the Cisco IMC using the credentials that you entered Step 7.
Proceed to Configure the Bare Metal Cisco UCS Server.
Configure the Bare Metal Cisco UCS Server
This procedure is specific to the Cisco 12G SAS Modular Raid Controller. For any other Raid controller please refer to the Cisco UCS Servers RAID Guide .
Step 1 From the left sidebar of the Cisco IMC web interface, click the Storage tab, and then click the Cisco 12G SAS Modular Raid Controller (SLOT-HBA) link.
Step 2 In the Cisco 12G SAS Modular Raid Controller (SLOT-HBA) pane, click the Controller Info tab.
Step 3 Under Physical Drive Info, make sure that boot drive is not set to true for any physical drives.
Step 4 In the Actions area, click Create Virtual Drive from the Unused Physical Drives link.
Step 5 In the Create Virtual Drive from Unused Physical Drives window, choose 10 from the RAID Level drop-down list.
Step 6 In the Create Drive Groups area, select the physical drives listed under the Physical Drives area, then add them to the Drive Groups.
Step 7 In the Virtual Drive Properties area, choose Write Back Good BBU from the Write Policy drop-down list.
Step 8 Complete the required fields, then click Create Virtual Drive .
Step 9 Click the Virtual Drive Info tab.
Step 10 Click Initialize . A popup window is displayed.
Step 12 Follow the steps below to enable Auto-Negotiation to speed up the installation:
a. From the left sidebar, click the Admin tab.
c. In the Network pane, click the Network Settings tab.
d. In the Port Properties area, check the Auto Negotiation check box.
Step 13 From the left sidebar, click the Admin tab.
Step 14 In the Utilities pane, click the Actions area, then click Reboot Cisco IMC .
Step 16 When prompted, press F2 to access the BIOS setup menu. The Aptio Setup Utility window appears, which provides the BIOS setup menu options.
Step 17 In the Aptio Setup Utility window, click the Boot Options tab.
Step 18 Enable UEFI Boot options , and then choose Bus PCI RAID Adapter for Boot Option #1.
Step 19 Press F10 to save and exit.
The system is now prepared to boot from RAID. (The first boot, however, must be done from a remote virtual CD/DVD which is mapped to the ISO image. That process is described in Install Cisco EPN Manager from an ISO Image.)
Proceed to Install Cisco EPN Manager from an ISO Image.
Install Cisco EPN Manager from an ISO Image
Step 1 Power up the Cisco UCS Server.
Step 2 Log into the Cisco IMC Server using the credentials you entered when configuring the IMC server. See Configure the Cisco IMC Server.
Step 3 Choose Server > Summary , then click Launch KVM Console to open the console (in a separate window).
Step 4 In the KVM Console window, choose Virtual Media > Activate Virtual Devices . A popup window is displayed.
Step 5 Click the Accept this Session radio button, then click Apply .
Step 6 In the KVM Console window, choose Virtual Media > Map CD/DVD .
Step 7 In the Virtual Media - Map CD/DVD window, select the ISO file, then click Map Device .
Step 8 In the KVM Console window, choose Virtual Media and verify that the ISO filename .iso Mapped to CD/DVD option is displayed.
Step 9 Reboot the server by choosing Power > Reset System (warm boot).
Step 10 Enter the boot menu by pressing F6 .
Step 11 From the boot device selection window, select Cisco vKVM-Mapped vDVD1.22 , then press Enter .
Step 12 For the boot option, enter 1 for Keyboard/Monitor or 2 for Serial Console, then press Enter . The Cisco EPN Manager installer extracts the content.
Step 13 After the extraction is complete, at the localhost login prompt, enter setup .
Step 14 Go to Step 3 in Install Cisco EPN Manager on the Server to complete the installation.
Uninstall Cisco EPN Manager
Uninstall Cisco EPN Manager (OVA/VM)
Perform a backup. Uninstalling Cisco EPN Manager using the following method will permanently delete all your data on the server, including server settings and local backups. You cannot restore your data unless you have a remote backup. Refer to the backup topics in the Cisco Evolved Programmable Network Manager User and Administrator Guide .
Step 1 In the VMware vSphere client, right-click the Cisco EPN Manager virtual machine.
Step 2 Power off the virtual machine.
Step 3 Click Delete from Disk to remove the Cisco EPN Manager virtual appliance.
Uninstall Cisco EPN Manager (ISO/Bare Metal)
Make sure you have backed up your current data. See the backup and restore topics in the Cisco Evolved Programmable Network Manager User and Administrator Guide .
To ensure information security, Cisco recommends you use either of the following methods to remove Cisco EPN Manager from the Cisco UCS server:
 Feedback