- Preface
- Introducing Cisco Network Services Manager
- Understanding Network Services Manager Concepts
- Using the Network Services Manager Northbound API
- Working with Tenants and Network Containers Using the Northbound API
- Using the Network Services Manager UI
- Monitoring Network Status
- Troubleshooting
- Northbound API Parameters
- Glossary
- Index
Cisco Network Services Manager User Guide, 5.0
Bias-Free Language
The documentation set for this product strives to use bias-free language. For the purposes of this documentation set, bias-free is defined as language that does not imply discrimination based on age, disability, gender, racial identity, ethnic identity, sexual orientation, socioeconomic status, and intersectionality. Exceptions may be present in the documentation due to language that is hardcoded in the user interfaces of the product software, language used based on RFP documentation, or language that is used by a referenced third-party product. Learn more about how Cisco is using Inclusive Language.
- Updated:
- November 13, 2012
Chapter: Using the Network Services Manager UI
Using the Network Services Manager Administration UI
This chapter describes the Network Services Manager Administration UI and includes the following sections:
•![]() Getting Started with the Administration UI
Getting Started with the Administration UI
•![]() Verifying Device Configurations
Verifying Device Configurations
Getting Started with the Administration UI
To log into the Network Services Manager Administration UI:
Step 1 ![]() In your browser, enable popup windows for the Network Services Manager engine. If you do not enable popup windows, you cannot view confirmation dialog boxes or other messages that Network Services Manager displays.
In your browser, enable popup windows for the Network Services Manager engine. If you do not enable popup windows, you cannot view confirmation dialog boxes or other messages that Network Services Manager displays.
Step 2 ![]() Enter the following URL:
Enter the following URL:
https://hostname:8443/
where hostname is the name of the Network Services Manager engine.
Step 3 ![]() When prompted, accept the security certificate.
When prompted, accept the security certificate.
Step 4 ![]() In the login screen, enter the username and password. The default value is admin for both the username and password.
In the login screen, enter the username and password. The default value is admin for both the username and password.

Note ![]() For security purposes, we recommend that you change the password. To change the login password, see Changing User Passwords.
For security purposes, we recommend that you change the password. To change the login password, see Changing User Passwords.
The main Administration screen is displayed with the ROOT domain selected.
Administration UI Features
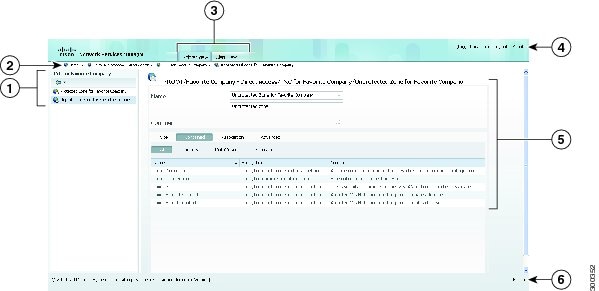
When you log into Network Services Manager, the Administration UI is displayed as shown in Figure 5-1. The UI includes the following components:
Figure 5-1 Administration UI
|
|
Domain Navigator |
|
Product information |
|
|
Breadcrumb trail |
|
Content pane |
|
|
Explorer View and Alert View tabs |
|
Status bar |
Explorer and Alert Views
The Administration UI includes the following views, each accessible via a tab at the top of the window:
•![]() Explorer View—The Explorer View enables you to view objects, their properties, and their running configurations.
Explorer View—The Explorer View enables you to view objects, their properties, and their running configurations.
•![]() Alert View—The Alert View (shown in Figure 5-2) displays a sortable list of system events, specific to the item selected in the Domain Navigator. You can resize the columns or hover your cursor over an entry in the table to see the complete text.
Alert View—The Alert View (shown in Figure 5-2) displays a sortable list of system events, specific to the item selected in the Domain Navigator. You can resize the columns or hover your cursor over an entry in the table to see the complete text.
Figure 5-2 Alert View

Domain Navigator
The Domain Navigator displays the domain hierarchy in a dynamic view that allows you to view tenants and the associated objects.
When you log into Network Services Manager, the ROOT domain is selected by default. As you navigate the hierarchy, the breadcrumb trail is updated with the path, and the content pane is updated with the properties of the currently selected item.
The return arrow button at the top of the Domain Navigator pane enables you to return to a higher level in the domain hierarchy.

Tip ![]() Use the drop-down list next to the return arrow to select the level you want to return to.
Use the drop-down list next to the return arrow to select the level you want to return to.
Breadcrumb Trail
The breadcrumb trail identifies your recent navigation path and enables you to easily return to previously viewed screens. It also provides the currently displayed item's path, relative to the ROOT domain. If you select a new item in the Domain Navigator, the breadcrumb trail reflects the new path from ROOT to the selected item.
Content Pane
The content pane contains detailed information about the selected object. The top portion contains:
•![]() The path from ROOT to the selected item.
The path from ROOT to the selected item.
•![]() Name and Comment fields.
Name and Comment fields.
The lower portion of the content pane contains tabs with object-specific properties. The tabs that are displayed depend on the selected object and can contain subordinate tabs. Table 5-1 describes the tabs available for common objects.
Status Bar
The status bar indicates whether Network Services Manager is loading information or ready for your next selection.
Product Information
Product information is available at the top right of the window and includes:
Verifying Device Configurations
After you add a tenant network container and network containers, you can verify that the configuration on a device matches the information you entered by using the Run Commands feature.
To verify the device configuration in Network Services Manager:
Step 1 ![]() Navigate to the required device by choosing ROOT > Contained > All.
Navigate to the required device by choosing ROOT > Contained > All.
Step 2 ![]() Click VMDC POD.
Click VMDC POD.
Step 3 ![]() Choose Contained > Network Elements.
Choose Contained > Network Elements.
Step 4 ![]() Click the required device in the list of network elements.
Click the required device in the list of network elements.
Step 5 ![]() In the properties screen, click Run Commands.
In the properties screen, click Run Commands.
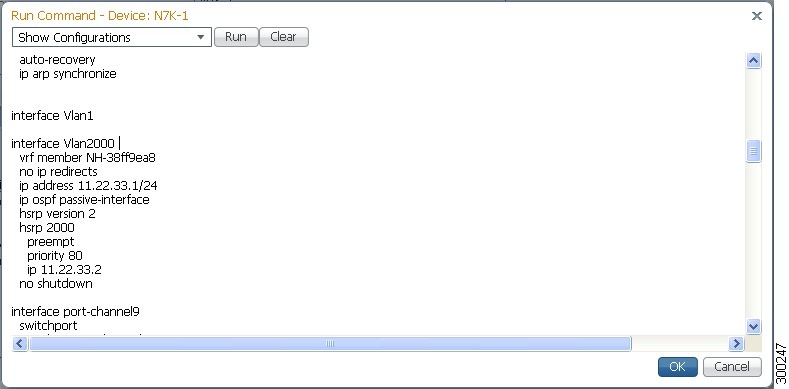
Step 6 ![]() In the Run Command dialog box, choose the required Show option from the drop-down list and click Run.
In the Run Command dialog box, choose the required Show option from the drop-down list and click Run.
The configuration is displayed in the dialog box (see Figure 5-3), allowing you to compare the information entered using Network Services Manager with the existing device configuration.
UI Example
Figure 5-3 shows an example device configuration in the Run Commands dialog box.
Figure 5-3 Device Configuration in Run Commands Dialog Box
Changing User Passwords
We recommend that you change user passwords for security purposes.
The following conventions apply when changing user passwords:
•![]() The password must contain at least eight characters.
The password must contain at least eight characters.
•![]() The password must contain characters from three of the following groups:
The password must contain characters from three of the following groups:
–![]() Lowercase letters
Lowercase letters
–![]() Uppercase letters
Uppercase letters
–![]() Numbers
Numbers
–![]() Special characters
Special characters
If your organization requires different password policy settings, review and edit the passwordpolicy.properties file on the engine in the following directory:
/usr/local/overdrive/engine/bin/UtilUpdateUserPassword
To change the password for the Network Services Manager Administration UI or apiclient account:
Step 1 ![]() Log into the Network Services Manager engine from the vSphere console window.
Log into the Network Services Manager engine from the vSphere console window.
Step 2 ![]() To enter the root shell, enter shell.
To enter the root shell, enter shell.
Step 3 ![]() Navigate to the correct directory by entering:
Navigate to the correct directory by entering:
cd /usr/local/overdrive/engine/bin/UtilUpdateUserPassword
Step 4 ![]() To change a password, do either or both of the following:
To change a password, do either or both of the following:
•![]() Administration UI password—Enter the following command:
Administration UI password—Enter the following command:
java -jar UtilUpdateUserPassword.jar old-password new-password
•![]() Apiclient account password—Enter the following command:
Apiclient account password—Enter the following command:
java -Dusername=apiclient -jar UtilUpdateUserPassword.jar old-password new-password
where:
–![]() old-password is the current apiclient account password.
old-password is the current apiclient account password.
–![]() new-password is the new apiclient account password.
new-password is the new apiclient account password.
Step 5 ![]() Leave the root shell by entering exit.
Leave the root shell by entering exit.
Step 6 ![]() To update affected clients, do one or both of the following:
To update affected clients, do one or both of the following:
•![]() Administration UI password—Close any browser windows that are logged into Network Services Manager using the old password, and log in again using the new password.
Administration UI password—Close any browser windows that are logged into Network Services Manager using the old password, and log in again using the new password.
•![]() Apliclient account password—Update any application using the apiclient account with the new password.
Apliclient account password—Update any application using the apiclient account with the new password.
 Feedback