Table Of Contents
Understanding Operations Manager Groups
Working with System-Defined Groups
Operations Manager System-Defined Groups
Common Services System-Defined Groups
Working with User-Defined Groups
Using Group Administration and Configuration
Creating an Access Port, Interface, or Trunk Port Group
Creating a Group—Using a Template
Editing an Access Port, Interface, or Trunk Port Group
Editing Group Properties—For a Group that Uses a Template
Managing Groups
These topics describe the concepts and processes involved in configuring groups:
•Understanding Operations Manager Groups
•Using Group Administration and Configuration
Understanding Operations Manager Groups
A group consists of Unified Communications s, where Unified Communications s refer to devices, applications, and groups. Each group has a set of properties (such as a name, description, permission, and so on), but what defines a group are its associated rules. Rules determine the membership of a group, which may change whenever the rule is evaluated.
Cisco Unified Operations Manager manages groups in a hierarchical fashion that supports subgrouping. Each child group is a subgroup of a parent group, and its group membership will be a subset of its immediate parent group. For an object to belong to a group, it must satisfy the immediate group rules and the parent group rules.
What you see in the Operations Manager group selector depends on the function you are using. Normally when you view the Operations Manager group selector, some groups are displayed under Operations Manager and other groups under Common Services, as shown in Figure 17-1.
•Common Services groups are created by Common Services when devices are added to the DCR. These are device groups. The group to which a device belongs is determined by Common Services group rules. Common Services groups include Unified Communications s such as routers, switches, and hubs. All Common Services groups are shared with Operations Manager—in other words, they are shown in the Operations Manager user interface. Groups are only shown when they have members.
•Operations Manager groups are created by Operations Manager. The group to which a device belongs is determined by Operations Manager group rules.
Figure 17-1 shows the object selector, with some groups under Common Services and others under Operations Manager.
Figure 17-1 Group Selector Showing Common Services and Operations Manager Groups
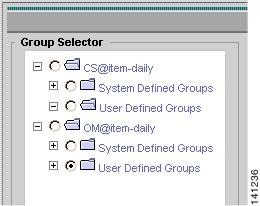
Group DescriptionCS@<server-name>
Groups that are controlled by Common Services.
OM@<server-name>
Groups that are controlled by Operations Manager.
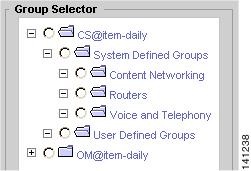
As shown in Figure 17-2, the following types of groups are supported in Operations Manager:
•System Defined groups—The default grouping of devices in CiscoWorks Common Services. System-defined groups cannot be deleted or edited. For a description of each system-defined group, see the "Working with System-Defined Groups" section.
•User Defined groups—Groups that you edit or create to reflect the way you manage the network. You can edit or create user-defined groups Operations Manager and determine whether they can be viewed by other users. User-defined groups include the following:
–Access Port Groups—Predefined groups that you can edit for your own purposes. For a detailed description, see Working with User-Defined Groups.
–Interface Groups—Predefined groups that you can edit for your own purposes. For a detailed description, see Working with User-Defined Groups.
–Trunk Port Groups—Predefined groups that you can edit for your own purposes. For a detailed description, see Working with User-Defined Groups.
–Groups you create (to use with views in the Monitoring Dashboard displays, or with notification groups in Notification Services). These are the only groups you can create. These appear in the Group Selector under User Defined Groups so you can view the group membership (device groups are created when the devices are added to the Operations Manager inventory).
Figure 17-2 Group Selector Showing Operations Manager Groups
Groups and ACS
The CiscoSecure Access Control Server (ACS) provides device-based filtering for many of the Operations Manager user interfaces that use Group Administration. For more information on ACS, see Device-Based Filtering, page 20-22.
Working with System-Defined Groups
The group selector displays some groups under Operations Manager and other groups under Common Services. The Common Services groups are created by Common Services and are visible when devices are added to the DCR. See Common Services System-Defined Groups for more information.
The Operations Manager groups are created by Operations Manager. These groups include Access Port Groups, Trunk Port Groups, and Interface Groups. See Table 17-1 for a list of the Operations Manager system-defined groups.
You can control the polling and thresholds settings for these groups using Administration > Polling and Thresholds. See Configuring Polling and Thresholds, page 19-1.
Operations Manager System-Defined Groups
The Operations Manager system-defined groups are visible to all users, and are the default groups that are administered by Operations Manager.
Table 17-1 describes the system-defined groups (device types) that come preconfigured in Operations Manager.
Common Services System-Defined Groups
The Common Services system-defined groups, as shown in Figure 17-3, are visible to all users, and are the default groups administered by Common Services. Not all system-defined groups are shown in Figure 17-3 because groups only appear in the group selector when they have device members (in other words, devices in the DCR that belong to that group).
Figure 17-3 Group Selector Showing Common Services System-Defined Groups
The following are the Common Services system-defined groups:
•Broadband Cable
•Content Networking
•DSL and LRE
•Interfaces and Modules
•Network Management
•Optical
•Routers
•Security and VPN
•Storage Networking
•Switches and Hubs
•Universal Gateways and Access Servers
•Unknown
•Voice and Telephony
•Wireless
For more information about Common Services system-defined groups, refer to the Common Services online help.
Working with User-Defined Groups
Because you cannot change the rules for system-defined groups, Operations Manager provides user-defined groups that can contain the devices, ports, or interfaces in which you are interested. Port and interface containment is only seen and used by Polling and Thresholds (see Configuring Polling and Thresholds, page 19-1), but device groups will contain members when devices are added to the Operations Manager inventory. Once you edit or create a group, you can determine whether other users can view the group.
User-defined groups are the basis for the views that appear in the Monitoring Dashboards (Service Level View, Alerts and Events, Phone Activities, and Service Quality Alerts). For every user-defined group you create, a corresponding view is automatically created. For creating user-defined groups, see Creating and Editing Groups.
By default, no devices belong to the predefined user-defined groups. To see membership details for the groups that are created in the Access Port, Interface, and Trunk port folders, you must go to the polling and thresholds pages. (See Configuring Polling and Thresholds, page 19-1.)
Table 17-2 describes the predefined user-defined groups.
Using Group Administration and Configuration
The Group Administration and Configuration page is where all group management activities take place. To open the Group Administration and Configuration page, select Devices > Device Groups.
These topics explain how to use the Group Administration and Configuration page:
Figure 17-4 shows an example of the Group Administration and Configuration page.
Figure 17-4 Group Administration and Configuration Page
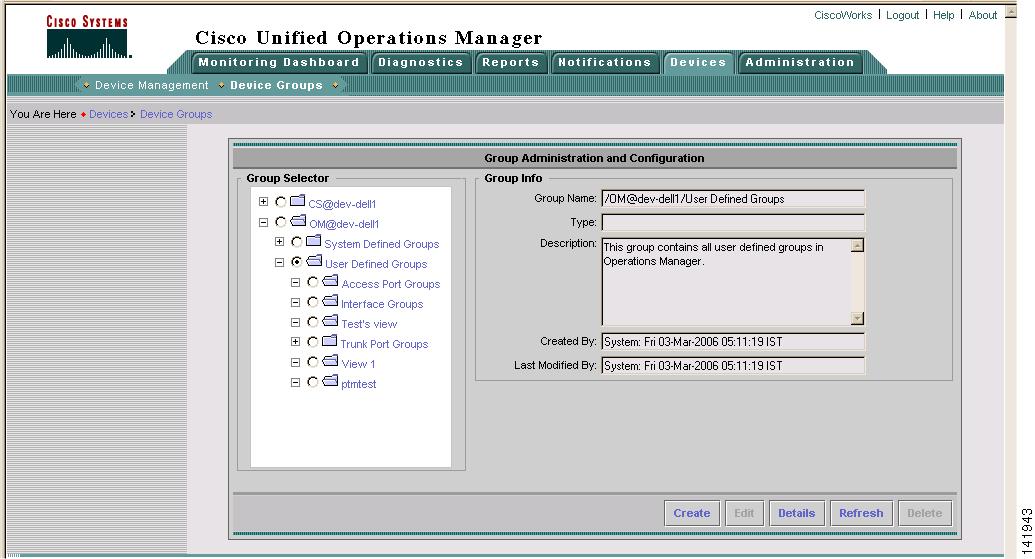
Table 17-3 describes the fields in the Group Administration and Configuration page.
Table 17-3 Fields on Group Administration and Configuration Page
GUI Element DescriptionGroup selector
A hierarchical display of all available groups.
Group Info pane
When you select an item from the Group Selector, the Group Info pane displays the following information:
•Group Name—The name of the group you selected.
•Type—The type of Unified Communications s in the selected group.
•Description—A text description of the group.
•Created By—The person who created the group.
•Last Modified By—The last person to edit the group settings.
Create button
Starts the Group Creation Wizard for creating a group, as described in the "Creating a Group" section.
Edit button
Starts the Group Edit Wizard for editing an existing group, as described in the "Editing Group Properties" section.
Details button
Opens the Properties: Details page, as described in the "Viewing Group Details" section.
Refresh button
Refreshes a group's membership, as described in the "Refreshing Membership" section.
Delete button
Deletes a group, as described in the "Deleting Groups" section.
Creating and Editing Groups
The processes for creating and editing groups are similar.
Keep these points in mind:
•You can only edit the predefined user-defined group folders (Access Port Groups, Interface Groups, and Trunk Port Groups), which means you cannot remove these folders from the device selector. Once you create a user-defined group under any of these folders, you can edit or delete the group you created. (See Creating an Access Port, Interface, or Trunk Port Group and Editing an Access Port, Interface, or Trunk Port Group.)
•You can create or edit all other user-defined groups (to use with, for example, views in the Monitoring Dashboard displays, or with notification groups in Notification Services). For example, you could create a group called test, which would appear directly under Operations Manager User Defined Groups in the Operations Manager group selector. (See Creating a Group and Editing Group Properties.)
Operations Manager uses the Group Creation Wizard to guide you through the steps required to create or edit a group. The wizards steps will vary depending on what you are creating. For example, the steps for creating a group using a template (see Creating a Group—Using a Template and Editing Group Properties—For a Group that Uses a Template) are different from the steps for creating a user-defined group without using a template. Further, if you are creating an Access Port, Interface, or Trunk Port group, the wizard steps are different.
For creating a user-defined group, the wizard consist of four steps:
1. Setting properties (for details, see Creating a Group and Editing Group Properties).
2. Creating rules (for details, see Understanding Rules).
3. Editing group membership (for details, see Finalizing Group Membership).
4. Viewing the summary (for details, see Viewing the Group Summary).
Note Operations Manager provides you with templates to make it easier for you to create user-defined groups. The four templates that are provided are based on the following:
•Location
•Name
•Subnet
•Service
For instructions on creating groups using the templates, see Creating a Group—Using a Template.
Creating a Group
Step 1 Select Devices > Device Groups. The Group Administration and Configuration page appears.
Step 2 In the Group Selector, select the parent group under which you want the new group to reside.
Note You must select the User Defined Groups folder or any subfolder. You can only add user-defined groups under the User Defined Groups folder.
Step 3 Click Create. The Properties: Create page appears. Figure 17-5 shows an example of the Properties: Create Page.
Figure 17-5 Properties: Create Page
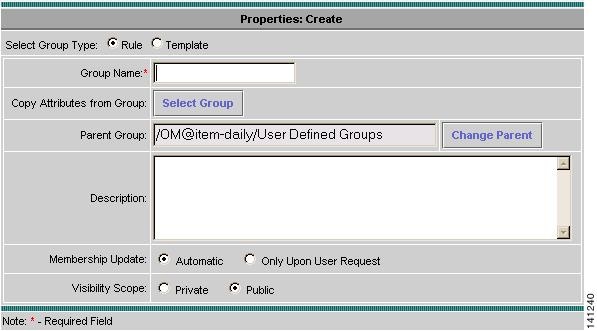
Step 4 In the Select Group Type field, select the Rule radio button.
Step 5 Enter a group name for the new group. The group name cannot contain single quotation marks, dots, or backslashes.
Step 6 If you do not want to copy the attributes of an existing group to your new group, proceed to Step 7. If you want to copy the attributes of an existing group to the new group, do the following:
Note All attributes except the group name are copied to the new group.
a. Click Select Group. The Replicate Attributes page appears.
b. Select the group from which you want to copy the attributes.
c. Click OK.
Step 7 If you want to change the parent group (the location where the group will reside in the Group Selector), do the following:
a. Click Change Parent. The Select Parent page appears.
b. Select the parent group.
c. Click OK.
Step 8 (Optional) Enter a description.
Step 9 Choose how you want the group membership updated:
•If you want the membership for this group updated automatically, select automatic.
•If you want the membership for this group updated only when the Refresh button is clicked, select Only Upon User Request.
Step 10 Select a Visibility Scope:
•Private—Available to created user only
•Public—Available to all users
Step 11 Click Next. The Rules: Create page appears. (For more information on creating rules, see Understanding Rules.)
Do one of the following:
•To create rules to apply to the group, go to Step 12.
•If you only want to add devices, click Next and select the devices on the Membership: Create page. Then go to Step 13.
Note If you need to return to any of the previous pages in the wizard, click Back.
Step 12 Create all rules that you want to apply to the group:
a. From the first list, select a logical operator.
Note The list of logical operators is enabled after at least one rule expression is entered.
b. Select an object type.
c. Select a variable.
d. Select an operator.
e. In the Value field, enter a value.
f. Click Add Rule Expression. The rule expression appears in the Rule Text box.
Note You can manually add or change any of the text in the Rule Text box. If you enter a single backslash (\), an error is displayed. To enter a single backslash in the Rule Text box, you must type two backslashes (\\) in place of the single backslash. You should always check the syntax after changing a rule expression.
g. If you have added complex rules (containing both AND and OR conditions), you must manually enter parentheses, as in the following example:
(:AccessPort.Mode equals "" OR :AccessPort.Mode contains "BACKUP" OR:AccessPort.Mode contains "NORMAL") AND(:AccessPort.DuplexMode contains "HALFDUPLEX" OR:AccessPort.DuplexMode contains "FULLDUPLEX")h. To verify that the rule syntax is correct, click Check Syntax. A dialog box appears, stating that the syntax is valid. Click OK.
i. If you want to view the rules for the parent group, select View Parent Rules.
Note All rules assigned to a parent group also apply to any of its subgroups.
j. Click Next. The Membership: Create page appears.
Step 13 You can add or remove specific Unified Communications s from the group membership (not supported for port and interface groups).
Note The group's rule captures the list of Unified Communications s that are added to or deleted from the group. The rule will contain an Includelist and/or Excludelist section to reflect this.
Although it is acceptable for a rule to have more than one Includelist or Excludelist, the recommended practice is to consolidate them, forming one Includelist and one Excludelist. Check for duplicates across both lists and ensure that no device is both included and excluded.
Note Some IPSLA devices do not automatically appear in the Unified Communications s Matching Membership column, even though they belong to the created group. You will have to manually move these devices from the Unified Communications s from Parent Group column to the Unified Communications s Matching Membership column in the Membership: Create page.
To add an Unified Communications :
a. In the Unified Communications s from Parent Group column, select the device to add.
b. Click Add.
To delete an Unified Communications :
a. In the Unified Communications s Matching Membership column, select the device to remove.
b. Click Remove.
Step 14 Click Next. The group's information appears on the Summary: Create page.
Step 15 Click Finish.
Creating an Access Port, Interface, or Trunk Port Group
Step 1 Select Devices > Device Groups. The Group Administration and Configuration page appears.
Step 2 In the Group Selector, select the parent group under which you want the new group to reside.
Note You must select one of the following folders: Access Port Groups, Interface Groups, or Trunk Port Groups.
Step 3 Click Create. The Properties: Create page appears.
Step 4 Enter a group name for the new group.
Note When you enter the group name; if you want to use special characters, the only allowable special characters are periods, underscores, and dashes.
Step 5 If you do not want to copy the attributes of an existing group to your new group, proceed to Step 7. If you want to copy the attributes of an existing group to the new group, do the following:
Note All attributes except the group name are copied to the new group.
a. Click Select Group. The Replicate Attributes page appears.
b. Select the group from which you want to copy the attributes.
c. Click OK.
Step 6 If you want to change the parent group (the location where the group will reside in the Group Selector), do the following:
a. Click Change Parent. The Select Parent page appears.
b. Select the parent group.
c. Click OK.
Step 7 (Optional) Enter a description.
Step 8 Select a Visibility Scope:
•Private—Available to created user only
•Public—Available to all users
Step 9 Click Next. The Rules: Create page appears. (For more information on creating rules, see Understanding Rules.)
Note If you need to return to any of the previous pages in the wizard, click Back.
Step 10 Create all rules that you want to apply to the group:
a. From the first list, select a logical operator.
Note The list of logical operators is enabled after at least one rule expression is entered.
b. Select an object type. You will have only one choice. This is dictated by which parent group you selected in Step 2.
c. Select a variable.
d. Select an operator.
e. In the Value field, enter a value.
f. Click Add Rule Expression. The rule expression appears in the Rule Text box.
Note You can manually add or change any of the text in the Rule Text box. If you enter a single backslash (\), an error is displayed. To enter a single backslash in the Rule Text box, you must type two backslashes (\\) in place of the single backslash. You should always check the syntax after changing a rule expression.
g. If you have added complex rules (containing both AND and OR conditions), you must manually enter parentheses, as in the following example:
(:AccessPort.Mode equals "" OR :AccessPort.Mode contains "BACKUP" OR:AccessPort.Mode contains "NORMAL") AND(:AccessPort.DuplexMode contains "HALFDUPLEX" OR:AccessPort.DuplexMode contains "FULLDUPLEX")h. To verify that the rule syntax is correct, click Check Syntax. A dialog box appears, stating that the syntax is valid. Click OK.
i. If you want to view the rules for the parent group, select View Parent Rules.
Note All rules assigned to a parent group also apply to any of its subgroups.
j. Click Next. The group's information appears on the Summary: Create page.
Step 11 Click Finish.
Creating a Group—Using a Template
To simplify the group creation process, Operations Manager provides you with templates to help you create a group. The groups you create can only be listed in the group selector under the User Defined Groups folder.
Note The groups that you create using these templates can only be based on the single attribute of the template. If you need to create a group using multiple attributes, you must create a rule. See Creating a Group.
Operations Manager provides the following templates:
•Location based—Creates a group based on device locations. In the group creation wizard you can enter a comma-separated list of locations, and all the devices in the listed locations will appear in the group.
•Name based—Creates a group based on device names. In the group creation wizard you can enter a comma-separated list of device names, and all the devices with the specified names will appear in the group.
•Subnet based—Creates a group based on the devices's subnet. In the group creation wizard you can enter a comma-separated list of subnets, and all the devices in those subnets will appear in the group.
•Service based—Creates a group based on the type of service the device provides. In the group creation wizard you can enter a comma-separated list of device services, and all the devices that provide the specified services will appear in the group. There are specific services that you can enter to create a service based group. You can only use the services that appear in the following list:
Note The service name must be entered just as it appears in this list.
–callmanager
–IPSLA
–callmanager express
–unity express
–conference connection
–unity connection
–emergency responder
–unity
–SRST
–gatekeeper
–h323
–mgcp
–Unified CCE
Step 1 Select Devices > Device Groups. The Group Administration and Configuration page appears.
Step 2 In the Group Selector, select the parent group under which you want the new group to reside.
Note You must select the User Defined Groups folder or any subfolder. You can only add user-defined groups under the User Defined Groups folder.
Step 3 Click Create. The Properties: Create page appears.
Step 4 In the Select Group Type field, select the Template radio button.
Step 5 Enter a group name for the new group.
Note When you enter the group name; if you want to use special characters, the only allowable special characters are periods, underscores, and dashes.
Step 6 If you want to change the parent group (the location where the group will reside in the Group Selector), do the following:
a. Click Change Parent. The Select Parent page appears.
b. Select the parent group.
c. Click OK.
Step 7 (Optional) Enter a description.
Step 8 Choose how you want the group membership updated:
•If you want the membership for this group updated automatically, select automatic.
•If you want the membership for this group updated only when the Refresh button is clicked, select Only Upon User Request.
Step 9 Select a Visibility Scope:
•Private—Available to the creator only
•Public—Available to all users
Step 10 Click Next. The Templates: Create page appears.
Step 11 In the Template Name field, select the template you want to base your group selection on.
Step 12 (Optional) Enter a description.
Step 13 In the List of Values field, enter the values that you want to use for filtering. For example, if you choose the name-based template, you can enter a list of device names.
Note Wild cards are not supported. Also, the operator that is being used for filtering is contains. For example, if you enter test, all devices that contain test anywhere in their name will be displayed.
Step 14 Click Next. The Membership: Create page appears. You can view the members of the group, but you cannot make any changes.
Step 15 Click Next. The group's information appears on the Summary: Create page.
Step 16 Click Finish.
Editing Group Properties
Step 1 Select Devices > Device Groups. The Group Administration and Configuration page appears.
Step 2 In the Group Selector, select the group you want to edit.
Step 3 Click Edit. The Properties: Edit page appears.
Step 4 You can edit the following in the Properties: Edit page:
•Group Name
Note When you enter the group name; if you want to use special characters, the only allowable special characters are periods, underscores, and dashes.
•Description
•Membership update type (not supported for port and interface groups)
•Visibility Scope
Note The parent group is displayed, but it cannot be edited.
Step 5 Click Next. The Rules: Edit page appears. For more information on creating rules, see Understanding Rules.
Note If you need to return to any of the previous pages in the wizard, click Back.
Step 6 You can add new rules or delete existing rules in the Rules: Edit page.
To add a new rule:
a. From the first list, select a logical operator.
Note The list of logical operators is enabled after at least one rule expression is entered.
b. From the Object Type list, select an object type.
c. From the Variable list, select a variable.
d. From the Operator list, select an operator.
e. In the Value field, enter a value.
f. Click Add Rule Expression. The rule expression appears in the Rule Text box.
Note You can manually add or change any of the text in the Rule Text box. If you enter a single backslash (\), an error is displayed. To enter a single backslash in the Rule Text box, you must type two backslashes (\\) in place of the single backslash. You should always check the syntax after changing a rule expression.
g. If you have added complex rules (containing both AND and OR conditions), you must manually enter parentheses, as in the following example:
(:AccessPort.Mode equals "" OR :AccessPort.Mode contains "BACKUP" OR:AccessPort.Mode contains "NORMAL") AND(:AccessPort.DuplexMode contains "HALFDUPLEX" OR:AccessPort.DuplexMode contains "FULLDUPLEX")h. To verify that the syntax of the rule is correct, click Check Syntax. A dialog box appears, stating that the syntax is valid. Click OK.
i. If you want to view the rules for the parent group, select View Parent Rules.
Note All rules assigned to a parent group also apply to any of its subgroups.
j. Click Next. The Membership: Edit page appears.
To delete a rule:
a. In the Rule Text box, select the entire rule text and press the Delete key.
After deleting the rule, you must click the page so that the page can refresh, removing the list of logical operators.
b. Click Next. The Membership: Edit page appears.
Step 7 You can add or remove specific Unified Communications s from the group membership (not supported for port and interface groups).
Note The group's rule captures the list of Unified Communications s that are added to or deleted from the group. The rule will contain an Includelist and/or Excludelist section to reflect this.
Although it is acceptable for a rule to have more than one Includelist or Excludelist, the recommended practice is to consolidate them, forming one Includelist and one Excludelist. Check for duplicates across both lists and ensure that no device is both included and excluded.
Note Some IPSLA devices do not automatically appear in the Unified Communications s Matching Membership column, even though they belong to the created group. You will have to manually move these devices from the Unified Communications s from Parent Group column to the Unified Communications s Matching Membership column in the Membership: Create page.
To add an Unified Communications :
a. In the Available Unified Communications s from Parent Group column, select the device to add.
b. Click Add.
To remove an Unified Communications :
a. In the Unified Communications s Matching Membership Criteria column, select the device to remove.
b. Click Remove.
Step 8 Click Next. The group's information appears on the Summary: Edit page.
Step 9 Click Finish.
Editing an Access Port, Interface, or Trunk Port Group
Step 1 Select Devices > Device Groups. The Group Administration and Configuration page appears.
Step 2 In the Group Selector, select the access port group, interface group, or trunk port group that you want to edit.
Step 3 Click Edit. The Properties: Edit page appears.
Step 4 You can edit the following in the Properties: Edit page:
•Description
•Visibility scope
Step 5 Click Next. The Rules: Edit page appears. (For more information on creating rules, see Understanding Rules.)
Note If you need to return to any of the previous pages in the wizard, click Back.
Step 6 You can add new rules or delete existing rules in the Rules: Edit page.
To add a new rule:
a. From the first list, select a logical operator.
Note The list of logical operators is enabled after at least one rule expression is entered.
b. From the Object Type list, select an object type.
c. From the Variable list, select a variable.
d. From the Operator list, select an operator.
e. In the Value field, enter a value.
f. Click Add Rule Expression. The rule expression appears in the Rule Text box.
Note You can manually add or change any of the text in the Rule Text box. If you enter a single backslash (\), an error is displayed. To enter a single backslash in the Rule Text box, you must type two backslashes (\\) in place of the single backslash. You should always check the syntax after changing a rule expression.
g. If you have added complex rules (containing both AND and OR conditions), you must manually enter parentheses, as in the following example:
(:AccessPort.Mode equals "" OR :AccessPort.Mode contains "BACKUP" OR:AccessPort.Mode contains "NORMAL") AND(:AccessPort.DuplexMode contains "HALFDUPLEX" OR:AccessPort.DuplexMode contains "FULLDUPLEX")h. To verify that the syntax of the rule is correct, click Check Syntax. A dialog box appears, stating that the syntax is valid. Click OK.
i. If you want to view the rules for the parent group, select View Parent Rules.
Note All rules assigned to a parent group also apply to any of its subgroups.
j. Click Next. The Membership: Edit page appears.
To delete a rule:
a. In the Rule Text box, select the entire rule text and press the Delete key.
After deleting the rule, you must click the page so that the page can refresh, removing the list of logical operators.
b. Click Next. The group's information appears on the Summary: Edit page.
Step 7 Click Finish.
Editing Group Properties—For a Group that Uses a Template
Step 1 Select Devices > Device Groups. The Group Administration and Configuration page appears.
Step 2 In the Group Selector, select the group you want to edit.
Step 3 Click Edit. The Properties: Edit page appears.
Step 4 You can edit the following in the Properties: Edit page:
•Group Name
Note When you enter the group name; if you want to use special characters, the only allowable special characters are periods, underscores, and dashes.
•Description
•Membership update type (not supported for port and interface groups)
•Visibility Scope
Note The parent group is displayed, but it cannot be edited.
Step 5 Click Next. The Templates page appears.
Step 6 You can change the following in the Templates page:
•Template
•Description
•List of Values
Step 7 Click Next. The Membership: Edit page appears. You can view the members of the group, but you cannot make any changes.
Step 8 Click Next. The group's information appears on the Summary: Edit page.
Step 9 Click Finish.
Understanding Rules
Every group is defined by a set of rules. A rule set contains a Boolean combination of individual rule expressions.
Rules are created to filter in the objects that you want to belong to the group, and to filter out those that you do not want in the group. When determining which Unified Communications s belong to a group, Group Management compares object information to the rule. If an Unified Communications 's information satisfies all of the rule's requirements, it is placed in the group.
One or more rule expressions can be applied to form a rule.
Each rule expression contains the following:
<object type>.<variable> <operator> <value>
For example:
:Gatekeeper.Cisco_CommunicationManager_or_Cluster.Name equals "ccm test1"Rules are defined through the Group Creation Wizard on the Rules: Create page.
You can define the following:
•OR, AND, EXCLUDE—Logical operators. This field appears after a rule expression is added in the Rule Text box.
–OR—Include devices that fulfill the requirements of either rule.
–AND—Include only devices that fulfill the requirements of both rules.
Note When using the AND operator, the rule expressions cannot contain different types of devices. For example, you cannot use the AND operator with the following rule expressions:
:MediaServer
:Gatekeeper
In this example, you would have to use the OR operator.
–EXCLUDE—Do not include these devices.
•Object Type—The type of object that is used to form a group. The object can be all devices, a group, or a type of device.
In the Object Type field you will see the following choices:
–AccessPort
–Device
–CUE
–DigitalVoiceGateway
–Gatekeeper
–Unified CCE
–MediaServer
–PhoneAccessSwitch
–VoiceGateway
–VoiceMailGateway
–Interfaces
–PRPhone
–SRSTDevice
–TrunkPort
•Variable—An attribute of the selected object type to be used for the rule. The list of possible variables changes based on the object type that is selected.
•Operator—The operator to be used in the rule. The list of possible operators changes based on the object type and the variable selected.
Note When using the equals operator the rule is case-sensitive.
•Value—The value of the rule expression. The possible values depend upon the object type, variable, and operator selected. Depending on the operator selected, the value may be free-form text or a list of values.
Some devices (Object Types) cannot be grouped using certain attributes (Variables), because the attributes for these devices do not exist. Table 17-4 lists the devices and the attributes.
Note After you have defined the rule, you should verify the syntax. You can do this on the Rules: Create page.
Figure 17-6 shows an example of the Rules: Create page.
Figure 17-6 Rules: Create Page
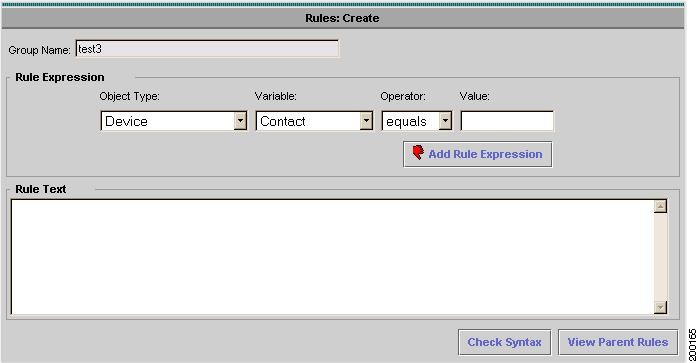
Table 17-5 describes the fields on the Rules: Create page of the Group Creation Wizard.
Understanding What to Enter in the Value Field
Most of the values that can be entered in the Value field of the Rules: Create page are self-evident, but some of the Unified Communications s in the Variables field have special meanings or restrictions on how to enter the related attribute in the Value field.
Table 17-6 describes the Unified Communications s that appear in the Variable field of the Rules: Create page that might need further explanation.
Examples of Rules
Example 1
You want to create a group that contains all of the media servers in the vegas cluster. Form the following rule:
:MediaServer.Cisco_CommunicationManager_or_Cluster.Name contains "VEGAS"•Object Type—MediaServer
•Variable—Cisco_CommunicationManager_or_Cluster.Name
•Operator—contains
•Value—"VEGAS"
Example 2
You want to create a group that contains all of the voice gateways that have 172 as part of their IP address.
:VoiceGateway.IP.Address contains "172"•Object Type—VoiceGateway
•Variable—IP.Address
•Operator—contains
•Value—"172"
Example 3
You want to create a group that contains all of the phone access switches in the San Jose location.
:PhoneAccessSwitch.Location equals "San Jose"•Object Type—PhoneAccessSwitch
•Variable—Location
•Operator—equals
•Value—"San Jose"
Note To help you to better understand group rules, you may want to look at the rules used for system-defined groups. These rules appear in the Properties: Details page. For a description of the Properties: Details page, see Viewing Group Details.
Finalizing Group Membership
After the group rules have been defined, they are evaluated, and you can view the group's members. In addition, the group membership can be modified by adding or removing specific Unified Communications s. The group rule will be automatically modified to reflect the Unified Communications s that were added or removed from the group. You add or remove specific Unified Communications s from a group's membership in the Membership: Create page of the Create Group Wizard.
Note If you used a template to create your group, you can only view membership details. You cannot add or remove Unified Communications s from a group's membership in the Membership: Create page.
Viewing the Group Summary
The final step in the Create Group Wizard is a summary page that displays the new group's definition. Figure 17-7 shows an example of the Summary: Create page.
Figure 17-7 Summary: Create Page
Table 17-7 describes the fields on the Summary: Create page of the Group Creation Wizard.
Viewing Group Details
A group's information is displayed on the Properties: Details page.
Step 1 Select Devices > Device Groups. The Group Administration and Configuration page appears.
Step 2 In the Group Selector, select the group for which you want to view details.
Step 3 Click Details. The Properties: Details page appears (see Figure 17-8).
Figure 17-8 Properties: Details Page
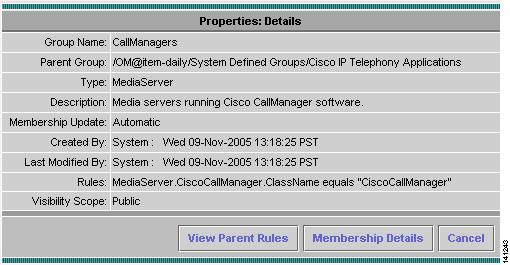
Table 17-8 describes the fields on the Properties: Details page.
Table 17-8 Fields on the Properties: Details Page
Heading/Button DescriptionGroup Name
Name of the group you are viewing.
Parent Group
The parent group of the group you are viewing.
Type
The type of the Unified Communications s that belong to the group.
Description
A text description of the group.
Membership Update
How group membership is updated. Membership updates can be automatic (updated every time the group is accessed) or can be upon user request only (updated only when you click the Refresh button).
Created By
The person who created the group.
Last Modified By
The last person to edit the group.
Rules
The rules used to filter group membership.
Visibility Scope
Setting that determines whether all users or only the created user can view the group.
View Parent Rules
Used to view the parent group rules.
Note All parent group rules apply to the subgroups.
Membership Details
Used to view membership details. See Viewing Membership Details.
Cancel
Closes the page and takes you back to the Group Administration and Configuration page.
Viewing Membership Details
You can view a list of the Unified Communications s that belong to a group by accessing the Membership: Details page.
Step 1 Select Devices > Device Groups. The Group Administration and Configuration page appears.
Step 2 In the Group Selector, select the group for which you want to view details.
Step 3 Click Details. The Properties: Details page appears.
Step 4 Click Membership Details. The Membership: Details page appears.
Figure 17-9 shows an example of the Membership: Details page.
Figure 17-9 Membership: Details Page
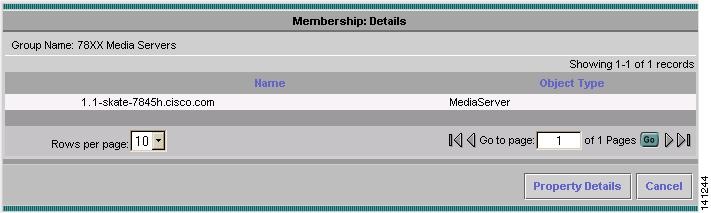
Table 17-9 describes the fields on the Membership: Details page.
Refreshing Membership
Refreshing a group's membership forces the group to recompute its membership by reevaluating its rules and obtaining membership information from the data collectors. Port and interface group membership listings are not supported, because these groups are only used for polling and threshold purposes.
Step 1 Select Devices > Device Groups. The Group Administration and Configuration page appears.
Step 2 In the Group Selector, select the group you want to refresh.
Step 3 Click Refresh.
Step 4 In the confirmation dialog box, click Yes. In the next dialog box, click OK.
Deleting Groups
You can only delete user-defined groups. This includes any Access Port, Interface, or Trunk Port groups that you created. You cannot delete the Access Port Groups, Interface Groups, or Trunk Port Groups folders.
Step 1 Select Devices > Device Groups. The Group Administration and Configuration page appears.
Step 2 In the Group Selector, select the group you want to delete.
Step 3 Click Delete.
Step 4 In the confirmation dialog box, click Yes. In the next dialog box, click OK.
Note Edit, Refresh, and Delete cause internal processes to start. For this reason, Operations Manager could experience a period of high CPU utilization after these processes are triggered.