Cisco IOS Telephony Service V2.1: New Features for Cisco IOS Release 12.2(11)YT
Available Languages
Table Of Contents
Cisco IOS Telephony Service V2.1: New Features for Cisco IOS Release 12.2(11)YT
Information About New Features in Cisco IOS Telephony Service V2.1
Specifications for Cisco IOS Telephony Service V2.1
Consultative Call Transfer Using the H.450.2 Standard
Analog Call Transfer Using Hookflash and the H.450.2 Standard
Call Forward Using the H.450.3 Standard
Silent Ring on Cisco IP Phone 7960 and Cisco IP Phone Expansion Module 7914
International Language Support: French, German, Italian, Spanish
Music on Hold from a Live Feed
Configurable IP Phone Header Bar
Idle Messaging for Cisco IP Phone 7940 and Cisco IP Phone 7960
Configurable Administrative User Classes
Cisco IP Phone Expansion Module 7914 Support
How to Configure New Features in Cisco ITS V2.1
Assembling Prerequisites for Cisco ITS V2.1
Installing Cisco ITS V2.1 Phone Firmware Files Smaller than 384 KB
Installing Cisco ITS V2.1 Phone Firmware Files Larger than 384 KB
Downgrading ITS Phone Firmware to an Earlier Version
Enabling Consultative Call Transfer Using the H.450.2 Standard
Enabling Analog Call Transfer Using Hookflash and the H.450.2 Standard
Enabling Call Forward Using the H.450.3 Standard
Enabling the Busy Attendant Announcement
Enabling Silent Ring on Cisco IP Phone 7960 and Cisco IP Phone Expansion Module 7914
Designating International Language and Tone Support
Configuring Music on Hold from a Live Feed
Disabling the Local Directory Service
Customizing an IP Phone Header Bar
Specifying an Idle Message for Cisco IP Phone 7940 and Cisco IP Phone 7960
Configuring Administrative User Classes
Specifying an Enhanced Dial-Plan Pattern
Adding Support for the Cisco IP Phone Expansion Module 7914
Rebooting Phones After Configuration Updates
Rebooting Phones with the reset Command
Rebooting One Phone with the restart Command
Rebooting All Phones with the restart Command
application (telephony-service)
dialplan-pattern (telephony-service)
restart all (telephony-service)
show telephony-service tftp-bind
Cisco IOS Telephony Service V2.1: New Features for Cisco IOS Release 12.2(11)YT
Cisco IOS Telephony Service (ITS) V2.1 introduces support for the ITU-T H.450 standard for consultative call transfer and call forwarding, four additional languages (French, German, Italian, and Spanish), other telephony features, and the Cisco IP Phone Expansion Module 7914.

Note
This document discusses new features only. For information on ITS installation and basic configuration, refer to Cisco IOS Telephony Service Version 2.01.
Feature Specifications for Cisco IOS Telephony Service
Determining Platform Support Through Cisco Feature Navigator
Cisco IOS software is packaged in feature sets that are supported on specific platforms. To get updated information regarding platform support for this feature, access Cisco Feature Navigator. Cisco Feature Navigator dynamically updates the list of supported platforms as new platform support is added for the feature.
Cisco Feature Navigator is a web-based tool that enables you to determine which Cisco IOS software images support a specific set of features and which features are supported in a specific Cisco IOS image. You can search by feature or release. Under the release section, you can compare releases side by side to display both the features unique to each software release and the features in common.
To access Cisco Feature Navigator, you must have an account on Cisco.com. If you have forgotten or lost your account information, send a blank e-mail to cco-locksmith@cisco.com. An automatic check will verify that your e-mail address is registered with Cisco.com. If the check is successful, account details with a new random password will be e-mailed to you. Qualified users can establish an account on Cisco.com by following the directions found at this URL:
Cisco Feature Navigator is updated regularly when major Cisco IOS software releases and technology releases occur. For the most current information, go to the Cisco Feature Navigator home page at the following URL:
Availability of Cisco IOS Software Images
Platform support for particular Cisco IOS software releases is dependent on the availability of the software images for those platforms. Software images for some platforms may be deferred, delayed, or changed without prior notice. For updated information about platform support and availability of software images for each Cisco IOS software release, refer to the online release notes or, if supported, Cisco Feature Navigator.
Note
Contents
•
•
Information About New Features in Cisco IOS Telephony Service V2.1
Note
Cisco IOS Telephony Service V2.1 introduces the new features that are described in the following sections:
•
•
•
•
•
•
•
•
•
•
•
Specifications for Cisco IOS Telephony Service V2.1
Table 1 lists the Cisco platforms, maximum number of Cisco IP phones, maximum number of directory numbers (DNs) or virtual voice ports, and memory requirements for ITS V2.1.
Note
Consultative Call Transfer Using the H.450.2 Standard
Cisco ITS V2.0 allowed only blind call transfers, in which a transferring party did not have the ability to announce or consult with a destination party before transferring a call. V2.0 used a Cisco ITS proprietary mechanism to perform these blind transfers. Cisco ITS V2.1 adds the ability to perform call transfers blind or with consultation using the ITU-T H.450.2 standard for H.323 calls.
This feature is implemented using a special Tool Command Language (TCL) script. The script requires support for TCL interactive voice response (IVR) 2.0 on Cisco IOS Release 12.2(11)YT.
Note
For configuration information, refer to the "Enabling Consultative Call Transfer Using the H.450.2 Standard" section.
Analog Call Transfer Using Hookflash and the H.450.2 Standard
Call transfer from analog Foreign Exchange Station (FXS) phones using hookflash is provided by the same TCL script that supports call transfer with the H.450.2 standard.
This feature allows analog phones to transfer calls with consultation by using the hookflash to initiate the transfer. Once the transferrer uses the hookflash, the party being transferred is put on hold. The transferrer hears dial tone and can dial a third party. Once a connection is made, the transferrer and the third party can consult. When the transferrer hangs up, the party being transferred is connected to the third party. If the transferrer hangs up while the third party's phone is still ringing, the party being transferred is connected to the ringing phone.
To speed up or delay the setting up of the consultation call during a call transfer from an analog phone, you can use the delay-time attribute-value (AV) pair with the call application voice command.
For configuration information, refer to the "Enabling Analog Call Transfer Using Hookflash and the H.450.2 Standard" section.
Call Forward Using the H.450.3 Standard
Call forwarding using the H.450.3 standard provides a standards-based alternative to Cisco ITS proprietary H.323 call forwarding. It provides forwarding for busy, no-answer, and unconditional (all calls) conditions. H.450.3 always returns the call to the originator gateway, even for the case that the forwarder and forward-to number are local on the same ITS network.
Calls to the same number from different originations can be selectively assigned to H.450.3 standard call forwarding or to Cisco-proprietary call forwarding. For example, if extension 5234 has all calls forwarded to 5277, a call from extension 4003 can be forwarded to 5277 using H.450.3, while a call from extension 4552 can be forwarded using Cisco ITS 2.0.
For configuration information, refer to the "Enabling Call Forward Using the H.450.3 Standard" section.
Busy Attendant Announcement
This feature plays a prerecorded announcement to external callers who are directly routed over an Foreign Exchange Office (FXO) port to a central, or reception, number that is busy and that has been configured with the connection plar-opx command. Normally, incoming calls that are received over FXO ports from the PSTN hear ringback tone until the FXO port goes "off-hook" to answer the call. And when the dialed extension is busy the FXO port has no way to answer, so the caller continues to hear ringback tone. If the Busy Attendant Announcement feature is enabled, a recording is heard by callers who dial busy extensions rather than continual ringback tone.
For example, an incoming call from the PSTN for extension 1000 cannot be answered by the FXO port until the phone at extension 1000 goes off-hook. The PSTN plays ringback tones to the caller until the FXO port answers. If the extension is busy, the PSTN continues to play ringback tones until the caller disconnects. There is no way for an FXO port to signal a busy condition on behalf of extension 1000.
If extension 1000 has been configured on an FXO port with the connection plar-opx 1000 command and the Busy Attendant Announcement feature has been enabled, the following will happen. If extension 1000 is available, the caller hears ringback and the FXO port stays in the on-hook state until the call is answered at extension 1000. If extension 1000 is busy, the FXO port answers the call and goes off-hook. The Busy Attendant Announcement application plays a prompt to the caller that may contain a phrase like "I'm sorry, but all lines are currently busy. Please call back later." Then the application disconnects the call. The prompt is based on the contents of a .au file.
For configuration information, refer to the "Enabling the Busy Attendant Announcement" section.
On-Hook Dialing
On-hook dialing allows you to enter dialed digits with the phone on-hook and the handset still in its cradle. Digits appear in the phone display as they are dialed, and a Backspace soft key (<<) allows you to erase digits that are entered incorrectly. When you have completed entering the digits and want the phone to dial the number, use one of the following methods:
•
•
No configuration is required to activate this feature.
Silent Ring on Cisco IP Phone 7960 and Cisco IP Phone Expansion Module 7914
Audible ringers can be disabled on individual lines on the Cisco IP Phone 7960 and the Cisco IP Phone Expansion Module 7914. This feature is most useful on phones with monitored shared lines.
For configuration information, see the "Enabling Silent Ring on Cisco IP Phone 7960 and Cisco IP Phone Expansion Module 7914" section.
International Language Support: French, German, Italian, Spanish
On the Cisco IP Phone 7940 and Cisco IP Phone 7960, the language displayed on the phone and the locale for network dial progress tones and cadences can be set to the following ISO-3166 codes for languages and locales:
•
•
•
•
For configuration information, see the "Designating International Language and Tone Support" section.
Music on Hold from a Live Feed
Previous releases of Cisco ITS provided music on hold (MoH) from an .au or .wav file held in router Flash memory. Cisco ITS V.2.1 introduces MoH from an external live audio feed (standard line level audio connection) that is directly connected to the router through an FXO or "ear and mouth" (E&M) analog voice port. If the external live feed source is disconnected or disabled, MoH can fall back to use the file in Flash memory. This feature is typically used to connect to a CD jukebox player. Only one live MoH feed is supported per system.
Music on hold, whether from a live source or a Flash file, is supplied only to public switched telephone network (PSTN) and VoIP G.711 calls, and is not supplied to local IP phone calls. Local IP phone callers hear a repeating tone while they are on hold for reassurance that the call is still connected.
For configuration information, see the "Configuring Music on Hold from a Live Feed" section.
System Speed Dial
A systemwide list of frequently called numbers can be programmed by an administrator for use as speed dial numbers on all phones, up to a maximum of 32 entries. The administrator creates an XML file that is entered in router Flash memory and is automatically integrated into the local directory services that are listed when the Directory button on a phone is pressed, as follows:
For configuration information, see the "Enabling System Speed Dial" section.
Local Directory Disable
The local directory that is displayed on an IP phone (item 4 in the Local Services menu) is served as an XML page that is accessed through HTTP without password protection. A new Cisco IOS command, no service local-directory, disables the directory HTTP service to suppress the availability of this directory.
For configuration information, see the "Disabling the Local Directory Service" section.
Configurable IP Phone Header Bar
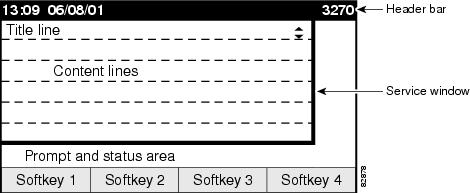
The Configurable IP Header Bar feature allows you to define a description to appear in the header bar (top line) of the phone display of a Cisco IP Phone 7940 or Cisco IP Phone 7960, as shown in Figure 1. Normally the header bar simply replicates the text appearing next to the first button. This feature allows you to specify different text for the header bar. For example, this line can be used to display the full E.164 number of the phone instead of just the extension number that appears by default. If no description is specified, the header bar replicates the line number or extension next to the first button on the phone.
For configuration information, see the "Customizing an IP Phone Header Bar" section.
Figure 1 Cisco IP Phone Display
Idle Messaging for Cisco IP Phone 7940 and Cisco IP Phone 7960
The Idle Messaging feature allows you to specify a file to display on Cisco IP Phone 7940s and Cisco IP Phone 7960s when they are not in use. You can use this feature to provide the phone display with a system message that is refreshed at configurable intervals.
For configuration information, see the "Specifying an Idle Message for Cisco IP Phone 7940 and Cisco IP Phone 7960" section.
Configurable Administrative User Classes
Previous versions of Cisco ITS allowed two levels of users: normal users and administrative users. Normal users were able to configure certain features on their own phones, and administrative users were able to configure systemwide features and provision phone systems.
Cisco ITS V2.1 divides administrative users into two classes: system administrators and customer administrators. System administrators are internal supporting phone staff that use a graphical user interface (GUI) to configure and maintain ITS systemwide. System administrators are able to access all GUI functionality. Customer administrators are external administrative staff that perform routine phone add-and-change work without having access to systemwide features. Customer administrators are limited to a configurable subset of GUI functionality.
Previous versions of Cisco ITS supported administrative user authentication on the local router only. Cisco ITS V2.1 supports authentication, authorization, and accounting (AAA) authentication through a RADIUS or TACACS+ server for system administrators. If authentication through the server fails, the local router is searched.
In addition, Cisco ITS V2.1 provides support for XML cascading style sheets (files with .css suffix) that can be used to customize the browser GUI display that is used by administrators and users to configure IP phones. For a description of the ITS GUI browser display, refer to Cisco IOS Telephony Service Version 2.01.
For configuration information, see the "Configuring Administrative User Classes" section.
Enhanced Dial-Plan Pattern
The Cisco IOS command dialplan-pattern contains a new keyword, extension-pattern, to allow additional manipulation of IP-phone abbreviated extension number prefix digits. When this keyword and its arguments are used, the leading digits of an extension pattern are stripped and replaced by the corresponding leading digits of the dial-plan pattern. This command can be used to avoid direct inward dial (DID) numbers like 408-555-0001 resulting in four-digit extensions such as 0001.
For configuration information, see the "Specifying an Enhanced Dial-Plan Pattern" section.
Cisco IP Phone Expansion Module 7914 Support
Call coverage is a critical capability for administrative assistants and others who must monitor, manage, and cover the various status of calls. This capability requires the ability to instantly determine the status of more lines than the six-line capacity of the Cisco IP Phone 7940 or the Cisco IP Phone 7960.
The Cisco IP Phone Expansion Module 7914 extends the capabilities of the Cisco IP Phone 7940 or the Cisco IP Phone 7960 with additional buttons and a liquid crystal display (LCD) display. With this expansion module, you add 14 buttons to the existing 6 buttons of the Cisco IP Phone 7940 or the Cisco IP Phone 7960, increasing the total number of buttons to 20 with one module or 34 when you add two Cisco IP Phone Expansion Module 7914s. Each of the 14 buttons on a Cisco IP Phone Expansion Module 7914 can be programmed as a directory number (DN), line key, or speed-dial key, much like the buttons on the Cisco IP Phone 7960. When used as a DN key, buttons are illuminated, allowing easy identification of call states.
For configuration information, see the "Adding Support for the Cisco IP Phone Expansion Module 7914" section.
Phone Reboot Commands
After you update information for a phone that is associated with a Cisco ITS router, the phone must be rebooted for the new information to take effect. In Cisco IOS Release 12.2(11)YT1, the reset command has been modified to add support for the sequential reset of ITS phones, which minimizes the risk of the conflict that can occur when multiple phones simultaneously attempt to access changed ITS configuration information via TFTP. In addition, the restart command has been introduced to support quick phone rebooting when only the line or speed-dial information for a phone changes.
The reset command performs a "hard" reboot similar to a power-off, power-on sequence, which includes a consultation with the local Dynamic Host Configuration Protocol (DHCP) server and TFTP server for updated information. The restart command performs a "soft" reboot by restarting phones without contacting the DHCP and TFTP servers. The reset command takes significantly longer to process than the restart command when more than one phone is being updated, but it must be used after updates to phone firmware, user locale, network locale, and URL parameters. The restart command, which is much quicker, can be used after simple button, line, or speed-dial changes.
For more information, see the "Rebooting Phones After Configuration Updates" section.
How to Configure New Features in Cisco ITS V2.1
Configuration instructions for new features in Cisco ITS V.2.1 are described in the following sections:
•
•
•
•
•
•
•
•
•
•
•
•
•
•
•
•
•
•
•
•
Assembling Prerequisites for Cisco ITS V2.1
To use Cisco ITS V2.1, you need to download Cisco IOS software and Cisco ITS V2.1 files, which are available through the Cisco Software Center. The files you need are listed below.
Note
Cisco IOS Software
•
Cisco ITS V2.1 Files
Download ITS V2.1 files to a TFTP server that is accessible to your ITS router. You can download all the files at once in a bundled file, or as individual files if necessary, as explained below.
Bundled File
A bundled, compressed file that contains the individual ITS V2.1 files can be downloaded from the following URL: http://www.cisco.com/cgi-bin/tablebuild.pl/ip-key.
•
Individual Files
Individual ITS files can be downloaded from the following URL: http://www.cisco.com/cgi-bin/tablebuild.pl/ip-iostsp.
The individual ITS V2.1 files include the following types of files:
•
–
–
–
–
–
•
–
–
–
–
–
•
•
•
•
–
–
•
Installing Cisco ITS V2.1 Phone Firmware Files Smaller than 384 KB
This task explains how to upgrade the phone firmware on the ITS phones on your network when the phone firmware files are smaller than 384 KB (393216 bytes). The task involves downloading the phone firmware to the ITS router and establishing the router as a TFTP server for the IP phones.
Note
Prerequisites
Ensure that the appropriate phone firmware file or files have been downloaded to a TFTP server location that is accessible to the ITS router. If the file has not been downloaded, get a copy from http://www.cisco.com/cgi-bin/tablebuild.pl/ip-iostsp.
Restrictions
Phone firmware files must be smaller than 384 KB. For files larger than 384 KB, refer to the "Installing Cisco ITS V2.1 Phone Firmware Files Larger than 384 KB" section.
Note
SUMMARY STEPS
1.
2.
3.
4.
5.
6.
DETAILED STEPS
What to Do Next
After installing the upgraded phone firmware and establishing the router as a TFTP server for the IP phones, perform the basic configuration described in the "Configuring Cisco ITS V2.1" section. Then you can configure any of the new features described in this document.
Installing Cisco ITS V2.1 Phone Firmware Files Larger than 384 KB
This procedure explains how to upgrade the phone firmware for the ITS phones on your network when the firmware files are larger than 384 KB (393216 bytes).
The following example scenario explains this process. The phone firmware file called P0030302xxxx.bin is the one that you have decided you need to use with ITS v2.1 and you are upgrading from ITS V2.0. P0030302xxxx.bin is larger than 384 KB, so this upgrade requires what is essentially a two-stage upgrade. First, you upgrade to P00303020209.bin, a file that is smaller than 384 KB, and then you upgrade to P0030302xxxx.bin. ITS v2.1 automatically performs this two-step operation, after sensing that the desired file is larger than 384KB and detecting that P00303020209.bin is available in Flash memory.
Note
Prerequisites
Ensure that the appropriate phone firmware file or files have been downloaded to a TFTP server location that is accessible to the ITS router. If the file has not been downloaded, get a copy from http://www.cisco.com/cgi-bin/tablebuild.pl/ip-iostsp. The following files are needed for this task:
•
•
Restrictions
This task applies only to Cisco IP Phone 7940 and Cisco IP Phone 7960 firmware files (P00303020209.bin) and Cisco IP Phone 7910 firmware files (P00403020209.bin) that are larger than 384 KB. For files that are smaller than 384 KB, refer to the "Installing Cisco ITS V2.1 Phone Firmware Files Smaller than 384 KB" section.
Note
SUMMARY STEPS
1.
2.
3.
4.
5.
6.
DETAILED STEPS
What to Do Next
After installing the upgraded phone firmware and establishing the router as a TFTP server for the IP phones, perform the basic configuration described in the "Configuring Cisco ITS V2.1" section. Then you can configure any of the new features described in this document.
Downgrading ITS Phone Firmware to an Earlier Version
If it becomes necessary to downgrade the Cisco IOS image back to ITS V2.0, you must use the following order so that the phones will boot correctly:
1.
2.
Configuring Cisco ITS V2.1
Cisco ITS V2.1 introduces the use of XML configuration files for IP phones. There is one shared default XML configuration file for each type of IP phone. When an IP phone comes online or is rebooted, it automatically gets information about itself from the appropriate default. The phone coming online uses a filename alias based on the phone type specified in the type command in Ethernet phone (ephone) configuration mode. The type command is mandatory only for IP phones that have added one or two Cisco IP Phone Expansion Module 7914s.
In ITS V2.1, the configuration files have been moved to system:/its/. The file named Flash:SEPDEFAULT.cnf that was used with previous ITS versions is now obsolete, but is retained as system:/its/SEPDEFAULT.cnf to support upgrades from older phone firmware.
The commands in this task identify and modify the XML phone configuration files so that the IP phones can automatically find the defaults to configure themselves when they come online or are rebooted. The last step in this task is to reset all phones, which causes them to request the new firmware files
Prerequisites
Phone firmware files must be downloaded and installed on a TFTP server on the ITS router using one of the following procedures:
•
•
SUMMARY STEPS
1.
2.
3.
4.
5.
6.
7.
8.
9.
10.
DETAILED STEPS
Troubleshooting Tips
•
•
Enabling Consultative Call Transfer Using the H.450.2 Standard
The Consultative Call Transfer Using the H.450.2 Standard feature adds support for initiating call transfer on a call leg using the ITU-T H.450.2 protocol. Call transfers using H.450.2 can be blind or consultative. A blind transfer is one in which the transferring phone connects the caller to a destination line before ringback begins. A consultative transfer is one in which the transferring party either connects the caller to a ringing phone (ringback heard) or speaks with the third party before connecting the caller to the third party.
You can specify blind or consultative transfer on a systemwide basis. The systemwide setting can then be overridden for individual phone lines. For example, in an ITS network that is set up for consultative transfer, a specific line with an auto-attendant that automatically transfers incoming calls to specific extension numbers can be set to use blind transfer, because auto-attendants cannot use consultative transfer.
Note that this feature and call forwarding using the H.450.3 standard can be enabled independently.
This feature requires the H.450 TCL script file that is described in the "Assembling Prerequisites for Cisco ITS V2.1" section. If you have already downloaded that file from the Cisco Software Center and loaded it onto your ITS router, you do not have to repeat those steps.
In addition to the TCL script, a ReadMe file that describes the script is available. Be sure to read this file whenever you download a new version of the script, because it may contain additional script-specific information, such as configuration parameters and user interface descriptions.
Note
Prerequisites
•
–
–
•
–
–
–
–
Note
Restrictions
•
•
•
•
•
SUMMARY STEPS
1.
2.
3.
4.
5.
6.
7.
8.
9.
10.
11.
12.
13.
14.
15.
16.
17.
18.
19.
20.
21.
22.
DETAILED STEPS
EXAMPLE
The following example specifies transfer with consultation using the H.450.2 standard for all IP phones serviced by the ITS router:
call application voice app_h450_transfer flash:app-h450-transfer.tclcall application voice app_h450_transfer language 1 encall application voice app_h450_transfer set-location en 0 flash:/prompts!dial-peer voice 100 potsdestination-pattern 9.Tport 1/0/0application app_h450_transfer!dial-peer voice 4000 voipdestination-pattern 4...session-target ipv4:1.1.1.1application app_h450_transfer!telephony-servicetransfer-pattern 4...transfer-system full-consultapplication app_h450_transferEnabling Analog Call Transfer Using Hookflash and the H.450.2 Standard
The Analog Call Transfer Using Hookflash and the H.450.2 Standard feature allows analog phones to transfer calls with consultation by using the hookflash to initiate the transfer.
This feature requires the same TCL script as the one described in the "Enabling Consultative Call Transfer Using the H.450.2 Standard" section. If you have already downloaded that file from the Cisco Software Center and loaded it on your ITS router, you do not have to repeat those steps. The TCL script has parameters to which you can pass values using attribute-value (AV) pairs in the call application voice command. The parameter that applies to this feature is as follows:
•
In addition to the TCL script, a ReadMe describes the script and the configurable AV pairs. Read this file whenever you download a new version of the script, because it may contain additional script-specific information, such as configuration parameters and user interface descriptions.
Note
Prerequisites
Note that these prerequisites are the same as those for the Enabling Consultative Call Transfer Using the H.450.2 Standard feature.
•
–
–
•
–
–
–
–
Note
Restrictions
•
•
SUMMARY STEPS
1.
2.
3.
4.
5.
6.
7.
8.
9.
10.
DETAILED STEPS
EXAMPLE
The following example enables the H.450 TCL script for analog transfer using hookflash and sets a delay time of 1 second:
call application voice transfer_app flash:app-h450-transfer.tclcall application voice transfer_app language 1 encall application voice transfer_app set-location en 0 flash:/promptscall application voice transfer_app delay-time 1!dial-peer voice 100 potsdestination-pattern 9.Tport 1/0/0application app_h450_transfer!dial-peer voice 4000 voipdestination-pattern 4...session-target ipv4:10.1.10.1application app_h450_transferEnabling Call Forward Using the H.450.3 Standard
The Call Forward Using the H.450.3 Standard feature provides a standards-based alternative to the Cisco-proprietary call forwarding feature present in previous versions of ITS, and offers call forwarding on busy, no-answer, and all conditions.
To use this feature, parties calling in to an ITS directory number that has been forwarded must support the H.450.3 standard. A new Cisco IOS command, call-forward pattern, allows you to specify the patterns of calling-party numbers that support the H.450.3 standard. When an ITS directory number has forwarded its calls and an incoming call is received for that directory number, the ITS router sends an H.450.3 response back to the original calling party to request that the call be placed again using the forward-to destination. Calling numbers that do not match the patterns defined with this command are forwarded using Cisco-proprietary call forwarding for backward compatibility.
This feature requires the same TCL script as Enabling Consultative Call Transfer Using the H.450.2 Standard. If you have already downloaded that file from the Cisco Software Center and loaded it on your ITS router, you do not have to repeat those steps. The TCL script has parameters to which you can pass values using attribute-value (AV) pairs in the call application voice command. The parameter that applies to this feature is as follows:
•
In addition to the TCL script, a ReadMe file describes the script and the configurable AV pairs. Read this file whenever you download a new version of the script, because it may contain additional script-specific information, such as configuration parameters and user interface descriptions.
Note
Note
Prerequisites
Note that these prerequisites are the same as those for the Enabling Consultative Call Transfer Using the H.450.2 Standard feature.
•
–
–
•
–
–
–
–
Note
Restrictions
You can perform a staged upgrade to H.450.3 call forwarding, but routers need to be configured to explicitly identify which calling party numbers support H.450.3 and which do not by using the call-forward pattern command.
SUMMARY STEPS
1.
2.
3.
4.
5.
6.
7.
8.
9.
10.
11.
12.
13.
14.
15.
16.
17.
18.
19.
DETAILED STEPS
EXAMPLE
The following example enables call forwarding using the H.450.3 standard and sets a maximum forward count of 2:
call application voice app_h450_transfer flash:app-h450-transfer.tclcall application voice app_h450_transfer language 1 encall application voice app_h450_transfer set-location en 0 flash:/promptscall application voice transfer_app max-fwd-cnt 2!dial-peer voice 100 potsdestination-pattern 9.Tport 1/0/0application app_h450_transfer!dial-peer voice 4000 voipdestination-pattern 4...session-target ipv4:1.1.1.1application app_h450_transfer!telephony-servicecall-forward pattern 4...application app_h450_transferEnabling the Busy Attendant Announcement
This feature requires the H.450 TCL script file that is described in the "Assembling Prerequisites for Cisco ITS V2.1" section. If you have already downloaded that file from the Cisco Software Center and loaded it onto your ITS router, you do not have to repeat those steps.
The H.450 TCL script has parameters to which you can pass values using attribute-value (AV) pairs in the call application voice command. The parameter that applies to this feature is as follows:
•
In addition to the TCL script, a ReadMe file describes the script and the configurable AV pairs. Be sure to read this file whenever you download a new version of the script, because it may contain additional script-specific information, such as configuration parameters and user interface descriptions.
Note
SUMMARY STEPS
1.
2.
3.
4.
5.
6.
7.
DETAILED STEPS
EXAMPLE
The following example enables the busy attendant announcement:
call application voice transfer_app flash:app-h450-transfer.tclcall application voice transfer_app language 1 encall application voice transfer_app set-location en 0 flash:/promptscall application voice transfer_app announce-for-busy 1!dial-peer voice 100 potsdestination-pattern 9.Tport 1/0/0application app_h450_transfer!dial-peer voice 4000 voipdestination-pattern 4...session-target ipv4:1.1.1.1application app_h450_transferEnabling Silent Ring on Cisco IP Phone 7960 and Cisco IP Phone Expansion Module 7914
The silent ring feature allows you to designate lines that do not produce an audible ring when they receive incoming calls. The silent ring feature is supported on multi-line IP phones, including the Cisco IP Phone 7940, Cisco IP Phone 7960, and Cisco IP Phone Expansion Module 7914.
The silent ring is enabled when the line button is configured with ringer option s or b.
Restrictions
Silent ring is limited to the Cisco IP Phone 7960 and the Cisco IP Phone Expansion Module 7914.
SUMMARY STEPS
1.
2.
3.
4.
DETAILED STEPS
EXAMPLE
The following example sets button 3 for silent ring:
ephone 4mac-address 1234.5678.abcdbutton 1:10 2:11 3s12Designating International Language and Tone Support
This task allows you to designate an ISO-3166 code for the language used in IP phone displays and for locale-specific call progress tones and cadences.
SUMMARY STEPS
1.
2.
3.
4.
DETAILED STEPS
EXAMPLE
The following example sets the locale for display language and call progress tones to France:
telephony-serviceuser-locale FRnetwork-locale FRTroubleshooting Tips
To display the current locale codes that are associated with dictionary, language, and call progress tone files, use the show telephony-service tftp-bind command.
Configuring Music on Hold from a Live Feed
The live feed MoH connection is established as an automatically connected voice call either by the Cisco ITS MoH system itself or by an external source directly calling into the live feed MoH port, including calls via VoIP with voice activity detection (VAD) disabled.
The recommended interface for live feed MoH is an analog E&M port because it requires the minimum number of external components. You directly connect a line level audio feed (standard audio jack) to pins 3 and 6 of an E&M RJ-45 connector. The E&M WAN interface card (WIC) has a built-in audio transformer that provides appropriate electrical isolation for the external audio source. (The audio connection on the E&M port does not require loop-current). The signal immediate and auto-cut-through commands disable E&M signaling on this voice port. A G.711 audio packet stream is generated by the digital signal processor (DSP) on the E&M port.
If you are using an FXO voice port for live-feed MoH instead of an E&M port, connect the MoH source to the FXO voice port. This connection requires an external adapter device to supply normal telephone company (telco) battery voltage with the correct polarity to the tip and ring leads of the FXO port. The adapter device must also provide transformer-based isolation between the external audio source and the tip and ring leads of the FXO port.
Music from a live feed is continuously fed into the MoH playout buffer instead of being read from in-flash file. There is typically a 2-second delay. The outbound call to the MoH live-feed source is attempted (or reattempted) every 30 seconds until connected by the directory number that has been configured for MoH.
Restrictions
•
•
•
SUMMARY STEPS
1.
2.
3.
4.
5.
6.
7.
8.
9.
10.
11.
12.
13.
14.
DETAILED STEPS
Step 1
voice-port port
Example:Router(config)# voice-port 1/1/0
Enters voice-port configuration mode. To find the correct definition of the port argument for your router, refer to the Cisco IOS Voice, Video, and Fax Command Reference, Release 12.2 T.
Step 2
input gain decibels
Example:Router(config-voice-port)# input gain 0
Specifies, in decibels, the amount of gain to be inserted at the receiver side of the interface. Acceptable values are integers from -6 to 14.
Step 3
auto-cut-through
Example:Router(config-voice-port)# auto-cut-through
(E&M ports only) Enables call completion when a PBX does not provide an M-lead response. MoH requires that you use this command with E&M ports.
Step 4
operation 4-wire
Example:Router(config-voice-port)# operation 4-wire(E&M ports only) Selects 4-wire cabling scheme. MoH requires that you specify 4-wire operation with this command for E&M ports.
Step 5
signal immediate
Example:Router(config-voice-port)# signal immediate
(E&M ports only) For E&M tie trunk interfaces, directs the calling side to seize a line by going off-hook on its E-lead and to send address information as DTMF digits.
Step 6
exit
Example:Router(config-voice-port)# exit
Exits voice-port configuration mode.
Step 7
dial peer voice tag pots
Example:Router(config)# dial peer voice 7777 pots
Enters dial-peer configuration mode.
Step 8
destination-pattern string
Example:Router(config-dial-peer)# destination-pattern 7777
Specifies either the prefix or the full E.164 telephone number to be used for a dial peer.
Step 9
port port
Example:Router(config-dial-peer)# port 1/1/0
Associate a dial peer with a specific voice port. To find the correct definition of the port argument for your router, refer to the Cisco IOS Voice, Video, and Fax Command Reference, Release 12.2T.
Step 10
exit
Example:Router(config-dial-peer)# exit
Exits dial-peer configuration mode.
Step 11
ephone-dn dn-tag
Example:Router(config)# ephone-dn 55
Enters ephone-dn configuration mode.
Step 12
number number
Example:Router(config-ephone-dn)# number 5555
Defines a valid directory number for a Cisco IP phone.
Step 13
moh out-call outcall-number
Example:Router(config-ephone-dn)# moh out-call 7777
Specifies the number to be called for a live feed to be used for MoH.
Step 14
exit
Example:Router(config-ephone-dn)# exit
Exits ephone-dn configuration mode.
EXAMPLE
The following example enables MoH on voice port 1/1/0 and dial peer 7777:
voice-port 1/1/0auto-cut-throughoperation 4-wiresignal immediate!dial-peer voice 7777 potsdestination-pattern 7777port 1/1/0!ephone-dn 55number 5555moh out-call 7777Troubleshooting Tips
The following commands can help troubleshoot live-feed MoH:
•
•
Enabling System Speed Dial
The system speed dial feature creates a list of frequently used numbers that is accessible to all IP phones. System speed dial is optional, and it is enabled only if a file called speeddial.xml is present in the Flash memory of the ITS router. Figure 2 shows a sample speeddial.xml file.
When an administrative user places the speeddial.xml file in router Flash memory, the speed-dial list that it contains is automatically integrated into the local directory services XML page that is provided to a phone when its Directory button is pressed.
Prerequisites
•
•
Figure 2 Sample speeddial.xml file
SUMMARY STEPS
1.
2.
3.
4.
DETAILED STEPS
EXAMPLE
The following example enables the Cisco Web browser and sets the HTTP path to Flash memory so that the speeddial.xml file in Flash memory is accessible to IP phones:
ip http serverip http path flashTroubleshooting Tips
•
Disabling the Local Directory Service
This Local Directory Service Disable feature allows you to disable the HTTP access mechanism that normally allows IP phones to access the local directory information provided by the ITS router. HTTP access to the local directory information is provided without validating that the accessing HTTP client is actually an authorized IP phone.
SUMMARY STEPS
1.
2.
3.
DETAILED STEPS
EXAMPLE
The following example disables the local directory on IP phones served by this router:
telephony-serviceno service local-directoryCustomizing an IP Phone Header Bar
For Cisco IP Phone 7940s and Cisco IP Phone 7960s with black header bars as shown in Figure 1, the Customizing an IP Phone Header Bar feature allows you to define the description that appears on the top line (black bar or header bar) of the display for the primary dialed number of a Cisco IP phone. Normally the header bar simply replicates the text appearing next to the first button. This feature allows you to specify different text for the header bar. For example, you can use this feature to display the complete E.164 telephone number at the top of the display instead of the extension number that appears next to the line button.
SUMMARY STEPS
1.
2.
3.
DETAILED STEPS
EXAMPLE
The following example provides the department and full E.164 number for a phone line in the phone header bar:
ephone-dn 55description "Marketing 408-555-5555"Specifying an Idle Message for Cisco IP Phone 7940 and Cisco IP Phone 7960
The Idle Message feature allows you to define a URL that contains an XML file to be displayed on Cisco IP Phone 7940s and Cisco IP Phone 7960s that are not in use, and to specify a refresh interval for the display, in seconds. The file can contain text, icons, or images, and must conform to the Cisco XML DTD that is described in Cisco IP Phone Services Application Development Notes.
SUMMARY STEPS
1.
2.
3.
DETAILED STEPS
EXAMPLE
The following example specifies that a file called logo.htm should be displayed on IP phones when they are not being used:
telephony-serviceurl idle http://www.abcwrecking.com/public/logo.htm idle-timeout 35
Configuring Administrative User Classes
Previous versions of Cisco ITS allowed two levels of users: administrative users and normal users. Cisco ITS V2.1 divides administrative users into two classes: system administrators and customer administrators. System administrators can configure all ITS features systemwide. Customer administrators are limited to a configurable subset of GUI functionality that is defined in an XML file. The file follows a template that conforms to the Cisco XML DTD. A sample file is shown in Figure 4, and the template is shown in Figure 3. The template is one of the files downloaded in the ITS V2.1 file set.
Cisco ITS V2.1 also provides support for XML cascading style sheets (files with .css suffix) that can be used to customize the browser GUI display.
Previous versions of Cisco ITS supported administrative user authentication on the local router only. Cisco ITS V2.1 supports AAA authentication for system administrators through a RADIUS or TACACS+ server. If authentication through the server fails, the local router is searched.
Prerequisites
•
•
Figure 3 Configurable Administrative User Class XML File Template
Figure 4 Sample XML file to Configure Administrative User Classes
Restrictions
•
•
•
Note
SUMMARY STEPS
1.
2.
3.
4.
5.
6.
7.
8.
9.
DETAILED STEPS
EXAMPLE
The following example establishes a system administrator named admin with full privileges and a password of admin, and a customer administrator named custadmin with limited privileges. The file called sample.xml contains the customization instructions to limit the GUI that custadmin sees.
telephony-serviceweb admin system name admin password adminweb admin customer name custadmin password zebraweb customize load sample.xmlSpecifying an Enhanced Dial-Plan Pattern
The keyword extension-pattern has been added to the dialplan-pattern command to allow additional manipulation of IP phone abbreviated extension number prefix digits.
The leading digits of the pattern specified by the extension-pattern keyword are stripped and replaced by the corresponding leading digits of the dial-plan pattern, which avoids DID numbers like 408-550-0001 resulting in 4-digit extension numbers like 0001.
SUMMARY STEPS
1.
2.
3.
DETAILED STEPS
EXAMPLE
The following example maps the extension pattern 4.. to the last three digits of the dial-plan pattern 4085556000:
telephony-servicedialplan-pattern 1 4085556000 extension-length 3 extension-pattern 4..Adding Support for the Cisco IP Phone Expansion Module 7914
Up to two Cisco IP Phone Expansion Module 7914s can be added to a Cisco IP Phone 7960 or Cisco IP Phone 7940. Once an expansion module is attached to a phone, the ITS router must be configured to recognize the presence of the module and must be loaded with firmware for the module. Note that the IP phone does not automatically detect the presence of the expansion module.
SUMMARY STEPS
1.
2.
3.
4.
5.
6.
7.
DETAILED STEPS
EXAMPLE
The following example enables two Cisco IP Phone Expansion Module 7914s on the phone with tag 4:
ephone 4type 7960 addon 1 7914 2 7914telephony-serviceload 7914 S00103020002tftp-server flash:S00103020002.binRebooting Phones After Configuration Updates
After you update information for a phone associated with an ITS router, the phone must be rebooted using one of the following commands:
•
•
The reset command takes significantly longer to process than the restart command when you are updating multiple phones, but it must be used when you update phone firmware, user locale, network locale, or URL parameters. For simple button, line, or speed-dial changes, use the restart command.
Note
This section describes the following tasks:
•
•
•
Rebooting Phones with the reset Command
The reset command is used to reboot IP phones after you update phone firmware, user locale, network locale, or URL parameters.
SUMMARY STEPS
1.
2.
3.
DETAILED STEPS
EXAMPLE
The following example performs a complete sequential reboot of all phones associated with the ITS router:
telephony-servicereset sequence-allRebooting One Phone with the restart Command
The restart command is used to reboot IP phones after you make simple button, line, or speed-dial changes.
SUMMARY STEPS
1.
2.
3.
DETAILED STEPS
EXAMPLE
The following example performs a fast reboot of ephone 1:
!ephone 1restart!Rebooting All Phones with the restart Command
The restart command is used to reboot IP phones after you make simple button, line, or speed-dial changes.
SUMMARY STEPS
1.
2.
3.
DETAILED STEPS
EXAMPLE
The following example performs a fast reboot of all phones associated with the ITS router:
!telephony-servicerestart all!Additional References
Additional information related to Cisco IOS Telephony Service V2.1 is available in the following references:
•
•
Related Documents
Previous versions of Cisco IOS Telephony Service
Cisco IOS Telephony Service
Cisco XML DTDs for IP phone applications
Cisco IP Phone Services Application Development Notes
Cisco IP Phones
•
•
TCL scripts and programming
•
•
Voice and telephony command reference
Cisco IOS Voice, Video, and Fax Command Reference, Release 12.2 T
Standards
ITU-T H.450.2
H.450.2 Call Transfer Supplementary Service for H.323
ITU-T H.450.3
H.450.3 Call Diversion Supplementary Service for H.323
1 Not all supported standards are listed.
MIBs
No new or modified MIBs are supported by this feature, and support for existing MIBs has not been modified by this feature.
To obtain lists of supported MIBs by platform and Cisco IOS release, and to download MIB modules, go to the Cisco MIB website on Cisco.com at the following URL:
http://www.cisco.com/public/sw-center/netmgmt/cmtk/mibs.shtml
1 Not all supported MIBs are listed.
To locate and download MIBs for selected platforms, Cisco IOS releases, and feature sets, use Cisco MIB Locator found at the following URL:
http://tools.cisco.com/ITDIT/MIBS/servlet/index
If Cisco MIB Locator does not support the MIB information that you need, you can also obtain a list of supported MIBs and download MIBs from the Cisco MIBs page at the following URL:
http://www.cisco.com/public/sw-center/netmgmt/cmtk/mibs.shtml
To access Cisco MIB Locator, you must have an account on Cisco.com. If you have forgotten or lost your account information, send a blank e-mail to cco-locksmith@cisco.com. An automatic check will verify that your e-mail address is registered with Cisco.com. If the check is successful, account details with a new random password will be e-mailed to you. Qualified users can establish an account on Cisco.com by following the directions found at this URL:
RFCs
No new or modified RFCs are supported by this feature, and support for existing RFCs has not been modified by this feature.
—
1 Not all supported RFCs are listed.
Technical Assistance
Command Reference
This section documents new and modified commands. All other commands used with this feature are documented in the Cisco IOS Release 12.2 command reference publications.
New Commands
•
•
•
Modified Commands
•
application (telephony-service)
To select the session-level application for all Cisco IP phone lines served by the Cisco IOS Telephony Service (ITS) router, use the application command in telephony-service configuration mode. To disable this application, use the no form of this command.
application application-name
no application application-name
Syntax Description
Defaults
DEFAULT session application
Command Modes
Telephony-service configuration
Command History
Usage Guidelines
Use this command to assign a tool command language (TCL) IVR application to all IP phones served by the ITS router.
Examples
The following example selects a TCL IVR application named app-xfer for all IP phones served by the ITS router:
Router(config)# telephony-serviceRouter(config-telephony-service) application app-xferRelated Commands
telephony-service
Enables Cisco ITS and enters telephony-service configuration mode.
button
To associate directory numbers (DNs) with individual buttons on a Cisco IP phone and specify ring behavior, use the button command in ephone configuration mode. To delete DNs from buttons on a Cisco IP phone, use the no form of this command.
button button-number{: | b | s}dn-tag [[button-number{: | b | s}dn-tag] ...]
no button button-number{: | b | s}dn-tag [[button-number{: | b | s}dn-tag] ...]
Syntax Description
Defaults
No default behavior or values
Command Modes
Ephone configuration
Command History
Usage Guidelines
The button command assigns telephone lines to the Cisco IP phones by assigning a button number to a Cisco IP phone directory number.
Telephone services such as call waiting and three-party conferences require a minimum of two phone lines (directory numbers defined with the ephone-dn command) to be available and configured on a Cisco IP phone. The Cisco IP Phone 7910 has only one physical line button. To support call waiting and three-party conferences on a Cisco IP Phone 7910, a second (hidden) line is required. This line cannot be selected directly using a line button. You can access the second line when you press the Conference button.
Silent ring can be configured with the s or b keyword in Cisco IOS Telephony Service (ITS) V2.1 or a later version. Silent ring can be configured on any type of phone, but typically you would only configure silent ring on a phone with multiple lines, such as a Cisco IP Phone 7940, a Cisco IP Phone 7960, or a Cisco IP Phone Expansion Module 7914.
Examples
The following example assigns four button numbers on the phone to directory number tags, and button 4 has a silent ring:
Router(config)# ephone 1Router(config-ephone)# button 1:1 2:4 3:16 4s19Related Commands
call-forward pattern
To specify a pattern for calling-party numbers that are able to support the ITU-T H.450.3 standard for call forwarding, use the call-forward pattern command in telephony-service configuration mode. To remove the pattern, use the no form of this command.
call-forward pattern pattern
no call-forward pattern pattern
Syntax Description
Defaults
No default behavior or values
Command Modes
Telephony-service configuration
Command History
Usage Guidelines
Use this command with Cisco IOS Telephony Service (ITS) V2.1 or a later version.
When H.450.3 call forwarding is selected, the router must be configured with a Tool Command Language (TCL) script that supports the H.450.3 protocol. The TCL script is loaded on the ITS router with the call application voice command.
The pattern match in this command is against the phone number of the calling party. When an ITS directory number has forwarded its calls and an incoming call is received for that number, the ITS router sends an H.450.3 response back to the original calling party to request that the call be placed again using the forward-to destination.
Calling numbers that do not match the patterns defined with this command are forwarded using Cisco-proprietary call forwarding for backward compatibility.
Examples
The following example specifies that all 4-digit directory numbers beginning with 4 should use the H.450.3 standard whenever they are forwarded:
Router(config)# telephony-serviceRouter(config-telephony-service)# call-forward pattern 4...The following example forwards all calls using the H.450.3 standard:
Router(config)# telephony-serviceRouter(config-telephony-service)# call-forward pattern .TRelated Commands
create cnf-files
To build the XML configuration files that are required for Cisco IOS Telephony Service (ITS) V2.1 or a later version, use the create cnf-files command in telephony-service configuration mode.
create cnf-files
Syntax Description
This command has no arguments or keywords.
Defaults
No default behavior or values
Command Modes
Telephony-service configuration
Command History
Usage Guidelines
Use this command to build XML configuration files for Cisco ITS V2.1 or later versions during initial system setup.The XML files created by this command are located in an in-RAM file system at system:/its.
Examples
The following example builds the necessary XML configuration files on the ITS router:
Router(config)# telephony-serviceRouter(config-telephony-service)# create cnf-filesRelated Commands
telephony-service
Enables Cisco IOS Telephony Service and enters telephony-service configuration mode.
description (ephone-dn)
To specify the directory number description to appear in the header bar of Cisco IP phones using Cisco IOS Telephony Service (ITS), use the description command in ephone-dn configuration mode. To return to the default, use the no form of this command.
description string
no description
Syntax Description
string
Text to appear in the header bar of an IP phone. This is a quoted string with spaces allowed.
Defaults
The directory number of the first line on the phone appears in the header bar.
Command Modes
Ephone-dn configuration
Command History
Usage Guidelines
Use this command with Cisco ITS V2.1 or a later version.
Examples
The following example defines a header bar display for the phone with directory number 71355:
Router(config)# ephone-dn 71355Router(config-ephone-dn)# description "Marketing 888-737-1355"Related Commands
ephone-dn
Enters ephone-dn configuration mode and configures directory numbers for Cisco IP phone lines.
dialplan-pattern (telephony-service)
To map an abbreviated extension number prefix digit pattern to a full E.164 telephone number pattern, use the dialplan-pattern command in telephony-service configuration mode. To disable the dialplan-pattern command settings, use the no form of this command.
dialplan-pattern tag pattern extension-length length [extension-pattern extension-pattern] [no-reg]
no dialplan-pattern tag [pattern extension-length length extension-pattern extension-pattern]
Syntax Description
Defaults
No default behavior or values
Command Modes
Telephony-service configuration
Command History
Usage Guidelines
Directory numbers for the Cisco IP phones are expected to be entered in extension number format. The extension number should be greater or equal to the extension length. Otherwise, the extension number cannot be converted to a qualified E.164 number. The dialplan-pattern command creates a global prefix that can be used to expand the abbreviated extension numbers to fully qualified E.164 numbers. The dial-plan pattern is also required to register the Cisco IP phone lines with a gatekeeper. The dialplan-pattern command can resolve an incoming call with a full E.164 number to a Cisco IP phone extension number.
The extension-length keyword enables the system to convert a full E.164 telephone number back to an extension number for the purposes of caller-ID display and for received-call and missed-call lists. For example, a company uses extension number range 5000 to 5099 across several sites, with only the extensions 5000 to 5009 present on the local router. An incoming call from 5044 arrives from the company's internal VoIP H.323 network and this call includes the calling number as 4085555044 in its full E.164 format.
The no-reg keyword provides dialing flexibility. You have the option not to register some specific numbers with the gatekeeper so that those numbers can be used for other telephony services.
When a called number matches a dial-plan pattern, the call is considered a local call and has a distinctive ring identifying the call as internal. Any call that does not match a dial-plan pattern is considered an external call and has a distinctive ring that is different from the internal ring. The valid dial-plan pattern with the lowest tag is used as a prefix to all local Cisco IP phone numbers.
The number of extension-pattern characters must match the extension length that is specified in this command. For example, if the extension length is three, then the extension-pattern can be 8.., 1.., 5.., and so forth.
Examples
The following example shows how to create dial-plan pattern 1 for extension numbers 5001 to 5099 with the telephone prefix starting with 408555. If the following example is set, the routers recognize that the 4085555044 matches dial-plan pattern 1, and uses the extension-length keyword to extract the last four digits of the number 5044 and present this as the caller ID for the incoming call.
Router(config)# telephony-serviceRouter(config-telephony-service)# dialplan-pattern 1 40855550.. extension-length 4 no-regIn the following example the dialplan-pattern command creates dial-plan pattern 1 for extensions 801 to 899 with the telephone prefix starting with 4085559. As each number in the extension pattern is declared with the number command, two POTs dial peers are created. In the following example, they are 801 (an internal office number) and 408-555-9001 (an external number).
Router(config)# telephony-serviceRouter(config-telephony-service)# dialplan-pattern 1 4085559... extension-length 3 extension-pattern 8..Router(config-telephony-service)# ephone-dn 1Router(config-ephone-dn)# number 801Related Commands
telephony-service
Enables Cisco IOS Telephony Service (ITS) and enters telephony-service configuration mode.
h450 h450-2 timeout
To specify timeout values for call transfers using the ITU-T H.450.2 standard, use the h450 h450-2 timeout command in H.323 voice service configuration mode. To return to the default, use the no form of this command.
h450 h450-2 timeout {T1 | T2 | T3 | T4}
milliseconds
no h450 h450-2 timeout {T1 | T2 | T3 | T4}
Syntax Description
Defaults
T1 timer is 2000 milliseconds.
T2 timer is 5000 milliseconds.
T3 timer is 5000 milliseconds.
T4 timer is 5000 milliseconds.Command Modes
H323 voice service configuration
Command History
Usage Guidelines
Use this command with Cisco IOS Telephony Service (ITS) V2.1 or a later version.
This command is primarily used when the default settings for these timers do not match your network delay parameters. Refer to the ITU-T H.450.2 specification for more information on these timers.
Examples
The following example defines a T1 timeout of 3000 milliseconds:
Router(config)# voice service voipRouter(conf-voi-serv)# h323Router(conf-serv-h323)# h450 h450-2 timeout T1 3000Related Commands
h323
Enables H.323 voice service configuration commands.
voice service
Enters voice-service configuration mode.
h450 h450-3 timeout
To specify timeout values for call forwarding using the ITU-T H.450.3 standard, use the h450 h450-3 timeout command in H.323 voice service configuration mode. To return to the default, use the no form of this command.
h450 h450-3 timeout T1 milliseconds
no h450 h450-3 timeout T1
Syntax Description
T1
Timeout value to wait for a rerouting response.
milliseconds
Number of milliseconds. Range is from 500 to 60000. Default is 5000.
Defaults
T1 timer is 5000 milliseconds.
Command Modes
H323 voice service configuration
Command History
Usage Guidelines
Use this command with Cisco IOS Telephony Service (ITS) V2.1 or a later version.
This command is primarily used when the default setting for this timer does not match your network delay parameters. Refer to the ITU-T H.450.3 specification for more information on these timers.
Examples
The following example defines a T1 timeout of 3000 milliseconds:
Router(config)# voice service voipRouter(conf-voi-serv)# h323Router(conf-serv-h323)# h450 h450-3 timeout T1 3000Related Commands
h323
Enables H.323 voice service configuration commands.
voice service
Enters voice-service configuration mode.
load (telephony-service)
To associate a phone firmware file with a type of Cisco IP phone, use the load command in telephony-service configuration mode. To disassociate a phone firmware file with a type of Cisco IP phones, use the no form of this command.
load phone-type firmware-file
no load phone-type firmware-file
Syntax Description
Defaults
No default behavior or values
Command Modes
Telephony-service configuration
Command History
Usage Guidelines
This command updates the Cisco IOS Telephony Service (ITS) configuration file for the specified type of IP phone to add the name of the correct firmware file that it should load. This filename also provides the version number for the phone firmware that is in the file. Later, whenever a phone is started or rebooted the phone reads the configuration file to determine the name of the firmware file that it should load and then looks for that firmware file on the TFTP server.
Cisco IP phones update themselves with new phone firmware whenever they are initially started up or reloaded.
A separate load command is needed for each type of phone. The Cisco IP Phone 7960 and Cisco IP Phone 7940 have the same phone firmware and share the 7960-7940 keyword.
When specifying the phone firmware filename in this command, do not use any file extension. For example, if the firmware file for Cisco IP Phone Expansion Module 7914s is named W05473955.bin, you enter load 7914 W05473955.
Following the load command, you use the tftp-server command to enable TFTP access to the file by Cisco IP phones. Note that the tftp-server command requires that you use the file extension as part of the filename.
Examples
The following example identifies the Cisco IP phone firmware file that is used by Cisco IP Phone 7960 and Cisco IP Phone 7910, and then defines the ITS router Flash memory as the location of the phone firmware file:
Router(config)# telephony-serviceRouter(config-telephony-service)# load 7960-7940 P00303020209Router(config-telephony-service)# load 7910 P00403020209Router(config-telephony-service)# exitRouter(config)# tftp-server flash:P00303020209.binRouter(config)# tftp-server flash:P00403020209.binRelated Commands
moh (ephone-dn)
To enable music on hold from a external live audio feed (standard line level audio connection) connected directly to the router by an FXO or an E&M analog voice port for Cisco IP phones using Cisco IOS Telephony Service (ITS), use the moh command in ephone-dn configuration mode. To disable music on hold from a live feed, use the no form of this command
moh out-call outcall-number
no moh out-call outcall-number
Syntax Description
Defaults
No default behavior or values
Command Modes
Ephone-dn configuration
Command History
Usage Guidelines
An MoH connection is established as an automatically connected voice call. The MoH call can be established either by the ITS MoH system itself, or by any external source directly calling into the MoH directory number (including calls over voice over IP (VoIP) if voice activity detection (VAD) is disabled). The typical operation is for the ITS MoH directory number to establish an MoH call to a local router E&M voice port.
Connection via E&M is the recommended mechanism because it requires minimal external components. The E&M port must be placed in 4-wire operation, using E&M immediate signaling and with the auto-cut-through option enabled.
The recommended interface for live feed MoH is an analog E&M port because it requires the minimum number of external components. You directly connect a line level audio feed (standard audio jack) to pins 3 and 6 of an E&M RJ-45 connector. The E&M WAN interface card (WIC) has a built-in audio transformer that provides appropriate electrical isolation for the external audio source. (The audio connection on the E&M port does not require loop-current). The signal immediate and auto-cut-through commands disable E&M signaling on this voice port. A G.711 audio packet stream is generated by the digital signal processor (DSP) on the E&M port.
If you are using an FXO voice port for live-feed MoH instead of an E&M port, connect the MoH source to the FXO voice port. This connection requires an external adapter device to supply normal telephone company (telco) battery voltage with the correct polarity to the tip and ring leads of the FXO port. The adapter device must also provide transformer-based isolation between the external audio source and the tip and ring leads of the FXO port.
Music from a live feed is continuously fed into the MoH playout buffer instead of being read from an audio file in Flash memory. There is typically a 2-second delay with live-feed MoH.
The outbound call to the MoH live-feed source is attempted (or re-attempted) every 30 seconds until connected by the directory number that has been configured for MoH.
If you also configure the moh command with the filename argument in telephony-service configuration mode, MoH will fall back to playing music from an audio file if the live music feed is interrupted.
Examples
The following example establishes a live music-on-hold source by setting up a call to extension 7777:
Router(config)# ephone-dn 55Router(config-ephone-dn)# moh out-call 7777Related Commands
network-locale
To set the definition of the tones and cadences on the Cisco IP Phone 7940 and Cisco IP Phone 7960 for a specific geographic area, use the network-locale command in telephony-service configuration mode. To disable selection of a code, use the no form of this command.
network-locale locale-code
no network-locale locale-code
Syntax Description
locale-code
The following ISO-3166 codes are valid entries:
•
•
•
•
•
Defaults
The default country code is US (United States).
Command Modes
Telephony-service configuration
Command History
Usage Guidelines
Use this command with Cisco IOS Telephony Service (ITS) V2.1 or a later version.
The show telephony-service tftp-bind command displays the locale that is currently associated with call progress tone files, and which has been set using this command.
Examples
The following example sets tones and cadences for France:
Router(config)# telephony-serviceRouter(config-telephony-service)# network-locale FRRelated Commands
reset (telephony-service)
To perform a complete reboot of one or all phones associated with a Cisco IOS Telephony Service (ITS) router, use the reset command in telephony-service configuration mode. To interrupt and cancel a sequential reset cycle, use the no form of the command.
reset {all [time-interval] | cancel | mac-address mac-address | sequence-all}
no reset all
Syntax Description
Defaults
time-interval is 15.
Command Modes
Telephony-service configuration
Command History
Usage Guidelines
After you update information for one or more phones associated with an ITS router, the phone or phones must be rebooted. There are two commands to reboot the phones: reset and restart. The reset command performs a "hard" reboot similar to a power-off-power-on sequence. It reboots the phone and sources the DHCP server and TFTP server to update from their information as well. The restart command performs a "soft" reboot by simply rebooting the phone without contacting the DHCP and TFTP servers. The reset command takes significantly longer to process than the restart command when you are updating multiple phones, but it must be used to update phone firmware, user locale, network locale, or URL parameters. For simple button, line, or speed-dial changes, you can use the restart command.
When using the reset command, the default time interval of 15 seconds is recommended for an 8- to 10-phone office so that all the phones do not attempt to access TFTP server resources simultaneously. This value should be modified accordingly for larger networks.
When you use the reset sequence-all command, the router waits for one phone to complete its reset before starting to reset the next phone. The delay provided by this command prevents multiple phones attempting to access the TFTP server simultaneously and therefore failing to reset properly. Each reset operation can take several minutes when you use this command. There is a reset timeout of 4 minutes, after which the router stops waiting for the currently registering phone to complete registration and starts to reset the next phone.
The reset sequence-all command is required when the phone firmware version, user locale, or network locale is changed, and is automatically selected over the reset all command when any of those three parameters are changed. However, this automatic selection of the reset sequence-all command can be overridden by using the reset all time-interval command when the time interval is set to some value other than the default of 15 seconds.
To interrupt and terminate an ongoing sequential reset cycle, use the reset cancel command.
The restart all command allows the system to perform quick phone resets in which only the button template, line information, and speed-dial information is updated. Refer to the command reference entry for restart all for more information.
Examples
The following example resets all IP phones served by this ITS router:
Router(config)# telephony-serviceRouter(config-telephony-service)# reset allThe following example resets the Cisco IP phone with the MAC address CFBA.321B.96FA:
Router(config)# telephony-serviceRouter(config-telephony-service)# reset mac-address CFBA.321B.96FAThe following example resets all IP phones in sequential, non-overlapping order:
Router(config)# telephony-serviceRouter(config-telephony-service)# reset sequence-allRelated Commands
restart (ephone)
To perform a fast reboot of a single phone associated with a Cisco IOS Telephony Service (ITS) router after updating buttons, lines, or speed-dial numbers, use the restart command in ephone configuration mode. To cancel the reboot, use the no form of this command.
restart
no restart
Syntax Description
This command has no arguments or keywords.
Defaults
No default behavior or values
Command Modes
Ephone configuration
Command History
Usage Guidelines
This command causes the system to perform a fast phone reset in which only the button template, lines, and speed-dial numbers are updated on the phone. For updates related to phone firmware, user locale, network locale, or URL parameters, use the reset command. The restart command is much faster than the reset command because the phone does not need to access the DHCP or TFTP server.
To restart all phones in an ITS system for quick changes to buttons, lines, and speed-dial numbers, use the restart all command in telephony-service configuration mode.
Examples
The following example restarts the phone with tag 1:
Router(config)# ephone 1Router(config-ephone)# restartRelated Commands
restart all (telephony-service)
To perform a fast reboot of all phones associated with a Cisco IOS Telephony Service (ITS) router after updating buttons, lines, or speed-dial numbers, use the restart all command in telephony-service configuration mode. To cancel the reboot, use the no form of this command.
restart all
no command
Syntax Description
This command has no arguments or keywords.
Defaults
No default behavior or values
Command Modes
Telephony-service configuration
Command History
Usage Guidelines
This command causes the system to perform a fast phone reset in which only the button template, lines, and speed-dial numbers are updated on the phone. For updates related to phone firmware, user locale, network locale, or URL parameters, use the reset command.
Use the restart all command to reboot IP phones after quick changes to buttons, lines, and speed-dial numbers. It is much faster than the reset command because the phone does not access the DHCP or TFTP server.
To restart a single phone, use the restart command in ephone configuration mode.
Examples
The following example performs a quick restart of all phones in the ITS system:
Router(config)# telephony-serviceRouter(config-telephony-service)# restart allRelated Commands
service local-directory
To enable the availability of the local directory service on IP phones served by Cisco IOS Telephony Service (ITS), use the service local-directory command in telephony service configuration mode. To disable the display, use the no form of this command.
service local-directory
no service local-directory
Syntax Description
This command has no arguments or keywords.
Defaults
Local directory service is available on IP phones.
Command Modes
Telephony-service configuration
Command History
Usage Guidelines
Use this command with Cisco ITS V2.1 or a later version.
The local directory service is available on IP phones by default.
Examples
The following example specifies that the directory service should not be available on the IP phones served by this ITS router:
Router(config)# telephony-serviceRouter(config-telephony-service)# no service local-directoryRelated Commands
telephony-service
Enables Cisco ITS and enters telephony-service configuration mode.
show telephony-service tftp-bind
To display the current network-locale and user-locale codes that are being used for international language support for IP phones, use the show telephony-service tftp-bind command in privileged EXEC mode.
show telephony-service tftp-bind
Syntax Description
This command has no arguments or keywords.
Command Modes
Privileged EXEC
Command History
Usage Guidelines
Use this command with Cisco IOS Telephony Service (ITS) V2.1 or a later version.
This command provides a list of dictionary, language, and tone configuration files that are associated with the ISO-3166 codes that have been selected using the user-locale and network-locale commands.
Examples
The following is sample output from the show telephony-service tftp-bind command when the ISO-3166 code for Germany has been selected for both language and tones:
Router(config)# show telephony-service tftp-bind
tftp-server system:/its/SEPDEFAULT.cnf
tftp-server system:/its/SEPDEFAULT.cnf alias SEPDefault.cnf
tftp-server system:/its/XMLDefault.cnf.xml alias XMLDefault.cnf.xml
tftp-server system:/its/ATADefault.cnf.xml
tftp-server system:/its/XMLDefault7960.cnf.xml alias SEP00036B54BB15.cnf.xml
tftp-server system:/its/germany/7960-font.xml alias German_Germany/7960-font.xml
tftp-server system:/its/germany/7960-dictionary.xml alias German_Germany/7960-dictionary.xml
tftp-server system:/its/germany/7960-kate.xml alias German_Germany/7960-kate.xml
tftp-server system:/its/germany/SCCP-dictionary.xml alias German_Germany/SCCP-dictionary.xml
tftp-server system:/its/germany/7960-tones.xml alias Germany/7960-tones.xml
Related Commands
transfer-mode
To specify the type of call transfer for an individual IP phone directory number using the ITU-T H.450.2 standard, use the transfer-mode command in ephone-dn configuration mode. To remove this specification, use the no form of this command.
transfer-mode {blind | consult}
no transfer-mode
Syntax Description
blind
Transfers calls without consultation using a single phone line.
consult
Transfers calls with consultation using a second phone line, if available.
Defaults
No default behavior or values
Command Modes
Ephone-dn configuration
Command History
Usage Guidelines
This command specifies the type of call transfer for an individual Cisco IP phone line that is using the ITU-T H.450.2 protocol. It allows you to override the system default transfer-system setting (full-consult or full-blind) for that line.
Call transfers using H.450.2 can be blind or consultative. A blind transfer is one in which the transferring phone connects the caller to a destination line before ringback begins. A consultative transfer is one in which the transferring party either connects the caller to a ringing phone (ringback heard) or speaks with the third party before connecting the caller to the third party.
You can specify blind or consultative transfer on a systemwide basis with the transfer-system command. The systemwide setting can then be overridden for individual phone lines with the transfer-mode command. For example, in an ITS network that is set up for consultative transfer, a specific line with an auto-attendant that automatically transfers incoming calls to specific extension numbers can be set to use blind transfer, because auto-attendants do not use consultative transfer.
Use this command with Cisco IOS Telephony Service (ITS) V2.1 or a later version.
Examples
The following example sets blind mode for call transfers from this directory number:
Router(config)# ephone-dn 21354Router(config-ephone-dn)# transfer-mode blindRelated Commands
transfer-system
To specify the call transfer method for all IP phones on a Cisco IOS Telephony Service (ITS) router using the ITU-T H.450.2 standard, use the transfer-system command in telephony-service configuration mode. To disable the call transfer method, use the no form of this command.
transfer-system {blind | full-blind | full-consult | local-consult}
no transfer-system
Syntax Description
Defaults
blind
Command Modes
Telephony-service configuration
Command History
Usage Guidelines
Use this command with Cisco ITS V2.1 or a later version.
Call transfers using the H.450.2 standard can be blind or consultative. A blind transfer is one in which the transferring phone connects the caller to a destination line before ringback begins. A consultative transfer is one in which the transferring party either connects the caller to a ringing phone (ringback heard) or speaks with the third party before connecting the caller to the third party. When H.450.2 call transfer is selected using the full-blind or full-consult keyword, the router must be configured with a Tool Command Language (TCL) script that supports the H.450.3 protocol. The TCL script is loaded on the ITS router with the call application voice command.
You can specify blind or consultative transfer on a systemwide basis with the transfer-system command. The systemwide setting can then be overridden for individual phone lines with the transfer-mode command. For example, in an ITS network that is set up for consultative transfer, a specific line with an auto-attendant that automatically transfers incoming calls to specific extension numbers can be set to use blind transfer, because auto-attendants cannot use consultative transfer.
Examples
The following example sets full consultation as the call transfer method for this ITS phone network:
Router(config)# telephony-serviceRouter(config-telephony-service)# transfer-system full-consultRelated Commands
type (ephone)
To define a phone type or to define one or two add-on phone modules for a Cisco IP phone, use the type command in ephone configuration mode. To remove a definition, use the no form of this command.
type phone-type [addon 1 module-type [2 module-type]]
no type phone-type [addon 1 module-type [2 module-type]]
Syntax Description
Defaults
No default behavior or values
Command Modes
Ephone configuration
Command History
Usage Guidelines
Use this command with Cisco IOS Telephony Service (ITS) V2.1 or a later version.
In ITS V2.1, the only phones you are required to identify with the type command are the Cisco ATA-186 or the Cisco ATA-188. Cisco IOS software is able to identify all other phone types, but will take the configured value if found.
In ITS V2.1, the only phones that can accept an add-on module are the Cisco IP Phone 7940 and the Cisco IP Phone 7960.
Examples
The following example defines an IP phone with tag 10 as a Cisco IP Phone 7960 with two attached Cisco IP Phone Expansion Module 7914s:
Router(config)# ephone 10Router(config-ephone)# type 7960 addon 1 7914 2 7914The following example defines the IP phone with tag 4 as a Cisco ATA device:
Router(config)# ephone 4Router(config-ephone)# mac 1234.87655.234Router(config-ephone)# type ataRelated Commands
url idle
To specify a file to display on an IP phone that is not in use, use the url idle command in telephony-service configuration mode. To disable display of the file, use the no form of this command.
url idle url idle-timeout seconds
no url idle
Syntax Description
url
Uniform resource location as defined in RFC 2396.
idle-timeout seconds
Time interval between display refreshes, in seconds. Range is from 0 to 300.
Defaults
No default behavior or values
Command Modes
Telephony-service configuration
Command History
Usage Guidelines
Use this command with Cisco IOS Telephony Service (ITS) V2.1 or a later version.
The file that is displayed must be encoded in XML using the Cisco XML DTD. For more information about Cisco DTD formats, refer to Cisco IP Phone Services Application Development Notes.
Examples
The following example specifies that the file logo.htm should be displayed on IP phones when they are not being used, and that the display should be refreshed every 12 seconds:
Router(config)# telephony-serviceRouter(config-telephony-service)# url idle http://mycompany.com/files/logo.xml idle-timeout 12Related Commands
telephony-service
Enables Cisco ITS and enters telephony-service configuration mode.
user-locale
To set the language for displays on the Cisco IP Phone 7940 and Cisco IP Phone 7960, use the user-locale command in telephony-service configuration mode. To disable selection of a language, use the no form of this command.
user-locale language-code
no user-locale language-code
Syntax Description
language-code
The following ISO-3166 codes are valid entries:
•
•
•
•
•
Defaults
The default code is US (United States).
Command Modes
Telephony-service configuration
Command History
Usage Guidelines
Use this command with Cisco IOS Telephony Service (ITS) V2.1 or a later version.
The show telephony-service tftp-bind command displays the locale that is currently associated with dictionary and language files, and which has been set using this command.
Examples
The following example sets the IP phone display language to French:
Router(config)# telephony-serviceRouter(config-telephony-service)# user-locale FRRelated Commands
web admin customer
To define a username and password for a Cisco IOS Telephony System (ITS) customer administrator, use the web admin customer command in telephony-service configuration mode. To disable a customer administrator login, use the no form of this command.
web admin customer name username {password string | secret {0 | 5} string}
no web admin customer
Syntax Description
Defaults
A customer administrator named Customer with no password is defined.
Command Modes
Telephony-service
Command History
Usage Guidelines
Use this command with Cisco IOS Telephony Service (ITS) V2.1 or a later version.
Examples
The following example defines a customer administrator named user22 whose password is pw567890:
Router(config)# telephony-serviceRouter(config-telephony-service)# web admin customer name user22 password pw567890Related Commands
telephony-service
Enables Cisco ITS and enters telephony-service configuration mode.
web admin system
To define a username and password for a Cisco IOS Telephony Service (ITS) system administrator, use the web admin system command in telephony-service configuration mode. To disable a customer administrator login, use the no form of this command.
web admin system name username {password string | secret {0 | 5} string}
no web admin system
Syntax Description
Defaults
A system administrator named Admin with no password is defined.
Command Modes
Telephony-service
Command History
Usage Guidelines
Use this command with Cisco ITS V2.1 or a later version.
Examples
The following example establishes a system administrator named user1 whose password is pw234567:
Router(config)# telephony-serviceRouter(config-telephony-service)# web admin system name user1 password pw234567Related Commands
telephony-service
Enables Cisco ITS and enters telephony-service configuration mode.
web customize load
To load and parse an eXtensible Markup Language (XML) file in router Flash memory to customize a graphical user interface (GUI) for a customer administrator using Cisco IOS Telephony Service (ITS), use the web customize load command in telephony-service configuration mode. To disable the customized GUI and fall back to the system administrator GUI, use the no form of this command.
web customize load filename
no web customize load
Syntax Description
filename
Loads and parses the specified file.
•
Defaults
The standard system administrator GUI is used.
Command Modes
Telephony-service configuration
Command History
Usage Guidelines
Use this command with Cisco ITS V2.1 or a later version.
Examples
The following example specifies a file named cust_admin_gui.xml as the file that defines the GUI for ITS customer administrators:
Router(config)# telephony-serviceRouter(config-telephony-service)# web customize load cust_admin_gui.xmlRelated Commands
telephony-service
Enables Cisco ITS and enters telephony-service configuration mode.
Glossary
ITU—International Telecommunication Union.
ITU-T—ITU Telecommunication Standardization Sector.
Note
 Feedback