- Configuration Quick Reference
- Cisco Services Ready Engine Virtualization Overview
- Installing the Cisco SRE Service Module into the Router
- Configuring the Cisco SRE Service Module Interfaces
- Installing and Managing the Cisco SRE-V Software
- Managing the VMware vSphere Hypervisor License
- Managing Virtual Machines
- Managing RAID
- Recovering from Device or Software Failure
Installation and Configuration Guide for Cisco Services Ready Engine Virtualization Release 2.0
Bias-Free Language
The documentation set for this product strives to use bias-free language. For the purposes of this documentation set, bias-free is defined as language that does not imply discrimination based on age, disability, gender, racial identity, ethnic identity, sexual orientation, socioeconomic status, and intersectionality. Exceptions may be present in the documentation due to language that is hardcoded in the user interfaces of the product software, language used based on RFP documentation, or language that is used by a referenced third-party product. Learn more about how Cisco is using Inclusive Language.
- Updated:
- December 15, 2011
Chapter: Managing Virtual Machines
- Downloading and Installing the vSphere Client
- Downloading the VMware vCenter Server
- Managing the Cisco SRE Service Module with the VMware vCenter Server
- About Lockdown Mode
- Important Information About Creating Virtual Machines
- Information About vSwitches
- VMware vSphere Hypervisor Advanced Customization
- Network Analysis Module Support
- Console Takes a Long Time to Reboot After Resetting System Configuration
- Cannot Change the VMware vSphere Hypervisor IP Address from the vSphere Console Interface
- Changing the IP Address of the VMware vSphere Hypervisor's Management Network
- Changing the Management Network Link
- Modifying Access to the DCUI
- VMware vSphere Hypervisor Does Not Remain in a Shutdown State
- Adding the Virtual Machines in the Same Subnet as the VMware vSphere Hypervisor
Managing Virtual Machines
A virtual machine is a software computer (just like a physical computer) that runs an operating system and applications. Virtual machines run on the VMware vSphere Hypervisor. You can use the same VMware vSphere Hypervisor to run several virtual machines. Use the vSphere Client GUI to create and manage virtual machines. Use the VMware vCenter Server to manage multiple VMware vSphere Hypervisor hosts.
•![]() Downloading and Installing the vSphere Client
Downloading and Installing the vSphere Client
•![]() Downloading the VMware vCenter Server
Downloading the VMware vCenter Server
•![]() Managing the Cisco SRE Service Module with the VMware vCenter Server
Managing the Cisco SRE Service Module with the VMware vCenter Server
•![]() Important Information About Creating Virtual Machines
Important Information About Creating Virtual Machines
•![]() VMware vSphere Hypervisor Advanced Customization
VMware vSphere Hypervisor Advanced Customization
Downloading and Installing the vSphere Client
To manage the virtual machine, you must download and install the vSphere Client on a Microsoft Windows system with Microsoft .NET 3.5 SP1 framework.
The vSphere Client contains an online tutorial for first-time users. It also contains embedded in-line getting started assistance, which allows you to set up your virtual infrastructure through an easy to use, step-by-step process. If you are an experienced user, you can choose to turn-off the getting started in-line assistance.

Note ![]() To download the vSphere Client, connection to the Internet is required. Before you download the vSphere Client, verify that you have network connectivity.
To download the vSphere Client, connection to the Internet is required. Before you download the vSphere Client, verify that you have network connectivity.
Procedure
Step 1 ![]() Go to https://hypervisor-ip-address.
Go to https://hypervisor-ip-address.
You are directed to the VMware website and the Welcome page opens.
Step 2 ![]() Click Download vSphere Client, and then click Run to download the vSphere Client. The VMware vSphere Client is installed and a shortcut icon to the client appears on your desktop.
Click Download vSphere Client, and then click Run to download the vSphere Client. The VMware vSphere Client is installed and a shortcut icon to the client appears on your desktop.
Step 3 ![]() Click the VMware vSphere Client icon to open the login window.
Click the VMware vSphere Client icon to open the login window.
Step 4 ![]() To manage a single VMware vSphere Hypervisor, enter the IP address or hostname of the VMware vSphere Hypervisor and the username and password, and then click Login. The vSphere Client GUI opens.
To manage a single VMware vSphere Hypervisor, enter the IP address or hostname of the VMware vSphere Hypervisor and the username and password, and then click Login. The vSphere Client GUI opens.
Note ![]() If you are a first-time user of the VMware vSphere Hypervisor, use root for the username; and for the password, leave the field empty. After you login, we recommend that you change the password.
If you are a first-time user of the VMware vSphere Hypervisor, use root for the username; and for the password, leave the field empty. After you login, we recommend that you change the password.
Note ![]() If you purchased the Cisco SRE-V option 3 (hardware, plus virtualization software, plus Microsoft Windows software), a virtual machine is provided to you by default. For Cisco SRE-V options, see Figure 1-3.
If you purchased the Cisco SRE-V option 3 (hardware, plus virtualization software, plus Microsoft Windows software), a virtual machine is provided to you by default. For Cisco SRE-V options, see Figure 1-3.
Step 5 ![]() From the vSphere Client main page, do one of the following:
From the vSphere Client main page, do one of the following:
•![]() To use the existing virtual machine that is provided to you by default with your Cisco SRE-V software option 3, do the following:
To use the existing virtual machine that is provided to you by default with your Cisco SRE-V software option 3, do the following:
–![]() From the left navigation tree, click the host name to expand it, and then choose the virtual machine.
From the left navigation tree, click the host name to expand it, and then choose the virtual machine.
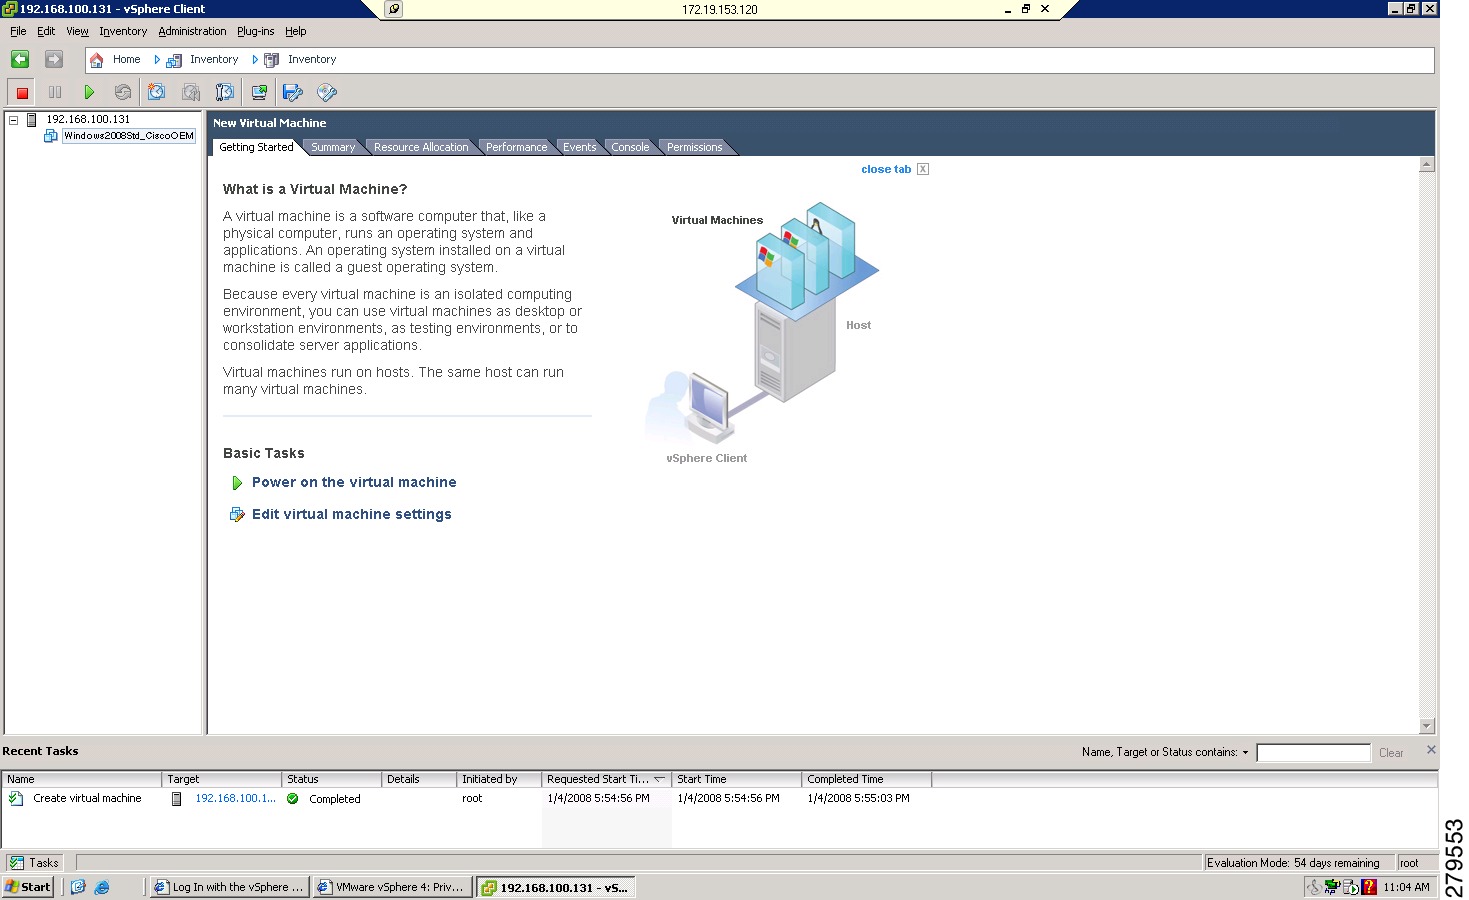
–![]() Follow the instructions that are displayed in the right pane under the Getting Started tab. See Figure 6-1.
Follow the instructions that are displayed in the right pane under the Getting Started tab. See Figure 6-1.
Figure 6-1 vSphere Client Inventory Page with a Virtual Machine Selected
•![]() To create a new virtual machine, see the "Important Information About Creating Virtual Machines" section, and then do the following:
To create a new virtual machine, see the "Important Information About Creating Virtual Machines" section, and then do the following:
–![]() From the left navigation tree, choose the host name.
From the left navigation tree, choose the host name.
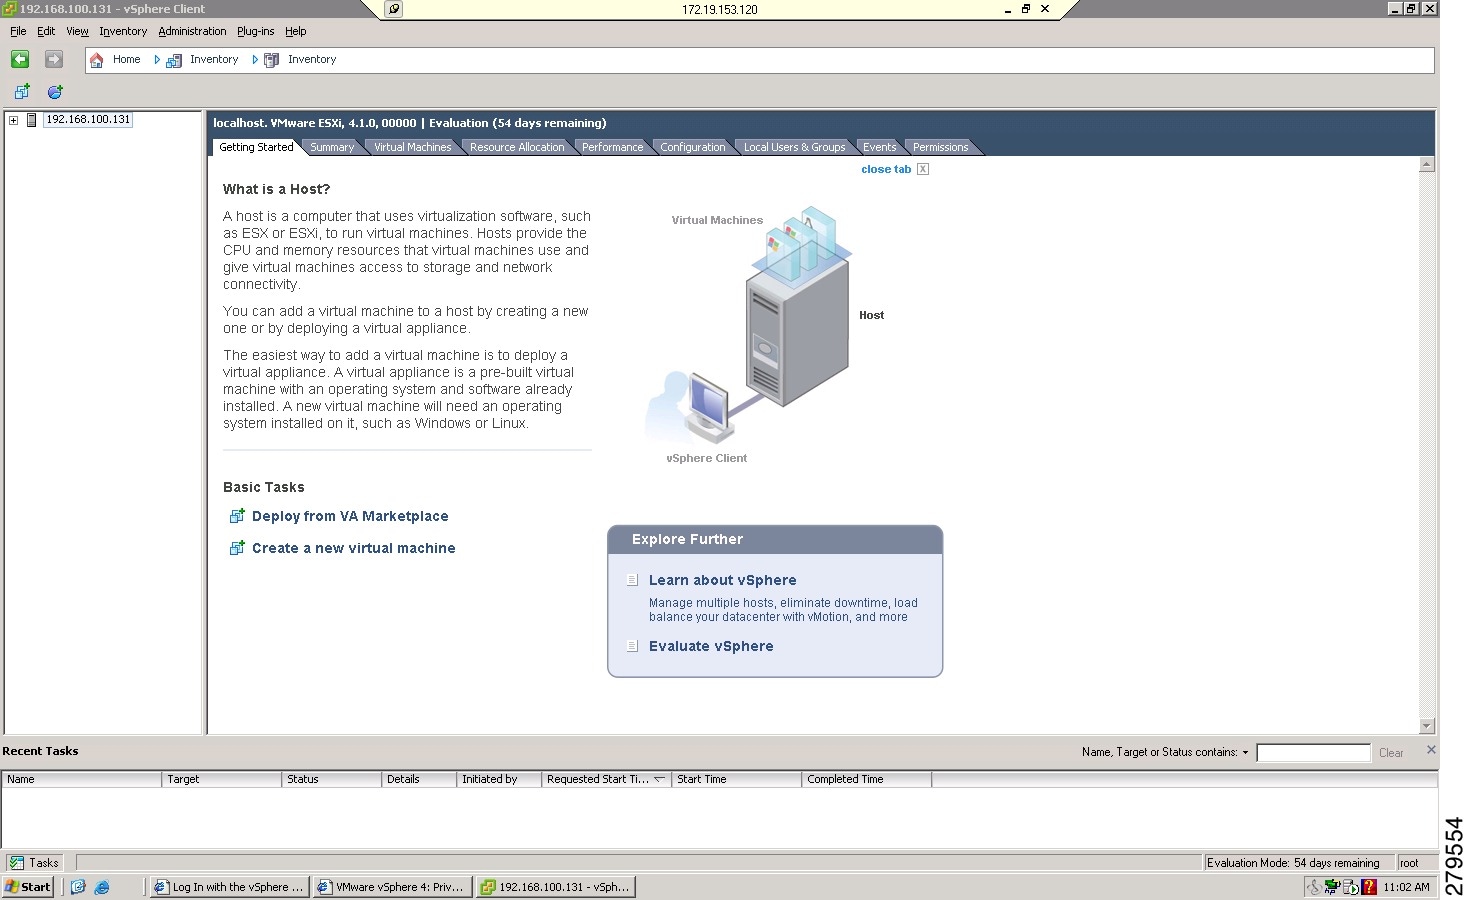
–![]() Follow the instructions that are displayed in the right pane under the Getting Started tab. See Figure 6-2.
Follow the instructions that are displayed in the right pane under the Getting Started tab. See Figure 6-2.
Figure 6-2 vSphere Client Inventory Page with the Host Name Selected
Note ![]() If you are an experienced user, you can choose to remove the Getting Started tab from your view. Go to Edit > Client Settings. The General tab is selected by default. From the Tasks pane, uncheck the Show Getting Started Tab checkbox.
If you are an experienced user, you can choose to remove the Getting Started tab from your view. Go to Edit > Client Settings. The General tab is selected by default. From the Tasks pane, uncheck the Show Getting Started Tab checkbox.
Step 6 ![]() To manage the virtual machines, use the functionality provided by the vSphere Client.
To manage the virtual machines, use the functionality provided by the vSphere Client.
Related Topics
•![]() Downloading the VMware vCenter Server
Downloading the VMware vCenter Server
•![]() Managing the Cisco SRE Service Module with the VMware vCenter Server
Managing the Cisco SRE Service Module with the VMware vCenter Server
•![]() Important Information About Creating Virtual Machines
Important Information About Creating Virtual Machines
Downloading the VMware vCenter Server
To manage multiple VMware vSphere Hypervisor hosts, download the VMware vCenter Server.
Before You Begin
•![]() Download and install the vSphere Client. See the "Downloading and Installing the vSphere Client" section.
Download and install the vSphere Client. See the "Downloading and Installing the vSphere Client" section.
•![]() To download the VMware vCenter Server, connection to the Internet is required. Verify that you have network connectivity.
To download the VMware vCenter Server, connection to the Internet is required. Verify that you have network connectivity.
Procedure
Step 1 ![]() Go to https://hypervisor-ip-address.
Go to https://hypervisor-ip-address.
You are directed to the VMware website and the Welcome page opens.
Step 2 ![]() Click Download VMware vCenter.
Click Download VMware vCenter.
For information on the VMware vCenter Server, see vSphere Installation and Setup at http://pubs.vmware.com/vsphere-50/topic/com.vmware.ICbase/PDF/vsphere-esxi-vcenter-server-50-installation-setup-guide.pdf.
Managing the Cisco SRE Service Module with the VMware vCenter Server
Before You Begin
•![]() Download and install the vSphere Client. See "Downloading and Installing the vSphere Client" section.
Download and install the vSphere Client. See "Downloading and Installing the vSphere Client" section.
•![]() Download the VMware vCenter Server. See "Downloading the VMware vCenter Server" section.
Download the VMware vCenter Server. See "Downloading the VMware vCenter Server" section.
Procedure
Step 1 ![]() Click the VMware vSphere Client icon to open the login window.
Click the VMware vSphere Client icon to open the login window.
Step 2 ![]() To manage multiple hosts, enter the IP address or hostname of the VMware vCenter Server, and the username and password of the VMware vCenter Server, and then click Login.
To manage multiple hosts, enter the IP address or hostname of the VMware vCenter Server, and the username and password of the VMware vCenter Server, and then click Login.
The vSphere Client GUI opens.
Step 3 ![]() From the vSphere Client main page, do the following:
From the vSphere Client main page, do the following:
a. ![]() Create a datastore.
Create a datastore.
b. ![]() Add a VMware vSphere Hypervisor host. The Add Host Wizard page opens.
Add a VMware vSphere Hypervisor host. The Add Host Wizard page opens.
c. ![]() Provide the IP address, and the username and password of the VMware vSphere Hypervisor host.
Provide the IP address, and the username and password of the VMware vSphere Hypervisor host.
For details, see vSphere Installation and Setup at http://pubs.vmware.com/vsphere-50/topic/com.vmware.ICbase/PDF/vsphere-esxi-vcenter-server-50-installation-setup-guide.pdf.
About Lockdown Mode
The VMware vSphere Hypervisor allows a host to be in lockdown mode when it is controlled by the VMware vCenter Server.
•![]() Behavior When Lockdown Mode is Disabled
Behavior When Lockdown Mode is Disabled
•![]() Behavior When Lockdown Mode is Enabled
Behavior When Lockdown Mode is Enabled
•![]() Determining if Lockdown Mode is Enabled
Determining if Lockdown Mode is Enabled
Behavior When Lockdown Mode is Disabled
By default, lockdown mode is disabled. When lockdown mode is disabled, all router and module communication commands behave normally.
Behavior When Lockdown Mode is Enabled
When lockdown mode is enabled, the VMware vSphere Hypervisor host can be only be managed by the VMware vCenter Server using its internal user called vpxuser. All other configuration methods, such as the vSphere Client, PowerCLI, and vCLI are disabled.
Table 6-1 describes the behavior of commands when lockdown mode is enabled.
Determining if Lockdown Mode is Enabled
To see if lockdown mode is enabled, enter the service-module sm slot/0 status command. If lockdown mode is enabled, the system displays (LOCKDOWN) in the output. See the following example:
VMware ESXi 5.0.0 build-469512 running on SRE (LOCKDOWN)
Note ![]() It can take up to ten seconds after enabling lockdown mode before the system recognizes it.
It can take up to ten seconds after enabling lockdown mode before the system recognizes it.
For more details about the VMware vSphere Hypervisor lockdown mode, see the VMware Knowledge Base article at http://kb.vmware.com/selfservice/microsites/search.do?language=en_US&cmd=displayKC&externalId=1008077.
Important Information About Creating Virtual Machines
If you purchased the Cisco SRE-V option 3 (hardware, plus virtualization software, plus Microsoft Windows software), a virtual machine with VMware tools and datastore(s) is provided to you by default. You can create additional virtual machines if needed.
If you purchased the Cisco SRE-V option 1 (hardware only, without the virtualization or Microsoft Windows software) or option 2 (hardware plus virtualization software), you must create virtual machines.
For information about the Cisco SRE-V options, see Figure 1-3.
See the following sections:
•![]() Basic Workflow for Creating Virtual Machines
Basic Workflow for Creating Virtual Machines
•![]() Limitations for Creating Virtual Machines
Limitations for Creating Virtual Machines
•![]() Networking Prerequisites for Creating Virtual Machines
Networking Prerequisites for Creating Virtual Machines
Basic Workflow for Creating Virtual Machines
1. ![]() (Optional) Create a datastore in Cisco SRE-V.
(Optional) Create a datastore in Cisco SRE-V.
2. ![]() Create the virtual machine.
Create the virtual machine.
3. ![]() Install the operating system on the virtual machine.
Install the operating system on the virtual machine.
4. ![]() Configure networking (external) for a virtual machine.
Configure networking (external) for a virtual machine.
5. ![]() Configure networking (internal) for a virtual machine.
Configure networking (internal) for a virtual machine.
For instructions, see the vSphere Client online help.
Limitations for Creating Virtual Machines
Before creating virtual machines, note the following limitations:
•![]() Each virtual machines has its own resource limitations, such as CPU core number and memory size.
Each virtual machines has its own resource limitations, such as CPU core number and memory size.
•![]() Virtual Symmetric Multiprocessing (vSMP) is not supported.
Virtual Symmetric Multiprocessing (vSMP) is not supported.
•![]() Physical peripheral devices, such as serial port is not supported.
Physical peripheral devices, such as serial port is not supported.
•![]() The physical USB device, which is plugged into the USB port in the front panel of the Cisco SRE Service Module, must not exceed 500 mA (2.5 Watt). For information about assigning USB devices to a virtual machine, see the vSphere user guide.
The physical USB device, which is plugged into the USB port in the front panel of the Cisco SRE Service Module, must not exceed 500 mA (2.5 Watt). For information about assigning USB devices to a virtual machine, see the vSphere user guide.
Related Topic
•![]() Downloading and Installing the vSphere Client
Downloading and Installing the vSphere Client
Networking Prerequisites for Creating Virtual Machines
If you want to assign virtual machines on different VLANs, you must configure VLANs on the ISR G2.
Example
interface SM1/1
description Internal switch interface connected to Service Module
switchport mode trunk
!
interface Vlan50
ip address 50.50.50.5 255.255.255.0
!
interface Vlan60
ip address 60.60.60.6 255.255.255.0
Related Topic
•![]() Downloading and Installing the vSphere Client
Downloading and Installing the vSphere Client
Installing VMware Tools
VMware Tools are a suite of utilities that enhances the performance of the virtual machine's guest operating system and improves the management of the virtual machine.
If you purchased the Cisco SRE-V option 3 (hardware, plus virtualization software, plus Microsoft Windows software), a virtual machine with VMware tools is provided to you by default so you do not need to install VMware tools on that machine. But, if you create a new virtual machine, you must install VMware tools on that virtual machine.
If you purchased the Cisco SRE-V option 1 (hardware only, without the virtualization or Microsoft Windows software) or option 2 (hardware plus virtualization software), you must install VMware tools after you create the virtual machine.
For information about the Cisco SRE-V options, see Figure 1-3.
Before You Begin
•![]() Install the supported guest operating system on the virtual machine.
Install the supported guest operating system on the virtual machine.
Procedure
Step 1 ![]() Go to the vSphere Client GUI main page.
Go to the vSphere Client GUI main page.
Step 2 ![]() From the left navigation tree, click the host name to expand it.
From the left navigation tree, click the host name to expand it.
Step 3 ![]() Right-click the virtual machine in which you want to install VMware tools, and then choose Power > Power On.
Right-click the virtual machine in which you want to install VMware tools, and then choose Power > Power On.
Step 4 ![]() Click the Console tab to make sure that the guest operating system starts successfully, and log in if necessary.
Click the Console tab to make sure that the guest operating system starts successfully, and log in if necessary.
Step 5 ![]() Right-click the virtual machine in which you want to install VMware tools, choose Guest, and then choose Install/Upgrade VMware Tools.
Right-click the virtual machine in which you want to install VMware tools, choose Guest, and then choose Install/Upgrade VMware Tools.
The Install VMware Tools confirmation dialog box opens.
Step 6 ![]() Click Ok in the confirmation dialog box.
Click Ok in the confirmation dialog box.
Step 7 ![]() Log into the virtual machine.
Log into the virtual machine.
Step 8 ![]() Go to Start > Open Windows Explorer.
Go to Start > Open Windows Explorer.
Step 9 ![]() Under Computer, click on the VMware Tools folder, and then choose VMware Tools or VMware Tools 64 as appropriate.
Under Computer, click on the VMware Tools folder, and then choose VMware Tools or VMware Tools 64 as appropriate.
The VMware Installation Wizard opens.
Step 10 ![]() Follow the steps in the wizard to complete the installation.
Follow the steps in the wizard to complete the installation.
Step 11 ![]() Click Finish.
Click Finish.
Step 12 ![]() Choose Yes when prompted to restart your system.
Choose Yes when prompted to restart your system.
Step 13 ![]() To verify the VMware tools installation status, click the Summary tab in the vSphere Client GUI. You should see VM Tools - Status OK.
To verify the VMware tools installation status, click the Summary tab in the vSphere Client GUI. You should see VM Tools - Status OK.
For more information, see The VMware Tools Installation Guide For Operating System Specific Packages document.
Related Topic
•![]() Downloading and Installing the vSphere Client
Downloading and Installing the vSphere Client
Information About vSwitches
The system creates the following vSwitches in the VMware vSphere Hypervisor:
•![]() vSwitch0—Uses the PCIe interface to connect to the VMware vSphere Hypervisor. The PCIe interface is sm slot/0.
vSwitch0—Uses the PCIe interface to connect to the VMware vSphere Hypervisor. The PCIe interface is sm slot/0.
vSwitch0 contains the VMkernel port group for the Management Network. The Management Network is used by the vSphere client to connect to the VMware vSphere Hypervisor.
Note ![]() For the Cisco IOS service-module commands to take effect, make sure that the Management Network VMkernel port group is configured to use the vSwitch that has the PCIe interface as the uplink. We recommend that you do not change the default VMkernel port group name, which is Management Network.
For the Cisco IOS service-module commands to take effect, make sure that the Management Network VMkernel port group is configured to use the vSwitch that has the PCIe interface as the uplink. We recommend that you do not change the default VMkernel port group name, which is Management Network.
•![]() vSwitch1—By default, vSwitch1 is connected to the MGF interface of the Cisco SRE Service Module. The MGF interface is sm slot/1.
vSwitch1—By default, vSwitch1 is connected to the MGF interface of the Cisco SRE Service Module. The MGF interface is sm slot/1.
vSwitch1 contains the VM Network port group, which can be used by guest virtual machines.
VMware vSphere Hypervisor Advanced Customization
•![]() Network Analysis Module Support
Network Analysis Module Support
•![]() Console Takes a Long Time to Reboot After Resetting System Configuration
Console Takes a Long Time to Reboot After Resetting System Configuration
•![]() Cannot Change the VMware vSphere Hypervisor IP Address from the vSphere Console Interface
Cannot Change the VMware vSphere Hypervisor IP Address from the vSphere Console Interface
•![]() Changing the IP Address of the VMware vSphere Hypervisor's Management Network
Changing the IP Address of the VMware vSphere Hypervisor's Management Network
•![]() Changing the Management Network Link
Changing the Management Network Link
•![]() VMware vSphere Hypervisor Does Not Remain in a Shutdown State
VMware vSphere Hypervisor Does Not Remain in a Shutdown State
•![]() Adding the Virtual Machines in the Same Subnet as the VMware vSphere Hypervisor
Adding the Virtual Machines in the Same Subnet as the VMware vSphere Hypervisor
Network Analysis Module Support
By default, the Network Analysis Module (NAM) capability is enabled on Cisco SRE-V. Only one NAM capable service module is supported in a ISR G2. Therefore, if the ISR G2 contains more than one NAM, make sure that you keep one NAM enabled, and disable the rest of the NAMs.
•![]() To disable a NAM, use the following command from tech-support:
To disable a NAM, use the following command from tech-support:
# esxcfg-advcfg --user-var CiscoRBCPNAMCapable --set-user-var 0
•![]() To enable a NAM, use the following command from tech-support:
To enable a NAM, use the following command from tech-support:
# esxcfg-advcfg --user-var CiscoRBCPNAMCapable --set-user-var 1
Reboot the Cisco SRE Service Module for the change to take effect.
Console Takes a Long Time to Reboot After Resetting System Configuration
When you choose the Reset System Configuration option from the vSphere console interface, the console reboots after a time interval of approximately two minutes. This is expected behavior.
Cannot Change the VMware vSphere Hypervisor IP Address from the vSphere Console Interface
When you use the vSphere console interface to change the IP address of the VMware vSphere Hypervisor, that IP address change is temporary and does not appear after you reboot the Cisco SRE Service Module. When you reboot the Cisco SRE Service Module, you notice that the IP address that you had configured using the following Cisco IOS command is in effect:
service-module ip address hypervisor-ip-address subnet-mask
If you want to change the IP address of the VMware vSphere Hypervisor, see the "Changing the IP Address of the VMware vSphere Hypervisor's Management Network" section.
Changing the IP Address of the VMware vSphere Hypervisor's Management Network
To change the IP address of the VMware vSphere Hypervisor, do the following:
1. ![]() Enter interface configuration mode for the slot and port where the Cisco SRE Service Module resides. For example:
Enter interface configuration mode for the slot and port where the Cisco SRE Service Module resides. For example:
Router(config)# interface sm 1/0
Router(config-if)#
2. ![]() Enter the following commands:
Enter the following commands:
Router(config-if)# service-module heartbeat-reset disable
Router(config-if)# no service-module ip default-gateway hypervisor-gateway-ip-address
Router(config-if)# no service-module ip address hypervisor-ip-address subnet-mask
3. ![]() Use the vSphere console interface to change the IP address of the VMware vSphere Hypervisor.
Use the vSphere console interface to change the IP address of the VMware vSphere Hypervisor.
Changing the Management Network Link
From the vSphere client, go to Home > Inventory > Configuration > Networking. Notice that under Virtual Network: vswitch0, the Management Network is connected to the Physical Adapter vmnic1, which is the PCIe link. To change this link, for example, from vmnic1 to vmic0, do the following:
1. ![]() Enter interface configuration mode for the slot and port where the Cisco SRE Service Module resides. For example:
Enter interface configuration mode for the slot and port where the Cisco SRE Service Module resides. For example:
Router(config)# interface sm 1/0
Router(config-if)#
2. ![]() Enter the following commands:
Enter the following commands:
Router(config-if)# service-module heartbeat-reset disable
Router(config-if)# no service-module ip default-gateway hypervisor-gateway-ip-address
Router(config-if)# no service-module ip address hypervisor-ip-address subnet-mask
Modifying Access to the DCUI
The value for the VMkernel.Boot.tty2Port is com1. Do not change this value.
Cisco IOS uses the com1 serial port to session into the console interface. The console interface allows you to access the VMware vSphere Hypervisor DCUI to perform Cisco SRE-V configuration. If you try to change the com1 port value from Advanced Settings in the vSphere Client GUI, you will not be able to access the Cisco SRE Service Module. To access the Cisco SRE Service Module, you must reinstall Cisco SRE-V.
VMware vSphere Hypervisor Does Not Remain in a Shutdown State
VMware vSphere Hypervisor cannot remain in a shutdown state, unless you disable heartbeat reset.
To disable heartbeat reset, do the following:
1. ![]() Enter interface configuration mode for the slot and port where the Cisco SRE Service Module resides. For example:
Enter interface configuration mode for the slot and port where the Cisco SRE Service Module resides. For example:
Router(config)# interface sm 1/0
Router(config-if)#
2. ![]() Enter the service-module heartbeat-reset disable command to disable heartbeat-reset:
Enter the service-module heartbeat-reset disable command to disable heartbeat-reset:
Router(config-if)# service-module heartbeat-reset disable
Adding the Virtual Machines in the Same Subnet as the VMware vSphere Hypervisor
To add virtual machines in the same subnet as the VMware vSphere Hypervisor, complete the following steps.
PREREQUISITES
See the "Prerequisites for Configuring the Cisco SRE Service Module Interfaces" section.
SUMMARY STEPS
From the Host-Router CLI, enter:
1. ![]() enable
enable
2. ![]() configure terminal
configure terminal
Configure VLANs
1. ![]() interface vlan vlan_number
interface vlan vlan_number
2. ![]() ip address vlan-ip-address subnet mask
ip address vlan-ip-address subnet mask
3. ![]() no shut
no shut
4. ![]() end
end
Configure slot/0 of the VMware vSphere Hypervisor
1. ![]() interface sm slot/0
interface sm slot/0
2. ![]() ip unnumbered vlan vlan_number
ip unnumbered vlan vlan_number
3. ![]() service-module ip address hypervisor-ip-address subnet-mask
service-module ip address hypervisor-ip-address subnet-mask
4. ![]() service-module ip default-gateway hypervisor-gateway-ip-address
service-module ip default-gateway hypervisor-gateway-ip-address
5. ![]() no shut
no shut
6. ![]() exit
exit
7. ![]() ip route hypervisor-ip-address subnet-mask sm slot/0
ip route hypervisor-ip-address subnet-mask sm slot/0
Configure slot/1 of the VMware vSphere Hypervisor
1. ![]() interface sm slot/1
interface sm slot/1
2. ![]() switchport mode trunk
switchport mode trunk
3. ![]() [switchport trunk allowed vlan vlan_numbers]
[switchport trunk allowed vlan vlan_numbers]
4. ![]() exit
exit
Save Configuration
1. ![]() copy running-config startup-config
copy running-config startup-config
2. ![]() show running-config
show running-config
DETAILED STEPS
|
|
|
|
|---|---|---|
|
|
||
Step 1 |
enable <password> Router> enable Router> <password> Router# |
Enters privileged EXEC mode on the host router. Enter your password if prompted. |
Step 2 |
configure terminal Router# configure terminal |
Enters global configuration mode on the host router. |
|
|
||
Step 1 |
interface vlan vlan_number Router(config)# interface vlan1 |
Enters VLAN configuration mode for the specified VLAN number. |
Step 2 |
ip address vlan-ip-address subnet-mask Router(config-if)# ip address 10.0.0.100 255.255.255.0
|
Specifies the IP address for the VLAN. • • |
Step 3 |
no shut Router(config-if)# no shut |
Causes the interface to be administratively up. |
Step 4 |
end Router(config)# end |
Returns to global configuration mode on the host router. |
|
|
||
Step 1 |
interface sm slot/0 Router(config)# interface sm 1/0 |
Enters interface configuration mode for the slot and port where the Cisco SRE Service Module resides. |
Step 2 |
ip unnumbered vlan vlan_number Router(config-if)# ip unnumbered vlan1
|
The ip unnumbered command enables IP processing on the specified VLAN interface without assigning an explicit IP address to that interface. • Note |
Step 3 |
service-module ip address hypervisor-ip-address subnet-mask Router(config-if)# service-module ip address 10.0.0.1 255.255.255.0
|
Specifies the IP address of the VMware vSphere Hypervisor. • • |
Step 4 |
service-module ip default-gateway hypervisor-gateway-ip-address Router(config-if)# service-module ip default-gateway 10.0.0.100
|
Specifies the IP address of the default gateway for the VMware vSphere Hypervisor. • |
Step 5 |
no shut Router(config-if)# no shut |
Causes the interface to be administratively up. |
Step 6 |
exit Router(config)# exit |
Returns to global configuration mode on the host router. |
Step 7 |
ip route hypervisor-ip-address subnet-mask sm slot/0 Router(config)# ip route 10.0.0.1 255.255.255.255 SM1/0 |
Creates a static route. If you used the ip unnumbered command in Step 2, you must use the ip route hypervisor-ip-address subnet-mask sm slot/0 command to create a static route. • • |
|
|
||
Step 1 |
interface sm slot/1 Router(config)# interface sm 1/1 |
Enters interface configuration mode for the slot and port where the Cisco SRE Service Module resides. |
Step 2 |
switchport mode trunk Router(config-if)# switchport mode trunk |
Puts the port into permanent trunking mode. The default configuration is access mode. |
Step 3 |
[switchport trunk allowed vlan vlan_numbers]
Router(config-if)# switchport mode trunk Router(config-if)# switchport trunk allowed vlan 1-2,40,60,1002-1005 |
(Optional) Allows trunking on the specified VLANs. • |
Step 4 |
exit Router(config)# exit |
Returns to global configuration mode on the host router. |
|
|
||
Step 1 |
copy running-config startup-config Router# copy running-config startup-config |
Saves the new running configuration of the router as the startup configuration. |
Step 2 |
show running-config Router# show running-config |
Displays the running configuration of the router so that you can verify the address configurations. |
 Feedback