- Configuration Quick Reference
- Cisco Services Ready Engine Virtualization Overview
- Installing the Cisco SRE Service Module into the Router
- Configuring the Cisco SRE Service Module Interfaces
- Installing and Managing the Cisco SRE-V Software
- Managing the VMware vSphere Hypervisor License
- Managing Virtual Machines
- Managing RAID
- Recovering from Device or Software Failure
Installation and Configuration Guide for Cisco Services Ready Engine Virtualization Release 2.0
Bias-Free Language
The documentation set for this product strives to use bias-free language. For the purposes of this documentation set, bias-free is defined as language that does not imply discrimination based on age, disability, gender, racial identity, ethnic identity, sexual orientation, socioeconomic status, and intersectionality. Exceptions may be present in the documentation due to language that is hardcoded in the user interfaces of the product software, language used based on RFP documentation, or language that is used by a referenced third-party product. Learn more about how Cisco is using Inclusive Language.
- Updated:
- December 15, 2011
Chapter: Installing and Managing the Cisco SRE-V Software
Installing and Managing the Cisco SRE-V Software

Note ![]() Microsoft Windows software is not available for download from Cisco.com. You must install your own version of the Microsoft Windows Server 2003 or Microsoft Windows Server 2008 software.
Microsoft Windows software is not available for download from Cisco.com. You must install your own version of the Microsoft Windows Server 2003 or Microsoft Windows Server 2008 software.
•![]() Downloading and Installing the Cisco SRE-V Software
Downloading and Installing the Cisco SRE-V Software
•![]() Upgrading, Migrating, and Downgrading the Cisco SRE-V Software
Upgrading, Migrating, and Downgrading the Cisco SRE-V Software
•![]() Entering and Exiting the VMware vSphere Hypervisor DCUI
Entering and Exiting the VMware vSphere Hypervisor DCUI
•![]() Installing VMware and Other Applications
Installing VMware and Other Applications
Understanding RAID Options
When installing the Cisco SRE-V application on a Cisco SRE 900 or 910 Service Module, you can choose to store data files on local Redundant Array of Inexpensive Disks (RAID). The available RAID mode options are: RAID 1, RAID 0, and non-RAID.
Note ![]() RAID is not supported on the Cisco SRE 700 or 710 Service Module. It is supported on the Cisco SRE 900 and 910 Service Modules only.
RAID is not supported on the Cisco SRE 700 or 710 Service Module. It is supported on the Cisco SRE 900 and 910 Service Modules only.
Table 4-1 provides a summary of the RAID options.
See the following sections for more information:
RAID 1
RAID 1 does the following:
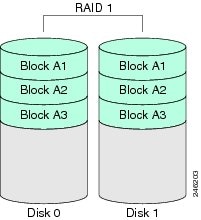
•![]() Creates a mirrored set of disk drives, where the data in both the disk drives is identical. See Figure 4-1.
Creates a mirrored set of disk drives, where the data in both the disk drives is identical. See Figure 4-1.
•![]() Provides high availability. If one disk drive fails, the other disk drive takes over, preserving the datastore.
Provides high availability. If one disk drive fails, the other disk drive takes over, preserving the datastore.
•![]() Supports fault tolerance and hot-swapping. When one disk drive fails, you can remove the faulty disk drive and replace it with a new disk drive. See the "Hot-Swapping the Faulty RAID 1 Disk Drive" section.
Supports fault tolerance and hot-swapping. When one disk drive fails, you can remove the faulty disk drive and replace it with a new disk drive. See the "Hot-Swapping the Faulty RAID 1 Disk Drive" section.
Compared to RAID 0, there is less storage space with RAID 1 because only half of the total potential disk storage space (465 GB) is available. This leads to a small impact on performance.
Figure 4-1 shows that in RAID 1, the data in disk 0 and disk 1 is identical (mirrored).
Figure 4-1 RAID 1 Option—Data in Disk 0 and Disk 1 Is Identical
RAID 0
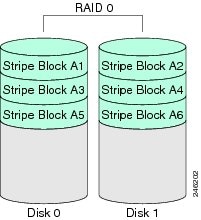
With RAID 0, the data is stored evenly in stripe blocks across two disk drives without redundancy (mirroring). The data in both the disk drives is different. See Figure 4-2.
Compared to RAID 1, RAID 0 provides additional storage because both the disk drives (927 GB) are used to store data. The performance is improved by two times because the read and write operation occurs in parallel within the two disk drives.
However, there is no fault tolerance, error checking, or hot-swapping. If one disk drive fails, the data in the entire array is destroyed. Because there is no error checking or hot-swapping, the array is susceptible to unrecoverable errors.
Figure 4-2 shows that in RAID 0, the data in disk 0 and disk 1 is different. The data is evenly divided across Disk 0 and Disk 1 without redundancy.
Figure 4-2 RAID 0—Data in Disk 0 and Disk 1 Is Different
Non-RAID
When the disk drives of a computer are not configured as RAID, the computer is in non-RAID mode. Non-RAID mode is also referred to as Just a Bunch of Disks or Just a Bunch of Drives (JBOD). Non-RAID mode does not support fault tolerance, error checking, hot-swapping, or redundancy.
Related Topics
•![]() Entering the RAID Management Command Environment
Entering the RAID Management Command Environment
•![]() Hot-Swapping the Faulty RAID 1 Disk Drive
Hot-Swapping the Faulty RAID 1 Disk Drive
Downloading and Installing the Cisco SRE-V Software
•![]() Downloading the Cisco SRE-V Software
Downloading the Cisco SRE-V Software
•![]() Installing the Cisco SRE-V Software—Clean Install
Installing the Cisco SRE-V Software—Clean Install
•![]() Uninstalling the Cisco SRE-V Software
Uninstalling the Cisco SRE-V Software
•![]() Verifying Software Installation or Uninstallation
Verifying Software Installation or Uninstallation
Downloading the Cisco SRE-V Software
Before You Begin
•![]() Ensure that you have the IP address or name of the FTP server in which you want to store the Cisco SRE-V software package file.
Ensure that you have the IP address or name of the FTP server in which you want to store the Cisco SRE-V software package file.
•![]() Verify that the FTP server is accessible.
Verify that the FTP server is accessible.
Procedure
Step 1 ![]() Go to http://www.cisco.com/go/ucse, click Download Software, and then download the Cisco SRE-V files:
Go to http://www.cisco.com/go/ucse, click Download Software, and then download the Cisco SRE-V files:
•![]() For the Cisco SRE 700 or 710 Service Module, download the following .zip file:
For the Cisco SRE 700 or 710 Service Module, download the following .zip file:
sre-v-k9.SPA.smv.2.0.0.zip
•![]() For the Cisco SRE 900 or 910 Service Module, download the following .zip file:
For the Cisco SRE 900 or 910 Service Module, download the following .zip file:
sre-v-k9-r.SPA.smv.2.0.0.zip
where r in the file name stands for RAID. RAID is supported on the Cisco SRE 900 and 910 Service Modules only.
Note ![]() If you use a file extractor tool designed for Windows, such as WinZip, you must disable CR/LF conversion of tar files. For example, in WinZip 9.0, choose Configuration > Miscellaneous, and then uncheck TAR file smart CR/LF conversion.
If you use a file extractor tool designed for Windows, such as WinZip, you must disable CR/LF conversion of tar files. For example, in WinZip 9.0, choose Configuration > Miscellaneous, and then uncheck TAR file smart CR/LF conversion.
Step 2 ![]() Extract the zip files to an FTP server. All files to be installed must reside in the same directory.
Extract the zip files to an FTP server. All files to be installed must reside in the same directory.
Step 3 ![]() Install the Cisco SRE-V software. See the "Installing the Cisco SRE-V Software—Clean Install" section or the "Migrating the Cisco SRE-V Software from Release 1.0 or 1.1 to Release 2.0" section as appropriate.
Install the Cisco SRE-V software. See the "Installing the Cisco SRE-V Software—Clean Install" section or the "Migrating the Cisco SRE-V Software from Release 1.0 or 1.1 to Release 2.0" section as appropriate.
Related Topics
•![]() Installing the Cisco SRE-V Software—Clean Install
Installing the Cisco SRE-V Software—Clean Install
•![]() Migrating the Cisco SRE-V Software from Release 1.0 or 1.1 to Release 2.0
Migrating the Cisco SRE-V Software from Release 1.0 or 1.1 to Release 2.0
Installing the Cisco SRE-V Software—Clean Install

Note![]() •
•![]() Cisco SRE-V software installation takes approximately 10 minutes. Depending on your network speed, the installation time can vary.
Cisco SRE-V software installation takes approximately 10 minutes. Depending on your network speed, the installation time can vary.
•![]() To view the status of the Cisco SRE-V installation, from the host-router CLI, enter the service-module sm slot/0 status command, as shown in the following example:
To view the status of the Cisco SRE-V installation, from the host-router CLI, enter the service-module sm slot/0 status command, as shown in the following example:
Router# service-module sm 1/0 status
Before you begin installing the Cisco SRE-V software, see the "Understanding RAID Options" section.
SUMMARY STEPS
1. ![]() enable
enable
2. ![]() service-module sm slot/0 install url url
service-module sm slot/0 install url url
or
service-module sm slot/0 install url url argument disk-cfg-mode={raid1 | raid0 | nonraid}
3. ![]() [service-module sm slot/0 status]
[service-module sm slot/0 status]
4. ![]() exit
exit
DETAILED STEPS
|
|
|
|
|---|---|---|
Step 1 |
enable <password> Router> enable Router> <password> Router# |
Enables privileged EXEC mode. Enter your password if prompted. |
Step 2 |
service-module sm slot/0 install url url
service-module sm slot/0 install url url argument disk-cfg-mode={raid1 | raid0 | nonraid}
Example of Cisco SRE 900 or 910 Service Module: Router# service-module sm 2/0 install url ftp://server.com/dir/sre-v-k9-r.SPA.smv.2.0.0.pkg Loading galactica-whql#$.1/solaria/2.0.0/raid/sre-v-k9-r. SPA.smv.2.0.0.pkg Delete the installed Cisco SRE-V Software and proceed with new installation? [no]: yes Loading solaria/2.0.0/raid/sre-v-k9-r.SPA.smv.2.0.0.pkg.i nstall.sre ! [OK - 5994/4096 bytes]
Service module installation ios_version 15.1(3.22)M0.6, ios_image c2951-universalk9-mz pkg_name sre-v-k9-r.spa.smv.2.0.0.pkg key_file sre-v-k9-r.spa.smv.2.0.0.key helper_file sre-v-installer.spa.smv.2.0.0 pid SM-SRE-900-K9
Check target platform capabilities cpu 1865 Please select disk configuration (-1 = nonraid, 0 = raid0, 1 = raid1 ) [-1]:
or Router# service-module sm 2/0 install url ftp://server.com/dir/sre-v-k9-r.SPA.smv.2.0.0.pkg argument disk-cfg-mode=raid1
Router# service-module sm 2/0 install url ftp://server.com/dir/sre-v-k9-r.SPA.smv.2.0.0.pkg argument disk-cfg-mode=raid0
Router# service-module sm 2/0 install url ftp://server.com/dir/sre-v-k9-r.SPA.smv.2.0.0.pkg argument disk-cfg-mode=nonraid |
Starts the installation of the Cisco SRE-V application. After you enter the install command, you are prompted to choose a disk configuration (RAID mode). The disk configuration options are: 1, 0, or -1. • • • For information about RAID options, see the "Understanding RAID Options" section. or Starts the installation of the Cisco SRE-V application in the specified RAID mode. The RAID mode options are: RAID 1, RAID 0, or non-RAID. For information about RAID options, see the "Understanding RAID Options" section. Note • • In the url, you can choose to use the username and password of the FTP server. For example: |
Step 2 (continued) |
Example of Cisco SRE 900 or 910 Service Module with FTP credentials in the URL: Router# service-module sm 2/0 install url ftp://username:password@server.com/dir/sre-v-k9-r .SPA.smv.2.0.0.pkg |
• • • |
Step 3 |
[service-module sm slot/0 status] Router# service-module sm 2/0 status |
(Optional) Monitors progress of the installation. |
Step 4 |
exit Router# exit |
Exits privileged EXEC mode. |
After you successfully install Cisco SRE-V Release 2.0, and you session into the service module, the console interface is displayed. The console interface allows you to access the VMware vSphere Hypervisor DCUI to perform Cisco SRE-V configuration. See "Entering and Exiting the VMware vSphere Hypervisor DCUI" section.
Related Topics
•![]() Downloading the Cisco SRE-V Software
Downloading the Cisco SRE-V Software
•![]() Uninstalling the Cisco SRE-V Software
Uninstalling the Cisco SRE-V Software
Uninstalling the Cisco SRE-V Software
SUMMARY STEPS
1. ![]() enable
enable
2. ![]() service-module sm slot/0 uninstall
service-module sm slot/0 uninstall
3. ![]() exit
exit
DETAILED STEPS
Related Topic
•![]() Downloading the Cisco SRE-V Software
Downloading the Cisco SRE-V Software
Verifying Software Installation or Uninstallation
To view the status of the Cisco SRE-V installation or uninstallation, from the host-router CLI, enter the service-module sm slot/0 status command, as shown in the following example:
Router# service-module sm 1/0 status
Service Module is Cisco SM1/0
Service Module supports session via TTY line 67
Service Module is in Steady state
Service Module heartbeat-reset is enabled
Getting status from the Service Module, please wait..
Cisco SRE-V Software 2.0.0.0
VMware ESXi 5.0.0 build-348481 running on SRE
Module resource information:
CPU Frequency: 1860 MHz
Memory Size: 4067 MB
Disk 0 Size: 500108 MB
Disk 1 Size: 500108 MB
Disk 2 Size: 1955 MB
No install/uninstall in progress
Related Topics
•![]() Installing the Cisco SRE-V Software—Clean Install
Installing the Cisco SRE-V Software—Clean Install
•![]() Uninstalling the Cisco SRE-V Software
Uninstalling the Cisco SRE-V Software
Upgrading, Migrating, and Downgrading the Cisco SRE-V Software
•![]() About Upgrading and Migrating
About Upgrading and Migrating
•![]() Migrating the Cisco SRE-V Software from Release 1.0 or 1.1 to Release 2.0
Migrating the Cisco SRE-V Software from Release 1.0 or 1.1 to Release 2.0
•![]() Upgrading the Cisco SRE-V Software from Release 1.5 to Release 2.0
Upgrading the Cisco SRE-V Software from Release 1.5 to Release 2.0
•![]() Downgrading the Cisco SRE-V Software from Release 2.0 to Release 1.5, 1.1, or 1.0
Downgrading the Cisco SRE-V Software from Release 2.0 to Release 1.5, 1.1, or 1.0
About Upgrading and Migrating
When you migrate the software, you perform a clean install of the Release 2.0 software and keep only the datastore content. To migrate the software, use the keep-ds argument.
When you upgrade the software, you perform a clean install of the Release 2.0 software and keep the VMware vSphere Hypervisor host configuration data as well as the datastore content. To upgrade the software, use the upgrade argument. To keep the VMWare vSphere Hypervisor host configuration data, use the upgrade argument.
If you use both the keep-ds and the upgrade arguments, the system uses the upgrade argument and ignores the keep-ds argument.
Migrating the Cisco SRE-V Software from Release 1.0 or 1.1 to Release 2.0
Before You Begin
•![]() Download the appropriate version of the Cisco SRE-V upgrade software. See the "Downloading the Cisco SRE-V Software" section.
Download the appropriate version of the Cisco SRE-V upgrade software. See the "Downloading the Cisco SRE-V Software" section.
Procedure
Step 1 ![]() Use the service-module sm slot/0 install url url argument keep-ds command to install the Cisco SRE-V software, as shown in the following example:
Use the service-module sm slot/0 install url url argument keep-ds command to install the Cisco SRE-V software, as shown in the following example:
Router# service-module sm 2/0 install url
ftp://server.com/dir/sre-v-k9-r.SPA.smv.2.0.0.pkg argument keep-ds
where url is the server and directory on which the application packages and Tcl script are located. The URL should point to the .pkg file on the FTP server.
In the URL, you can choose to use the username and password of the FTP server. For example:
Router# service-module sm 2/0 install url
ftp://username:password@server.com/dir/sre-v-k9-r.SPA.smv.2.0.0.pkg argument keep-ds
Step 2 ![]() After the upgrade, the content in the disk is retained but you must reconfigure the VMware vSphere Hypervisor, and then add the virtual machines to the inventory.
After the upgrade, the content in the disk is retained but you must reconfigure the VMware vSphere Hypervisor, and then add the virtual machines to the inventory.
Related Topics
Upgrading the Cisco SRE-V Software from Release 1.5 to Release 2.0
Before You Begin
•![]() Download the appropriate version of the Cisco SRE-V upgrade software. See the "Downloading the Cisco SRE-V Software" section.
Download the appropriate version of the Cisco SRE-V upgrade software. See the "Downloading the Cisco SRE-V Software" section.
Procedure
Step 1 ![]() Use the service-module sm slot/0 install url url argument upgrade command to install the Cisco SRE-V software, as shown in the following example:
Use the service-module sm slot/0 install url url argument upgrade command to install the Cisco SRE-V software, as shown in the following example:
Router# service-module sm 2/0 install url
ftp://server.com/dir/sre-v-k9-r.SPA.smv.2.0.0.pkg argument upgrade
where url is the server and directory on which the application packages and Tcl script are located. The URL should point to the .pkg file on the FTP server.
In the URL, you can choose to use the username and password of the FTP server. For example:
Router# service-module sm 2/0 install url
ftp://username:password@server.com/dir/sre-v-k9-r.SPA.smv.2.0.0.pkg argument upgrade
Related Topics
Downgrading the Cisco SRE-V Software from Release 2.0 to Release 1.5, 1.1, or 1.0
Before You Begin
•![]() Export the virtual machines to a remote location.
Export the virtual machines to a remote location.
•![]() Download the software for the Cisco SRE-V release for which you want to downgrade. See the "Downloading the Cisco SRE-V Software" section. Instead of downloading Release 2.0, download the version you need.
Download the software for the Cisco SRE-V release for which you want to downgrade. See the "Downloading the Cisco SRE-V Software" section. Instead of downloading Release 2.0, download the version you need.
Procedure
Step 1 ![]() Use the service-module sm slot/0 install url url command to install the lower version of the Cisco SRE-V software. See the following example which is downgrading to Release 1.1. (If you are downgrading to a different version, substitute that version number).
Use the service-module sm slot/0 install url url command to install the lower version of the Cisco SRE-V software. See the following example which is downgrading to Release 1.1. (If you are downgrading to a different version, substitute that version number).
Router# service-module sm slot/0 install url
ftp://server.com/dir/sre-v-k9.smv.1.1.1.pkg
where url is the server and directory on which the application packages and Tcl script are located. The URL should point to the .pkg file on the FTP server. In the URL, you can choose to use the username and password of the FTP server. For example:
Router# service-module sm slot/0 install url
ftp://username:password@server.com/dir/sre-v-k9.smv.1.1.1.pkg
Step 2 ![]() Choose the RAID mode that you want enabled. During the installation process, you are prompted to choose a disk configuration (RAID mode). The disk configuration options are: 1, 0, or -1.
Choose the RAID mode that you want enabled. During the installation process, you are prompted to choose a disk configuration (RAID mode). The disk configuration options are: 1, 0, or -1.
•![]() 1 is RAID 1 mode.
1 is RAID 1 mode.
•![]() 0 is RAID 0 mode.
0 is RAID 0 mode.
•![]() -1 is non-RAID mode.
-1 is non-RAID mode.
The service module reboots and the downgraded version of the Cisco SRE-V software is installed.
Step 3 ![]() Reconfigure the VMware vSphere Hypervisor.
Reconfigure the VMware vSphere Hypervisor.
Step 4 ![]() Import the virtual machines that you had exported.
Import the virtual machines that you had exported.
Entering and Exiting the VMware vSphere Hypervisor DCUI
Procedure
Step 1 ![]() Use the service-module sm slot/0 session command to session into the Cisco SRE Service Module, as shown in the following example:
Use the service-module sm slot/0 session command to session into the Cisco SRE Service Module, as shown in the following example:
Router# service-module sm 2/0 session
SRE-Module#
The DCUI Welcome page appears.
Step 2 ![]() If you are a first-time user of the VMware vSphere Hypervisor, use root for the username; and for the password, leave the field empty. After you login, we recommend that you change the password.
If you are a first-time user of the VMware vSphere Hypervisor, use root for the username; and for the password, leave the field empty. After you login, we recommend that you change the password.
Step 3 ![]() To exit from the DCUI, press Ctrl + Shift + 6 + x.
To exit from the DCUI, press Ctrl + Shift + 6 + x.
The router prompt appears.
Step 4 ![]() Enter the disconnect command to disconnect from the DCUI, as shown in the following example:
Enter the disconnect command to disconnect from the DCUI, as shown in the following example:
Router# disconnect
Step 5 ![]() At the confirmation prompt, press Enter to confirm the disconnect operation.
At the confirmation prompt, press Enter to confirm the disconnect operation.
Installing VMware and Other Applications
•![]() Other Cisco Applications on the Cisco SRE Service Module
Other Cisco Applications on the Cisco SRE Service Module
•![]() Installing the VMware vSphere Hypervisor Patch or Update Release
Installing the VMware vSphere Hypervisor Patch or Update Release
Other Cisco Applications on the Cisco SRE Service Module
Before You Begin
•![]() Export the virtual machines to a remote location.
Export the virtual machines to a remote location.
•![]() Download the application that you want to install on the Cisco SRE Service Module.
Download the application that you want to install on the Cisco SRE Service Module.
•![]() Download the hardware utility called sm-hw-util.1.1.1. This hardware utility changes the SATA mode from AHCI to IDE. The sm-hw-util.1.1.1 utility is part of the file called sm-hw-util.1.1.1.zip. Go to Cisco.com and enter sm-hw-util.1.1.1.zip to search for the file.
Download the hardware utility called sm-hw-util.1.1.1. This hardware utility changes the SATA mode from AHCI to IDE. The sm-hw-util.1.1.1 utility is part of the file called sm-hw-util.1.1.1.zip. Go to Cisco.com and enter sm-hw-util.1.1.1.zip to search for the file.
Procedure
Step 1 ![]() Use the service-module sm slot/0 install url url/sm-hw-uti1.1.1.1 argument sata-mode=ide command to change the SATA mode from AHCI to IDE:
Use the service-module sm slot/0 install url url/sm-hw-uti1.1.1.1 argument sata-mode=ide command to change the SATA mode from AHCI to IDE:
Router# service-module sm slot/0 install url url/sm-hw-uti1.1.1.x argument
sata-mode=ide
Step 2 ![]() Use the service-module sm slot/0 install url application_url command to install the software, as shown in the following example:
Use the service-module sm slot/0 install url application_url command to install the software, as shown in the following example:
Router# service-module sm slot/0 install url application_url.pkg
where url is the server and directory on which the application packages and Tcl script are located. The URL should point to the .pkg file on the FTP server.
The service module reboots and the application is installed.
Installing the VMware vSphere Hypervisor Patch or Update Release
VMware vSphere Hypervisor patches and update releases are available periodically on an as-needed basis from Cisco.com. However, you can also install patches released from VMware.com onto this platform
Restriction
•![]() RAID functionality is not provided in VMware patches. To prevent the RAID functionality from being overwritten when installing a patch or update release using the ESXi CLI on a Cisco SRE 900 or 910 Service Module, use the software vib update command and not the software vib install command.
RAID functionality is not provided in VMware patches. To prevent the RAID functionality from being overwritten when installing a patch or update release using the ESXi CLI on a Cisco SRE 900 or 910 Service Module, use the software vib update command and not the software vib install command.
Before You Begin
•![]() Download the patch or update release.
Download the patch or update release.
Procedure
Step 1 ![]() Use an update utility, such as vCenter Update Manager (VUM), the vSphere remote CLI, or the ESXi CLI to install the patch or update release.
Use an update utility, such as vCenter Update Manager (VUM), the vSphere remote CLI, or the ESXi CLI to install the patch or update release.
 Feedback