Upgrading the Cisco CMC
Available Languages
Contents
Upgrading the Cisco CMC
Upgrading the Cisco CMC Image through the Cisco CMTS
The Cisco CMC consists of the following three images:
Golden Image
The image on the Cisco CMC that is downloaded as part of the factory settings is called the golden image. This image is read-only and cannot be deleted or replaced using the CLI. This image supports only the Cisco CMC image upgrade and does not support the other features.
Bank 1 and Bank 2 Images
The non-golden images on the Cisco CMC that support all the features are called the bank 1 and bank 2 images. These images can be copied to or deleted from the Cisco CMC. When the Cisco CMC image is upgraded, the bank 1 and bank 2 images are upgraded alternately. That is, if the last upgraded image is the bank 1 image, then the bank 2 image is upgraded with the current upgrade, and vice versa. When the image (non-golden) upgrade fails, the Cisco CMC tries to boot with the image from the other bank. If the images from both the banks fail, the Cisco CMC boots with the golden image.
Before You BeginProcedureBefore upgrading the Cisco CMC image through the Cisco CMTS, you must specify the TFTP or FTP server address and full file path in the DHCP server.
If you are using a Cisco Network Registrar as the DHCP server, you must specify the values for the following fields:
For more information on the Cisco Network Registrar, see Cisco Network Registrar.
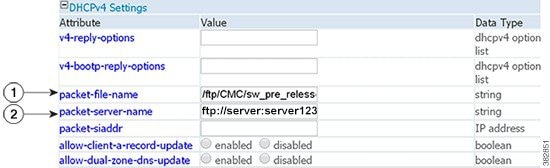
The figure below shows an example of how to specify the values in the Cisco Network Registrar:
1 Specify the new image file name and its full path 2 Specify the TFTP or FTP server address where the new image is located While upgrading the software images on Cisco CMTS and Cisco CMC, upgrade the Cisco CMC first, and then upgrade the Cisco CMTS.
What to Do Next
If you are unable to upgrade the Cisco CMC image through Cisco CMTS, upgrade it through the Cisco CMC console. For more information, see Upgrading the Cisco CMC Image through the Cisco CMC Console.
Upgrading the Cisco CMC Image Through the Cisco CMC
Important:Upgrade the Cisco CMC image through the Cisco CMC only if you are unable to upgrade it through the Cisco CMTS.
The following sections provide information on how to upgrade the Cisco CMC through the Cisco CMC console:
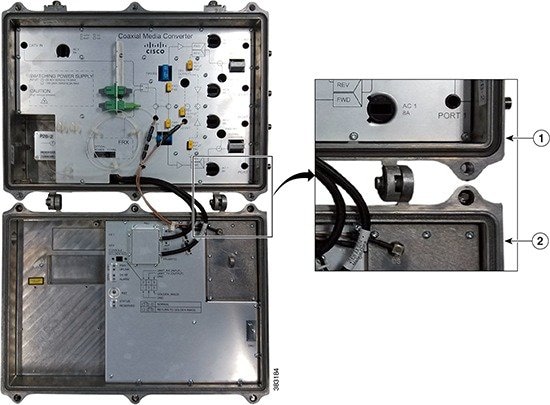
Opening the Cisco CMC
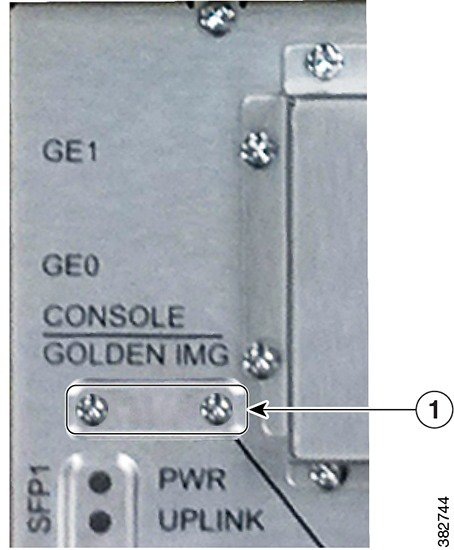
Using the Console Port on the Cisco CMC
The console port on the Cisco CMC is used for connecting the Cisco CMC to a PC using a console cable.
Warning
The console cable connection is only for initial installation and maintenance of the Cisco CMC. The console cable must not be connected during electromagnetic compliance testing. The console cable must be disconnected from the Cisco CMC after the final installation.
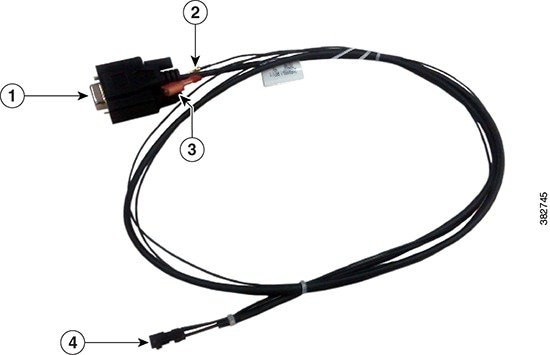
The figure below shows the console cable used with the Cisco CMC.
The table below provides the console cable connector pin definitions.
Before You BeginProcedure
- Open the Cisco CMC lid. See Opening the Cisco CMC.
- Have the following tools ready before performing this task:
What to Do Next
- Disconnect the console cable from the console port.
- Reinstall the console port cover and tighten the screws using a screwdriver.
- Close the Cisco CMC lid. See Closing the Cisco CMC.
Upgrading the Cisco CMC Image through the Cisco CMC Console
ProcedureImportant:Perform this procedure only if you are unable to upgrade the Cisco CMC image through the Cisco CMTS.
Restriction
While upgrading the software images on Cisco CMTS and Cisco CMC, upgrade the Cisco CMC first, and then upgrade the Cisco CMTS.
Important:If the Cisco CMTS is upgraded before the Cisco CMC, the Cisco CMC may not come online.
Step 1 Open the Cisco CMC lid. See Opening the Cisco CMC. Step 2 Connect the console cable to the Cisco CMC console port and connect the other end of the console cable to a computer. See Using the Console Port on the Cisco CMC. Step 3 Log in to the Cisco CMC console using telnet.
Note Use a baud rate of 115200.
Step 4 Enable the privilege mode on the Cisco CMC using the enable command. Enter your password, if prompted.
Example:CMC> enableStep 5 Upgrade the Cisco CMC image using the upgrade system url command. url—Firmware path, where the image is available.
Tip The firmware path is case-sensitive.
Note If the image version available on the specified firmware path is the same as the image running on the Cisco CMC currently, the Cisco CMC does not upgrade the image.
Example:CMC# upgrade system tftp://192.168.1.1/image-1.1.binStep 6 After the image upgrade is completed, disconnect the console cable from the Cisco CMC console port. Step 7 Close the Cisco CMC lid. See Closing the Cisco CMC.
Closing the Cisco CMC
Proper housing closure is important to maintain the Cisco CMC in good working condition. Proper closure ensures a good seal against the environment and protects the internal modules.
Caution
Avoid moisture damage and RF leakage. Follow the procedure exactly as shown below to ensure a proper seal.
The Cisco CMC has waterproof rubber and EMI gasket to seal the equipment.
Before You BeginProcedure
- Ensure that the waterproof rubber and EMI gasket on the Cisco CMC are not worn out. Wipe off any excess dirt and debris. If the waterproof rubber or EMI gasket is worn out, contact the Cisco Technical Assistance Center (TAC) for further assistance.
- Have the following tools ready before performing this task:
Step 1 Close the lid.
Caution Ensure that all the cables are out of the way when closing the lid.
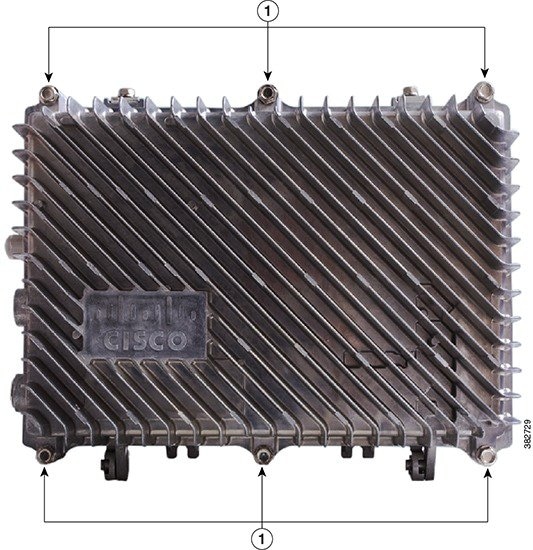
Step 2 Lightly secure the six 1/2-inch closure bolts using a hex driver or ratchet. Step 3 Tighten the six housing closure bolts from 5 ft-lb to 12 ft-lb (6.8 Nm to 16.3 Nm) using a torque wrench in the correct sequence as shown in the figure below. Step 4 Using the same sequence, tighten the closure bolts again with the same torque specification to ensure proper closure.
Notices
Copyright © 2014, Cisco Systems, Inc. All rights reserved.


 Feedback