- Preface
- Introduction to Cisco WAAS
- Planning Your WAAS Network
- Using Device Groups and Device Locations
- Configuring Traffic Interception
- Configuring Network Settings
- Configuring Administrative Login Authentication, Authorization, and Accounting
- Creating and Managing Administrator User Accounts
- Creating and Managing IP Access Control Lists for WAAS Devices
- Configuring Other System Settings
- Using the WAE Device Manager GUI
- Configuring WAFS
- Configuring Application Acceleration
- Configuring and Managing WAAS Print Services
- Maintaining Your WAAS System
- Monitoring and Troubleshooting Your WAAS Network
- Configuring SNMP Monitoring
- Default Application Policies
- Index
Cisco Wide Area Application Services Configuration Guide (Software Version 4.0.3)
Bias-Free Language
The documentation set for this product strives to use bias-free language. For the purposes of this documentation set, bias-free is defined as language that does not imply discrimination based on age, disability, gender, racial identity, ethnic identity, sexual orientation, socioeconomic status, and intersectionality. Exceptions may be present in the documentation due to language that is hardcoded in the user interfaces of the product software, language used based on RFP documentation, or language that is used by a referenced third-party product. Learn more about how Cisco is using Inclusive Language.
- Updated:
- May 4, 2007
Chapter: Using Device Groups and Device Locations
- About Device and Baseline Groups
- Working with Device Groups
- Working with Baseline Groups
- Working with Device Locations
Using Device Groups and Device Locations
This chapter describes the types of device groups supported by the WAAS software and how to create groups that make it easier to manage and configure multiple devices at the same time. This chapter also discusses how to use device locations.

Note ![]() Throughout this chapter, the term WAAS device is used to refer collectively to the WAAS Central Managers and WAEs in your network. The term WAE refers to WAE appliances and WAE Network Modules (the NME-WAE family of devices).
Throughout this chapter, the term WAAS device is used to refer collectively to the WAAS Central Managers and WAEs in your network. The term WAE refers to WAE appliances and WAE Network Modules (the NME-WAE family of devices).
This chapter contains the following topics:
•![]() About Device and Baseline Groups
About Device and Baseline Groups
•![]() Working with Device Locations
Working with Device Locations
About Device and Baseline Groups
When you create a device group, you need to identify the unique characteristics that distinguish that group of devices from others in your network. For example, in larger WAAS deployments, one set of devices may need to be configured with authentication settings that are different from another set of devices in your WAAS network. In this situation, you would create two device groups that each contain different authentication settings, and then assign your devices to the most appropriate group.
If you have devices that reside in different time zones, you can also create device groups based on geographic regions so that the devices in one group can have a different time zone setting from the devices in another group.
In smaller WAAS deployments where all devices can be configured with the same settings, you may only need to create one general device group. This setup allows you to configure settings for the group, and then apply those settings consistently across all your WAAS devices.
Groups not only save you time when configuring multiple devices, but they also ensure that configuration settings are applied consistently across your WAAS network.
When you register a WAE device with the WAAS Central Manager, that device automatically joins the AllDevicesGroup, which is the only default device group on the system. If you create additional device groups, you need to decide if you want your WAE devices to belong to more than one group (the default All Devices group and the new device group you create). If you only want a device to belong to a device group that you create, make sure that you remove the device from the default All Devices group.
You can organize your WAAS devices into the following types of device groups:
•![]() Standard Device Group—A collection of devices that share common qualities and capabilities. Setting up groups based on their authentication settings as previously described is an example of a device group. There are two types of device groups: Configuration Group and WAFS Core Cluster. These are explained in more detail in the "Creating a New Device Group" section.
Standard Device Group—A collection of devices that share common qualities and capabilities. Setting up groups based on their authentication settings as previously described is an example of a device group. There are two types of device groups: Configuration Group and WAFS Core Cluster. These are explained in more detail in the "Creating a New Device Group" section.
•![]() Baseline Group—A special type of device group used to configure a WAAS service consistently across multiple devices. There are three types of baseline groups: File, Acceleration, and Platform.
Baseline Group—A special type of device group used to configure a WAAS service consistently across multiple devices. There are three types of baseline groups: File, Acceleration, and Platform.
By default, all devices registered with the WAAS Central Manager are assigned to all three baseline groups.
Baseline groups allow you to apply consistent service settings across devices that reside in different device groups.
For example, if you have WAAS devices that reside in different device groups and you want all the devices to share the same application policies, you should make all your policy changes to the Acceleration baseline group. Whenever you create a new policy or modify an existing policy, those changes are distributed to each device that belongs to the Acceleration baseline group. If you make the policy changes to a specific device group, the devices that belong to your other groups are not updated with the policy changes.
Working with Device Groups
This section contains the following topics:
•![]() Viewing Device Group Assignments
Viewing Device Group Assignments
•![]() Viewing the Device Groups List
Viewing the Device Groups List
•![]() Enabling and Disabling Device Group Overlap
Enabling and Disabling Device Group Overlap
•![]() Overriding Group Configuration Settings
Overriding Group Configuration Settings
•![]() Understanding the Impact of Assigning a Device to Multiple Device Groups
Understanding the Impact of Assigning a Device to Multiple Device Groups
Creating a Device Group
Table 3-1 describes the process for creating a new device group.
|
|
|
|---|---|
|
|
Defines general information about the new group, such as the group name and whether all newly activated devices are assigned to this group. For more information, see the "Creating a New Device Group" section. |
|
|
Specifies the settings that are unique to this device group. All devices that are a member of this group will automatically inherit these settings. For more information, see the "Configuring the Settings for a Device Group" section. |
|
|
Assigns devices to the group so they can inherit the group settings. For more information, see the "Assigning Devices to a Configuration Device Group" section. |
Creating a New Device Group
Before you create a device group, make sure you understand the unique properties that you want the group to contain. For example, you may want to set up two device groups that have different authentication settings or different time zone settings.
To create a device group, follow these steps:
Step 1 ![]() From the WAAS Central Manager GUI, choose Devices > Device Groups.
From the WAAS Central Manager GUI, choose Devices > Device Groups.
The Device Groups window appears. (See Figure 3-1.)
Figure 3-1 Device Groups Window
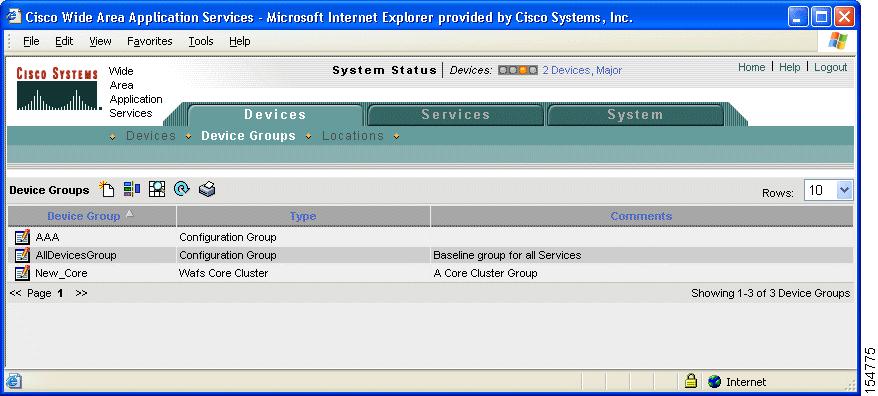
From this window you can perform the following tasks:
•![]() Click the Edit icon next to the device group that you want to modify.
Click the Edit icon next to the device group that you want to modify.
•![]() Create a new device group as described in the steps that follow.
Create a new device group as described in the steps that follow.
Step 2 ![]() Click the Create New Device Group icon in the taskbar.
Click the Create New Device Group icon in the taskbar.
The Creating New Device Group window appears. (See Figure 3-2.)
Figure 3-2 Creating New Device Group Window
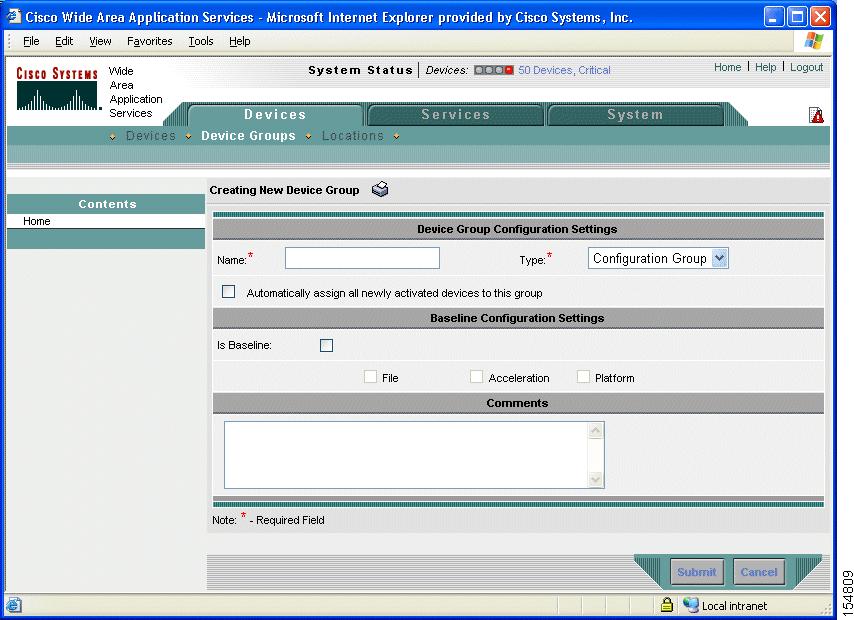
Step 3 ![]() In the Name field, enter the name of the device group.
In the Name field, enter the name of the device group.
The name must be unique and should be a name that is useful in distinguishing the device group from others on your system. The name cannot contain spaces or special characters.
Step 4 ![]() From the Type drop-down list, select one of the following options:
From the Type drop-down list, select one of the following options:
•![]() Configuration Group—The standard type of device group.
Configuration Group—The standard type of device group.
•![]() WAFS Core Cluster—A special type of device group that only needs to be created when configuring wide area file services (WAFS). For more information, see the "Configuring the Core Cluster" section.
WAFS Core Cluster—A special type of device group that only needs to be created when configuring wide area file services (WAFS). For more information, see the "Configuring the Core Cluster" section.
Step 5 ![]() To set this device group as the default device group for all newly activated devices, check the Automatically assign all newly activated devices to this group check box.
To set this device group as the default device group for all newly activated devices, check the Automatically assign all newly activated devices to this group check box.
Step 6 ![]() Do not check any of the Baseline check boxes. If you want to create a baseline group, see the "Customizing the Baseline Group Settings" section.
Do not check any of the Baseline check boxes. If you want to create a baseline group, see the "Customizing the Baseline Group Settings" section.
Step 7 ![]() (Optional) Enter comments about the group in the Comments field. The comments you enter will appear in the Device Group window shown in Figure 3-1.
(Optional) Enter comments about the group in the Comments field. The comments you enter will appear in the Device Group window shown in Figure 3-1.
Step 8 ![]() Click Submit.
Click Submit.
The page refreshes with additional options.
Note ![]() The Pages configured for this device group arrow lists the configuration windows in the WAAS Central Manager GUI that have been configured for this device group. Because this is a new device group, no pages will appear in this list.
The Pages configured for this device group arrow lists the configuration windows in the WAAS Central Manager GUI that have been configured for this device group. Because this is a new device group, no pages will appear in this list.
Step 9 ![]() (Optional) Customize the Contents pane for this device group by completing the following steps:
(Optional) Customize the Contents pane for this device group by completing the following steps:
a. ![]() Click the Select pages to hide from table of contents for this device group arrow.
Click the Select pages to hide from table of contents for this device group arrow.
b. ![]() A list of windows in the WAAS Central Manager GUI appears.
A list of windows in the WAAS Central Manager GUI appears.
c. ![]() Check the windows that you want to hide for this device group. You can click the folder icon next to a window to display its child windows.
Check the windows that you want to hide for this device group. You can click the folder icon next to a window to display its child windows.
d. ![]() Click Submit.
Click Submit.
Use this feature to remove from view any configuration windows that you do not need for that particular device group.
Step 10 ![]() Configure the settings for this device group, as described in the Configuring the Settings for a Device Group section.
Configure the settings for this device group, as described in the Configuring the Settings for a Device Group section.
Configuring the Settings for a Device Group
After creating a device group, you need to configure the settings that you want to be unique to this group.
If you have a general device group that contains all your WAAS devices, configure only the settings that you want to be consistent across all the devices. Settings that apply to a single device should be configured on that device only and not on the device group.
Note ![]() We recommend that you do not configure file and acceleration settings for a device group. Instead, use the File and Acceleration baseline groups for this purpose. For more information, see the "Working with Baseline Groups" section.
We recommend that you do not configure file and acceleration settings for a device group. Instead, use the File and Acceleration baseline groups for this purpose. For more information, see the "Working with Baseline Groups" section.
To configure settings for a device group, follow these steps:
Step 1 ![]() From the WAAS Central Manager GUI, choose Devices > Device Groups.
From the WAAS Central Manager GUI, choose Devices > Device Groups.
The Device Groups window appears.
Step 2 ![]() Click the Edit icon next to the device group that you want to configure.
Click the Edit icon next to the device group that you want to configure.
The Modifying Device Group window appears.
Step 3 ![]() To view which configuration windows have already been configured for the baseline group, click the Pages configured for this device group arrow button.
To view which configuration windows have already been configured for the baseline group, click the Pages configured for this device group arrow button.
A list of pages that are configured for that device group appears. If this is a new device group or if there are no pages configured for this device group, the list displays Null.
Step 4 ![]() Use the Contents pane to navigate to each configuration window that you want to modify for this device group.
Use the Contents pane to navigate to each configuration window that you want to modify for this device group.
If a window has not been configured for this device group, the message "There are currently no settings for this group" appears at the top of the window, as shown in Figure 3-3.
Figure 3-3 Example of a Window that Has Not Been Configured for a Device Group
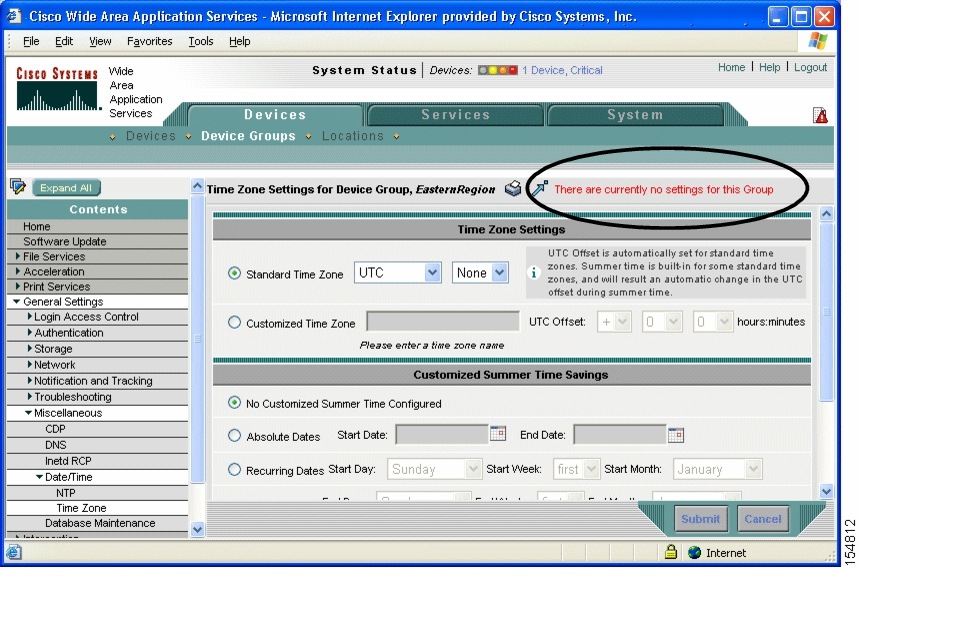
Step 5 ![]() Make the necessary changes on the configuration window, and click Submit when finished.
Make the necessary changes on the configuration window, and click Submit when finished.
After a particular setting is configured, the configuration window is listed under Pages configured for this device group in the Modifying Device Group window.
Step 6 ![]() Assign devices to this new group as described in the "Assigning Devices to a Configuration Device Group" section.
Assign devices to this new group as described in the "Assigning Devices to a Configuration Device Group" section.
Assigning Devices to a Configuration Device Group
After you create a configuration device group, you need to assign devices to the group. The WAAS Central Manager GUI provides two methods to assign devices to a configuration group. You can either select the device first, then assign a group to the device, or you can select the device group first, then assign devices to the group.
The procedures in this section describe how to assign devices to a group. To assign a group to a device, choose Devices > Devices, click the Edit icon next to the device that you want to assign to a group, and choose Assign Groups from the Contents pane. You can then assign a group to the device using the same method described in steps 4 and 5 below.
You cannot assign the WAAS Central Manager to a device group. You must configure the WAAS Central Manager separately from other devices.
Note ![]() By default, all devices automatically join the AllDevicesGroup when they are activated. If you do not want a device to belong to two different device groups, you should unassign the device from the AllDevicesGroup before you assign the device to another device group.
By default, all devices automatically join the AllDevicesGroup when they are activated. If you do not want a device to belong to two different device groups, you should unassign the device from the AllDevicesGroup before you assign the device to another device group.
To assign a device to a device group, follow these steps:
Step 1 ![]() From the WAAS Central Manager GUI, choose Devices > Device Groups.
From the WAAS Central Manager GUI, choose Devices > Device Groups.
Step 2 ![]() Click the Edit icon next to the device group that you want to assign devices to.
Click the Edit icon next to the device group that you want to assign devices to.
The Modifying Device Group window appears.
Step 3 ![]() In the Contents pane, choose Assign Devices.
In the Contents pane, choose Assign Devices.
The WAE Assignments window appears, displaying the WAEs devices assigned to various locations.
Step 4 ![]() Assign a device to the device group by doing either of the following:
Assign a device to the device group by doing either of the following:
•![]() Click
Click ![]() in the taskbar to assign all available devices to the group.
in the taskbar to assign all available devices to the group.
•![]() Click
Click ![]() next to each device that you want to assign to the group. The icon changes to
next to each device that you want to assign to the group. The icon changes to ![]() when selected.
when selected.
Step 5 ![]() Click Submit.
Click Submit.
A green check mark appears next to the assigned devices.
Step 6 ![]() To remove devices from the group, click the Unassign icon (green check mark) next to the name of the device that you want to remove from the device group. Alternatively, you can click the Remove all WAEs icon in the taskbar to remove all devices from the selected device group. Click Submit.
To remove devices from the group, click the Unassign icon (green check mark) next to the name of the device that you want to remove from the device group. Alternatively, you can click the Remove all WAEs icon in the taskbar to remove all devices from the selected device group. Click Submit.
Deleting a Device Group
To delete a device group, follow these steps:
Step 1 ![]() From the WAAS Central Manager GUI, choose Devices > Device Groups. The Device Groups window appears. (See Figure 3-1.)
From the WAAS Central Manager GUI, choose Devices > Device Groups. The Device Groups window appears. (See Figure 3-1.)
Step 2 ![]() Click the Edit icon next to the name of the device group that you want to delete. The Modifying Device Group window appears.
Click the Edit icon next to the name of the device group that you want to delete. The Modifying Device Group window appears.
Step 3 ![]() In the taskbar, click the Delete Device Group icon. You are prompted to confirm your decision to delete the device group.
In the taskbar, click the Delete Device Group icon. You are prompted to confirm your decision to delete the device group.
Step 4 ![]() To confirm your decision, click OK.
To confirm your decision, click OK.
Viewing Device Group Assignments
The WAAS Central Manager GUI allows you to view the groups that a device belongs to, as well as the devices that belong to a specific group. This section describes both of these procedures.
To view the groups that a device belongs to, follow these steps:
Step 1 ![]() From the WAAS Central Manager GUI, choose Devices > Devices.
From the WAAS Central Manager GUI, choose Devices > Devices.
Step 2 ![]() Click the Edit icon next to the device for which you want to view its group assignments.
Click the Edit icon next to the device for which you want to view its group assignments.
The Device Home window appears.
Step 3 ![]() In the Assignments section on the Device Home window, click the link that displays the groups the device is assigned to.
In the Assignments section on the Device Home window, click the link that displays the groups the device is assigned to.
The Device Group Assignments page appears, which shows all the device groups in your WAAS network. Device groups with a green check mark next to them are assigned to this device.
You can also go to the Device Group Assignments window directly by browsing to the Assign Groups option in the Contents pane.
To view the devices that are assigned to a specific group, follow these steps:
Step 1 ![]() From the WAAS Central Manager GUI, choose Devices > Device Groups.
From the WAAS Central Manager GUI, choose Devices > Device Groups.
Step 2 ![]() Click the Edit icon next to the group for which you want to view its device members.
Click the Edit icon next to the group for which you want to view its device members.
The Modifying Device Group window appears.
Step 3 ![]() From the Contents pane, choose Assign Devices.
From the Contents pane, choose Assign Devices.
The WAE Assignments window appears, which shows all the devices on your WAAS network. Devices with a green check mark next to them are assigned to this group.
Viewing the Device Groups List
The Device Groups window lists all the device groups that have been created in your WAAS network. To view this list, choose Devices > Device Groups in the WAAS Central Manager GUI.
Figure 3-4 shows an example of the Device Groups window.
Figure 3-4 Device Groups Window
This window displays the following information about each device group:
•![]() Type of device group (either Configuration Group or WAFS Core Cluster).
Type of device group (either Configuration Group or WAFS Core Cluster).
•![]() Any comments that were entered when the device group was created.
Any comments that were entered when the device group was created.
From this window you can perform the following tasks:
•![]() Create a new device group. For more information, see the "Creating a New Device Group" section.
Create a new device group. For more information, see the "Creating a New Device Group" section.
•![]() Modify the settings of a device group by clicking the Edit icon next to the group that you want to edit.
Modify the settings of a device group by clicking the Edit icon next to the group that you want to edit.
Enabling and Disabling Device Group Overlap
By default, you can assign a device to multiple device groups (including baseline groups). You can disable this functionality so a device can only belong to one device group, which eliminates the possibility of a device inheriting settings from more than one group.
To enable or disable device group overlap, follow these steps:
Step 1 ![]() From the WAAS Central Manager GUI, choose System > Configuration.
From the WAAS Central Manager GUI, choose System > Configuration.
The Config Properties window appears.
Step 2 ![]() Click the Edit icon next to the property name DeviceGroup.overlap.
Click the Edit icon next to the property name DeviceGroup.overlap.
The Modifying Config Property, DeviceGroup.overlap window appears.
Step 3 ![]() From the Value drop-down list, choose either true or false. (The default is true.)
From the Value drop-down list, choose either true or false. (The default is true.)
When you disable device group overlap (set to false), existing overlapping device groups are retained and continue to be handled as though overlap were enabled; however, any newly added groups do not allow overlapping, and new devices cannot be added to the existing overlapping groups.
Step 4 ![]() Click Submit.
Click Submit.
Overriding Group Configuration Settings
The WAAS Central Manager GUI provides the following methods to override the current group configuration on a device:
•![]() Forcing Device Group Settings on All Devices in the Group
Forcing Device Group Settings on All Devices in the Group
•![]() Selecting Device Group Precedence
Selecting Device Group Precedence
•![]() Overriding the Device Group Settings on a Device
Overriding the Device Group Settings on a Device
Forcing Device Group Settings on All Devices in the Group
To force a device group configuration across all devices in the group, follow these steps:
Step 1 ![]() From the WAAS Central Manager GUI, choose Devices > Device Groups.
From the WAAS Central Manager GUI, choose Devices > Device Groups.
The Device Groups listing window appears.
Step 2 ![]() Click the Edit icon next to the device group with the settings you want to force on all devices in that group.
Click the Edit icon next to the device group with the settings you want to force on all devices in that group.
The Modifying Device Group window appears.
Step 3 ![]() Click the Force Group Settings icon in the taskbar.
Click the Force Group Settings icon in the taskbar.
The WAAS Central Manager GUI returns the following message:
The action will apply all settings configured for this device group to all the WAEs
assigned to it. Do you wish to continue?
Step 4 ![]() To force group settings across all devices in the device group, click Yes.
To force group settings across all devices in the device group, click Yes.
Step 5 ![]() Click Submit.
Click Submit.
Selecting Device Group Precedence
When a device belongs to multiple device groups that have conflicting settings, the device automatically inherits the settings from the device group that was most recently changed. For a more detailed description of how a device inherits settings when it belongs to multiple device groups, see "Understanding the Impact of Assigning a Device to Multiple Device Groups" section.
When a configuration conflict occurs, you can edit a device's configuration on a page-by-page basis and select which device group's settings should take precedence.
To select the device group precedence, follow these steps:
Step 1 ![]() From the WAAS Central Manager GUI, choose Devices > Devices.
From the WAAS Central Manager GUI, choose Devices > Devices.
Step 2 ![]() Click the Edit icon next to the device that you want to set the device group precedence.
Click the Edit icon next to the device that you want to set the device group precedence.
The Device Home window appears.
Step 3 ![]() From the Contents pane, browse to the configuration window that contains the conflicting settings.
From the Contents pane, browse to the configuration window that contains the conflicting settings.
A drop-down list appears in the taskbar at the top of the window, as shown in Figure 3-5. This drop-down list allows you to select the device group that you want this configuration window to inherit settings from. The device group that is currently selected is the device group that has precedence.
Figure 3-5 Specifying the Device Group Precedence for a Configuration Window
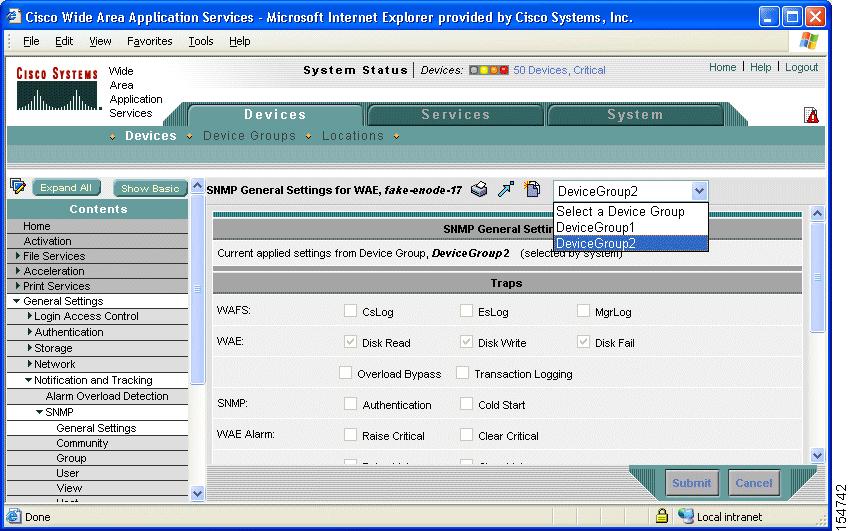
Step 4 ![]() From the drop-down list, select the device group that you want this configuration page to inherit settings from, and click Submit.
From the drop-down list, select the device group that you want this configuration page to inherit settings from, and click Submit.
The configuration window changes to reflect the settings associated with the selected device group.
Overriding the Device Group Settings on a Device
The WAAS Central Manager GUI allows you to override the device group settings and specify new settings that are unique to that device.
To override the device group settings on a device, follow these steps:
Step 1 ![]() From the WAAS Central Manager GUI, choose Devices > Devices.
From the WAAS Central Manager GUI, choose Devices > Devices.
Step 2 ![]() Click the Edit icon next to the device that you want to override its group settings.
Click the Edit icon next to the device that you want to override its group settings.
The Device Home window appears.
Step 3 ![]() From the Contents pane, browse to the configuration window that contains the device group settings you want to override.
From the Contents pane, browse to the configuration window that contains the device group settings you want to override.
Step 4 ![]() Click the Override Group Settings icon in the taskbar.
Click the Override Group Settings icon in the taskbar.
The setting in the configuration window are enabled.
Note ![]() The Override Group Settings icon only appears on configuration windows that have been modified on the associated device group.
The Override Group Settings icon only appears on configuration windows that have been modified on the associated device group.
Step 5 ![]() Make the necessary changes to the configuration window, and click Submit.
Make the necessary changes to the configuration window, and click Submit.
The device is now configured with settings that are different from the device group it belongs to.
Step 6 ![]() To reapply the device groups settings to this configuration window, select the device group from the drop-down list in the taskbar, and click Submit.
To reapply the device groups settings to this configuration window, select the device group from the drop-down list in the taskbar, and click Submit.
Understanding the Impact of Assigning a Device to Multiple Device Groups
If a device belongs to multiple device groups, there is the potential for a configuration conflict to occur if the groups are not configured exactly the same. In this case, the device will inherit the settings from the device group that was most recently changed. In some cases, however, a device can retain settings from more than one device group depending on how the changes were implemented.
The following scenario describes how a device can retain settings from multiple device groups:
Action 1: Device A is assigned to Device Group 1 (DG1).
Result: Device A automatically inherits all the configuration settings of DG1.
Action 2: Device A is assigned to Device Group 2 (DG2) so it now belongs to two device groups (DG1 and DG2).
Result: Device A inherits all the settings from DG2, but it remains a member of DG1.
Action 3: The standard time zone setting on DG1 is changed to America New York.
Result: The time zone of Device A changes to America New York, but the device maintains all its other configuration settings from DG2.
In this scenario, Device A's configuration is a hybrid of DG1 and DG2. If you want to specify which device group settings a device should inherit, you can use the override features described in the "Overriding Group Configuration Settings" section.
Working with Baseline Groups
A baseline group is a special type of device group used to configure a WAAS service consistently across multiple devices. The WAAS Central Manager GUI provides the following three types of baseline groups:
•![]() File—Configures file services consistently across multiple devices.
File—Configures file services consistently across multiple devices.
•![]() Acceleration—Configures the application policies consistently across multiple devices.
Acceleration—Configures the application policies consistently across multiple devices.
•![]() Platform—Configures platform settings consistently across multiple devices. The platform settings reside under the General Settings menu in the Contents pane.
Platform—Configures platform settings consistently across multiple devices. The platform settings reside under the General Settings menu in the Contents pane.
For example, if you want all your devices to have the same set of application policies, we recommend that you create an Acceleration baseline group that contains all your custom and modified policies. When you assign all your devices to this group, the devices automatically inherit the application policies from the group. Anytime you need to change a policy, you make the change to the baseline group and the change is propagated to all your devices.
A device can be a member of multiple baseline groups. However, a particular service can have only one baseline group associated with it at any given time.
A baseline group is configured in the same way and functions in the same manner as a device group. You first create the baseline group, then configure or modify service settings for that group, then finally assign devices to the group.
When you are working with baseline groups, you can perform the following tasks:
•![]() Configuring the Default Baseline Groups
Configuring the Default Baseline Groups
•![]() Switching the Baseline Group for a Service
Switching the Baseline Group for a Service
Configuring the Default Baseline Groups
Table 3-2 describes the process for configuring the default baseline groups that come with your WAAS system.
|
|
|
|---|---|
|
|
Changes the basic properties of the baseline group like whether newly activated devices automatically join the group. For more information, see the "Customizing the Baseline Group Settings" section. |
|
|
Configures the service settings that are unique to the baseline group. All devices that are a member of this group will automatically inherit these settings. For more information, see the "Configuring the Service Settings for a Baseline Group" section. |
|
|
Assigns devices to the group so they can inherit the group settings. For more information, see the "Assigning Devices to a Configuration Device Group" section. |
Customizing the Baseline Group Settings
The first step in configuring a baseline group is to customize the basic settings that determine the following:
•![]() Whether all newly activated devices automatically join the baseline group.
Whether all newly activated devices automatically join the baseline group.
•![]() The configuration windows that you want to hide for the baseline group.
The configuration windows that you want to hide for the baseline group.
To customize the settings for a baseline group, follow these steps:
Step 1 ![]() From the WAAS Central Manager GUI, choose the baseline group that you want to customize.
From the WAAS Central Manager GUI, choose the baseline group that you want to customize.
The three baseline groups are located in the following sections of the GUI:
•![]() Services > File > Baseline Settings
Services > File > Baseline Settings
•![]() Services > Acceleration > Baseline Settings
Services > Acceleration > Baseline Settings
•![]() Services > Platform > Baseline Settings
Services > Platform > Baseline Settings
The Selecting the (File, Acceleration, or Platform) Baseline Group window for the chosen service appears.
Note ![]() If this baseline group does not have a device group assigned to it, the Selecting the File Baseline Group window appears. From this window, select the device group that you want to assign to this baseline group, and then proceed with the rest of the instructions in this section.
If this baseline group does not have a device group assigned to it, the Selecting the File Baseline Group window appears. From this window, select the device group that you want to assign to this baseline group, and then proceed with the rest of the instructions in this section.
Step 2 ![]() To change the name of the baseline group, enter the new name in the provided field.
To change the name of the baseline group, enter the new name in the provided field.
The name must be unique and should be a name that is useful in distinguishing the baseline group from others on your system. The name cannot contain spaces or special characters.
Step 3 ![]() Check the Automatically assign all newly activated devices to this group check box to set this baseline group as the default device group for all newly activated devices. Only check this box if you want all your devices to inherit the settings of this baseline group.
Check the Automatically assign all newly activated devices to this group check box to set this baseline group as the default device group for all newly activated devices. Only check this box if you want all your devices to inherit the settings of this baseline group.
Step 4 ![]() Enter your comments in the Comments field to provide a description of this baseline group.
Enter your comments in the Comments field to provide a description of this baseline group.
The comments you enter will appear on the Device Group window shown in Figure 3-1.
Step 5 ![]() Click the Pages configured for this device group arrow to view the list of the windows in the WAAS Central Manager GUI that have been configured for this baseline group.
Click the Pages configured for this device group arrow to view the list of the windows in the WAAS Central Manager GUI that have been configured for this baseline group.
Step 6 ![]() Customize the Contents pane for this baseline group by completing the following steps:
Customize the Contents pane for this baseline group by completing the following steps:
a. ![]() Click the Select pages to hide from table of contents for this device group arrow.
Click the Select pages to hide from table of contents for this device group arrow.
A list of windows in the WAAS Central Manager GUI appears.
b. ![]() Place a check next to the windows that you want to hide for this baseline group. Use this feature to remove from view any configuration windows that you do not need for this particular baseline group.
Place a check next to the windows that you want to hide for this baseline group. Use this feature to remove from view any configuration windows that you do not need for this particular baseline group.
Step 7 ![]() Click Submit.
Click Submit.
The windows that you selected to hide for this baseline group disappear from the Contents pane.
Step 8 ![]() Configure the service settings for this baseline group as described in the section that follows.
Configure the service settings for this baseline group as described in the section that follows.
Configuring the Service Settings for a Baseline Group
Each baseline group should be configured to reflect the unique service settings that are not shared with the other baseline groups. For example, if you use the File baseline group to configure File Services on your devices and the Acceleration baseline group to configure the application policies, then these two baseline groups should be configured with different service settings. In this case, the File baseline group can be configured with Edge Server service enabled, and the Acceleration baseline group can be configured with custom or modified application policies.
To configure service settings for a baseline group, follow these steps:
Step 1 ![]() From the WAAS Central Manager GUI, choose the baseline group that you want to configure.
From the WAAS Central Manager GUI, choose the baseline group that you want to configure.
The three baseline groups are located in the following sections of the GUI:
•![]() Services > File > Baseline Settings
Services > File > Baseline Settings
•![]() Services > Acceleration > Baseline Settings
Services > Acceleration > Baseline Settings
•![]() Services > Platform > Baseline Settings
Services > Platform > Baseline Settings
The Modifying Device Group window for the chosen service appears.
Step 2 ![]() Click the Pages configured for this device group arrow button to view the configuration windows that have already been configured for the baseline group.
Click the Pages configured for this device group arrow button to view the configuration windows that have already been configured for the baseline group.
A list of pages that are configured for this baseline group appears. If this is a new baseline group or if there are no pages configured for this baseline group, the list displays Null.
Step 3 ![]() Use the Contents pane to navigate to the configuration window that you want to modify for this baseline group.
Use the Contents pane to navigate to the configuration window that you want to modify for this baseline group.
Depending on the baseline group you are configuring, you will likely want to modify the following configuration windows:
•![]() File Services—Configures service settings for the File baseline group.
File Services—Configures service settings for the File baseline group.
•![]() Acceleration—Configures service settings for the Acceleration baseline group.
Acceleration—Configures service settings for the Acceleration baseline group.
•![]() General Settings—Configures service settings for the Platform baseline group.
General Settings—Configures service settings for the Platform baseline group.
If a configuration window has not been configured for this baseline group, the message "There are currently no settings for this group" appears at the top of the window, as shown in Figure 3-3.
Step 4 ![]() After making the necessary changes to a File, Acceleration or General Settings configuration window, click Submit.
After making the necessary changes to a File, Acceleration or General Settings configuration window, click Submit.
After you submit your changes, the modified configuration window is listed under Pages configured for this device group in the Modifying Device Group window.
Step 5 ![]() Assign devices to this new group as described in the "Assigning Devices to a Configuration Device Group" section.
Assign devices to this new group as described in the "Assigning Devices to a Configuration Device Group" section.
Switching the Baseline Group for a Service
The WAAS Central Manager GUI allows you to switch the device group that is associated with a baseline group. When you switch a baseline group, you must choose a regular device group to take its place. During the switch, the regular device group that you choose is converted to a baseline group, and the baseline group that you remove is converted to a regular device group.
To remove a baseline group from a service and associate another baseline group in its place, follow these steps:
Step 1 ![]() From the WAAS Central Manager GUI, choose Services > File or Acceleration or Platform > Baseline Settings.
From the WAAS Central Manager GUI, choose Services > File or Acceleration or Platform > Baseline Settings.
The Modify Device Group window for the chosen service appears.
Step 2 ![]() Click the Switch Baseline Group icon in the taskbar. The WAAS Central Manager GUI returns the following message:
Click the Switch Baseline Group icon in the taskbar. The WAAS Central Manager GUI returns the following message:
This action will remove this device group as the Baseline Group for this service. You can
then select another device group or create a new one to the Baseline Group for this
service. Do you wish to Continue?
Step 3 ![]() To remove the device group from the service, click OK.
To remove the device group from the service, click OK.
The WAAS Central Manager GUI displays the Selecting the Baseline Group window for the chosen service.
Step 4 ![]() From the Select a Device Group to be the Baseline Group drop-down list, choose a device group, or choose the Create New Device Group option, as follows:
From the Select a Device Group to be the Baseline Group drop-down list, choose a device group, or choose the Create New Device Group option, as follows:
•![]() If you choose a device group to be the baseline group for that service, the WAAS Central Manager GUI takes you to the Modify Device Group window for that device group.
If you choose a device group to be the baseline group for that service, the WAAS Central Manager GUI takes you to the Modify Device Group window for that device group.
•![]() If you choose the Create New Device Group option, the WAAS Central Manager GUI takes you to the Create New Device Group window.
If you choose the Create New Device Group option, the WAAS Central Manager GUI takes you to the Create New Device Group window.
Working with Device Locations
The WAAS Central Manager GUI allows you to create locations that you can associate with a WAAS device. You assign a device to a location when you first activate the device. The main purpose of assigning a device to a location is to help you identify a WAAS device by the physical region in which it resides. Locations are different from device groups because devices do not inherit settings from the location to which they belong.
You assign a device to a location when you activate the device as described in the Cisco Wide Area Application Services Quick Configuration Guide.
You can work with locations by performing these tasks:
Creating Locations
To create a new location or modify an existing one, follow these steps:
Step 1 ![]() From the WAAS Central Manager GUI, choose Devices > Locations.
From the WAAS Central Manager GUI, choose Devices > Locations.
The Locations window appears. (See Figure 3-6.)
Figure 3-6 Locations Window
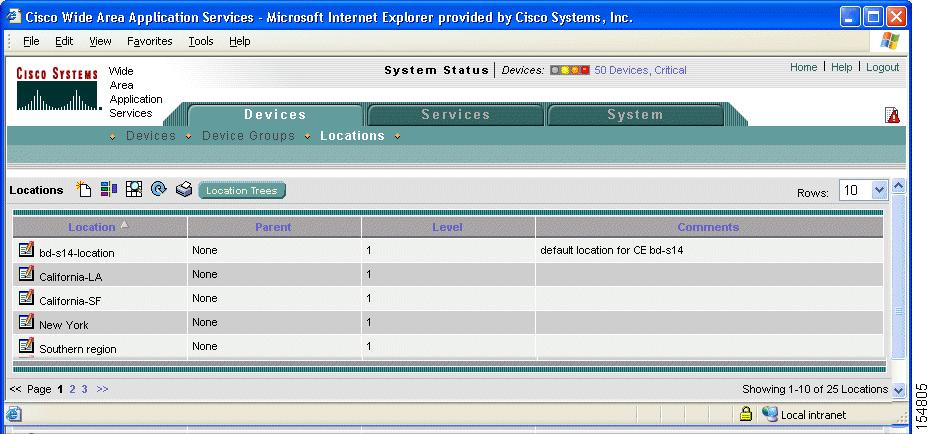
Step 2 ![]() In the taskbar, click the Create New Location icon.
In the taskbar, click the Create New Location icon.
The Creating New Location window appears. (See Figure 3-7.)
Figure 3-7 Creating New Location Window
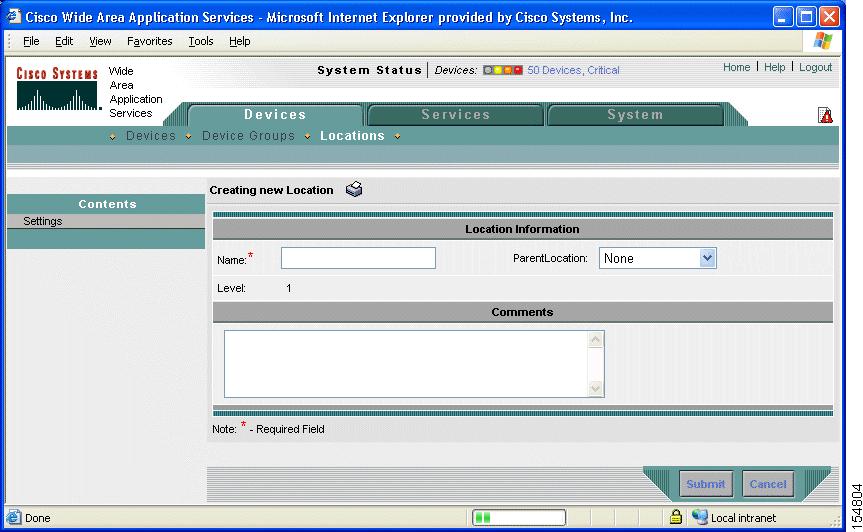
Step 3 ![]() In the Name field, enter a location name.
In the Name field, enter a location name.
Step 4 ![]() From the Parent Location drop-down list, choose a parent location (or choose None).
From the Parent Location drop-down list, choose a parent location (or choose None).
A location with no parent is a level 1 location. A location with a level 1 parent becomes a level 2 location, and so forth. The location level is displayed after you choose a parent location (or choose None) and click Submit to save the configuration.
Step 5 ![]() (Optional) In the Comments field, enter comments about the location.
(Optional) In the Comments field, enter comments about the location.
Step 6 ![]() Click Submit.
Click Submit.
Step 7 ![]() To modify a location, go to the Locations window, and click the Edit icon next to the name of the location you want to modify.
To modify a location, go to the Locations window, and click the Edit icon next to the name of the location you want to modify.
Step 8 ![]() To assign a device to this location, see the "Modifying Device Properties" section.
To assign a device to this location, see the "Modifying Device Properties" section.
Deleting Locations
You can delete locations as needed, as long as they are not the root locations of activated WAAS devices.
Note ![]() If a location has a device assigned to it, you can first assign the device to another location and then delete the original location.
If a location has a device assigned to it, you can first assign the device to another location and then delete the original location.
To delete a location, follow these steps:
Step 1 ![]() From the WAAS Central Manager GUI, choose Devices > Locations. The Locations window appears.
From the WAAS Central Manager GUI, choose Devices > Locations. The Locations window appears.
Step 2 ![]() Click the Edit icon next to the location that you want to delete.
Click the Edit icon next to the location that you want to delete.
The Modifying Location window appears.
Step 3 ![]() In the taskbar, click the Trash icon. You are asked to confirm your decision to delete the location.
In the taskbar, click the Trash icon. You are asked to confirm your decision to delete the location.
Step 4 ![]() To confirm the action, click OK. The location is deleted.
To confirm the action, click OK. The location is deleted.
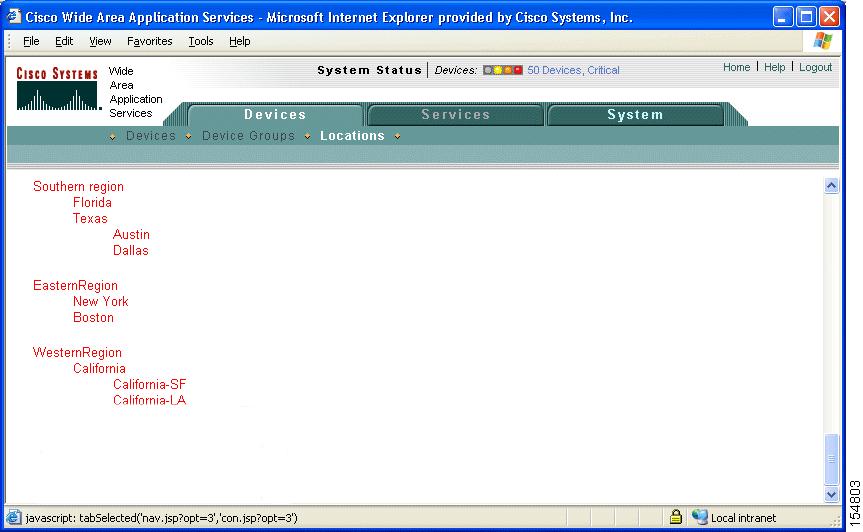
Viewing the Location Tree
The location tree represents the network topology you configured when you assigned a parent to each location. The WAAS Central Manager GUI graphically displays the relationships between the locations configured in your WAAS network.
To view the location tree, choose Devices > Locations. In the taskbar, click the Location Trees button. The location tree is displayed as shown in Figure 3-8.
Figure 3-8 Example of the Location Tree
 Feedback