- Preface
- Getting Started Installing or Upgrading Cisco StadiumVision Director
- Migrating From Platform 2 Servers to a Virtual Environment
- Installing Cisco StadiumVision Director for the First Time
- Using the Software Manager to Upgrade Cisco StadiumVision Director Software, Language Packs, and Fonts
- Verifying the Upgrade
- Upgrading the Cisco DMP 4310G Firmware
- Upgrading the SV-4K and DMP-2K Media Player Firmware
- Appendix A: Post-Upgrade Checklist
- Appendix B: Port Reference
- Appendix C: CIMC Configuration and Firmware Upgrade Guidelines on the Cisco UCS C220 Server
- Appendix D: Using the TUI Upgrade Utility to Upgrade the Cisco StadiumVision Software
Cisco StadiumVision Director Software Installation and Upgrade Guide, Release 4.1
Bias-Free Language
The documentation set for this product strives to use bias-free language. For the purposes of this documentation set, bias-free is defined as language that does not imply discrimination based on age, disability, gender, racial identity, ethnic identity, sexual orientation, socioeconomic status, and intersectionality. Exceptions may be present in the documentation due to language that is hardcoded in the user interfaces of the product software, language used based on RFP documentation, or language that is used by a referenced third-party product. Learn more about how Cisco is using Inclusive Language.
- Updated:
- May 15, 2016
Chapter: Migrating From Platform 2 Servers to a Virtual Environment
- Objectives
- Workflow Summary
- Migration Phases
- Before You Begin
- Phase 1: Preparation of the Production Server Environment
- Phase 2: Preparation of a Virtual Machine
- Phase 3: Migration From Physical to Virtual Server
- Phase 4: Promotion of the Virtual Server
- Phase 5: Creation of Another Virtual Server Instance
- Cloning a Virtual Machine in VMware
- Configuring the New Virtual Machine as the Cisco StadiumVision Director Secondary Server
- Configuring the Backup Environment Between the Virtual Servers
- Starting a Backup Manually on the Virtual/Primary Server for Immediate Execution
- Shut Down Cisco StadiumVision Director on the Virtual/Secondary Server
Migrating From Platform 2 Servers to a Virtual Environment

Note![]() Due to memory and performance requirements, the Cisco StadiumVision Platform 2 servers (Cisco UCS C200) are not supported in Cisco StadiumVision Director Release 4.1.
Due to memory and performance requirements, the Cisco StadiumVision Platform 2 servers (Cisco UCS C200) are not supported in Cisco StadiumVision Director Release 4.1.
In this document, the following terminology is used:
- Migration —Migration means moving an existing Cisco StadiumVision Director platform to a new hardware platform in a virtual environment.
- Upgrade — Means changing your software version to a newer release on your existing platform.
This module describes how to migrate your existing physical Platform 2 servers (Cisco UCS C200s) running Release 4.0 to a virtual environment so that you can upgrade to Release 4.1.
The information in this module also can be applied to Platform 3 servers. However, Platform 3 servers are supported in Release 4.1 and do not have a strict requirement to be migrated to a virtual environment before being upgraded to Release 4.1.
Objectives
The objectives of this module in preparing for an upgrade to Cisco StadiumVision Director Release 4.1 are:
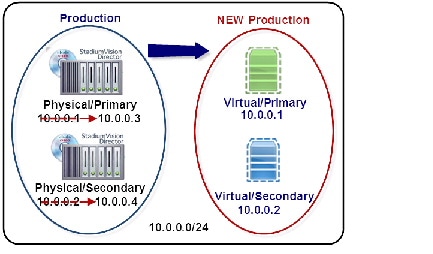
- Moving two physical, Cisco StadiumVision Director Platform 2 servers (Cisco UCS C200s) currently in production running Release 4.0.0-732 (SP3) to two virtual servers running Release 4.0.0-732 (SP3) (Figure 1).
- Retaining the ability to power up retired physical servers as needed without an IP addressing conflict.
Figure 1 Migration Objectives From Cisco StadiumVision Director Physical Servers to Virtual Servers
Workflow Summary
Table 1 provides a high-level summary of the tasks required to migrate from physical to virtual servers running Cisco StadiumVision Director. It includes links to topics within this module that provide more detailed information, along with other related documentation references.
|
|
|
|
|---|---|---|
| 2. 3. |
Note Contact your Cisco representative or Technical Support to obtain the full ISO image for Release 4.0. |
|
1. 2. 5. 7. 
|
||
1. 2. 3. 4. 5. |
|
|
1. 2. |
||
1. 3. |
|
|
1. 2. 3. |
|
Migration Phases
This section provides detailed information about the tasks to migrate to a virtual environment. It includes the following topics:
- Before You Begin
- Phase 1: Preparation of the Production Server Environment
- Phase 2: Preparation of a Virtual Machine
- Phase 3: Migration From Physical to Virtual Server
- Phase 4: Promotion of the Virtual Server
- Phase 5: Creation of Another Virtual Server Instance
Before You Begin
Before you migrate your servers in preparation for an upgrade to Release 4.1, complete the following tasks:
- Read the Release Notes for Cisco StadiumVision Director Release 4.1.
- Obtain two new IP addresses on the same VLAN as your current Cisco StadiumVision Director production servers.

Tip The best practice is to use unique IP addresses on all servers. This avoids IP address conflicts in the case of a need to turn on retired production servers for information or any potential requirement to fall back to Release 4.0 on those servers.
Tip Upgrade ISO images are available from the Software Download Center. To obtain the Release 4.0.0-525 full ISO image, contact your Cisco representative or Cisco Technical Support.
–![]() Full ISO for Release 4.0.0-525.
Full ISO for Release 4.0.0-525.
–![]() Upgrade ISO for Release 4.0.0-601 (SP1)
Upgrade ISO for Release 4.0.0-601 (SP1)
Phase 1: Preparation of the Production Server Environment
This phase includes the tasks required to prepare your production servers for migration:
- Upgrading the Production Servers (as required)
- Documenting the Primary Production Server Configuration (required)
- Preparing the Primary Server for Migration (required)
- Changing the IP Addresses on the Production Servers (required)
Note![]() Upgrading and documenting the production server network configuration can be done ahead of migration. The remainder of the tasks in this section should be scheduled when there is a sufficient period of time to perform the migration and test the outcome when no events are scheduled.
Upgrading and documenting the production server network configuration can be done ahead of migration. The remainder of the tasks in this section should be scheduled when there is a sufficient period of time to perform the migration and test the outcome when no events are scheduled.
Upgrading the Production Servers
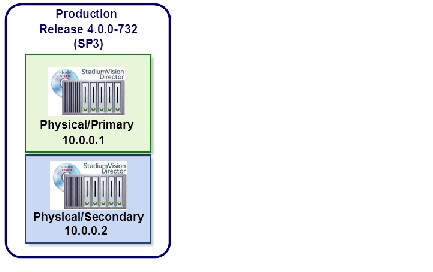
Figure 2 shows the target Cisco StadiumVision Director software version that should be installed on your Cisco UCS C200 production servers before migration to a virtual environment.
Figure 2 Target Software Version for Cisco StadiumVision Director Production Servers
Upgrade Paths
Depending on the version of Cisco StadiumVision Director currently running on your Platform 2 servers, you might have several upgrades to perform.
The upgrade paths to Release 4.0.0-732 (SP3) follow a linear progression as shown below:
Release 3.2.0-520 (SP2) > Release 4.0.0-601 (SP1) > Release 4.0.0-707 (SP2) > Release 4.0.0-732 (SP3)
Release 4.0.0-525 > Release 4.0.0-601 (SP1) > Release 4.0.0-707 (SP2) > Release 4.0.0-732 (SP3)
For information about how to upgrade to Release 4.0, see the Cisco StadiumVision Director Software Installation and Upgrade Guide, Release 4.0.
Documenting the Primary Production Server Configuration
At a minimum, be sure to document the network configuration (IP address, DNS server, NTP server, and timezone information) for your primary production server prior to migration.
To verify this information, you can go to the TUI Main Menu > System Settings > Network Settings.
Preparing the Primary Server for Migration
To prepare the primary production server for migration, complete the following steps:
Step 1![]() Stop all active scripts:
Stop all active scripts:
a.![]() Go to Control Panel > Control.
Go to Control Panel > Control.
Step 2![]() Process all ungenerated Proof of Play (PoP) reports:
Process all ungenerated Proof of Play (PoP) reports:
a.![]() Go to Control Panel > Setup > Proof of Play.
Go to Control Panel > Setup > Proof of Play.
b.![]() Select an event script with a green status icon.
Select an event script with a green status icon.
a.![]() Go to Management Dashboard > Tools > Advanced > Run a Task.
Go to Management Dashboard > Tools > Advanced > Run a Task.
b.![]() In the Tasks to Run box, select BackupTask.
In the Tasks to Run box, select BackupTask.
Step 4![]() Obtain a System State Report (SSR):
Obtain a System State Report (SSR):
b.![]() Select Report Destination and Level options.
Select Report Destination and Level options.
Changing the IP Addresses on the Production Servers
Note![]() The best practice is to use unique IP addresses on all servers. Be sure to configure the retiring production servers with the new IP addresses.
The best practice is to use unique IP addresses on all servers. Be sure to configure the retiring production servers with the new IP addresses.
Reusing the production IP addresses on the new virtual servers and changing to new IP addresses on the retiring production servers has the following benefits:
- Avoids IP address conflicts in the case of a need to turn on retired production servers for information or any potential requirement to fall back to Release 4.0 on those servers.
- Preserves DHCP strings required for SV-4K and DMP-2K Option 43 deployment that are already used in production. These strings include the IP address of the Cisco StadiumVision Director server in the converted URL.
Prerequisites
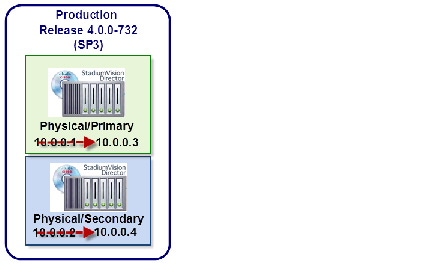
Before you begin this task, be sure that you have obtained two new IP addresses on the same VLAN as your production servers. These new IP addresses will be configured on the production servers (Figure 3).
Figure 3 New IP Address Configuration on Production Servers
Procedure
To change the IP address on the production servers, complete the following steps:
Step 1![]() From the TUI Main Menu on the primary server, go to the System Settings menu.
From the TUI Main Menu on the primary server, go to the System Settings menu.
Step 2![]() Select the Network Settings option.
Select the Network Settings option.
The Network Settings sub-menu is displayed.
Step 3![]() Select the Setup Network Information option.
Select the Setup Network Information option.
Step 4![]() At the Configure Network confirmation screen, press any key to continue.
At the Configure Network confirmation screen, press any key to continue.
The Select Action screen is displayed with the “Edit Devices” option highlighted.
The Select a Device screen is displayed with the “eth0” network interface highlighted.
The Ethernet Configuration screen is displayed.
Note![]() The Linux screen is misspelled “Devernet Configuration.”
The Linux screen is misspelled “Devernet Configuration.”
Step 7![]() Press the tab key until the cursor is positioned on the Static IP address line.
Press the tab key until the cursor is positioned on the Static IP address line.
Step 8![]() Press the backspace key to go to the beginning of the line and type in the new IP address of the primary server.
Press the backspace key to go to the beginning of the line and type in the new IP address of the primary server.
In our example from Figure 3, this would be 10.0.0.3.
Step 9![]() Press the tab key until the Ok button is highlighted and press Enter.
Press the tab key until the Ok button is highlighted and press Enter.
You return to the Select a Device screen.
Step 10![]() Press the tab key until the Save button is highlighted and press Enter.
Press the tab key until the Save button is highlighted and press Enter.
You return to the Select Action screen.
Step 11![]() Press the tab key until the Save&Quit button is highlighted and press Enter.
Press the tab key until the Save&Quit button is highlighted and press Enter.
You return to the TUI Configure Network screen.
Step 12![]() Press any key to return to the Network Settings sub-menu.
Press any key to return to the Network Settings sub-menu.
Step 13![]() Select the Edit hosts file option.
Select the Edit hosts file option.
a.![]() Press any key to enter edit mode.
Press any key to enter edit mode.
b.![]() Replace the server’s original IP address (in our example, 10.0.0.1) with the new IP address of the primary server (ex. 10.0.0.3).
Replace the server’s original IP address (in our example, 10.0.0.1) with the new IP address of the primary server (ex. 10.0.0.3).
Step 14![]() Save the configuration and exit vi using the following command:
Save the configuration and exit vi using the following command:
Step 15![]() Restart the network service:
Restart the network service:
a.![]() From the TUI Main Menu, go to the Services Control sub-menu.
From the TUI Main Menu, go to the Services Control sub-menu.
b.![]() Select the Networking option.
Select the Networking option.
The Networking sub-menu is displayed.
c.![]() Select the Restart networking option.
Select the Restart networking option.
The network daemon is restarted and the IP address change is put into effect on the primary server.
Step 16![]() Repeat this procedure on the secondary production server using the other new IP address (in our example, 10.0.0.4) in Step 8 and Step 13.
Repeat this procedure on the secondary production server using the other new IP address (in our example, 10.0.0.4) in Step 8 and Step 13.
Phase 2: Preparation of a Virtual Machine
Note![]() This section only provides a high-level summary of the tasks to perform to prepare your virtual machine to run Cisco StadiumVision Director. It does not intend to provide specific details about how to install and configure VMware software.
This section only provides a high-level summary of the tasks to perform to prepare your virtual machine to run Cisco StadiumVision Director. It does not intend to provide specific details about how to install and configure VMware software.
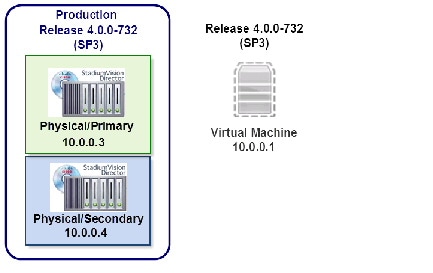
After you have prepared your production servers running Release 4.0.0-732 (SP3) and changed their IP addresses, you are ready to install and configure the primary virtual server.
Figure 4 shows the objective of this section to install a virtual machine running Cisco StadiumVision Director Release 4.0.0-732 (SP3), with the original IP address of the primary production server (which is 10.0.0.1 in our example).
Figure 4 Install a Virtual Machine with Release 4.0 SP3 and Primary Server Original IP Address
Prerequisites
Before you install a virtual machine for Cisco StadiumVision Director, be sure that the following requirements are met:
1.![]() You have changed the IP addresses on the production servers.
You have changed the IP addresses on the production servers.
2.![]() You have verified that your virtual server meets the requirements listed in Table 1.
You have verified that your virtual server meets the requirements listed in Table 1.
Procedure
To install the virtual machine, complete the following steps:
Step 1![]() Configure the virtual machine operating system specifications according to the tested specifications provided in Table 2 .
Configure the virtual machine operating system specifications according to the tested specifications provided in Table 2 .
|
|
|
|---|---|
Step 2![]() Install VMware client software and configure the original IP address of the primary production Cisco StadiumVision Director server.
Install VMware client software and configure the original IP address of the primary production Cisco StadiumVision Director server.
Step 3![]() Load the full ISO for Cisco StadiumVision Director Release 4.0.0-525 on the virtual machine.
Load the full ISO for Cisco StadiumVision Director Release 4.0.0-525 on the virtual machine.
Step 4![]() Test IP connectivity between the virtual server and the primary production server using the ping command.
Test IP connectivity between the virtual server and the primary production server using the ping command.
Step 5![]() Configure the server system settings with the network setup information that you documented from the production primary server.
Configure the server system settings with the network setup information that you documented from the production primary server.
For more information, see the “Configuring the Cisco StadiumVision Director Server System Settings” module in the Cisco StadiumVision Director Server Administration Guide, Release 4.0.
Step 6![]() Perform upgrades to move to 4.0.0-732 (SP3):
Perform upgrades to move to 4.0.0-732 (SP3):
Release 4.0.0-525 > Release 4.0.0-601 (SP1) > Release 4.0.0-707 (SP2) > Release 4.0.0-732 (SP3)
For more information, see the “Using the Software Manager to Upgrade Cisco StadiumVision Director Software, Language Packs, and Fonts” module in the Cisco StadiumVision Director Software Installation and Upgrade Guide, Release 4.0.
Phase 3: Migration From Physical to Virtual Server
This phase includes the tasks to establish the virtual server as backup to the primary production server to begin the virtual migration process:
Configuring the Virtual Server as the Cisco StadiumVision Director Secondary Server
To configure the virtual server as secondary/inactive in Cisco StadiumVision Director, complete the following steps:
Step 1![]() Log into the TUI as installer on the virtual server using a directly-connected console or SSH client.
Log into the TUI as installer on the virtual server using a directly-connected console or SSH client.
The TUI Main Menu is displayed.
Step 2![]() Go to the StadiumVision Server Administration > Failover sub-menu.
Go to the StadiumVision Server Administration > Failover sub-menu.
Step 3![]() Select the Configure as Secondary/Inactive option.
Select the Configure as Secondary/Inactive option.
Step 4![]() Press any key to return to the Failover sub-menu.
Press any key to return to the Failover sub-menu.
Step 5![]() Return to the StadiumVision Server Administration menu by typing R and pressing Enter.
Return to the StadiumVision Server Administration menu by typing R and pressing Enter.
Step 6![]() Type R and press Enter to return to the Main Menu.
Type R and press Enter to return to the Main Menu.
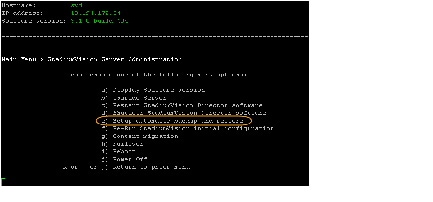
Step 7![]() From the Main Menu, go to the System Accounts > Enable/Disable Backup User menu (Figure 5).
From the Main Menu, go to the System Accounts > Enable/Disable Backup User menu (Figure 5).
Figure 5 Enable/Disable Backup User Menu

Step 8![]() Select Enable backup user account.
Select Enable backup user account.
Tip To navigate through the TUI menus you must type the character that corresponds to the menu area where you want to go (a, b, c, and so on) and press Enter.
To return to other menus, you must back out of the hierarchy of menus using one of the indicated keys to return you to prior menus.
When successfully created, the following messages are displayed:
Step 9![]() Press any key to return to the Enable/Disable Backup user menu.
Press any key to return to the Enable/Disable Backup user menu.
Step 10![]() Return to the Main Menu and go to the StadiumVision Server Administration menu.
Return to the Main Menu and go to the StadiumVision Server Administration menu.
Step 11![]() Select the Shutdown StadiumVision Director Software option.
Select the Shutdown StadiumVision Director Software option.
Step 12![]() Return to the Main Menu and exit the TUI.
Return to the Main Menu and exit the TUI.
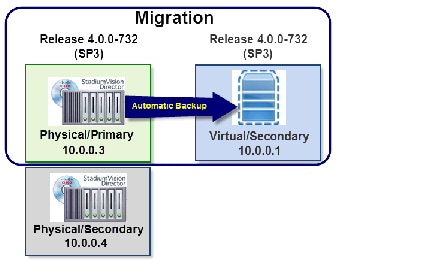
Configuring the Backup Environment Between the Primary Production Server and Virtual/Secondary Server
To transfer Cisco StadiumVision Director backup data to the new virtual/secondary server, you need to establish the automatic backup between the primary production server and the virtual/secondary server (Figure 6). Later this backup data will be restored on the virtual server.
Figure 6 Automatic Backup from Primary Production Server to Virtual/Secondary Server
To set up the primary server for automatic backup and restore, complete the following steps:
Step 1![]() On the primary server, log into the TUI by doing the following:
On the primary server, log into the TUI by doing the following:
a.![]() Use a directly connected console, or use an SSH client from a laptop computer that is connected to the Cisco StadiumVision Server network to run a secure login to the primary Cisco StadiumVision Director server using the IP address for your server.
Use a directly connected console, or use an SSH client from a laptop computer that is connected to the Cisco StadiumVision Server network to run a secure login to the primary Cisco StadiumVision Director server using the IP address for your server.
b.![]() When the login prompt appears, enter the installer userid followed by the installer password at the password prompt.
When the login prompt appears, enter the installer userid followed by the installer password at the password prompt.
Step 2![]() From the Main Menu, go to StadiumVision Server Administration > Setup automatic backup and restore.
From the Main Menu, go to StadiumVision Server Administration > Setup automatic backup and restore.
Figure 7 Setup Automatic Backup and Restore Menu Option
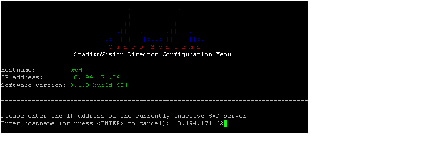
Step 3![]() At the prompt type the IP address or hostname of your secondary server as shown in the example in Figure 8:
At the prompt type the IP address or hostname of your secondary server as shown in the example in Figure 8:
Figure 8 Secondary Server IP Address Configuration
Step 4![]() At the prompt, type the password for the installer account on the secondary backup server.
At the prompt, type the password for the installer account on the secondary backup server.
Step 5![]() When accepted, the system generates the RSA keys and the public key is copied to the secondary server. Confirm that the keys are created without errors as shown in (Figure 9):
When accepted, the system generates the RSA keys and the public key is copied to the secondary server. Confirm that the keys are created without errors as shown in (Figure 9):
Figure 9 Generation of RSA Keys

Step 6![]() Wait until the “Press any key” message appears (there can be a short delay before it is displayed).
Wait until the “Press any key” message appears (there can be a short delay before it is displayed).
Step 7![]() Then, press any key to return to the StadiumVision Server Administration menu.
Then, press any key to return to the StadiumVision Server Administration menu.
Step 8![]() Continue to return to the Main Menu and exit the TUI.
Continue to return to the Main Menu and exit the TUI.
Starting a Backup Manually on the Primary Server for Immediate Execution
You need to start a backup on the primary server so that the backup data is made available for a restore on the secondary/virtual server.
To start a backup manually on the primary server for immediate execution, complete the following steps:
Step 1![]() On the primary server, log into Cisco StadiumVision Director as an administrator.
On the primary server, log into Cisco StadiumVision Director as an administrator.
Step 2![]() From the Cisco StadiumVision Director main menu, click Management Dashboard.
From the Cisco StadiumVision Director main menu, click Management Dashboard.
The Cisco StadiumVision Management Dashboard is opened in a new window.
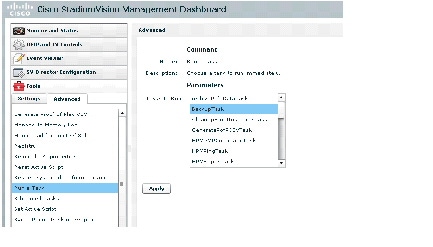
Step 3![]() Select Tools > Advanced > Run a Task.
Select Tools > Advanced > Run a Task.
Step 4![]() In the Tasks to Run box, select the BackupTask (Figure 10).
In the Tasks to Run box, select the BackupTask (Figure 10).
Figure 10 Running a Scheduled Backup Task Manually
The backup begins immediately. When completed, the CMS is automatically restarted.
Note![]() The “success” message that appears means that the backup task has started. It does not mean that the backup has completed.
The “success” message that appears means that the backup task has started. It does not mean that the backup has completed.
Phase 4: Promotion of the Virtual Server
In this phase of the migration, the virtual server becomes the new primary/active server with restored data from backup and the production server is shut down:
- Promoting the Virtual Server (required)
- Restoring the Virtual Server with System Data From a Backup File (required)
- Stopping Services and Shutting Down the Primary Production Server (required)
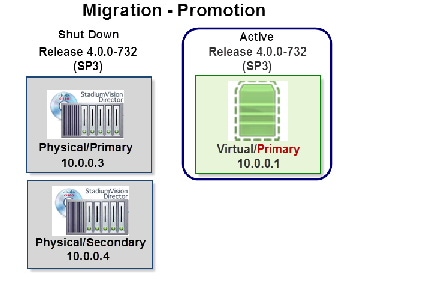
In this phase, the virtual server is the only active server as shown in Figure 11.
Figure 11 Virtual Server is the New Primary Cisco StadiumVision Director Server
Promoting the Virtual Server
To promote the virtual server, complete the following steps:
Step 1![]() Log into the TUI as installer on the secondary virtual server using a directly-connected console or SSH client.
Log into the TUI as installer on the secondary virtual server using a directly-connected console or SSH client.
The TUI Main Menu is displayed.
Step 2![]() Go to the StadiumVision Server Administration > Failover sub-menu.
Go to the StadiumVision Server Administration > Failover sub-menu.
Step 3![]() Select the Promote as Primary/Active option.
Select the Promote as Primary/Active option.
The Cisco StadiumVision Director services are started and also configured to start automatically when a reboot occurs.
Restoring the Virtual Server with System Data From a Backup File
To restore the virtual server with system data from a backup file, complete the following steps:
Step 1![]() Log into Cisco StadiumVision Director on the virtual server using an administrator account.
Log into Cisco StadiumVision Director on the virtual server using an administrator account.
Step 2![]() From the Cisco StadiumVision Director main menu, click Management Dashboard.
From the Cisco StadiumVision Director main menu, click Management Dashboard.
Step 3![]() From the Dashboard Drawers, select Tools > Advanced > Restore system data from backup.
From the Dashboard Drawers, select Tools > Advanced > Restore system data from backup.
Step 4![]() Select the components that you want to restore, and select the date of the backup file to use for the restore.
Select the components that you want to restore, and select the date of the backup file to use for the restore.
The restore begins. A dialog box appears notifying you when the restore process has successfully completed.
Step 6![]() When the restore is complete, look around the system to verify that everything looks as expected.
When the restore is complete, look around the system to verify that everything looks as expected.
Stopping Services and Shutting Down the Primary Production Server
To stop services, auto-restart, and shut down the primary production server, complete the following steps:
Step 1![]() Log into the TUI as installer on the primary production server using a directly-connected console or SSH client.
Log into the TUI as installer on the primary production server using a directly-connected console or SSH client.
The TUI Main Menu is displayed.
Step 2![]() Go to the StadiumVision Server Administration > Failover sub-menu.
Go to the StadiumVision Server Administration > Failover sub-menu.
Step 3![]() Select the Configure as Secondary/Inactive option.
Select the Configure as Secondary/Inactive option.
Step 4![]() Press any key to return to the Failover sub-menu.
Press any key to return to the Failover sub-menu.
Step 5![]() Return to the StadiumVision Server Administration menu by typing R and pressing Enter.
Return to the StadiumVision Server Administration menu by typing R and pressing Enter.
Step 6![]() Select the Power Off option.
Select the Power Off option.
The primary server is shut down.
Phase 5: Creation of Another Virtual Server Instance
This phase includes the tasks to create another virtual machine to be configured as the secondary/inactive Cisco StadiumVision Director server:
- Cloning a Virtual Machine in VMware (suggested)
- Configuring the New Virtual Machine as the Cisco StadiumVision Director Secondary Server (required)
- Configuring the Backup Environment Between the Virtual Servers (required)
- Shut Down Cisco StadiumVision Director on the Virtual/Secondary Server (required)
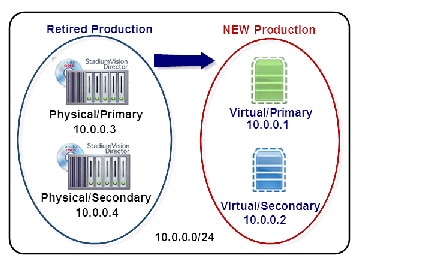
Figure 12 shows the status of the retired physical and new virtual production servers when migration is complete at the end of this phase.
Figure 12 Production Server Status After Migration Completion
Cloning a Virtual Machine in VMware
You can use VMware software to clone the virtual/primary machine as shown in Figure 13. Otherwise, you need to implement another virtual machine instance as described in “Phase 2: Preparation of a Virtual Machine” section.
Figure 13 Cloning a Virtual Machine in VMware

Configuring the New Virtual Machine as the Cisco StadiumVision Director Secondary Server
Follow the steps in the “Configuring the Virtual Server as the Cisco StadiumVision Director Secondary Server” section.
Note![]() Be sure to give the new or cloned virtual machine the IP address of the original, secondary production server. In our example, 10.0.0.2.
Be sure to give the new or cloned virtual machine the IP address of the original, secondary production server. In our example, 10.0.0.2.
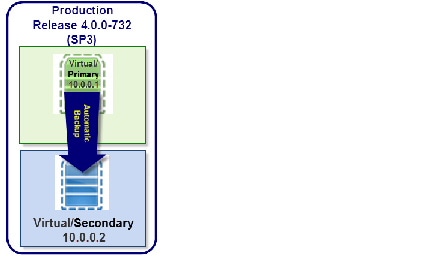
Configuring the Backup Environment Between the Virtual Servers
Establish the automatic backup on the virtual/primary server to the virtual/secondary server as shown in Figure 14 by following the same steps described in the “Configuring the Backup Environment Between the Primary Production Server and Virtual/Secondary Server” section.
Figure 14 Configuring Automatic Backup Between the Virtual Servers
Starting a Backup Manually on the Virtual/Primary Server for Immediate Execution
Run a backup on the virtual/primary server by following the steps in the “Starting a Backup Manually on the Virtual/Primary Server for Immediate Execution” section.
Shut Down Cisco StadiumVision Director on the Virtual/Secondary Server
To shut down the Cisco StadiumVision Director software on the virtual/secondary server, complete the following steps:
Step 1![]() Log into the TUI as installer on the virtual/secondary server using a directly-connected console or SSH client.
Log into the TUI as installer on the virtual/secondary server using a directly-connected console or SSH client.
The TUI Main Menu is displayed.
Step 2![]() Go to the StadiumVision Server Administration menu.
Go to the StadiumVision Server Administration menu.
Step 3![]() Select the Shutdown StadiumVision Director Software option.
Select the Shutdown StadiumVision Director Software option.
What To Do Next
After you have migrated Cisco StadiumVision Director to a virtual server environment and confirmed successful Cisco StadiumVision operation, you can upgrade your servers to Release 4.1.
For more information, see the Cisco StadiumVision Director Software Installation and Upgrade Guide, Release 4.1.
 Feedback