VT Advantage on Cisco CallManager Express Configuration Example
Available Languages
Contents
Introduction
This document provides a sample installation of Cisco Video Telephony (VT) Advantage on a Cisco CallManager Express (Cisco CME) System.
Prerequisites
Requirements
Ensure that you meet these requirements before you attempt this configuration:
-
Enable Video on Cisco CallManager Express
-
Enable Video on each Cisco IP phone
-
Connect the Cisco IP phone to the telephony network
-
Download the Cisco VT Advantage software
Components Used
The information in this document is based on these software and hardware versions:
-
Cisco VT Camera
-
Personal Computer (PC)
-
Cisco IP 7960 Phone
-
VT Advantage Software 1.0(2)
The information in this document was created from the devices in a specific lab environment. All of the devices used in this document started with a cleared (default) configuration. If your network is live, make sure that you understand the potential impact of any command.
Overview
Cisco VT Advantage is a system that brings video telephony functionality to Cisco IP phones enabled for video. Cisco VT Advantage software integrated with the VT camera allows a personal computer connected to a Cisco IP phone to add video to phone calls without requiring the push of an extra button. With Cisco VT Advantage enabled, you still have the capability for the IP phone to forward, transfer, hold, or mute. Cisco VT Advantage is intended for desktop-to-desktop IP video calls, and not as a video conferencing solution.
Cisco VT Advantage Installation
Set Up the Cisco VT Camera
Complete these steps in order to install the Cisco VT Camera.
Figure 1—Cisco VT Camera 
-
Remove the camera, privacy shade, and the flexible camera base from the packing.
-
Mount the camera on the flexible camera base.
-
Attach the privacy shade to the camera.
-
Position the camera on top of your monitor.
Note: Do not connect the camera if the VT Advantage software is not installed.
Install VT Advantage Software (Optional)
The Requirements section of this document specifies that you need to have the software installed already. If you have not done so, or you want to upgrade the version, you can download the software from the Software Download (registered customers only) page.
If you require assistance when you install the software on your PC, refer to VT Advantage Installation on a PC for more information.
Verify
Complete these steps in order to verify that your Cisco VT Advantage program works correctly.
-
Choose Start > Programs > Cisco VT Advantage in order to launch the VT Advantage program.
If the program does not open, but you are able to see the small icon on the Taskbar, double-click on it in order to bring up the VT Advantage window.
Figure 2—Cisco VT Advantage Icon
-
Click the Start Video Check button in order to see both the local and remote windows that display the images of the video telephony call.
Once a phone call is made, you should see yourself on the local window and the person on the other side of the phone call on the remote window. Also, you should see a solid green bar for the sending and receiving window. If you have a red X through the VT Advantage window, then you need to troubleshoot this problem.
Figure 3—VT Advantage Remote and Local Window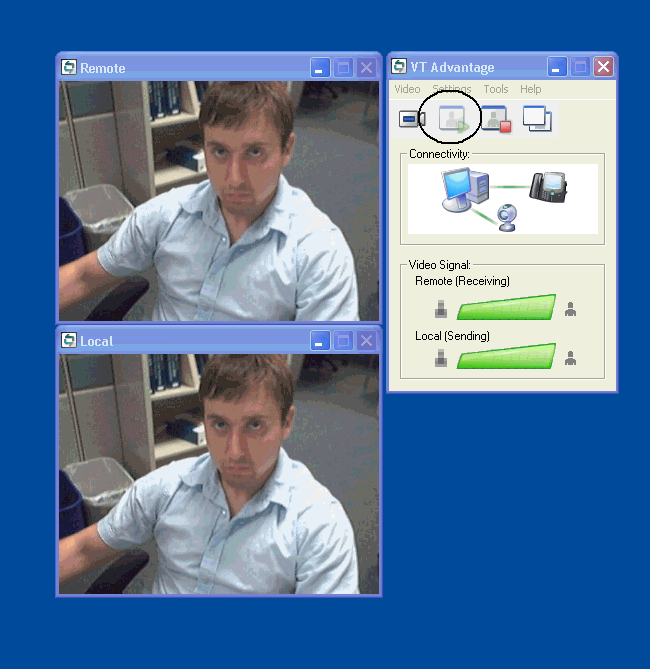


Troubleshoot
Problem 1
If you do not receive a local signal, make sure that the video camera is installed correctly into the USB port and that it is not muted in the VT Advantage application (Video > mute video).
Another problem that you might encounter is that you see a red X through the VT Advantage window which means that there is no connection between the IP phone and your PC. Check that the cable is plugged in properly and that it is not malfunctioning.
Figure 4—Connectivity Problems 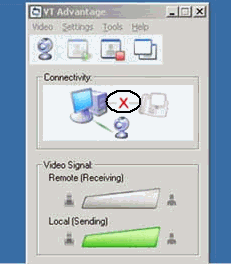
Another option is to check the configuration that you have on your Cisco CallManager Express system in order to see if video is enabled on the Cisco CallManager Express and the IP phones. This output is an excerpt from a working Cisco CallManager Express configuration.
| Cisco 3725 |
|---|
AUSNML-3725-03#show running-config . . . . ! ! ! ! telephony-service no auto-reg-ephone load 7960-7940 P00307020300 max-ephones 144 max-dn 500 ip source-address 172.22.1.154 port 2000 service phone videoCapability 1 !--- The service phone videoCapability command enables !--- the video functionality on your Cisco CallManager Express system. This command !--- is case sensitive, so in order for it to work, it must be typed !--- as is shown here: dialplan-pattern 1 5125551212 extension-length 4 voicemail 2000 max-conferences 8 gain -6 transfer-system full-consult secondary-dialtone 9 create cnf-files version-stamp Jan 01 2002 00:00:00 ! ! ephone-dn 11 dual-line number 1001 name Cisco Auto-Attendant call-forward all 2010 call-forward busy 2010 ! ! ephone-dn 12 dual-line number 1002 namest Phone call-forward busy 2000 call-forward noan 2000 timeout 10 phone 1 device-security-mode none video !--- The video command enables the option of using video !--- on your phone. Once this configuration is added, your !--- phone shows a small camera icon on the bottom right !--- corner of the window. mac-address 0030.94C2.D6E7 type 7960 button 1:11 2:16 ! ! ! |
If you get the error message not connected to phone when you run the VT Advantage Camera connect tool, check if the PC has access to the voice VLAN. Make sure that the firewall does not block the route to the voice VLAN, and, if there is no route to the voice VLAN on the firewall, you need to add a route.
Problem 2
If video works between intrasites but not intersites, then perform this step:
Go to System > Locations and change the Location RSVP settings parameter to No Reservation.
Related Information
Revision History
| Revision | Publish Date | Comments |
|---|---|---|
1.0 |
28-Jul-2008 |
Initial Release |
 Feedback
Contact Cisco
- Open a Support Case

- (Requires a Cisco Service Contract)