TACACS+ and RADIUS Attributes for Various Cisco and Non-Cisco Devices Configuration Example
Available Languages
Contents
Introduction
This document provides a compilation of attributes that various Cisco and non-Cisco products expect to receive from an authentication, authorization, and accounting (AAA) server; in this case, the AAA server is an Access Control Server (ACS). The ACS can return these attributes along with an Access-Accept as a part of a shell profile (TACACS+) or authorization profile (RADIUS).
This document provides step-by-step instructions on how to add custom attributes to shell profiles and authorization profiles. This document also contains a list of devices and the TACACS+ and RADIUS attributes that the devices expect to see returned from the AAA server. All topics include examples.
The list of attributes provided in this document is not exhaustive or authoritative and may change at any time without an update to this document.
Prerequisites
Requirements
There are no specific requirements for this document.
Components Used
The information in this document is based on the ACS Version 5.2/5.3.
Conventions
Refer to the Cisco Technical Tips Conventions for more information on document conventions.
Create a Shell Profile (TACACS+)
A shell profile is a basic permissions container for TACACS+-based access. You can specify which TACACS+ attributes and attribute values should be returned with the Access-Accept, in addition to the Cisco® IOS privilege level, session timeout, and other parameters.
Complete these steps in order to add custom attributes to a new shell profile:
-
Log in to the ACS interface.
-
Navigate to Policy Elements > Authorization and Permissions > Device Administration > Shell Profiles.
-
Click the Create button.
-
Name the shell profile.
-
Click the Custom Attributes tab.
-
Enter the attribute name in the Attribute field.
-
Choose whether the requirement is Mandatory or Optional from the Requirement drop-down list.
-
Leave the drop-down for the attribute value set to Static. If the value is static, you can enter the value in the next field. If the value is dynamic, you cannot enter the attribute manually; instead the attributed is mapped to an attribute in one of the identity stores.
-
Enter the value of the attribute in the last field.
-
Click the Add button in order to add the entry to the table.
-
Repeat to configure all the attributes you need.
-
Click the Submit button at the bottom of the screen.
Configuration Example
Device: Application Control Engine (ACE)
Attribute(s): shell:<context-name>
Value(s): <Role-name> <domain-name1>
Usage: The role and the domain are separated by a space character. You can configure a user (for example, USER1) to be assigned a role (for example, ADMIN) and a domain (for example, MYDOMAIN) when the user logs in to a context (for example, C1).
Create an Authorization Profile (RADIUS)
An authorization profile is a basic permissions container for RADIUS-based access. You can specify which RADIUS attributes and attribute values should be returned with the Access-Accept, in addition to the VLANs, Access Control Lists (ACLs), and other parameters.
Complete these steps in order to add custom attributes to a new authorization profile:
-
Log in to the ACS interface.
-
Navigate to Policy Elements > Authorization and Permissions > Network Access > Authorization Profiles.
-
Click the Create button.
-
Name the authorization profile.
-
Click the RADIUS Attributes tab.
-
Select a dictionary from the Dictionary Type drop-down menu.
-
In order to set the select the attribute for the RADIUS Attribute field, click the Select button. A new window appears.
-
Review the available attributes, make your selection, and click OK. The Attribute Type value is set by default, based on the attribute selection that you just made.
-
Leave the drop-down for the attribute value set to Static. If the value is static, you can enter the value in the next field. If the value is dynamic, you cannot enter the attribute manually; instead the attributed is mapped to an attribute in one of the identity stores.
-
Enter the value of the attribute in the last field.
-
Click the Add button in order to add the entry to the table.
-
Repeat to configure all the attributes you need.
-
Click the Submit button at the bottom of the screen.
Configuration Example
Device: ACE
Attribute(s): cisco-av-pair
Value(s): shell:<context-name>=<Role-name> <domain-name1> <domain-name2>
Usage: Each value after the equal sign is separated by a space character. You can configure a user (for example, USER1) to be assigned a role (for example, ADMIN) and a domain (for example, MYDOMAIN) when the user logs in to a context (for example, C1).
Device List
Aggregation Services Routers (ASR)
RADIUS (Authorization Profile)
Attribute(s): cisco-av-pair
Value(s): shell:tasks="#<role-name>,<permission>:<process>"
Usage: Set the values of <role-name> to the name of a role locally defined on the router. The role hierarchy can be described in terms of a tree, where the role #root is at the top of the tree, and the role #leaf adds additional commands. These two roles can be combined and passed back if: shell:tasks="#root,#leaf".
Permissions can also be passed back on an individual process basis, so that a user can be granted read, write, and execute privileges for certain processes. For example, in order to grant a user read and write privileges for the bgp process, set the value to: shell:tasks="#root,rw:bgp". The order of the attributes does not matter; the result is the same whether the value is set to shell:tasks="#root,rw:bgp" or ro shell:tasks="rw:bgp,#root".
Example – Add the Attribute to an Authorization Profile| Dictionary Type | RADIUS Attribute | Attribute Type | Attribute Value |
|---|---|---|---|
| RADIUS-Cisco | cisco-av-pair |
String | shell:tasks="#root,#leaf,rwx:bgp,r:ospf" |
Application Control Engine (ACE)
TACACS+ (Shell Profile)
Attribute(s): shell:<context-name>
Value(s): <Role-name> <domain-name1>
Usage: The role and the domain are separated by a space character. You can configure a user (for example, USER1) to be assigned a role (for example, ADMIN) and a domain (for example, MYDOMAIN) when the user logs in to a context (for example, C1).
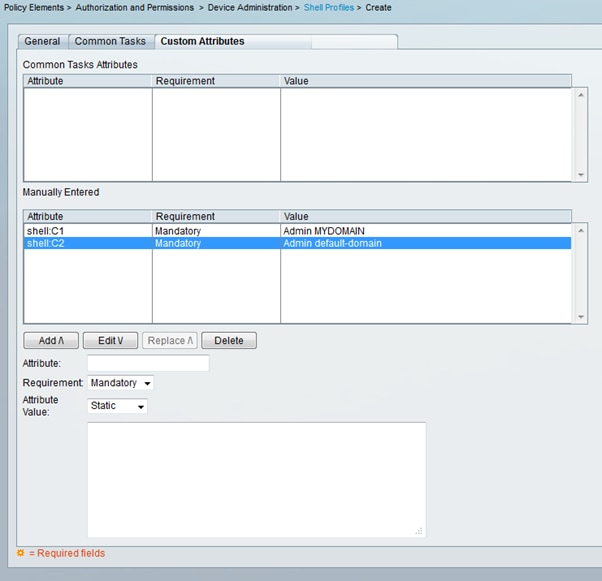
Example – Add the Attribute to a Shell Profile| Attribute | Requirement | Attribute Value |
|---|---|---|
shell:C1 |
Mandatory | Admin MYDOMAIN |
If USER1 logs in through the C1 context, that user is automatically assigned the ADMIN role and the MYDOMAIN domain (provided that an authorization rule has been configured where, once USER1 logs in, they are assigned this authorization profile).
If USER1 logs in through a different context, which is not returned in the value of the attribute that the ACS sends back, that user is automatically assigned the default role (Network-Monitor) and the default domain (default-domain).
RADIUS (Authorization Profile)
Attribute(s): cisco-av-pair
Value(s): shell:<context-name>=<Role-name> <domain-name1> <domain-name2>
Usage: Each value after the equal sign is separated by a space character. You can configure a user (for example, USER1) to be assigned a role (for example, ADMIN) and a domain (for example, MYDOMAIN) when the user logs into a context (for example, C1).
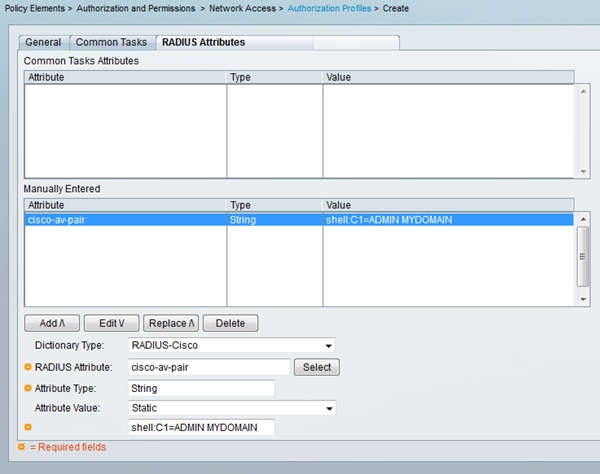
Example – Add the Attribute to an Authorization Profile| Dictionary Type | RADIUS Attribute | Attribute Type | Attribute Value |
|---|---|---|---|
| RADIUS-Cisco | cisco-av-pair |
String | shell:C1=ADMIN MYDOMAIN |
If USER1 logs in through the C1 context, that user is automatically assigned the ADMIN role and MYDOMAIN domain (provided that an authorization rule has been configured where, once USER1 logs in, they are assigned this authorization profile).
If USER1 logs in through a different context, which is not returned in the value of the attribute that the ACS sends back, that user is automatically assigned the default role (Network-Monitor) and the default domain (default-domain).
BlueCoat Packet Shaper
RADIUS (Authorization Profile)
Attribute(s): Packeteer-AVPair
Value(s): access=<level>
Usage: <level> is the level of access to grant. Touch access is equivalent to read-write, while look access is equivalent to read-only.
The BlueCoat VSA does not exist in the ACS dictionaries by default. In order to use the BlueCoat attribute in an authorization profile, you must create a BlueCoat dictionary and add the BlueCoat attributes to that dictionary.
Create the dictionary:
-
Navigate to System Administration > Configuration > Dictionaries > Protocols > RADIUS > RADIUS VSA.
-
Click Create.
-
Enter the details of the dictionary:
-
Name: BlueCoat
-
Vendor ID: 2334
-
Attribute Prefix: Packeteer-
-
-
Click Submit.
Create an attribute in the new dictionary:
-
Navigate to System Administration > Configuration > Dictionaries > Protocols > RADIUS > RADIUS VSA > BlueCoat.
-
Click Create.
-
Enter the details of the attribute:
-
Attribute: Packeteer-AVPair
-
Description: Used in order to specify access level
-
Vendor Attribute ID: 1
-
Direction: OUTBOUND
-
Multiple Allowed: False
-
Include attribute in log: Checked
-
Attribute Type: String
-
-
Click Submit.
| Dictionary Type | RADIUS Attribute | Attribute Type | Attribute Value |
|---|---|---|---|
| RADIUS-BlueCoat | Packeteer-AVPair |
String | access=look |
| Dictionary Type | RADIUS Attribute | Attribute Type | Attribute Value |
|---|---|---|---|
| RADIUS-BlueCoat | Packeteer-AVPair |
String | access=touch |
Brocade Switches
RADIUS (Authorization Profile)
Attribute(s): Tunnel-Private-Group-ID
Value(s): U:<VLAN1>; T:<VLAN2>
Usage: Set <VLAN1> to the value of the data VLAN. Set <VLAN2> to the value of the voice VLAN. In this example, the data VLAN is VLAN 10, and the voice VLAN is VLAN 21.
Example – Add the Attribute to an Authorization Profile| Dictionary Type | RADIUS Attribute | Attribute Type | Attribute Value |
|---|---|---|---|
| RADIUS-IETF | Tunnel-Private-Group-ID |
Tagged String | U:10;T:21 |
Cisco Unity Express (CUE)
RADIUS (Authorization Profile)
Attribute(s): cisco-av-pair
Value(s): fndn:groups=<group-name>
Usage: <group-name> is the name of the group with the privileges that you want to grant to the user. This group must be configured on Cisco Unity Express (CUE).
Example – Add the Attribute to an Authorization Profile| Dictionary Type | RADIUS Attribute | Attribute Type | Attribute Value |
|---|---|---|---|
| RADIUS-Cisco | cisco-av-pair |
String | fndn:groups=Administrators |
Infoblox
RADIUS (Authorization Profile)
Attribute(s): Infoblox-Group-Info
Value(s): <group-name>
Usage: <group-name> is the name of the group with the privileges that you want to grant to the user. This group must be configured on the Infoblox device. In this configuration example, the group name is MyGroup.
The Infoblox VSA does not exist in the ACS dictionaries by default. In order to use the Infoblox attribute in an authorization profile, you must create an Infoblox dictionary and add the Infoblox attributes to that dictionary.
Create the dictionary:
-
Navigate to System Administration > Configuration > Dictionaries > Protocols > RADIUS > RADIUS VSA.
-
Click Create.
-
Click the small arrow next to Use Advanced Vendor Options.
-
Enter the details of the dictionary:
-
Name: Infoblox
-
Vendor ID: 7779
-
Vendor Length Field Size: 1
-
Vendor Type Field Size: 1
-
-
Click Submit.
Create an attribute in the new dictionary:
-
Navigate to System Administration > Configuration > Dictionaries > Protocols > RADIUS > RADIUS VSA > Infoblox.
-
Click Create.
-
Enter the details of the attribute:
-
Attribute: Infoblox-Group-Info
-
Vendor Attribute ID: 009
-
Direction: OUTBOUND
-
Multiple Allowed: False
-
Include attribute in log: Checked
-
Attribute Type: String
-
-
Click Submit.
| Dictionary Type | RADIUS Attribute | Attribute Type | Attribute Value |
|---|---|---|---|
| RADIUS-Infoblox | Infoblox-Group-Info |
String | MyGroup |
Intrusion Prevention System (IPS)
RADIUS (Authorization Profile)
Attribute(s): ips-role
Value(s): <role name>
Usage: The value <role name> can be any one of the four Intrusion Prevention System (IPS) user roles: viewer, operator, administrator, or service. Refer to the configuration guide for your version of IPS for the details of the permissions granted to each user role type.
-
Cisco Intrusion Prevention System Device Manager Configuration Guide for IPS 7.0
-
Cisco Intrusion Prevention System Device Manager Configuration Guide for IPS 7.1
| Dictionary Type | RADIUS Attribute | Attribute Type | Attribute Value |
|---|---|---|---|
| RADIUS-Cisco | cisco-av-pair |
String | ips-role:administrator |
Juniper
TACACS+ (Shell Profile)
Attribute(s): allow-commands ; allow-configuration ; local-user-name ; deny-commands ; deny-configuration; user-permissions
Value(s): <allow-commands-regex> ; <allow-configuration-regex> ; <local-username> ; <deny-commands-regex> ; <deny-configuration-regex>
Usage: Set the value of <local-username> (that is, the value of the local-user-name attribute) to a username that exists locally on the Juniper device. For example, you can configure a user (for example, USER1) to be assigned the same user template as a user (for example, JUSER) that exists locally on the Juniper device when you set the value of the local-user-name attribute to JUSER. The values of the allow-commands, allow-configuration, deny-commands, and deny-configuration attributes can be entered in regex format. The values that these attributes are set to are in addition to the operational/configuration mode commands authorized by the user's login class permissions bits.
Example – Add Attributes to a Shell Profile 1| Attribute | Requirement | Attribute Value |
|---|---|---|
allow-commands |
Optional | "(request system) | (show rip neighbor)" |
allow-configuration |
Optional | |
local-user-name |
Optional | sales |
deny-commands |
Optional | "<^clear" |
deny-configuration |
Optional |
| Attribute | Requirement | Attribute Value |
|---|---|---|
allow-commands |
Optional | "monitor | help | show | ping | traceroute" |
allow-configuration |
Optional | |
local-user-name |
Optional | engineering |
deny-commands |
Optional | "configure" |
deny-configuration |
Optional |
Nexus Switches
RADIUS (Authorization Profile)
Attribute(s): cisco-av-pair
Value(s): shell:roles="<role1> <role2>"
Usage: Set the values of <role1> and <role2> to the names of roles locally defined on the switch. When you add multiple roles, separate them with a space character. When multiple roles are passed back from the AAA server to the Nexus switch, the result is that the user has access to commands defined by the union of all three roles.
The built-in roles are defined in Configuring User Accounts and RBAC.
Example – Add the Attribute to an Authorization Profile| Dictionary Type | RADIUS Attribute | Attribute Type | Attribute Value |
|---|---|---|---|
| RADIUS-Cisco | cisco-av-pair |
String | shell:roles="network-admin vdc-admin vdc-operator" |
Riverbed
TACACS+ (Shell Profile)
Attribute(s): service ; local-user-name
Value(s): rbt-exec ; <username>
Usage: In order to grant the user read-only access, the <username> value must be set to monitor. In order to grant the user read-write access, the <username> value must be set to admin. If you have another account defined in addition to admin and monitor, configure that name to be returned.
Example – Add Attributes to a Shell Profile (for read-only access)| Attribute | Requirement | Attribute Value |
|---|---|---|
service |
Mandatory | rbt-exec |
local-user-name |
Mandatory | monitor |
| Attribute | Requirement | Attribute Value |
|---|---|---|
service |
Mandatory | rbt-exec |
local-user-name |
Mandatory | admin |
Wireless LAN Controller (WLC)
RADIUS (Authorization Profile)
Attribute(s): Service-Type
Value(s): Administrative (6) / NAS-Prompt (7)
Usage: In order to grant the user read/write access to the Wireless LAN Controller (WLC), the value must be Administrative; for read-only access, the value must be NAS-Prompt.
For details, see RADIUS Server Authentication of Management Users on Wireless LAN Controller (WLC) Configuration Example
Example – Add the Attribute to an Authorization Profile (for read-only access)| Dictionary Type | RADIUS Attribute | Attribute Type | Attribute Value |
|---|---|---|---|
| RADIUS-IETF | Service-Type |
Enumeration | NAS-Prompt |
| Dictionary Type | RADIUS Attribute | Attribute Type | Attribute Value |
|---|---|---|---|
| RADIUS-IETF | Service-Type |
Enumeration | Administrative |
Data Center Network Manager (DCNM)
DCNM must be restarted after the authentication method is changed. Otherwise, it may assign network-operator privilege instead of network-admin.
| DCNM Role | RADIUS Cisco-AV-Pair | Tacacs Cisco-AV-Pair |
|---|---|---|
| User | shell:roles = "network-operator" |
cisco-av-pair=shell:roles="network-operator" |
| Administrator | shell:roles = "network-admin" |
cisco-av-pair=shell:roles="network-admin" |
Related Information
Revision History
| Revision | Publish Date | Comments |
|---|---|---|
1.0 |
22-Jan-2013 |
Initial Release |
 Feedback
Contact Cisco
- Open a Support Case

- (Requires a Cisco Service Contract)