Use the Secure IDS/IPS Sensor COM Port for Console Access
Available Languages
Contents
Introduction
Some tasks require you to log into a Cisco Secure Intrusion Detection System (IDS)/ Intrusion Prevention System (IPS) Sensor directly. For example, initializing a Cisco Secure IDS/IPS Sensor requires you to log into the CLI and run the setup command. Other tasks that require you to log into a Cisco Secure IDS Sensor include changing the Cisco Secure IDS/IPS Sensor's IP address, subnet mask and/or default gateway, and troubleshooting certain errors.
You can log into the Cisco Secure IDS/IPS Sensor using one of these methods.
-
Through the system console (a directly-connected keyboard and monitor).
-
Telnet into the Cisco Secure IDS/IPS Sensor.
-
Browse to the Cisco Secure IDS/IPS Sensor using https.
-
Connect a PC to the COM port on the Cisco Secure IDS/IPS Sensor and use a communications package.
This document describes how to log into the Cisco Secure IDS/IPS Sensor using the last method.
Prerequisites
Requirements
There are no specific requirements for this document.
Components Used
The information in this document is based on Cisco Secure IDS version 4.x and IPS 5.x and later.
Note: The same cable as described in this document works with all sensor versions back to 2.2.0.x.
The information in this document was created from the devices in a specific lab environment. All of the devices used in this document started with a cleared (default) configuration. If your network is live, make sure that you understand the potential impact of any command.
Conventions
For more information on document conventions, refer to the Cisco Technical Tips Conventions.
Required Cable
You need a DB-9-to-DB-9 null-modem cable to connect a PC to the COM port on the Cisco Secure IDS/IPS Sensor. This cable is sold as a serial LapLink or File Transfer Cable. Be careful with null-modem adapters/connectors because they do not always work for this application. The null-modem cable pinout is provided in this document if you want to build your own. You need DB-9 female connectors at each end.
Null-Modem Cable Pinout
| From Pin or Pins | Direction | From Pin or Pins |
|---|---|---|
| 1 and 6 | --> | 4 |
| 2 | --> | 3 |
| 3 | --> | 2 |
| 4 | --> | 1 and 6 |
| 5 | --> | 5 |
| 7 | --> | 8 |
| 8 | --> | 7 |
How to Log in Using the COM Port
Complete these steps.
-
Using the null-modem cable, connect the appropriate COM port on the PC to the COM 1 port on the Cisco Secure IDS Sensor.
The COM 1 port location on the different Cisco Secure IDS Sensor models are shown here.
-
4210
-
4215
The 4215 Sensor has an RJ45 console port connector. Use the RJ45 console cable along with the DB-9 or DB-25 adaptor contained in the accessory kit to establish a console connection.
-
4220/4230
-
4235/4250
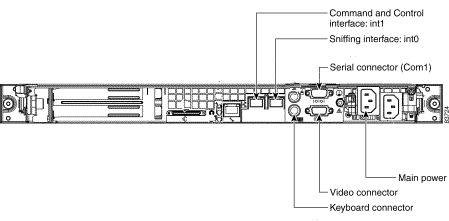
-
-
Once the PC and Cisco Secure IDS Sensor are connected, start your communications software on the PC. Configure the COM port settings in the communications software according to this table.
Parameters Settings Bits per second 9600 Data bits 8 Parity None Stop bits 1 Flow control None -
Connect the PC COM port to the Cisco Secure IDS Sensor using the communications software. If your call is successful, you see a <sensorname> login: prompt. If this is the first time you have logged in, use the default username/password of cisco/cisco (you are prompted to change the password).


Related Information
Revision History
| Revision | Publish Date | Comments |
|---|---|---|
1.0 |
19-Jan-2006 |
Initial Release |
 Feedback
Contact Cisco
- Open a Support Case

- (Requires a Cisco Service Contract)