Introduction
This document describes configuration and troubleshooting of RADIUS over Datagram Transport Layer Security protocol (DTLS). DTLS provides encryption services for RADIUS, which is transported over a secure tunnel.
Prerequisites
Requirements
Cisco recommends that you have knowledge of these topics:
- Cisco Identity Services Engine (ISE)
- RADIUS protocol
- Cisco IOS
Components Used
The information in this document is based on these software and hardware versions:
- Cisco Identity Services Engine 2.2
- Catalyst 3650 with IOS 16.6.1
The information in this document was created from the devices in a specific lab environment. All of the devices used in this document started with a cleared (default) configuration. If your network is live, make sure that you understand the potential impact of any command.
Configure
Configurations
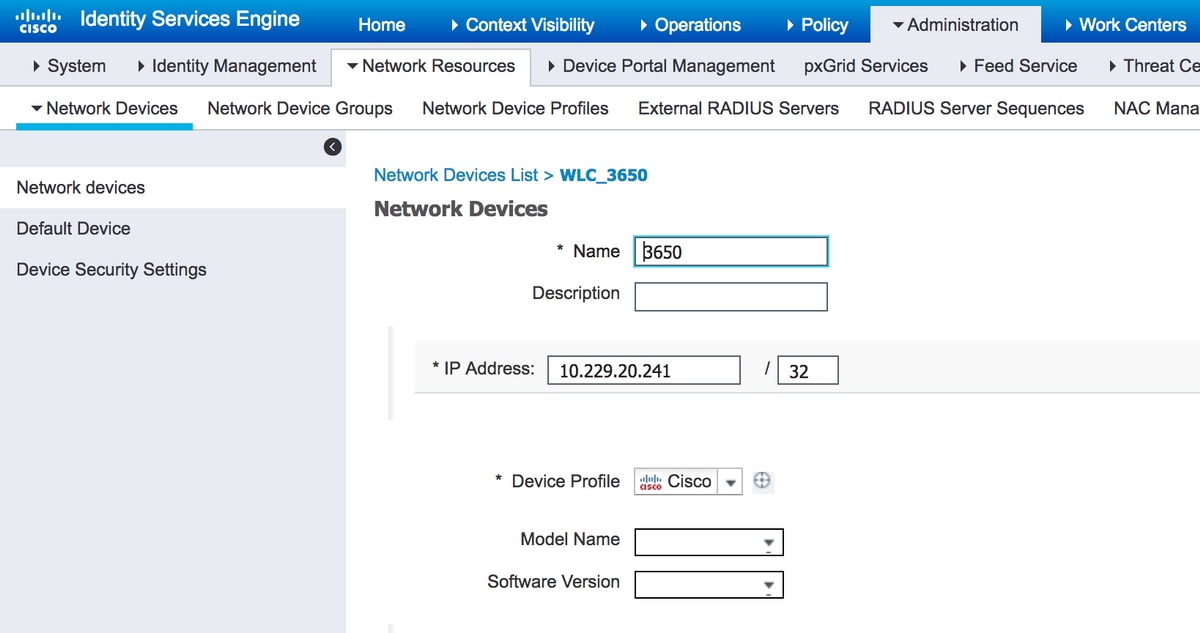
1. Add network device on ISE and enable DTLS protocol.
Navigate to Administration > Network Resources > Network Devices. Click Add and provide at least mandatory fields:
- Name - A friendly name of the device is added.
- IP Address - IP address, which authenticator uses to contact ISE. It is possible to configure a range of devices. In order to do that, specify proper mask (smaller than 32).
- Device Profile - General settings for the device. It allows to specify what protocols are handled, detailed Change of Authorization (CoA) settings and Radius attributes configuration. For more details, navigate to Administration > Network Resources > Network Device Profiles.
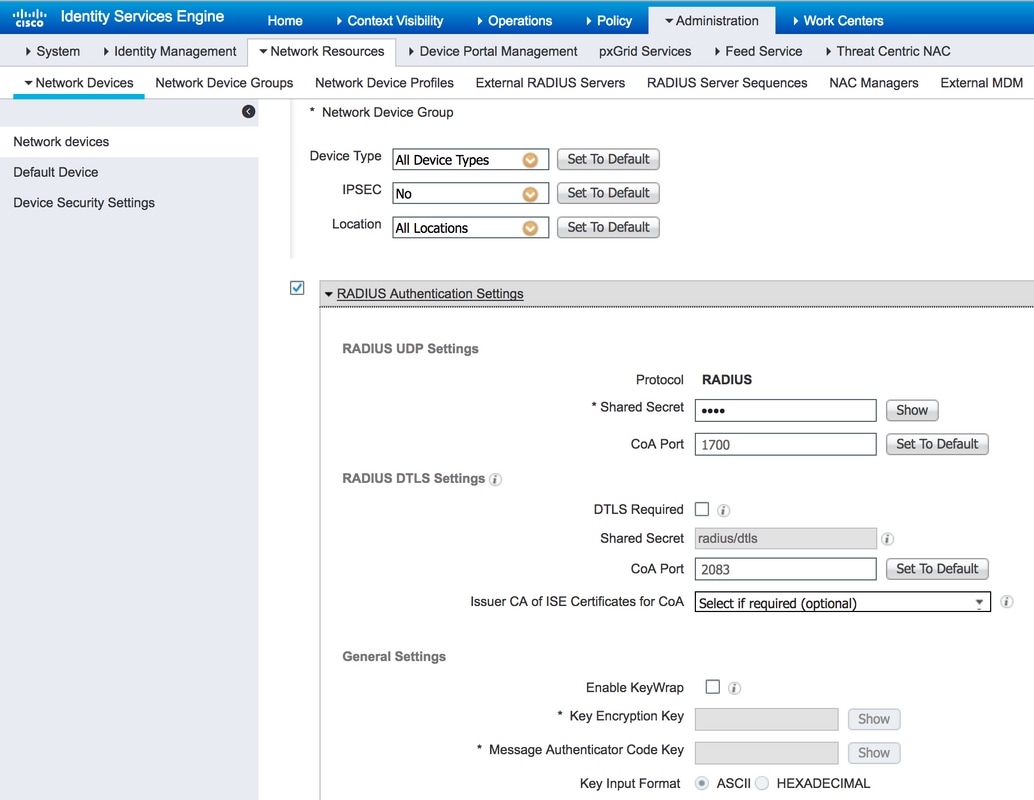
- Network Device Group - Set device type, IPSec the capabilities and device location. This setting is not mandatory. If you do not select custom values, default settings are assumed.
Select checkbox RADIUS Authentication Settings and under RADIUS DTLS Settings select checkbox DTLS Required. This allows RADIUS communication with authenticator only via DTLS secure tunnel. Note that Shared Secret textbox is grayed out. This value in case of RADIUS DTLS is fixed and the same string is configured on authenticator side.
2. Configure DTLS port and idle timeout.
You can configure the port which is used for DTLS communication and idle timeout at Administration > System > Settings > Protocols > RADIUS > RADIUS DTLS.
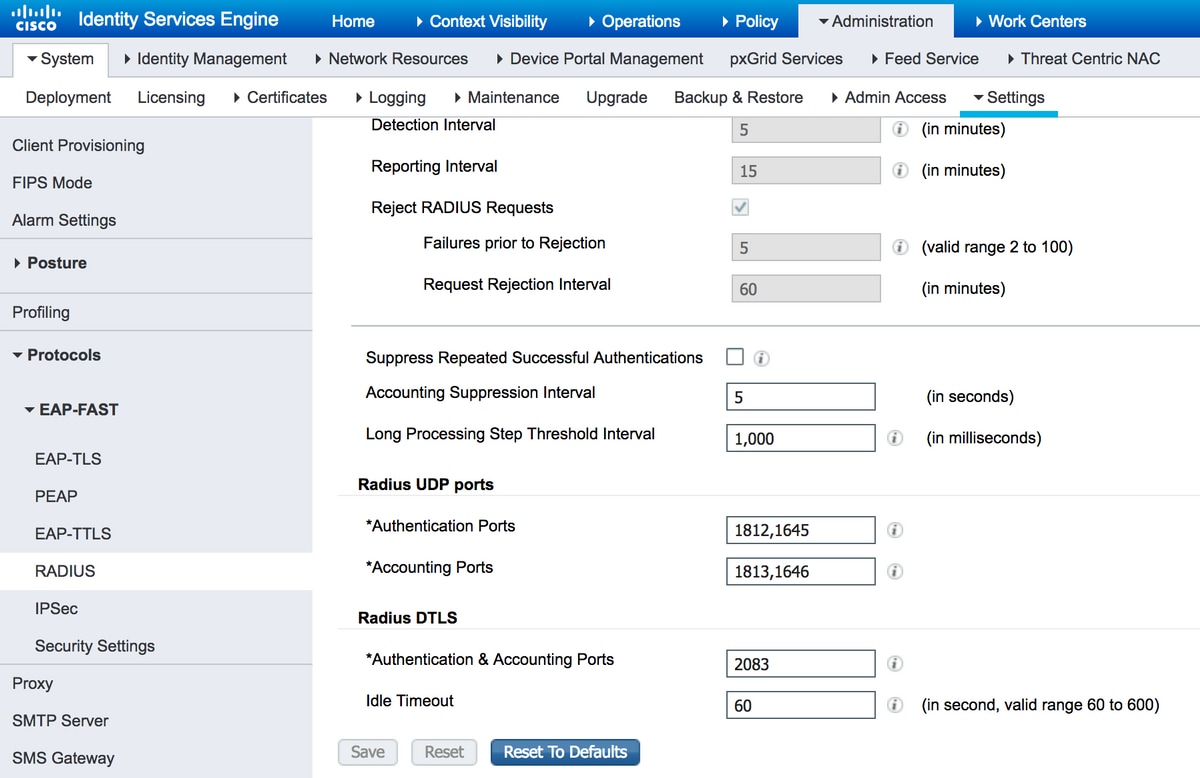
Note that DTLS port is different from RADIUS ports. By default, a RADIUS uses pairs 1645, 1646 and 1812, 1813. By default DTLS for authentication, authorization, accounting and CoA uses port 2083. Idle Timeout specifies how long ISE and authenticator maintain tunnel without any actual communication going through it. This timeout is measured in seconds and ranges from 60 to 600 seconds.
3. Export issuer of DTLS RADIUS certificate from ISE trust store.
In order to establish the tunnel between ISE and authenticator, both entities need to exchange and verify certificates. Authenticator has to trust ISE RADIUS DTLS certificate, which means that its issuer has to be present in authenticator's Trust Store. In order to export signer of ISE certificate, navigate to Administration > System > Certificates, as shown in the image:
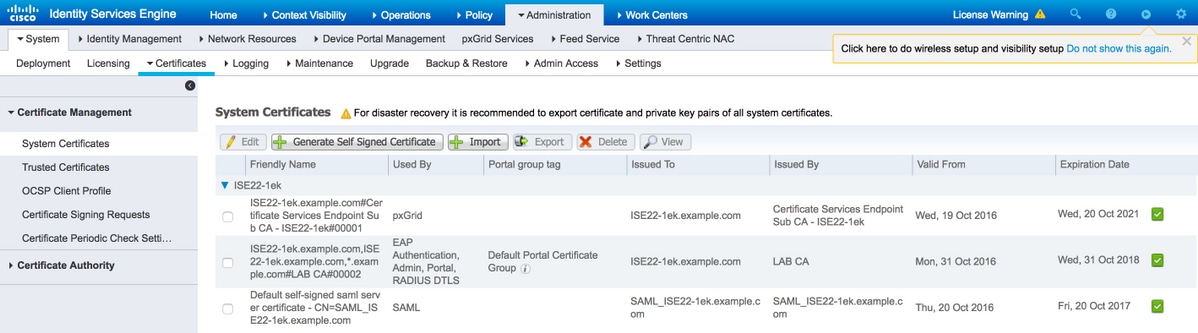
Locate certificate with RADIUS DTLS role assigned and check Issued By field for this certificate. This is the Common Name of certificate that has to be exported from ISE Trust Store. In order to do that, navigate to Administration > System > CertificatesTrusted Certificates. Select checkbox next to the appropriate certificate and click Export.
4. Configure Trust Point and import certificate to authenticator.
In order to configure trustpoint, log in to the switch and execute commands:
configure terminal
crypto pki trustpoint isetp
enrollment terminal
revocation-check none
exit
Import certificate with command crypto pki authenticate isetp. When prompted to accept certificate, type yes.
Switch3650(config)#crypto pki authenticate isetp

Enter the base 64 encoded CA certificate.
End with a blank line or the word "quit" on a line by itself

-----BEGIN CERTIFICATE-----
MIIDWTCCAkGgAwIBAgIQL9s4RrhtWLpJjBYB5v0dtTANBgkqhkiG9w0BAQUFADA/
MRMwEQYKCZImiZPyLGQBGRYDY29tMRcwFQYKCZImiZPyLGQBGRYHZXhhbXBsZTEP
MA0GA1UEAxMGTEFCIENBMB4XDTE1MDIxMjA3MzgxM1oXDTI1MDIxMjA3NDgxMlow
PzETMBEGCgmSJomT8ixkARkWA2NvbTEXMBUGCgmSJomT8ixkARkWB2V4YW1wbGUx
DzANBgNVBAMTBkxBQiBDQTCCASIwDQYJKoZIhvcNAQEBBQADggEPADCCAQoCggEB
AMDSfJwvbJLHHJf4vDTalGjKrDI73c/y269IMZV48xpCruNhglcU8CW/T9Ysj6xk
Oogtx2vpG4XJt7KebDZ/ac1Ymjg7sPBPcnyDZCd2a1b39XakD2puE8lVi4RVkjBH
pss2fTWeuor9dzgb/kWb0YqIsgw1sRKQ2Veh1IXmuhX+wDqELHPIzgXn/DOBF0qN
vWlevrAlmBTxC04t1aPwyRk6b6ptjMeaIv2nqy8tOrldMVYKsPDj8aOrFEQ2d/wg
HDvd6C6LKRBpmAvtrqyDtinEl/CRaEFH7dZpvUSJBNuh7st3JIG8gVFstweoMmTE
zxUONQw8QrZmXDGTKgqvisECAwEAAaNRME8wCwYDVR0PBAQDAgGGMA8GA1UdEwEB
/wQFMAMBAf8wHQYDVR0OBBYEFO0TzYQ4kQ3fN6x6JzCit3/l0qoHMBAGCSsGAQQB
gjcVAQQDAgEAMA0GCSqGSIb3DQEBBQUAA4IBAQAWbWGBeqE2u6IGdKEPhv+t/rVi
xhn7KrEyWxLkWaLsbU2ixsfTeJDCM8pxQItsj6B0Ey6A05c3YNcvW1iNpupGgc7v
9lMt4/TB6aRLVLijBPB9/p2/3SJadCe/YBaOn/vpmfBPPhxUQVPiBM9fy/Al+zsh
t66bcO3WcD8ZaKaER0oT8Pt/4GHZA0Unx+UxpcNuRRz4COArINXE0ULRfBxpIkkF
pWNjH0rlV55edOga0/r60Cg1/J9VAHh3qK2/3zXJE53N+A0h9whpG4LYgIFLB9ep
ZDim7KGsf+P3zk7SsKioGB4kqidHnm34XjlkWFnrCMQH4HC1oEymakV3Kq24
-----END CERTIFICATE-----

Certificate has the following attributes:
       Fingerprint MD5: B33EAD49 87F18924 590616B9 C8880D9D
      Fingerprint SHA1: FD729A3B B533726F F8450358 A2F7EB27 EC8A1178

% Do you accept this certificate? [yes/no]: yes
Trustpoint CA certificate accepted.
% Certificate successfully imported
5. Export certificate of the switch.
Select trustpoint and certificate to be used for DTLS on the switch and export it:
Switch3650(config)#crypto pki export TP-self-signed-721943660 pem terminal
% Self-signed CA certificate:
-----BEGIN CERTIFICATE-----
MIICKTCCAZKgAwIBAgIBATANBgkqhkiG9w0BAQUFADAwMS4wLAYDVQQDEyVJT1Mt
U2VsZi1TaWduZWQtQ2VydGlmaWNhdGUtNzIxOTQzNjYwMB4XDTE2MDQyNzExNDYw
NloXDTIwMDEwMTAwMDAwMFowMDEuMCwGA1UEAxMlSU9TLVNlbGYtU2lnbmVkLUNl
cnRpZmljYXRlLTcyMTk0MzY2MDCBnzANBgkqhkiG9w0BAQEFAAOBjQAwgYkCgYEA
xRybTGD526rPYuD2puMJu8ANcDqQnwunIERgvIWoLwBovuAu7WcRmzw1IDTDryOH
PXt1n5GcQSAOgn+9QdvKl1Z43ZkRWK5E7EGmjM/aL1287mg4/NlrWr4KMSwDQBJI
noJ52CABXUoApuiiJ8Ya4gOYeP0TmsZtxP1N+s+wqjMCAwEAAaNTMFEwDwYDVR0T
AQH/BAUwAwEB/zAfBgNVHSMEGDAWgBSEOKlAPAHBPedwichXL+qUM+1riTAdBgNV
HQ4EFgQUhDipQDwBwT3ncInIVy/qlDPta4kwDQYJKoZIhvcNAQEFBQADgYEAlBNN
wKSS8yBuOH0/jUV7sy3Y9/oV7Z9bW8WFV9QiTQ1lZelvWMTbewozwX2LJvxobGcj
Pi+n99RIH8dBhWwoYl9GTN2LVI22GIPX12jNLqps+Mq/u2qxVm0964Sajs5OlKjQ
69XFfCVot1NA6z2eEP/69oL9x0uaJDZa+6ileh0=
-----END CERTIFICATE-----
In order to list all trustpoints configured, execute command show crypto pki trustpoints. Once the certificate is printed to console, copy it to a file and save on your PC.
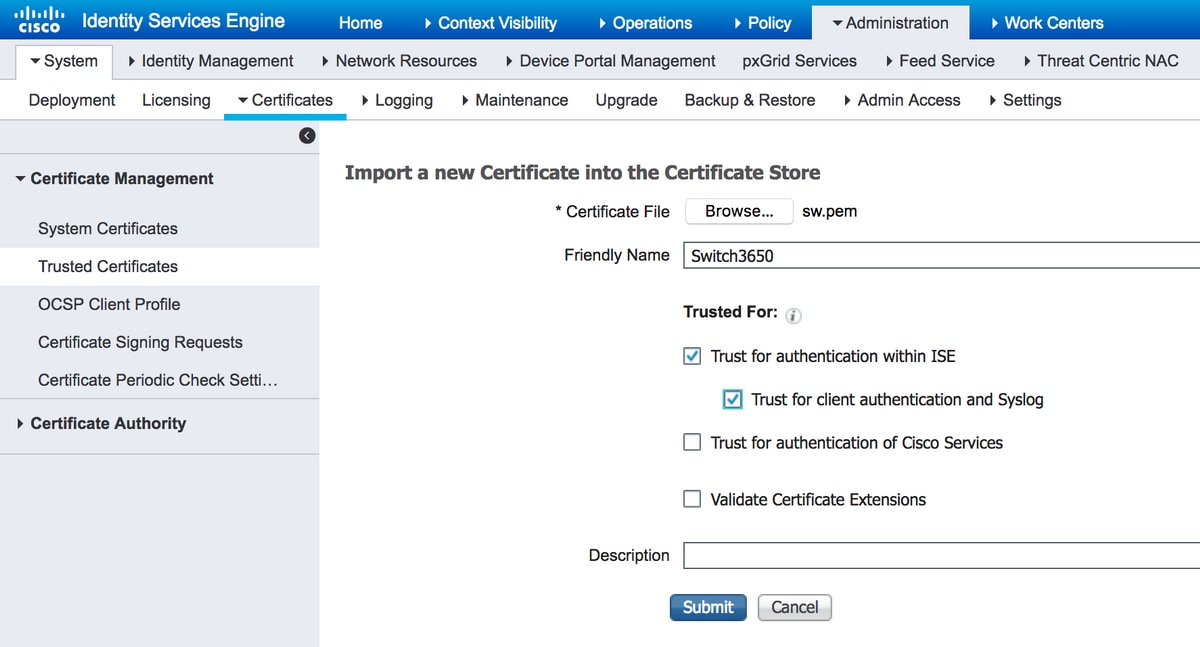
6. Import switch certificate to ISE Trust Store.
On ISE, navigate to Administration > Certificates > Trusted Certificates and click Import.
Now click Browse and select certificate of the switch. Provide (optionally) Friendly Name and select checkboxes Trust for authentication within ISE and Trust for client authentication and Syslog. Then click Submit, as shown in the image:
7. Configure RADIUS on the switch.
Add RADIUS configuration on the switch. In order to configure the switch to communicate with ISE over DTLS, use commands:
radius server ISE22
 address ipv4 10.48.23.86
 key radius/dtls
 dtls port 2083
 dtls trustpoint client TP-self-signed-721943660
 dtls trustpoint server isetp
Rest of AAA specific configuration depends on your requirements and design. Treat this configuration as an example:
aaa group server radius ISE
 server name ISE22

radius-server attribute 6 on-for-login-auth
radius-server attribute 8 include-in-access-req
radius-server attribute 25 access-request include

aaa authentication dot1x default group ISE
aaa authorization network default group ISE
8. Configure Policies on ISE.
Configure authentication and authorization policies on ISE. This step depends on your design and requirements as well.
Verify
In order to verify that users can authenticate, use test aaa command on the switch:
Switch3650#test aaa group ISE alice Krakow123 new-code
User successfully authenticated

USER ATTRIBUTES

username             0   "alice"
Switch3650#
You should see message User successfully authenticated. Navigate to ISE Operations > RADIUS > LiveLog and select details for appropriate log (Click on magnifying glass):

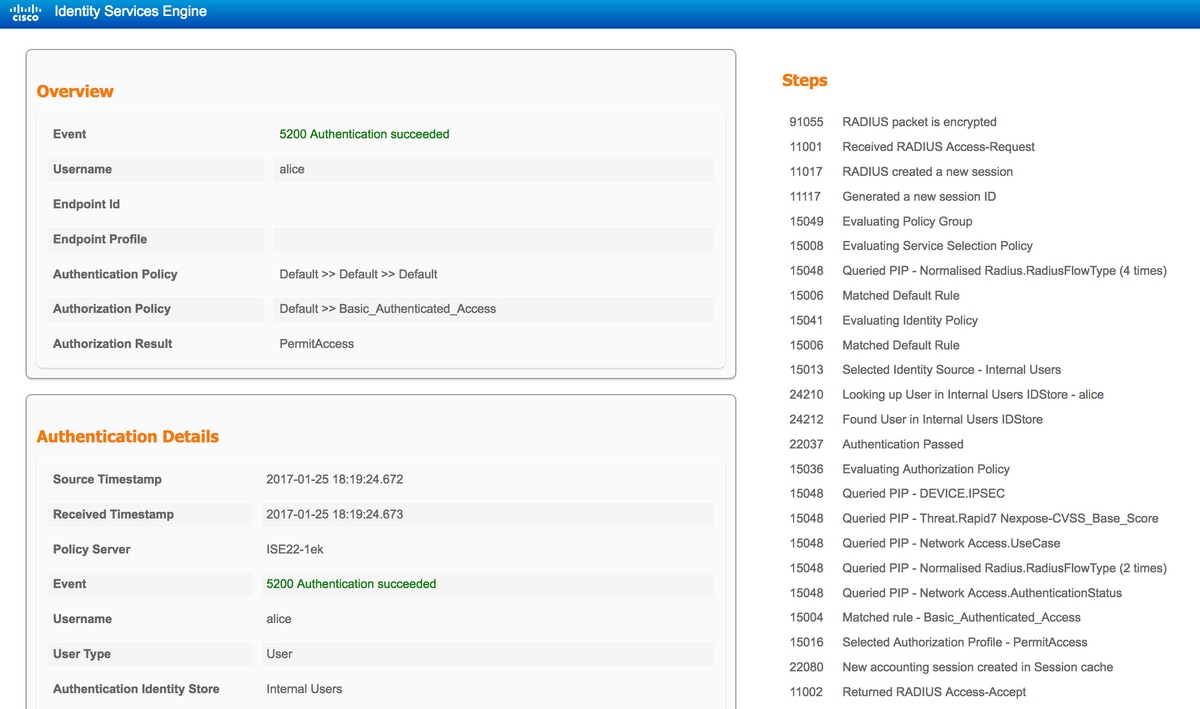
On the right side of the report, there is a list of Steps. Check that first step in the list is RADIUS packet is encrypted.
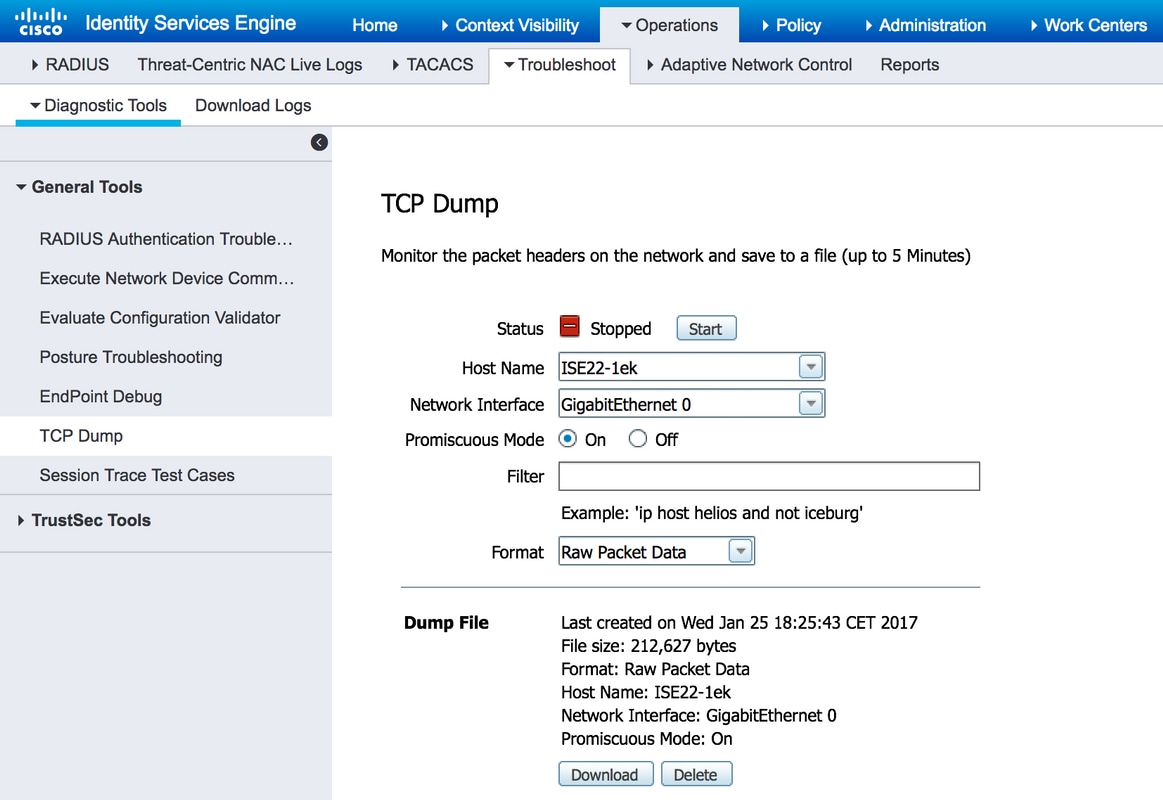
Additionally, you can start packet capture on ISE and execute test aaa command one more time. In order to start capture, navigate to Operations > Troubleshoot > Diagnostic Tools > General Tools > TCP Dump. Select Policy Service Node used for authentication and click Start:
When authentication is finished, click Stop and Download. When you open packet capture, you should be able to see traffic encrypted with DTLS:
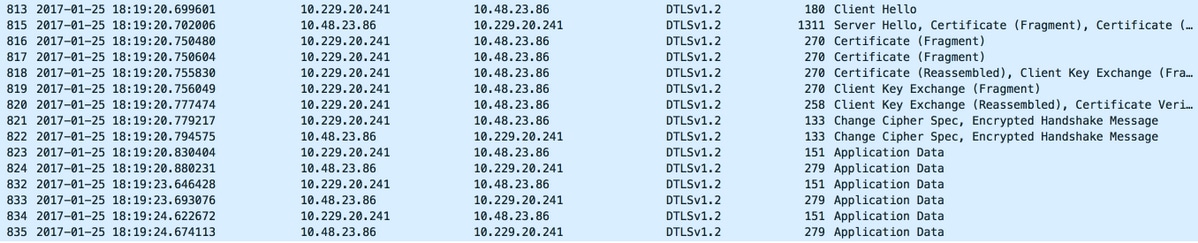
Packets #813 - #822 are part of DTLS handshake. When the handshake is successfully negotiated, Application Data is transfered. Note that number of packets may vary and depends for example on the authentication method used (PAP, EAP-PEAP, EAP-TLS, etc). Contents of each packet are encrypted:

When all data is transmitted, the tunnel is not torn down immediately. IdleTimeout configured on ISE determines how long tunnel can be established without communication going through it. If the timer expires and new Access-Request has to be sent to ISE, DTLS handshake is performed and the tunnel is rebuilt.
Troubleshoot
1. ISE does not receive any requests.
Note that default DTLS port is 2083. Default RADIUS ports are 1645,1646 and 1812,1813. Ensure that firewall does not block UDP/2083 traffic.
2. DTLS handshake fails.
In the detailed report on ISE you may see that DTLS handshake failed:
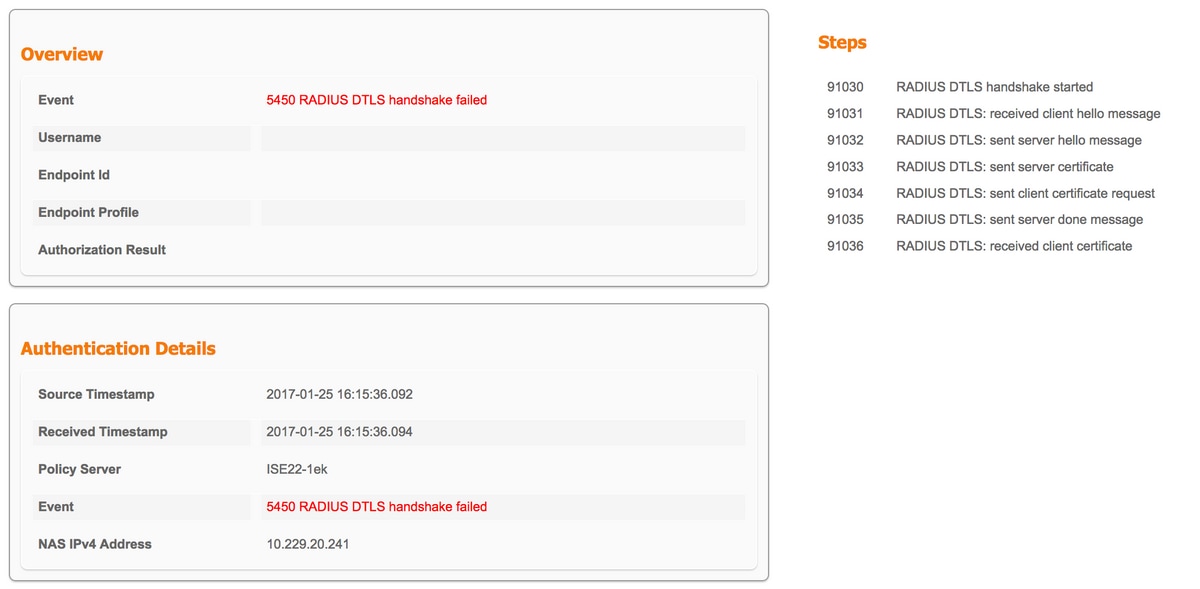
Possible reason is that either switch or ISE does not trust certificate sent during the handshake. Verify certificate configuration. Verify that proper certificate is assigned to RADIUS DTLS role on ISE and to trustpoints on the switch.
 Feedback