Configure and Troubleshoot SNMP on Firepower FDM
Available Languages
Download Options
Bias-Free Language
The documentation set for this product strives to use bias-free language. For the purposes of this documentation set, bias-free is defined as language that does not imply discrimination based on age, disability, gender, racial identity, ethnic identity, sexual orientation, socioeconomic status, and intersectionality. Exceptions may be present in the documentation due to language that is hardcoded in the user interfaces of the product software, language used based on RFP documentation, or language that is used by a referenced third-party product. Learn more about how Cisco is using Inclusive Language.
Introduction
This document describes how to enable Simple Network Management Protocol (SNMP) on Firepower Device Management on version 6.7 with REST API.
Prerequisites
Requirements
Cisco recommends that you have knowledge of these topics:
- Firepower Threat Defense (FTD) managed by Firepower Device Management (FDM) on version 6.7
- Knowledge of REST API
- Knowledge of SNMP
Components Used
Firepower Threat Defense (FTD) managed by Firepower Device Management (FDM) on version 6.7.
The information in this document was created from the devices in a specific lab environment. All of the devices used in this document started with a cleared (default) configuration. If your network is live, ensure that you understand the potential impact of any command.
Background Information
What’s New on 6.7
FTD Device REST API supports configuration and management of SNMP server, users, host, and host-groups. With the SNMP FTD Device REST API support in FP 6.7:
- A user can configure SNMP via FTD Device REST API to manage the network
- SNMP server, users, and host/host-groups can be added/updated or managed via FTD Device REST API.
The examples included in the document describe the configuration steps taken by FDM API Explorer.
Note: SNMP can only be configured via REST API when FTD run version 6.7 and managed by FDM
Feature Overview – SNMP FTD Device REST API Support
- This feature adds new FDM URL endpoints specific to SNMP.
- These new APIs can be used to configure SNMP for polls and traps to monitor systems.
- Post SNMP configuration via APIs, the Management Information Bases (MIBs) on the Firepower devices, are available for polls or for trap notification on NMS/ SNMP Client.
SNMP API/URL Endpoints
|
URL |
Methods |
Models |
|
/devicesettings/default/snmpservers |
GET |
SNMPServer |
|
/devicesettings/default/snmpservers/{objId} |
PUT, GET |
SNMPServer |
|
/object/snmphosts |
POST, GET |
SNMPHost |
|
/object/snmphosts/{objId} |
PUT, DELETE, GET |
SNMPHost |
|
/object/snmpusergroups |
POST, GET |
SNMPUserGroup |
|
/object/snmpusergroups/{objId} |
PUT, DELETE, GET |
SNMPUserGroup |
|
/object/snmpusers |
POST, GET |
SNMPUser |
|
/object/snmpusers/{objId} |
PUT, DELETE, GET |
SNMPUser |
Configure
- The SNMP host has 3 primary versions
- SNMP V1
- SNMP V2C
- SNMP V3
- Each of these has a specific format for “securityConfiguration”.
- For V1 and V2C: It contains a “Community String” and a “type” field that identifies the config as V1 or V2C.
- For SNMP V3: It contains a valid SNMP V3 user and a “type” field that identifies the config as V3.
SNMP v3
1. Access the FDM API Explorer
To access the FDM REST API Explorer from the FDM GUI select the 3 dots and then API Explorer. Alternatively, navigate to URL https://FDM_IP/#/api-explorer:

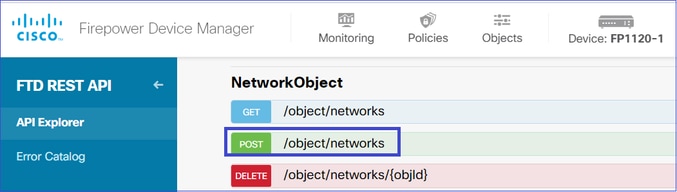
2. Network Object Config
Create a new network object for the SNMP host: on FDM API Explorer select NetworkObject and then POST /object/networks:
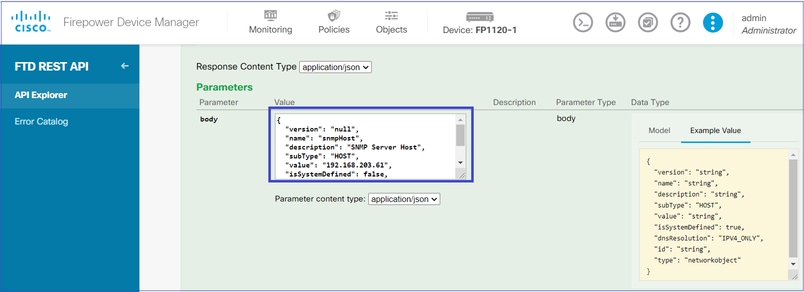
The SNMP Host JSON format is this. Paste this JSON into the body section and change the IP address on "value" to match the SNMP host IP address:
{
"version": "null",
"name": "snmpHost",
"description": "SNMP Server Host",
"subType": "HOST",
"value": "192.168.203.61",
"isSystemDefined": false,
"dnsResolution": "IPV4_ONLY",
"type": "networkobject"
}
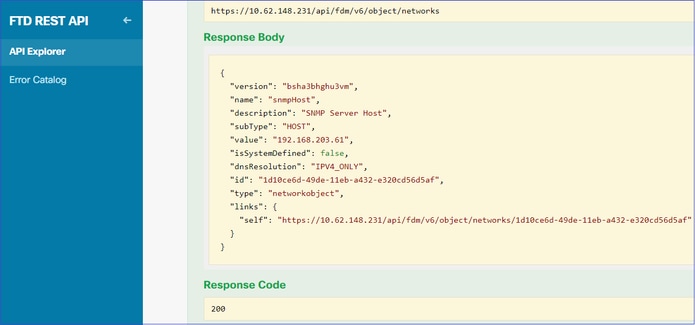
Scroll down and select the TRY IT OUT! button to execute the API call. A successful call returns Response code 200.

Copy the JSON data from the response body to a notepad. Later, you need to fill out the information about the SNMP host.
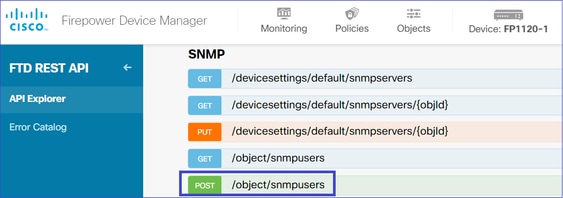
3. Create a new SNMPv3 user
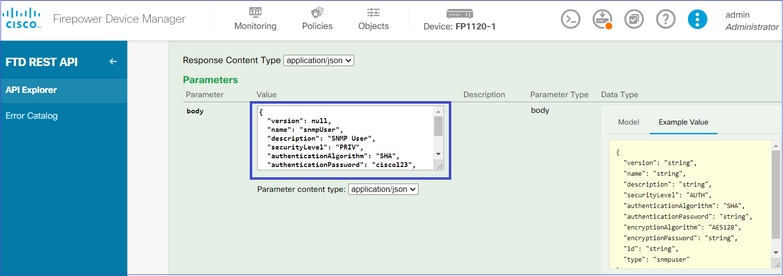
On FDM API Explorer select SNMP and then POST /object/snmpusers
Copy this JSON data to a notepad and modify the sections that you are interested (for example, "authenticationPassword', "encryptionPassword’ or the algorithms):
{
"version": null,
"name": "snmpUser",
"description": "SNMP User",
"securityLevel": "PRIV",
"authenticationAlgorithm": "SHA",
"authenticationPassword": "cisco123",
"encryptionAlgorithm": "AES128",
"encryptionPassword": "cisco123",
"id": null,
"type": "snmpuser"
}Caution: The passwords used in the examples are for demonstration purposes only. In a production environment ensure that you use strong passwords
Copy the modified JSON data to the body section:
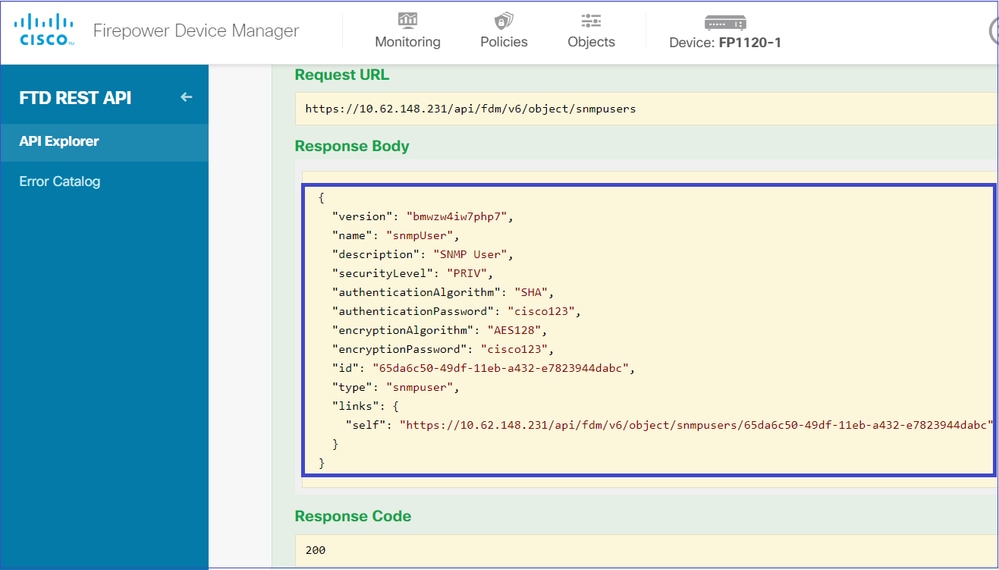
Scroll down and select the TRY IT OUT! button to execute the API call. A successful call returns Response code 200. Copy the JSON data from the response body to a notepad. Later, you need to fill out the information about the SNMP user.
4. Get interface information
On FDM API Explorer select Interface and then GET /devices/default/interfaces. You need to collect information from the interface that connects to the SNMP server.

Scroll down and select the TRY IT OUT! button to execute the API call. A successful call returns Response code 200. Copy the JSON data from the response body to a notepad. Later, you need to fill out information about the interface.
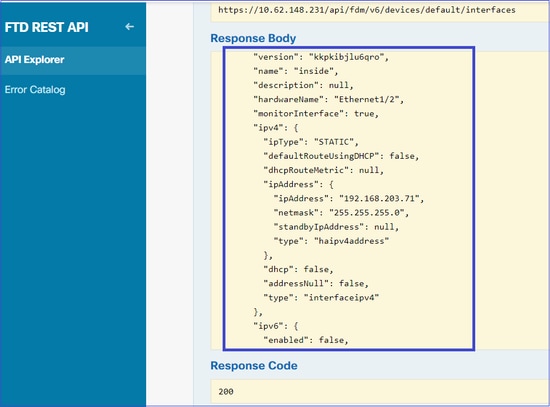
Note down the interface "version", "name", "id", and "type" from the JSON data. Example of a JSON data from interface inside:
 {
"version": "kkpkibjlu6qro",
"name": "inside",
"description": null,
"hardwareName": "Ethernet1/2",
"monitorInterface": true,
"ipv4": {
"ipType": "STATIC",
"defaultRouteUsingDHCP": false,
"dhcpRouteMetric": null,
"ipAddress": {
"ipAddress": "192.168.203.71",
"netmask": "255.255.255.0",
"standbyIpAddress": null,
"type": "haipv4address"
},
"dhcp": false,
"addressNull": false,
"type": "interfaceipv4"
},
"ipv6": {
"enabled": false,
"autoConfig": false,
"dhcpForManagedConfig": false,
"dhcpForOtherConfig": false,
"enableRA": false,
"dadAttempts": 1,
"linkLocalAddress": {
"ipAddress": "",
"standbyIpAddress": "",
"type": "haipv6address"
},
"ipAddresses": [
{
"ipAddress": "",
"standbyIpAddress": "",
"type": "haipv6address"
}
],
"prefixes": null,
"type": "interfaceipv6"
},
"managementOnly": false,
"managementInterface": false,
"mode": "ROUTED",
"linkState": "UP",
"mtu": 1500,
"enabled": true,
"macAddress": null,
"standbyMacAddress": null,
"pppoe": null,
"speedType": "AUTO",
"duplexType": "AUTO",
"present": true,
"tenGigabitInterface": false,
"gigabitInterface": false,
"id": "fc3d07d4-49d2-11eb-85a8-65aec636a0fc",
"type": "physicalinterface",
"links": {
"self": "https://10.62.148.231/api/fdm/v6/devices/default/interfaces/fc3d07d4-49d2-11eb-85a8-65aec636a0fc"
}
},
From the JSON data, you can see interface 'inside' has this data that needs to be associated with the SNMP server:
- "version": "kkpkibjlu6qro"
- "name": "inside",
- "id": "fc3d07d4-49d2-11eb-85a8-65aec636a0fc",
- "type": "physicalinterface",
5. Create a new SNMPv3 host
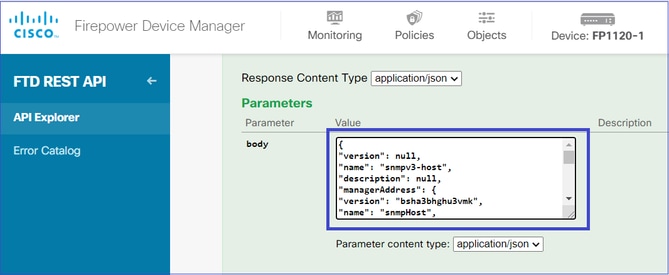
On FDM API Explorer select SNMP and then POST /object/snmphosts/ under SNMP
Use this JSON as a template. Copy and paste data from previous steps to the template accordingly:
{
"version": null,
"name": "snmpv3-host",
"description": null,
"managerAddress": {
"version": "bsha3bhghu3vmk",
"name": "snmpHost",
"id": "1d10ce6d-49de-11eb-a432-e320cd56d5af",
"type": "networkobject"
},
"pollEnabled": true,
"trapEnabled": true,
"securityConfiguration": {
"authentication": {
"version": "bmwzw4iw7php7",
"name": "snmpUser",
"id": "65da6c50-49df-11eb-a432-e7823944dabc",
"type": "snmpuser"
},
"type": "snmpv3securityconfiguration"
},
"interface": {
"version": "kkpkibjlu6qro",
"name": "inside",
"id": "fc3d07d4-49d2-11eb-85a8-65aec636a0fc",
"type": "physicalinterface"
},
"id": null,
"type": "snmphost"
}
Note:
- Replace the value in managerAddress id, type,version, and name with the information you received from Step1
- Replace the value in authentication with the information you received from Step 2
- Replace the value in interface with the data you received from Step 3
- For SNMP2, there is no authentication, and the type is snmpv2csecurityconfiguration instead of snmpv3securityconfiguration
Copy the modified JSON data to the body section
Scroll down and select the TRY IT OUT! button to execute the API call. A successful call returns Response code 200.

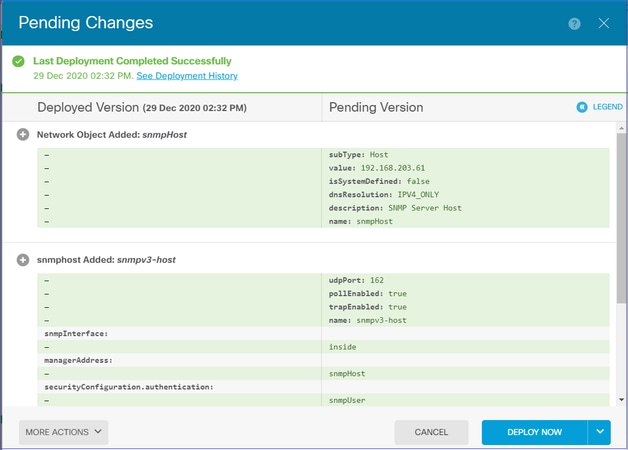
Navigate to FDM GUI and Deploy the changes. You can see most of the SNMP configuration:
SNMP v2c
For v2c you don’t need to create a user but you still need to:
- Create a Network Object Config (same as described in the SNMPv3 section)
- Get interface information (same as described in the SNMPv3 section)
- Create a new SNMPv2c host object
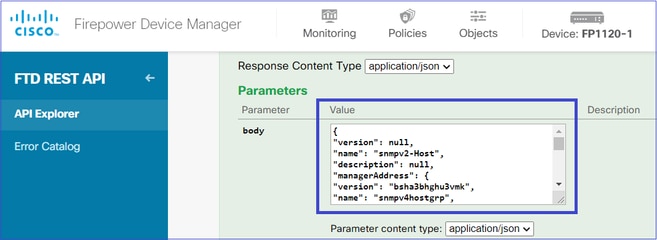
This is a sample of a JSON payload that creates an SNMPv2c object:
{
"version": null,
"name": "snmpv2-Host",
"description": null,
"managerAddress": {
"version": "bsha3bhghu3vmk",
"name": "snmpv4hostgrp",
"id": "1d10ce6d-49de-11eb-a432-e320cd56d5af",
"type": "networkobject"
},
"pollEnabled": true,
"trapEnabled": true,
"securityConfiguration": {
"community": "cisco123",
"type": "snmpv2csecurityconfiguration"
},
"interface": {
"version": "kkpkibjlu6qro",
"name": "inside",
"id": "fc3d07d4-49d2-11eb-85a8-65aec636a0fc",
"type": "physicalinterface"
},
"id": null,
"type": "snmphost"
}
Use the POST method to deploy the JSON payload:
Scroll down and select the TRY IT OUT! button to execute the API call. A successful call returns Response code 200.
SNMP Configuration Removal
Step 1.
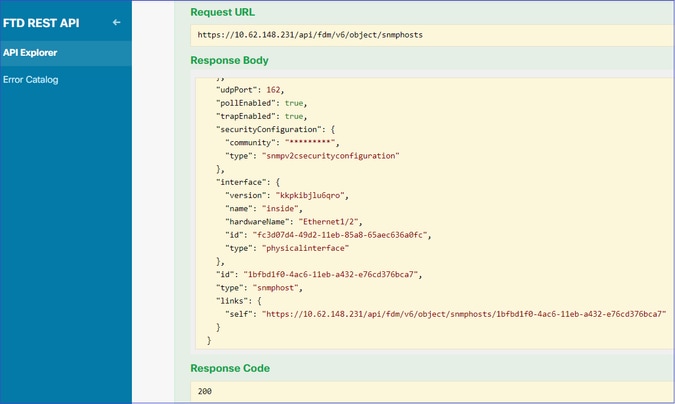
Get the SNMP host information (SNMP > /object/snmphosts):
Scroll down and select the TRY IT OUT! button to execute the API call. A successful call returns Response code 200.
You get a list of objects. Note down the id of the snmphost object that you want to remove:
{
"items": [
{
"version": "ofaasthu26ulx",
"name": "snmpv2-Host",
"description": null,
"managerAddress": {
"version": "bsha3bhghu3vm",
"name": "snmpHost",
"id": "1d10ce6d-49de-11eb-a432-e320cd56d5af",
"type": "networkobject"
},
"udpPort": 162,
"pollEnabled": true,
"trapEnabled": true,
"securityConfiguration": {
"community": "*********",
"type": "snmpv2csecurityconfiguration"
},
"interface": {
"version": "kkpkibjlu6qro",¬
"name": "inside",
"hardwareName": "Ethernet1/2",
"id": "fc3d07d4-49d2-11eb-85a8-65aec636a0fc",
"type": "physicalinterface"
},
"id": "1bfbd1f0-4ac6-11eb-a432-e76cd376bca7",
"type": "snmphost",
"links": {
"self": "https://10.62.148.231/api/fdm/v6/object/snmphosts/1bfbd1f0-4ac6-11eb-a432-e76cd376bca7"
}
},
Step 2.
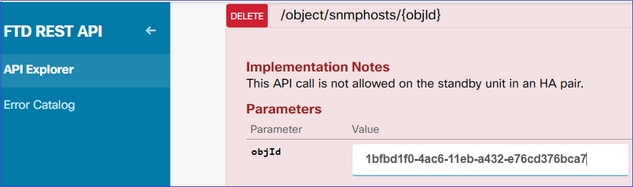
Choose the DELETE option in SNMP > /object/snmphosts{objId}. Paste the id you collected in step 1:
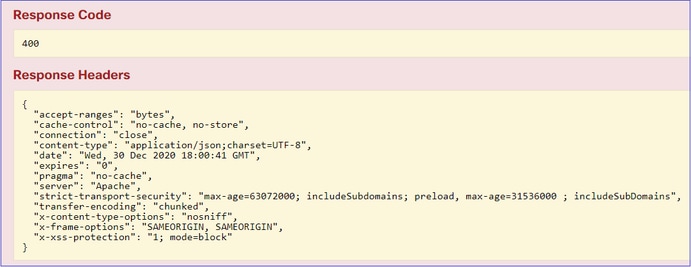
Scroll down and select the TRY IT OUT! button to execute the API call. The call returns Response code 400.
Step 3.
Deploy the change:

The deployment removes the host information:
FP1120-1# show run snmp-server
snmp-server group AUTH v3 auth
snmp-server group PRIV v3 priv
snmp-server group NOAUTH v3 noauth
snmp-server location null
snmp-server contact null
snmp-server community *****
snmpwalk for v2c fails:
root@kali2:~# snmpwalk -v2c -c cisco123 -OS 192.168.203.71
Timeout: No Response from 192.168.203.71
For v3 you must delete the objects in this order.
- SNMP host (the successful return code is 204)
- SNMP user (the successful return code is 204)
If you try to delete the objects in the wrong order you get this error:
{
"error": {
"severity": "ERROR",
"key": "Validation",
"messages": [
{
"description": "You cannot delete the object because it contains SNMPHost: snmpv3-host2, SNMPHost: snmpv3-host.
You must remove the object from all parts of the configuration before you can delete it.",
"code": "deleteObjWithRel",
"location": ""
}
]
}
}
Verify
SNMP v3 Verification
After the deployment, navigate to FTD CLI to verify the SNMP configuration. Note that the engineID value is auto-generated.
FP1120-1# connect ftd
> system support diagnostic-cli
Attaching to Diagnostic CLI ... Press 'Ctrl+a then d' to detach.
Type help or '?' for a list of available commands.

FP1120-1> enable
Password:
FP1120-1# show run all snmp-server
snmp-server group AUTH v3 auth
snmp-server group PRIV v3 priv
snmp-server group NOAUTH v3 noauth
snmp-server user snmpUser PRIV v3 engineID 80000009febdf0129a799ef469aba2d5fcf1bfd7e86135a1f8 encrypted auth sha ca:1b:18:f3:62:b1:63:7e:92:34:92:b3:cf:54:86:f9:8e:2a:4c:fd priv aes 128 ca:1b:18:f3:62:b1:63:7e:92:34:92:b3:cf:54:86:f9
snmp-server listen-port 161
snmp-server host inside 192.168.203.61 version 3 snmpUser udp-port 162
snmp-server location null
snmp-server contact null
snmp-server community *****
snmp-server enable traps snmp authentication linkup linkdown coldstart warmstart
no snmp-server enable traps syslog
no snmp-server enable traps ipsec start stop
no snmp-server enable traps entity config-change fru-insert fru-remove fan-failure power-supply power-supply-presence cpu-temperature chassis-temperature power-supply-temperature chassis-fan-failure accelerator-temperature l1-bypass-status
no snmp-server enable traps memory-threshold
no snmp-server enable traps interface-threshold
no snmp-server enable traps remote-access session-threshold-exceeded
no snmp-server enable traps connection-limit-reached
no snmp-server enable traps cpu threshold rising
no snmp-server enable traps ikev2 start stop
no snmp-server enable traps nat packet-discard
no snmp-server enable traps config
no snmp-server enable traps failover-state
no snmp-server enable traps cluster-state
snmp-server enable oid mempool
snmp-server enable
snmpwalk test
root@kali2:~# snmpwalk -v3 -l authPriv -u snmpUser -a SHA -A cisco123 -x AES -X cisco123 192.168.203.71
iso.3.6.1.2.1.1.1.0 = STRING: "Cisco Firepower Threat Defense, Version 6.7.0 (Build 65), ASA Version 9.15(1)"
iso.3.6.1.2.1.1.2.0 = OID: iso.3.6.1.4.1.9.1.2663
iso.3.6.1.2.1.1.3.0 = Timeticks: (1616700) 4:29:27.00
iso.3.6.1.2.1.1.4.0 = STRING: "null"
iso.3.6.1.2.1.1.5.0 = STRING: "FP1120-1"
iso.3.6.1.2.1.1.6.0 = STRING: "null"
iso.3.6.1.2.1.1.7.0 = INTEGER: 4
...
SNMP v2c Verification
FP1120-1# show run snmp-server
snmp-server host inside 192.168.203.61 community ***** version 2c
snmp-server location null
snmp-server contact null
snmp-server community *****
snmpwalk for v2c:
root@kali2:~# snmpwalk -v2c -c cisco123 -OS 192.168.203.71
iso.3.6.1.2.1.1.1.0 = STRING: "Cisco Firepower Threat Defense, Version 6.7.0 (Build 65), ASA Version 9.15(1)"
iso.3.6.1.2.1.1.2.0 = OID: iso.3.6.1.4.1.9.1.2663
iso.3.6.1.2.1.1.3.0 = Timeticks: (10482200) 1 day, 5:07:02.00
iso.3.6.1.2.1.1.4.0 = STRING: "null"
iso.3.6.1.2.1.1.5.0 = STRING: "FP1120-1"
iso.3.6.1.2.1.1.6.0 = STRING: "null"
iso.3.6.1.2.1.1.7.0 = INTEGER: 4
Troubleshoot
Enable capture with trace on the firewall:
FP1120-1# capture CAPI trace interface inside match udp any any eq snmp
Use the snmpwalk tool and verify you can see the packets:
FP1120-1# show capture
capture CAPI type raw-data trace interface inside [Capturing - 3137 bytes]
  match udp any any eq snmp
The capture contents:
FP1120-1# show capture CAPI

154 packets captured

   1: 17:04:16.720131       192.168.203.61.51308 > 192.168.203.71.161:  udp 39
   2: 17:04:16.722252       192.168.203.71.161 > 192.168.203.61.51308:  udp 119
   3: 17:04:16.722679       192.168.203.61.51308 > 192.168.203.71.161:  udp 42
   4: 17:04:16.756400       192.168.203.71.161 > 192.168.203.61.51308:  udp 51
   5: 17:04:16.756918       192.168.203.61.51308 > 192.168.203.71.161:  udp 42
Verify that the SNMP server statistics counters show SNMP Get or Get-next requests and responses:
FP1120-1# show snmp-server statistics
62 SNMP packets input
0 Bad SNMP version errors
0 Unknown community name
0 Illegal operation for community name supplied
0 Encoding errors
58 Number of requested variables
0 Number of altered variables
0 Get-request PDUs
58 Get-next PDUs
0 Get-bulk PDUs
0 Set-request PDUs (Not supported)
58 SNMP packets output
0 Too big errors (Maximum packet size 1500)
0 No such name errors
0 Bad values errors
0 General errors
58 Response PDUs
0 Trap PDUs
Trace an ingress packet. The packet is UN-NAT to the internal NLP interface:
FP1120-1# show capture CAPI packet-number 1 trace

30 packets captured

1: 17:04:16.720131 192.168.203.61.51308 > 192.168.203.71.161: udp 39
Phase: 1
Type: CAPTURE
Subtype:
Result: ALLOW
Config:
Additional Information:
MAC Access list

Phase: 2
Type: ACCESS-LIST
Subtype:
Result: ALLOW
Config:
Implicit Rule
Additional Information:
MAC Access list

Phase: 3
Type: UN-NAT
Subtype: static
Result: ALLOW
Config:
Additional Information:
NAT divert to egress interface nlp_int_tap(vrfid:0)
Untranslate 192.168.203.71/161 to 169.254.1.3/4161

Phase: 4
Type: ACCESS-LIST
Subtype:
Result: ALLOW
Config:
Implicit Rule
Additional Information:

Phase: 5
Type: NAT
Subtype: per-session
Result: ALLOW
Config:
Additional Information:

Phase: 6
Type: IP-OPTIONS
Subtype:
Result: ALLOW
Config:
Additional Information:

Phase: 7
Type: NAT
Subtype: rpf-check
Result: ALLOW
Config:
Additional Information:

Phase: 8
Type: NAT
Subtype: per-session
Result: ALLOW
Config:
Additional Information:

Phase: 9
Type: FLOW-CREATION
Subtype:
Result: ALLOW
Config:
Additional Information:
New flow created with id 1078, packet dispatched to next module

Phase: 10
Type: INPUT-ROUTE-LOOKUP-FROM-OUTPUT-ROUTE-LOOKUP
Subtype: Resolve Preferred Egress interface
Result: ALLOW
Config:
Additional Information:
Found next-hop 169.254.1.3 using egress ifc nlp_int_tap(vrfid:0)

Phase: 11
Type: ADJACENCY-LOOKUP
Subtype: Resolve Nexthop IP address to MAC
Result: ALLOW
Config:
Additional Information:
Found adjacency entry for Next-hop 169.254.1.3 on interface nlp_int_tap
Adjacency :Active
MAC address 3208.e2f2.b5f9 hits 0 reference 1

Result:
input-interface: inside(vrfid:0)
input-status: up
input-line-status: up
output-interface: nlp_int_tap(vrfid:0)
output-status: up
output-line-status: up
Action: allow
The NAT rule is deployed automatically as a part of the SNMP configuration:
FP1120-1# show nat
Manual NAT Policies (Section 1)
1 (nlp_int_tap) to (inside) source dynamic nlp_client_0_192.168.203.61_intf4 interface destination static nlp_client_0_ipv4_40 nlp_client_0_ipv4_40 service nlp_client_0_17svc162_39 nlp_client_0_17svc162_39
translate_hits = 0, untranslate_hits = 0

Auto NAT Policies (Section 2)
…
2 (nlp_int_tap) to (inside) source static nlp_server_0_snmp_intf4 interface service udp 4161 snmp
translate_hits = 0, untranslate_hits = 2
In the backend port UDP 4161 listens for SNMP traffic:
> expert
admin@FP1120-1:~$ sudo netstat -an | grep 4161
Password:
udp 0 0 169.254.1.3:4161 0.0.0.0:*
udp6 0 0 fd00:0:0:1::3:4161 :::*
In a case of incorrect/incomplete configuration the ingress SNMP packet is dropped since there is no UN-NAT phase:
FP1120-1# show cap CAPI packet-number 1 trace

6 packets captured

1: 18:36:35.868485 192.168.203.61.50105 > 192.168.203.71.161: udp 42
Phase: 1
Type: CAPTURE
Subtype:
Result: ALLOW
Config:
Additional Information:
MAC Access list

Phase: 2
Type: ACCESS-LIST
Subtype:
Result: ALLOW
Config:
Implicit Rule
Additional Information:
MAC Access list

Phase: 3
Type: ROUTE-LOOKUP
Subtype: No ECMP load balancing
Result: ALLOW
Config:
Additional Information:
Destination is locally connected. No ECMP load balancing.
Found next-hop 192.168.203.71 using egress ifc identity(vrfid:0)

Phase: 4
Type: NAT
Subtype: per-session
Result: ALLOW
Config:
Additional Information:

Phase: 5
Type: ACCESS-LIST
Subtype:
Result: DROP
Config:
Implicit Rule
Additional Information:

Result:
input-interface: inside(vrfid:0)
input-status: up
input-line-status: up
Action: drop
Drop-reason: (acl-drop) Flow is denied by configured rule, Drop-location: frame 0x0000557415b6347d flow (NA)/NA
FTD LINA syslogs show that the ingress packet is discarded:
FP1120-1# show log | include 161
Dec 30 2020 18:36:38: %FTD-7-710005: UDP request discarded from 192.168.203.61/50105 to inside:192.168.203.71/161
Dec 30 2020 18:36:39: %FTD-7-710005: UDP request discarded from 192.168.203.61/50105 to inside:192.168.203.71/161
Q&A
Q. Can I use the FTD management interface to send SNMP messages?
No, this is not currently supported.
Related enhancement defect: https://bst.cloudapps.cisco.com/bugsearch/bug/CSCvu48012
Related Information
Revision History
| Revision | Publish Date | Comments |
|---|---|---|
2.0 |
02-Jun-2023 |
Recertification |
1.0 |
30-Dec-2020 |
Initial Release |
Contributed by Cisco Engineers
- Xiang JiCisco TAC Engineer
- Mikis ZafeiroudisCisco TAC Engineer
- Juan ParraCisco TAC Engineer
 Feedback
Contact Cisco
- Open a Support Case

- (Requires a Cisco Service Contract)