Configure a Basic Router with Configuration Professional
Available Languages
Download Options
Bias-Free Language
The documentation set for this product strives to use bias-free language. For the purposes of this documentation set, bias-free is defined as language that does not imply discrimination based on age, disability, gender, racial identity, ethnic identity, sexual orientation, socioeconomic status, and intersectionality. Exceptions may be present in the documentation due to language that is hardcoded in the user interfaces of the product software, language used based on RFP documentation, or language that is used by a referenced third-party product. Learn more about how Cisco is using Inclusive Language.
Contents
Introduction
This document describes how to use the Cisco Configuration Professional (CCP) to set the basic configuration of the router.
Prerequisites
Requirements
There are no specific requirements for this document.
Components Used
The information in this document is based on these software and hardware versions:
-
Cisco 2811 Router with Cisco IOS®Software Release 12.4(9)
-
CCP Version 2.5
The information in this document was created from the devices in a specific lab environment. All of the devices used in this document started with a cleared (default) configuration. If your network is live, ensure that you understand the potential impact of any command.
Background Information
This document describes how to use the Cisco Configuration Professional (CCP) in order to set the basic configuration of the router. Basic configuration of the router includes configuration of the IP address, default routing, static and dynamic routing, static and dynamic NAT, host name, banner, secret password, user accounts, and other options. CCP allows you to configure your router in several network environments, such as small office home office (SOHO), branch office (BO), regional office, and central site or Enterprise headquarters, with an easy-to-use web-based management interface.
Note: For more information, documentation, and support availability refer to Cisco Configuration Professional and Cisco Configuration Professional for Catalyst.
Install Cisco Configuration Professional
Perform these steps in order to install CCP:
-
Download CCP V2.5 and install it on your local PC. Only registered Cisco users have access to internal tools and information.
-
Launch CCP from your local PC through Start > Programs > Cisco Configuration Professional and choose the Community which has the router you want to configure.
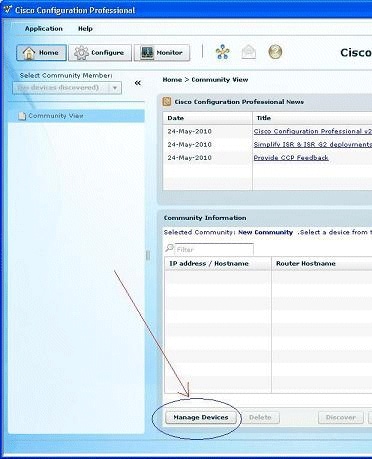 Manage Devices
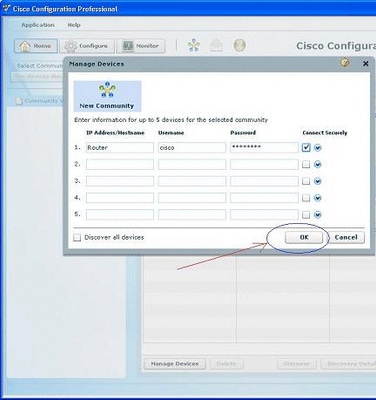 Select a New Community
3. In order to discover the device that you want to configure, highlight the router and click the Discover button.
 Discover a New Community
Router Configuration to Run CCP
Perform these configuration steps to run CCP on a Cisco router:
-
Connect to your router with Telnet, SSH, or through the console.
Enter global configuration mode with this command:
Router(config)#enable
-
If HTTP and HTTPS are enabled and configured to use nonstandard port numbers, you can skip this step and simply use the port number already configured.
Enable the router HTTP or HTTPS server with these Cisco IOS Software commands:
Router(config)# ip http server
Router(config)# ip http secure-server
Router(config)# ip http authentication local
-
Create a user with privilege level 15:
Router(config)#username <username> privilege 15 password 0 <password>
Note: Replace <username> and <password> with the username and password that you want to configure. Do not use the same password for your user and enable passwords.
-
Configure SSH and Telnet for local login and privilege level 15.
Router(config)# line vty 0 4
Router(config-line)# privilege level 15
Router(config-line)# login local
Router(config-line)# transport input telnet
Router(config-line)# transport input telnet ssh
Router(config-line)# exit
-
(Optional) Enable local logging to support the log monitoring function:
Router(config)# logging buffered 51200 warning
Requirements
This document assumes that the Cisco router is fully operational and configured to allow the CCP to make configuration changes.
Conventions
Refer to the Cisco Technical Tips Conventions for more information on document conventions.
Configuration
In this section, you are presented with the information to configure the basic settings for a router in a network.
Note: Use the Command Lookup Tool to obtain more information on the commands used in this section. Only registered Cisco users have access to internal tools and information.
Network Diagram
This document uses this network setup:
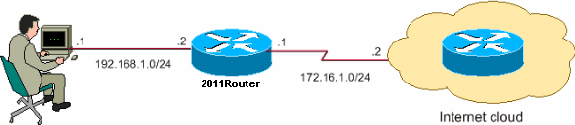 Network Setup
Note: The IP address schemes used in this configuration cannot be legally routed on the Internet. They are RFC 1918 addresses which have been used in a lab environment.
Interface Configuration
To configure the interfaces of a Cisco router:
-
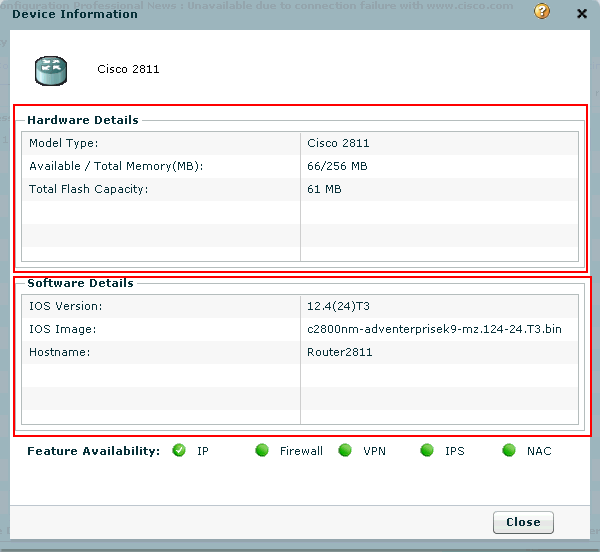
Click Home in order to go to the CCP homepage.
The CCP homepage provides information such as the hardware and software of the router, feature availability, and a configuration summary.
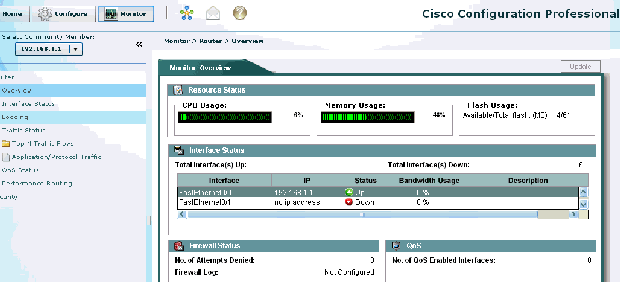 CCP Homepage
 -
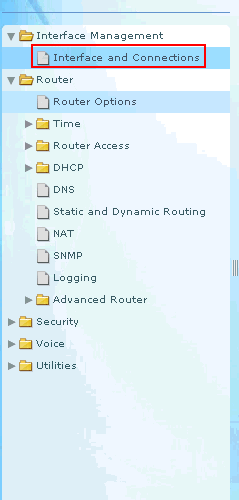
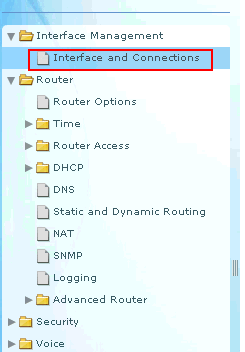
Choose Configure > Interface Management > Interfaces and Connections > Create Connection in order to configure the WAN connection for the interface.
As an example, for FastEthernet 0/1, choose the Ethernet option and click Create New Connection .
Note: For other types of interfaces like Ethernet , choose the respective interface type and click Create New Connection to proceed.
 Interfaces and Connections
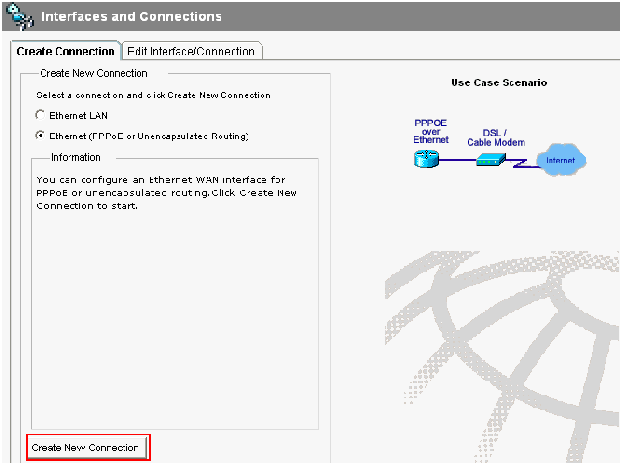 Create New Connection
 -
Click Next in order to proceed once this interface appears:
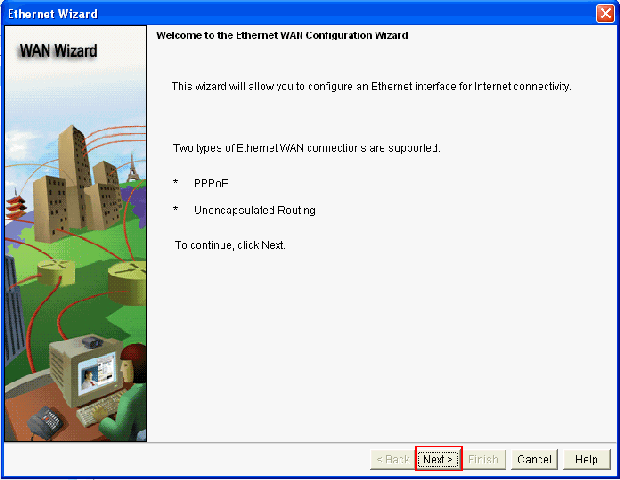 WAN Wizard Opens
 -
Choose FastEthernet 0/1 (desired) from the Available Interfaces option and click Next .
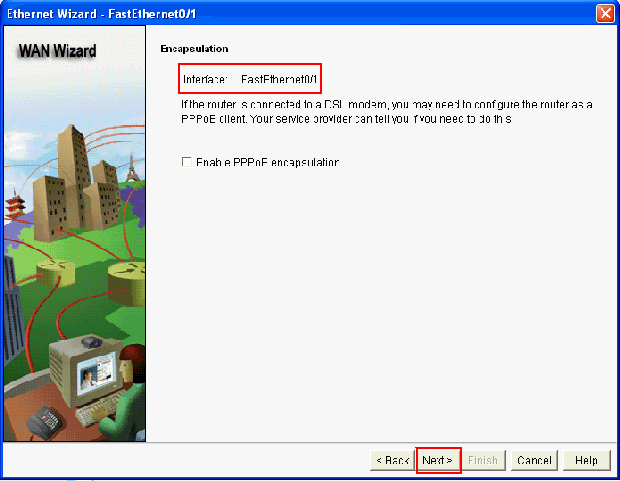 Choose FastEthernet 0/1 from the Available Interfaces Option
 -
Specify the static IP address with the corresponding subnet mask for the interface and click Next .
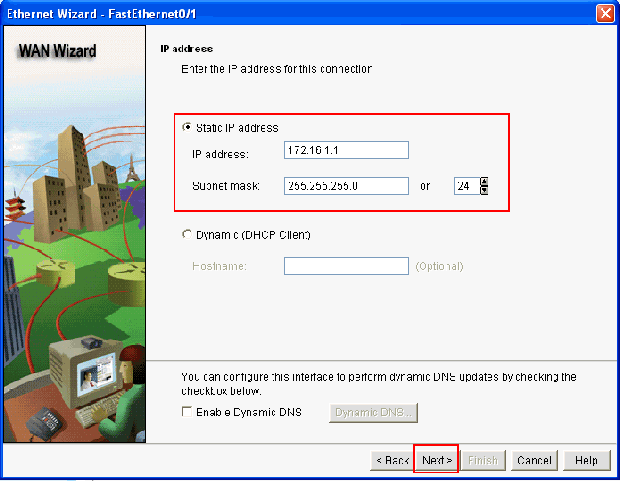 Specify IP Address and Submask
 -
Configure the default routing with optional parameters such as the next hop IP address (172.16.1.2 as per network diagram) supplied by the ISP and click Next .
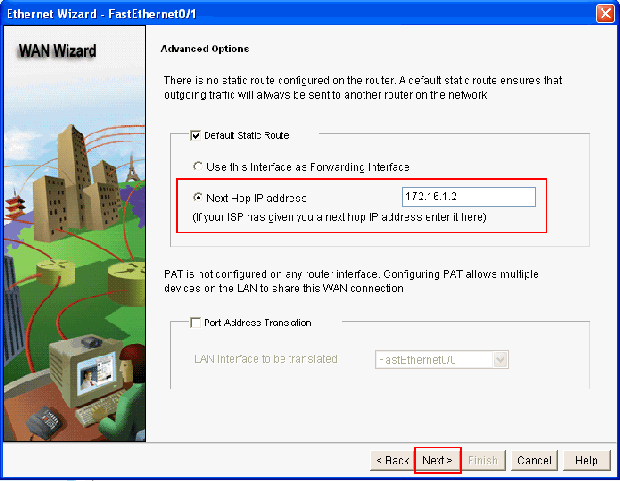 Configure the Default Routing
This window appears and shows the configuration summary configured by the user. Click Finish.
Note: Check the box next to
Test the connectivity after configuringto ensure that the connectivity of the configuration works.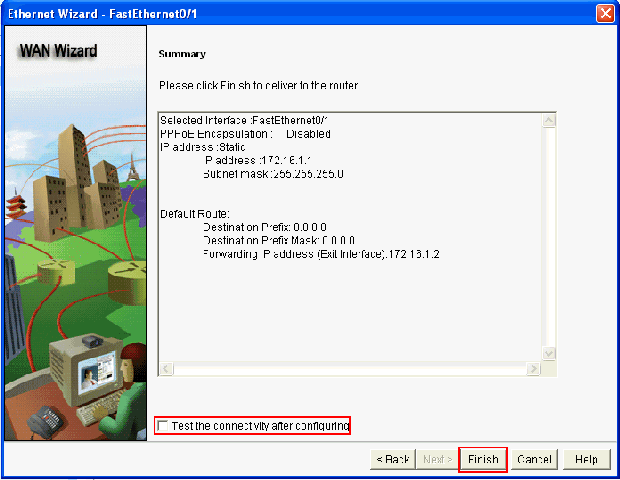 Configuration Summary
This window appears and shows the command delivery status to the router. Otherwise, it displays errors if the command delivery fails due to incompatible commands or unsupported features.
-
Choose Configure > Interface Management > Interfaces and Connections > Edit Interfaces/Connections in order to add/edit/delete the various interfaces.
 Edit Interfaces and Connections
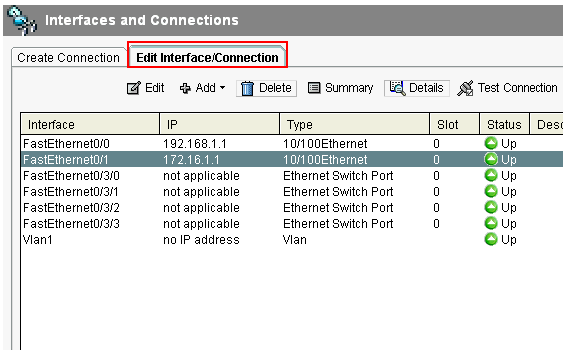 Interfaces and Connections Window
Highlight the interface with which you want to make changes and click Edit if you want to edit or change the interface configuration. Here, you can change the current static IP address.
NAT Configuration
Dynamic NAT Configuration
To configure the dynamic NAT in a Cisco router:
-
Choose Configure > Router > NAT > Basic NAT and click Launch the selected task in order to configure basic NAT.
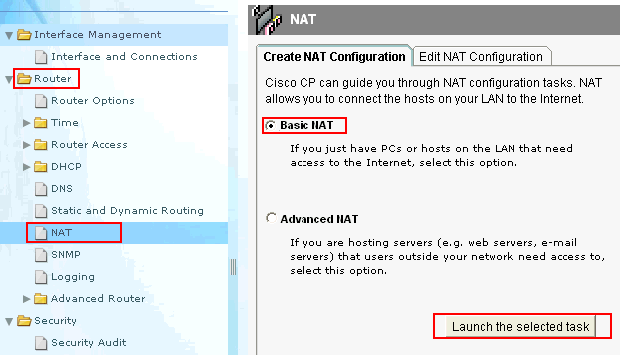 Launch the Selected Task
 -
Click Next .
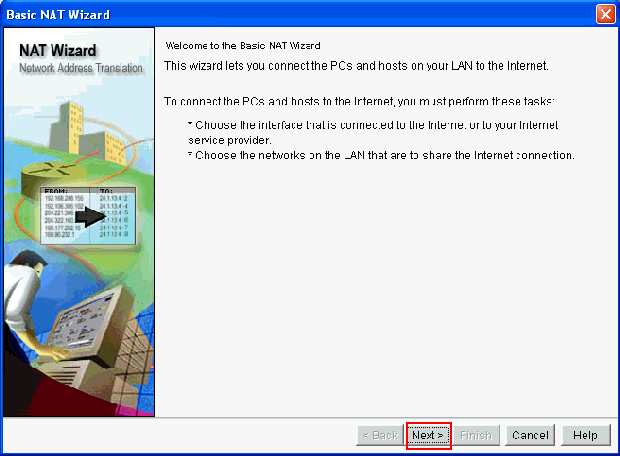 Select Next
 -
Choose the interface that connects to the Internet or your ISP and choose the IP address range to which Internet access is to be shared. After you select this information, click Next.
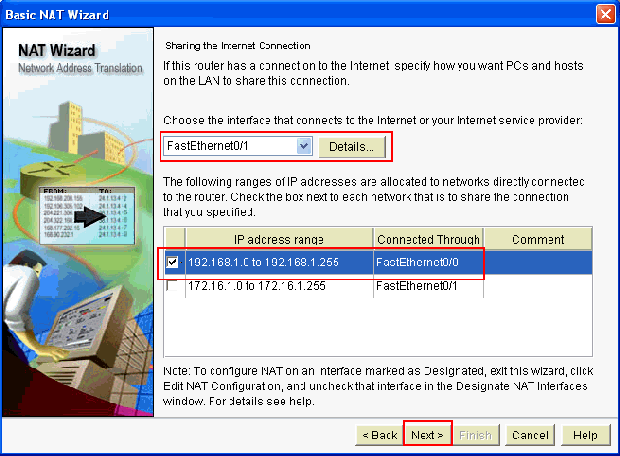 Choose Interface Connect to the Internet or Your ISP
 -
This window appears and shows the configuration summary configured by the user. Click Finish.
-
The Edit NAT Configuration window shows the dynamic NAT configuration with the translated IP address overloaded. If you want to configure the dynamic NAT with address pool, click Address Pool .
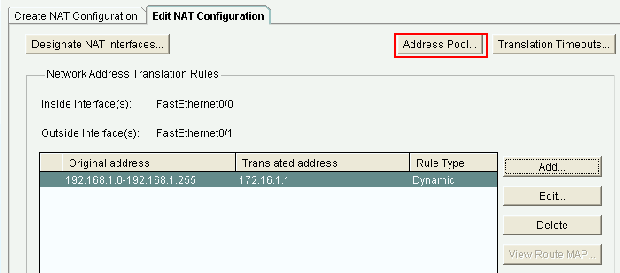 Edit NAT Configuration Window and Select Address Pool
 -
Click Add .
Here, information such as the pool name and IP address range with netmask are provided. There can be times when most of the addresses in the pool have been assigned, and the IP address pool is nearly depleted. When this occurs, PAT can be used with a single IP address in order to satisfy additional requests for IP addresses. Check Port Address Translation (PAT) if you want the router to use PAT when the address pool is close to depletion. Click OK .
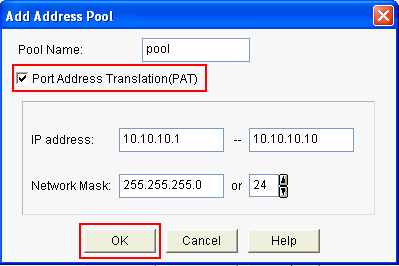 Check Port Address Translation (PAT)
 -
Click Add.
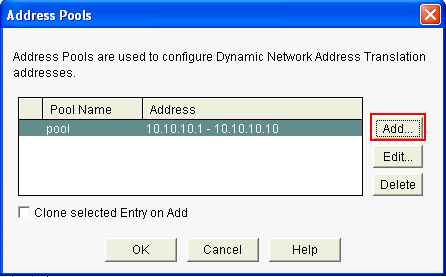 Address Pools Configure Dynamic NAT
 -
Click Edit .
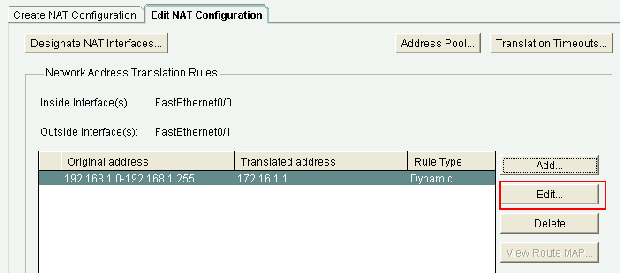 Edit the NAT Configuration
 -
Choose Address Pool in the Type field, provide the name to the Address Pool as pool , and click OK .
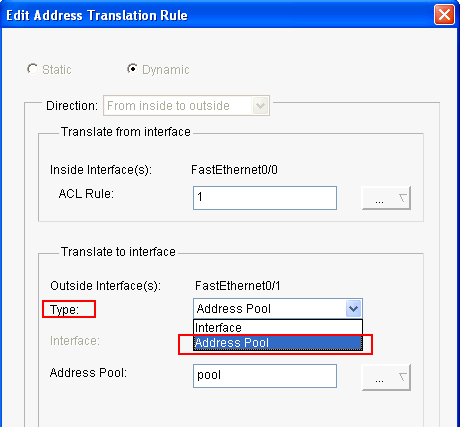 Provide the Address Pool Name
 -
This window shows the configuration for dynamic NAT with the address pool. Click Designate NAT Interfaces .
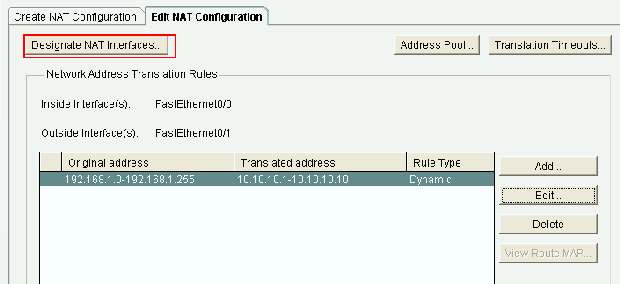 Designate NAT Interfaces
Use this window in order to designate the inside and outside interfaces that you want to use in NAT translations. NAT uses the inside and outside designations when it interprets translation rules, because translations are performed from inside to outside, or from outside to inside. Once designated, these interfaces are used in all NAT translation rules. The designated interfaces appear in the Translation Rules list in the main NAT window.
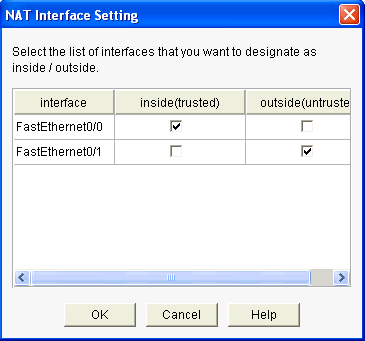 NAT Interface Setting
Static NAT Configuration
Perform these steps in order to configure static NAT in a Cisco router:
-
Choose Configure > Router > NAT > Edit NAT Configuration and click Add in order to configure static NAT.
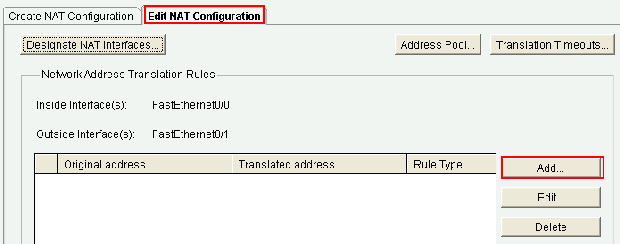 Configure the Static NAT
 -
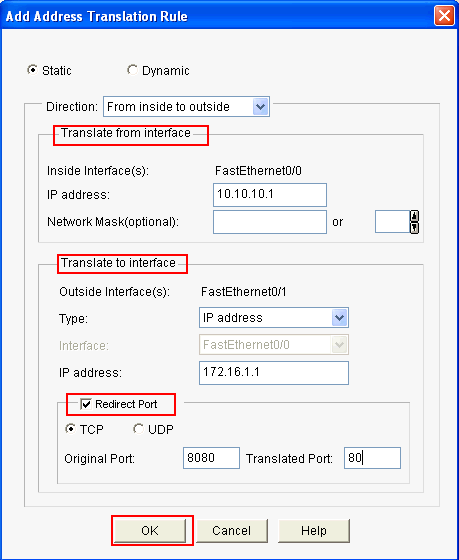
Choose the Direction either from inside to outside or from outside to inside and specify the inside IP address to be translated under Translate from Interface. For the Translate to Interface area, choose the Type:
-
Choose IP Address if you want the Translate from Address to be translated to an IP address defined in the IP Address field.
-
Choose Interface if you want the Translate from Address < to use the address of an interface on the router. The Translate from Address is translated to the IP address assigned to the interface that you specify in the Interface field.
Check Redirect Port if you want to include port information for the inside device in the translation. This enables you to use the same public IP address for multiple devices, as long as the port specified for each device is different. You must create an entry for each port
mappingfor this Translated to address. Click TCP if this is a TCP port number and click UDP if it is a UDP port number. In the Original Port field, enter the port number on the inside device. In the Translated Port field, enter the port number that the router is to use for this translation. Refer to Configure Network Address Translation .This window shows the static NAT configuration with port redirection enabled:
 Redirect the Port
 -
This window shows the static NAT configuration with port redirection enabled:
 Static NAT with Port Redirection
Routing Configuration
Static Routing Configuration
To configure static routing in a Cisco router:
-
Choose Configure > Router > Static and Dynamic Routing and click Add in order to configure static routing.
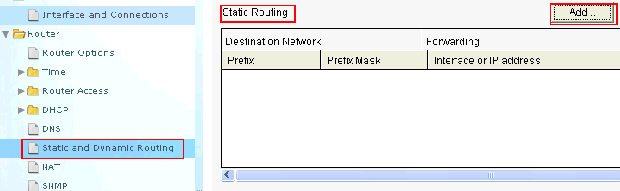 Configure the Static Routing
 -
Enter the Destination Network address with mask and choose either outgoing interface or next hop IP address.
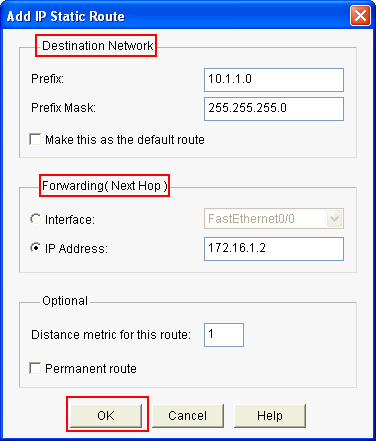 Enter the Destination Network Address
This window shows the static route configured for the 10.1.1.0 network with 172.16.1.2 as the next hop IP address:
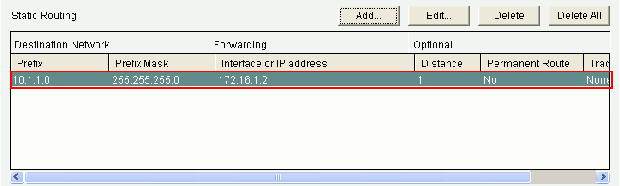 Configured Network
Dynamic Routing Configuration
To configure the dynamic routing in a Cisco router:
-
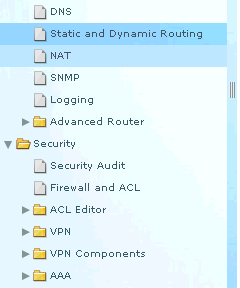
Choose Configure > Router > Static and Dynamic Routing .
-
Select the RIP and click Edit .
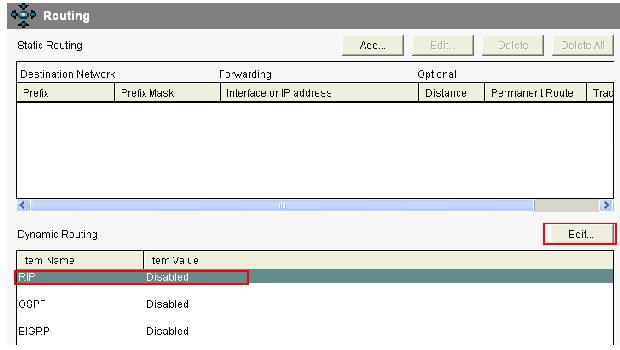 Configure Dynamic Routing
 -
Check Enable RIP , choose the RIP version, and click Add .
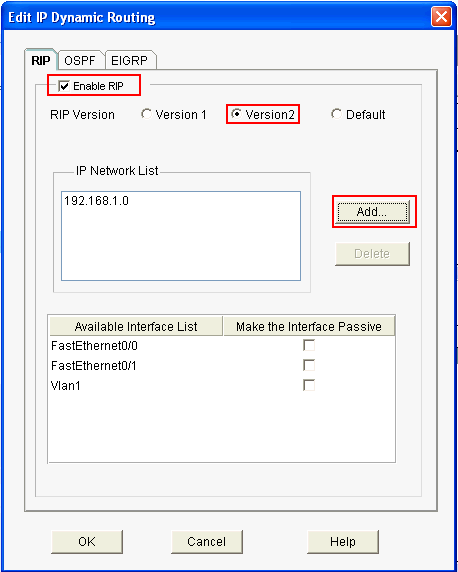 Enable and Add RIP
 -
Specify the Network address to be advertised.
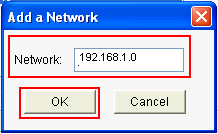 Network Address to Advertise
 -
Click OK .
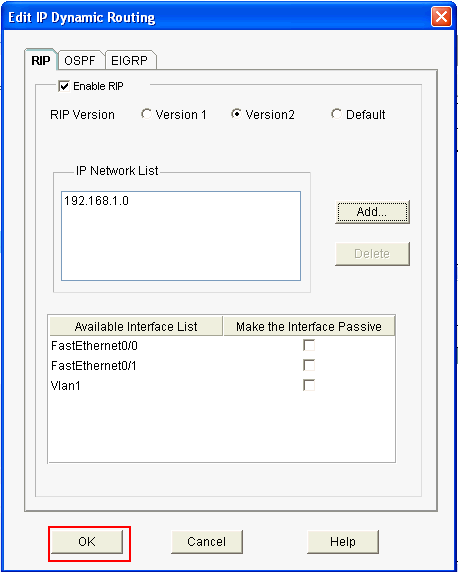 Enable RIP
 -
Click Deliver in order to transfer the commands to the router.
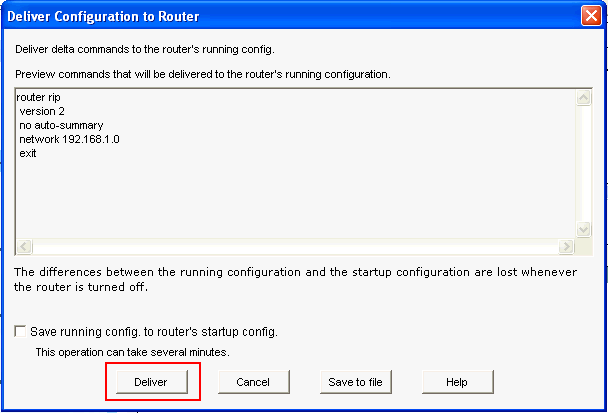 Deliver Commands to the Router
This window shows the dynamic RIP routing configuration:
 RIP Routing Configuration
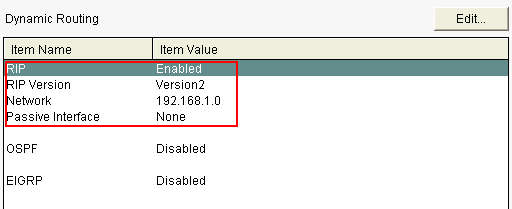 Configuration of RIP Routing
Miscellaneous Configuration
To configure the other basic settings in a Cisco router:
-
Choose Configure > Router > Router Options and click Edit if you want to change the Hostname, Domain Name, Banner, and Enable Secret Password properties for a router.
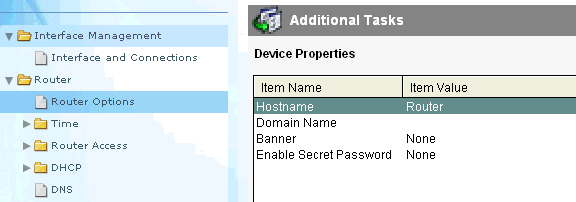 Edit Basic Settings
 -
Choose Configure > Router Access > User Accounts/View in order to add/edit/delete the User Accounts to the router.
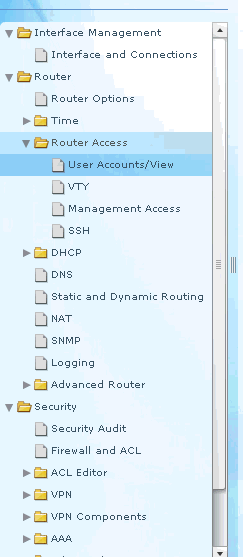 Add/Edit/Delete User Accounts
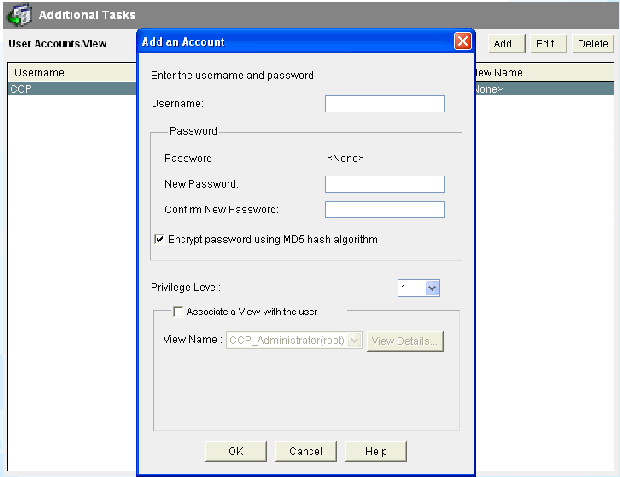 Add an Account
 - Choose Configure > Utilities >
Save Running Config to PCin order tosavethe configuration to the NVRAM of the router as well as the PC and to reset the current configuration to default (factory) settings.Note: To use CCP to restore the configuration file stored on a computer to a router or to back up the configuration file from a router to a computer, access the Configuration Editor, and click I agree . In the Configure window, choose Import configuration from PC , and then click the
Replace running configurationbutton.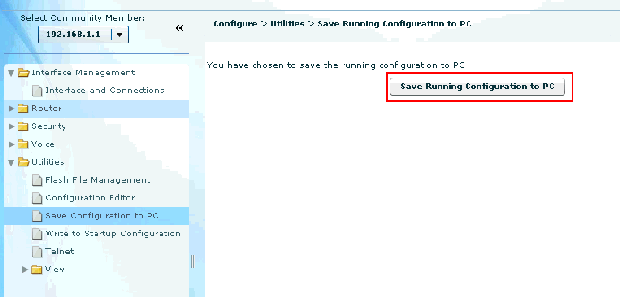 Retain the Configuration
CLI Configuration
| Router Configuration |
|---|
Router# show run Building configuration... Current configuration : 2525 bytes ! version 12.4 service timestamps debug datetime msec service timestamps log datetime msec no service password-encryption ! hostname Router ! boot-start-marker boot-end-marker ! no logging buffered enable password cisco ! no aaa new-model ! resource policy ! ip cef ! !--- RSA certificate generated after you enable the |
Verification
Choose Configure > Interface & Connections > Edit Interface Connections > Test Connection in order to test the end-to-end connectivity. You can specify the remote end IP address if you click the User-specified radio button.
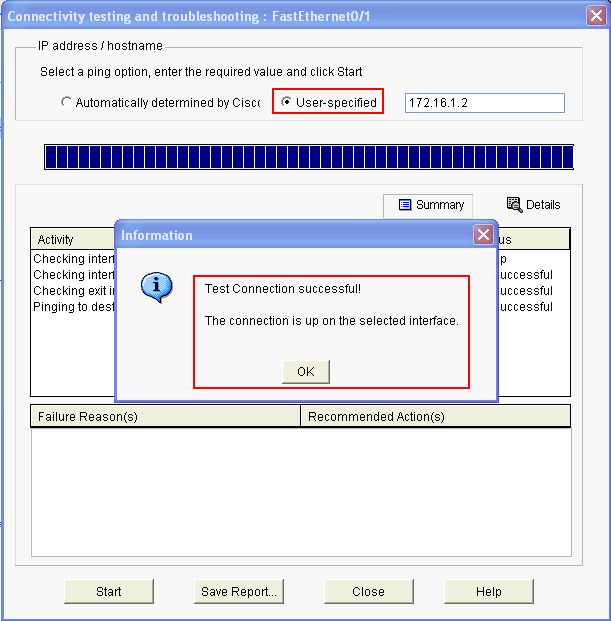 Specify the Remote and IP Address
Troubleshoot
(OIT) supports certain show commands. Use the OIT to view an analysis of show command output.
Note: Refer to Important Information on Debug Commands before you issue debug commands.
You can use these options in order to troubleshoot the configuration:
-
Choose Help > About this Router in order to view the hardware and software details of the router.
 Hardware and Software Details
 -
The Help option provides information about the various available options in the CCP for the configuration of routers.
 Information About Various Options
How can I change the username and password for the router?
You can change the router username and password through CCP. Complete these steps in order to change the username and password:
-
Create a new temporary user account, and then log in to the temporary user account.
-
Change the username and password of the main user account (that is, the user account of the router on which you want to change the username and password) in your CCP.
-
Log out from the temporary account and log into the main user account.
-
Delete the temporary user account after you change the password for the main account.
I receive an internal error when I use Internet Explorer 8 to access CCP. How do I resolve this issue?
Problem
You can receive this internal error when you use Internet Explorer 8 to configure the 2800 series router with CCP:
Internal error: [FaultEvent fault=[RPC Fault faultString="Send failed" faultCode="Client.Error.MessageSend"
faultDetail="Channel.Connect.Failed error NetConnection.Call.Failed: HTTP: Status 200: url:
'http://localhost:8600/messagebroker/amf '"] messageId="A08846FF-E7C6-F578-7C38-61C6E94899C7"
type="fault" bubbles=false cancelable=true eventPhase=2]
Do not down grade your Java because that does not resolve the issue.
Solution
This error can be the result of a browser compatibility issue. Internet Explorer 8 changes many fundamental aspects of applications developed for IE. Cisco recommends that you downgrade Internet Explorer to version 7. You must also remove the install and then reinstall CCP.
I receive this error message when I try to install CCP: "Unable to read the source file. File could be Corrupted. Please re-install Cisco Configuration Professional to resolve the issue." How do I resolve this issue?
Problem
When you download the application setup file and attempt to install CCP, you can receive this error:
Unable to read the source file. File could be Corrupted.
Please re-install Cisco Configuration Professional to resolve the issue
Solution
To resolve this problem:
-
Delete all instances of CCP on your PC and perform a fresh download and install.
-
If the previous step does not work, try to download a different version of CCP.
-
If the previous step does not work, contact Cisco Worldwide Support Contacts.
Note: You must have valid Cisco user credentials in order to contact Cisco TAC.
How do I access the CCP technical logs?
Click Start > Programs > Cisco Systems > Cisco Configuration Professional > Collect Data for Tech Support . CCP automatically archives the logs in a zip file named _ccptech.zip . Perform a local file system search for this file if it is not saved to your Desktop. You can send these technical logs to Cisco Worldwide Support Contacts.
Note: Close all instances of CCP to avoid with other issues due to archived logs.
Router discovery takes more time than usual; how do I resolve this issue?
Problem
Once CCP is launched and the community is configured, discovery of the router takes more time than usual. Here are the CCP logs that describe the time elapsed:
July 10, 2009 8:29:19 AM EDT Discovering device test-router
July 10, 2009 8:29:20 AM EDT Last discovery clean-up elapsed time was 47 milliseconds.
July 10, 2009 8:31:13 AM EDT Discovery job allocation elapsed time was 113859 milliseconds.
July 10, 2009 8:31:13 AM EDT Authentication completed.
July 10, 2009 8:40:28 AM EDT Video feature disabled. Video feature discovery elapsed time=214375 ms
July 10, 2009 8:51:15 AM EDT Security feature ready - elapsed time was 860734 milliseconds.
July 10, 2009 8:51:16 AM EDT Total device test-router discovery elapsed time was 1316047 milliseconds.
This issue occurs with all routers irrespective of their model and platform. In addition, there are no memory or CPU related issues on the routers.
Solution
Verify the authentication mode. If authentication does not occur locally, check for an issue with the server that authenticates this. Fix any issue with this server to resolve this issue.
I am unable to view the IPS configuration page on CCP; how do I resolve this issue?
Problem
When a specific feature in the Configuration window does not show anything except a blank page, there can be a incompatibility issues.
Solution
Verify these items in order to resolve this issue:
-
Verify if that specific feature is supported and enabled on your router model.
-
Verify if your router version supports that feature. Router version incompatibilities could be resolved with a version upgrade.
-
Verify if the problem is with the current licensing.
Related Information
Revision History
| Revision | Publish Date | Comments |
|---|---|---|
2.0 |
20-Oct-2022 |
Recertification and Updated |
1.0 |
21-May-2010 |
Initial Release |
Contributed by Cisco Engineers
- Julio JimenezCisco TAC Engineer
- Danny DuranCisco TAC Project Manager
 Feedback
Contact Cisco
- Open a Support Case

- (Requires a Cisco Service Contract)